1
Assembly of the FreeStyle Arm Mounting Base
There are two different ways to use the FreeStyle Arm Mounting Base.
You can mount it to the portable base (hardware provided), or mount it
directly to a table (Hardware not provided).
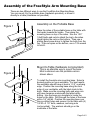
Figure 1
Assembly on the Portable Base
Place the sides of the portable base on the table with
the bends towards the inside. Then place the
mounting base on top of the sides. Use the 1.25"
1/4x20 bolts and nuts to attach the top to the sides.
Hand tighten the nuts on the bottom. Then use a
phillips head screw driver to tighten the bolts from the
top. If the nut spins on the bottom, use a 7/16 wrench
to hold it.
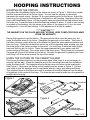
Mount to Table (hardware not provided)
Figure 2
This is an alternate way to mount the base.
Most customers use the portable version
shown above
To install the freestyle arm mounting base. Select a
desired position on your worktable. For best results
the worktable should have at least a 1-1/2“ overhang
edge. Position the mounting base along the front
edge of your worktable, with the black knob to the
back. Make sure the mounting bolts and wing nuts
will have clearance underneath the table before
drilling. Use the base as a template to locate the
holes on the table. Drill through the holes of the base
with a 1/4” drill bit. Position the mounting base over
the pre-drilled holes and secure it to the table with (4)
1/4-20 x 2 1/2” bolts, washers, and wing nuts
(not-provided). The washers should go on the
underside of the table.
Page 2 of 5