1
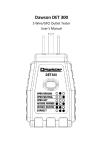
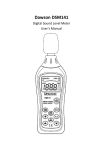
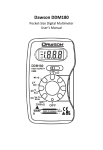
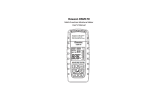
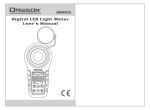
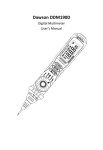
Dawson DAM110B Digital Non-Contact Tachometer User’s Manual Table of Contents LIMITED WARRANTY AND LIMITATION OF LIABILITY ..................................................... 3 Out of the Box............................................. 4 Accesories ................................................... 4 Certification: .............................................. 4 INTRODUCTION ........................................... 5 Overview ..................................................... 5 Safety Information...................................... 5 USING THE METER ....................................... 7 Figures and Components ............................ 7 Buttons and Components ...................... 7 Button Description ................................ 9 Display Description .............................. 10 1 MEASUREMENTS ......................................... 11 Rotations per Minute (RPM) ................... 12 Maximum/Minimum ................................ 12 Saving Data .............................................. 13 Read/ Recall Data ..................................... 13 SPECIFICATIONS ........................................ 14 General Specification ................................ 14 Operating Environment ............................ 14 Technical Parameters ............................... 15 MAINTENANCE AND REPAIR ..................... 15 Repair ....................................................... 15 Replacing Batteries................................... 16 CONTACT DAWSON ................................... 16 FEATURES ...................................... Back Page 2 LIMITED WARRANTY AND LIMITATION OF LIABILITY This instrument from Dawson Tools Inc. will be free from defects in workmanship and material for three years from the date of original purchase. This warranty does not cover defects resulting from damage caused by the user such as drops, neglect, misuse, unauthorized alteration, usage outside of specified conditions, contamination, or improper repair/maintenance. To receive service on the instrument if it becomes necessary during the warranty period, contact your nearest Dawson authorized service center at (800) 898-6991 or visit www.DawsonTools.com to obtain a return authorization (within the US only). A return authorization is necessary before returning any instrument to Dawson; no service will be provided without a return authorization. The user is responsible for properly packing the unit and charges such as shipping, freight and insurance charges. The extent of Dawson's liability is limited solely to the repair/replacement of the instrument. The above warranty in its entirety is inclusive and no other warranties, written or oral, are expressed or implied. 3 Out of the Box Check the Meter and accessories thoroughly before using the Meter. Contact your local distributor if the Meter or any components are damaged or malfunction. Accessories: Reflective sheet User’s Manual 1.5V AAA Battery Soft Case Certification: The Meter is compiled to EMC requirements. 4 1pc 1pc 4pcs 1pc Introduction Overview The DAM110B is a non-contact digital photo tachometer with stable performance, high reliability and a high safety standard. This Meter uses a compact, high-speed integrated chip capable of measuring rotation speeds from 50RPM to 19999RPMs. The backlit LCD allows measurements and reading in low light. Safety Information WARNING TO REDUCE THE RISK OF FIRE, ELECTRICAL SHOCK, PRODUCT DAMAGE OR PERSONAL INJURY, PLEASE FOLLOW THE SAFETY INSTRUCTIONS DESCRIBED IN THE USER MANUAL. READ THE USER MANUALS BEFORE USING THE METER. 5 WARNING TO ENSURE SAFE OPERATION AND LIFE OF THE METER, DO NOT PLACE THE METER IN ANY ENVIRONMENT OF HIGH PRESSURE, HIGH TEMPERATURE, DUST, EXPLOSIVE GAS OR VAPOR. 6 Avoid shaking, dropping or any kind of impacts when using or transporting the Meter. To avoid electric shock or personal injury, repairs or servicing not covered in this manual should be performed only by qualified personnel. Avoid direct exposure to sunlight to ensure extended life of the Meter. Do not place Meter in a strong magnetic field; this may cause false readings. Use only the batteries indicated in the Technical Spec. Avoid exposing batteries to humidity. Replace batteries as soon as the low battery indicator appears. Please keep the original packing for future shipping purposes (ex. Calibration) After opening the box, check for any damage during delivery. Using the Meter Figures and Components Buttons and Components 1. Laser emission and receiving window 2. LCD display 3. Instrument case 4. Power button 5. Maximum and Minimum button 6. Hold button 7. Measurement button 8. Data storage button 9. Data storage Read button 10. Backlight button 11. Storage read number plus button 12. Storage read number minus button 7 Front Panel 8 Button Description Power On/Off Press the “ ” button to turn on or off the meter MIN/MAX Switch measurement mode between maximum (MAX) and minimum (MIN) MODE Switch measurement mode between m/min, m/sec, ft/min, ft/sec, in/min and RPM MEASURE Press and hold the button to read the current measurement MEM Save current speed. READ Read the data saved by “MEM” Press the button to hold data Turn on/off the backlight 9 Plus button: increase the number when reading or to saving data Minus button: decrease the number when reading or saving data Display Description 10 1.Signal symbol 2. Low battery symbol 3. Maximum measurement display 4. Rotation speed reading display 5. Minimum measurement display 6. Storage state display 7. Storage number display 8. Average measurement value display 9. Measurement unit display Measurement WARNING: KEEP A SAFE DISTANCE FROM HIGH-SPEED ROTATING OBJECTS TO AVOID ANY MECHANICAL DAMAGE OR PERSONAL INJURY. DO NOT POINT THE METER AT A LIVING BODY TO AVOID INJURY. 11 Rotation per Minute (RPM) 1. Attach the reflective sheet to the target. NOTE: Target cannot be made of a strong light reflective material as it will affect the measurement accuracy. If so, cover the target first and then attach the reflective sheet. If the target is under strong sunlight or strong reflection is inevitable, please use Dawson DAM110A contact type tachometer. 2. 3. Set the Meter in a fixed location, making sure the meter is perpendicular to the rotating surface and can spot the reflective sheet. Hold the “MEASURE” button and read testing result on LCD screen. Signal symbol will blink during measurement. Maximum/Minimum 12 To show the maximum measurement, press “MAX/MIN” button till “MAX” is displayed. To show the minimum of the measurement, press “MAX/MIN” button till “MIN” is displayed. To show current readings, press “MAX/MIN” button till the LCD does not display “MAX” or “MIN”. NOTE: “MAX/MIN” cannot be used in real time; no current data will be shown or updated when “MAX/MIN” is used. Saving Data 1. 2. 3. Press “MEM” button and “MEM” will appear on the upper right corner of LCD screen; default storage number is “00”. Press “ “ or “ “ to select storage number. Press “ ” to save the reading in the specified storage number; value will flash once. The current value is stored in the selected storage number. Press “READ” to exit data saving. Read/ Recall Data 1. 2. 3. 13 Press “READ” to recall the saved data. Press “ “ or “ “ to select and read value stored in that storage number. Press “MEM” to exit. Specifications General Specification Rotation speeds from 50 to 19999RPM ; display will read 0.00 if below 50 RPM Measuring distance: 2 in. to 10 in. Auto power off: 30 sec Low battery symbol “ ” is displayed if batteries are lower than 4.5V Power supply: 4 × 1.5V AAA battery Dimension (LxWxH): 7.5” x 2.4” x 1.1” (155 x 60 x 27 mm) Weight: 0.3lb (120gm) Operating Environment Elevation < 6560 ft (2000 m) Relative humidity (RH) ≤ 80%RH Operating temperature: 32– 104°F (0 - 40°C) 14 Technical Parameters Measuring Scope 50~ 99.99 RPM 100~ 9999.9RPM 10000~ 99999 RPM Accuracy* ±(0.03%±2d) Resolutions 0.01RPM 0.1RPM 1RPM *All accuracies indicated in this document are stated in laboratory conditions and can be guaranteed for measurements carried out in the same conditions, or with required conditions. Maintenance and Repair Repair Please follow these steps closely if the Meter is not functioning properly: 15 Check batteries; replace with new batteries if low battery indicator “ ” appears. Follow User’s Manual to confirm all procedures. Before sending Meter back for repair, include a description of the problems encountered. Remove batteries and pack Meter well to avoid damage in delivery, Dawson does not cover damage due to delivery. Repair or service not covered in this manual should be performed only by the authorized service center or qualified personnel. Replacing Batteries Follow these steps to replace batteries: Turn off the Meter. Loosen the battery compartment door and remove the door from the case bottom. Remove batteries and replace with new batteries. Re-attach the battery compartment door to the case bottom and tighten screw. Contact Dawson Dawson Tools, Inc. 1142 S. Diamond Bar Blvd., #858 Diamond Bar, CA 91765 Phone: (310) 728-6220 www.DawsonTools.com Do not recycle 16 (Back page) Features 17 LCD Display Auto Ranging Auto Power Off MAX/MIN/AVG Display Back Light Data Hold Low Battery Indicator