1
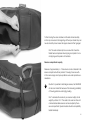
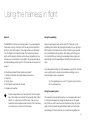
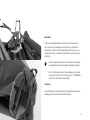
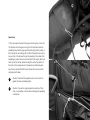
IMPRESS 3 User manual Edition 1 / 07-2011 Contents Thank you for flying ADVANCE ....................................................... 4 About ADVANCE .............................................................................. 5 The IMPRESS 3................................................................................ 6 Welcome on board! ...................................................................... 6 Notable features of the IMPRESS 3.............................................. 6 More important details.................................................................. 7 Saftey advice.................................................................................... 8 General advice about paragliding................................................ 8 Using the harness............................................................................. 9 Delivery......................................................................................... 9 Adjusting the harness................................................................. 10 Cockpit and instrument panel..................................................... 16 Stowage/Ballast compartment.....................................................17 More details..................................................................................17 Installing the reserve................................................................... 18 Using the harness in flight.............................................................. 24 Generell....................................................................................... 24 Using the Speedbag .................................................................. 24 Using the speed system ............................................................ 25 Throwing the reserve................................................................... 25.. Using the harness with other brands of paraglider ................... 25.. Winching...................................................................................... 25 Acro flying................................................................................... 25 Tandem flying.............................................................................. 26.. Replacing parts ............................................................................. 27 Maintenance, repair and care........................................................ 30 Maintenance................................................................................ 30 Check.......................................................................................... 31 Repairs........................................................................................ 31 Disposal....................................................................................... 31 Technical details............................................................................. 34 Technical details IMPRESS 3...................................................... 34 Materials used............................................................................. 35 Certification................................................................................. 35 Service............................................................................................ 36 ADVANCE Service Center.......................................................... 36 The ADVANCE website............................................................... 36 Warranty...................................................................................... 36 Size guide ...................................................................................... 38 List of components ........................................................................ 40 3 Thank you for flying ADVANCE Congratulations on your choice of an IMPRESS 3, a quality product from ADVANCE. We are confident that you will spend many rewarding hours in the air with it. This manual contains instructions and important advice about safety, care and maintenance. We strongly advise that you read it carefully before your first flight with the harness. You can always find the latest version of the manual and additional up-to-date information on www. advance.ch. Any new safety-related findings about the product will be published there. For questions or problems please contact your supplier or ADVANCE direct. We wish you a lot of fun with the IMPRESS 3 and, as always, “happy landings”. Team ADVANCE 4 About ADVANCE ADVANCE is one of the leading worldwide paraglider manufacturers, and is based in Switzerland. Since the company was founded in 1988 it has maintained its own policies and concepts, both in development and production. The results are matured products with unmistakable characteristics. on-going interaction with customers brings new insights that find their way into ADVANCE products – thus completing the «Circle of Service». Backing the brand is a team of experts who share the passion of those who put their trust in ADVANCE products. With their own understanding of flight they bring their personal experience and dedication to the working processes. For many years ADVANCE has drawn on the competition scene for technical knowledge. A small team of selected test and competition pilots has achieved much sporting success with ADVANCE prototypes, and has won many important international titles. Total control of the production process and close supervision of the working practices in the dedicated factory in Vietnam guarantee a high standard of workmanship. A long term relationship with fabric and line manufacturers also enables ADVANCE knowledge and expertise to find its way directly into the development of new materials. ADVANCE puts great importance on after-sales customer support, and has built up a worldwide service network for this purpose. An 5 The IMPRESS 3 Welcome on board! The IMPRESS 3 starts a new generation of harnesses for thermal, cross country and competition pilots. This continued development of the unique LIGHTNESS concept, without seatboard, provides the highest level of comfort and lowest aerodynamic drag. With its LTF certified back protector the IMPRESS 3 weighs only 4.7 kg, and is very light and compact. als and clever design also means that the packed volume is markedly reduced. Perfect aerodynamics A lot of wind tunnel work was done during the IMPRESS 3 development, mainly concentrating on the airflow around the chest and leg areas. The result is a low drag and geometrically optimised harness with a new Cockpit-Spoiler-Concept. Notable features of the IMPRESS 3 Based on the LIGHTNESS concept The new design, without a seatboard, supports the pilot’s weight over a large area, on an ergonomically shaped and edge-free surface, on which he reclines very comfortably. There are no places to raise pressure points on long flights, and this is a major advantage compared with conventional harnesses. Much lighter The IMPRESS 3 weighs only 4.7 kg – something new for a harness with speedbag and approved protector. The weight reduction results from numerous design and material details; the use of lighter materi6 More important details LIGHTNESS conzept Weight reduction • The harness has the proven ADVANCE two-buckle strapping sys- tem, combining chest and leg straps (called the Safe-T-System). • A well-placed lead-out for a drink system, to provide for convenient drinking on long flights. • The speedbag, adjustable in length and angle, guarantees com- fortable leg support and helps to minimise aerodynamic drag. • The speedbag includes a useful cockpit with removable instrument panel, and has integrated side pockets. • The built-in reserve compartment is in the ideal place, and is large enough for all current reserves, including Rogallo-type steerables. • The main supports will accept QuickOut carabiners. • There is an additional pocket for ballast or stores under the seat. • The speed system has ball bearing pulleys, and can always be easily reached in flight. Perfect aerodynamics 7 Safety advice As with all commercial reserve parachutes paraglider harnesses, because of their design, are not at all suitable for freefall parachuting. The reserve and its attachments are not designed for an abrupt opening. cover and licence. A pilot must be able to correctly assess the weather conditions before taking off. His or her capabilities must be adequate for the actual paraglider. All adjustments to the harness should definitely be made before flight. Correct harness settings contribute decisively to functioning, safety and comfort in flight. Wearing an adequate helmet, suitable boots and clothing, and carrying an emergency parachute are essential. Before every flight all items of equipment should be checked for damage and airworthiness. A proper pre-takeoff check must also be carried out. The foam protector under the seat does not provide total protection from injury. It only serves to dampen impacts and so minimise injuries that might result from a minor collision with the ground from a low height following unfortunate takeoffs or landings. When carrying out paraglider sports every pilot bears sole responsibility for all risks including injury and death. Neither the manufacturer nor the seller of a paraglider can guarantee or be held responsible for the pilot’s safety. When carrying out safety training over water you should be aware that the foam protector under the seat, and the comfort foam in the back float in water, and could put the pilot in a head down attitude. There is also a risk that the protector and comfort foam may eventually fill with water and sink – with the pilot. General advice about paragliding Flying a paraglider calls for appropriate training and a sound knowledge of the subject, as well as, of course, the necessary insurance 8 Using the harness Delivery Delivery package Before delivery every ADVANCE product has to be checked by the dealer for completeness and correct basic settings. The completed warranty document will ensure that defects in the product attributable to manufacturing faults are covered by the ADVANCE warranty. (See Warranty in the section «Service».) The IMPRESS 3 harness package contains: The IMPRESS 3 harness is delivered with the foam protector installed under the seat, the comfort foam in the back, and a fitted speedbag, footboard and speed lines. The upper and lower speedbag straps are located in the speedbag and already hung in the main carabiners. All harness and speedbag straps will show their basic settings at delivery. • Harness and speedbag with carbon footboard • 2 Alu main carabiners • Reserve V-connection and reserve handle with its attached four-flap inner container • Integrated cockpit with removable instrument panel • Foam protector under the seat • Comfort foam in the back • Speed system (consisting of 2 grey speed lines with Brummel hooks, 2 orange connecting lines for length adjustment, 1 black speed loop with a grey connecting loop) • Radio pocket • ‘Getting started’ booklet 9 Adjusting the harness The IMPRESS 3 can fit your body shape perfectly. ADVANCE actually recommend the IMPRESS 3 basic setting as an efficient and good set-up; it has been arrived at and refined by the ADVANCE test team. It will give the majority of pilots a comfortable and optimum fitting, assuming you have chosen the right harness size. (See ‘Technical Data’ in the section “Technical Details”.) Start out from the basic settings and make your own adjustments step by step according to the instructions that follow. They cover all the important criteria, such as upper body support, pressure distribution, speedbag length and the best speedbag angle for performance. Caution: Small changes to any of the straps have a large effect on the setting. Proceed towards your individual fitting in very small steps and always set all straps symmetrically, so that your glider wants to fly straight. Tip: Pack the back pocket and install the reserve before you start adjusting. This will give something close to a realistic fly- ing attitude. The shoulder, back and chest straps can be adjusted in flight. The rest of the IMPRESS 3 adjustment system can only be set on the ground. ADVANCE therefore recommend that you get well acquainted with the adjustments before your first flight in the harness. In any case your first test should take place in quiet weather conditions. Caution: Setting up your IMPRESS 3 is not complicated or difficult so long as you follow the recommended step by step procedure. ADVANCE recommend that you try to achieve the ideal position as described. 10 6 5 2 1 7 8 4 4 11 1. Start at the basic settings To begin with make sure all the straps, including the speedbag straps, are at their basic settings. This is the case when the free end of each strap reaches the white mark. The harness will have been delivered like this. 2. Set the speedbag length Now you can adjust the speedbag length to suit your leg length. The length of the speedbag and therefore your centre of gravity position sets the speedbag angle. For the best aerodynamic speedbag angle the underside of the speedbag should be horizontal. To set the length first loosen the upper speedbag line (4) completely, then adjust the lower speedbag strap (4) – which carries most of the load – to your perfect speedbag length. Now pull in the upper speedbag strap (4) as far as necessary. A good speedbag length will lightly support the legs on the footboard, without effort or strain. Upper and lower speedbag straps should both be under light tension, and symmetrical (same left and right). 12 More adjustment: The angle of the footboard itself can be adjusted by slightly altering the top to bottom relationship of the speedbag straps. 4. Checking the settings Info: Foot support is part of the speedbag and this is what supports you in your reclining position. The speedbag is re- movable, but only for repair or replacement (see section “Re- placing parts“). The IMPRESS 3 harness only works with its speedbag. Info: Compared with the Impress 2 you need much less load on the IMPRESS 3 footboard to hold your legs level. New an- gle geometry has achieved this. - Is the underside of the speedbag still horizontal? If not you can move your centre of gravity by changing the length of the upper and lower speedbag straps. It’s best to get an observer to check the speedbag angle. - Are the back straps low enough so that they don’t cut into your armpits? - The front edge of the harness should not be pressing the backs of your knees. - The speedbag should not have any obvious creases. 3. Setting the upper body angle Run through the following points to check your perfect position: Repeat the procedure as often as necessary – after every flight (if you like). Perfect is best: it works well. Now you can alter your upper body recline angle using the back straps (5). The back straps at the sides are mounted relatively high. This gives good back support and takes weight off the shoulders. Finally you can tighten or loosen the shoulder straps (6) as you wish – quite loose, or providing light support – but without putting pressure on the shoulders. 13 5. Fine adjustments Adjusting the main support loadshare strap, and seat surface straps Finally you can check the main support loadshare straps (7) and the seat surface straps (8), which, together with the main support, provide a very individual and precise shape for your body. Basically you should leave the pre-set basic setting of these straps unaltered for the Ideal position, so long as your weight is evenly distributed, all the straps are under load and you don’t feel any pressure lines from the seat surface. If there’s pressure from the sides pull in the loadshare straps (7). If you sense annoying pressure under your bottom loosen the loadshare straps. Too much pressure at the backs of the knees means loosen the seat surface strap a little (8). If there’s not enough support under the knees pull these (8) in slightly. Adjusting the leg straps Basically the leg straps (1) are set so that adjustment is not necessary. If these do annoy you, you can lengthen them, to the extent that they don’t annoy you in flight, but that you can still get into the speedbag. its zip fastener and take the foam out. The length of the leg straps has no effect on agility or weight steering. Adjusting the chest strap You can alter the carabiner distance using the chest strap (2). The ADVANCE development team recommend a ‘good shoulder width’ of about 45 cm as ideal. The possible adjustment range is between 40 und 48 cm, measured between carabiner base centres. The chest strap is closed by automatic quick releases and this makes up the Safe-T-System. The wider the chest strap the more agile will be the seat, and weight steering will be more effective. A narrow setting gives quiet, damped flying characteristics. The adjustable range is large and you can match harness agility to the conditions during flight, as you wish. The IMPRESS 3 is provided with the Closure Remember System. This is a safety device attached to the chest/leg straps which draws the pilot’s attention to the chest strap when he closes the speedbag before takeoff, thus reminding him that it too should have been closed. This safety device may prevent that pilot – who unfastens the chest strap, leaves the speedbag closed (e.g. following a failed takeoff), then takes off again – from falling out of the harness. To adjust the leg straps (1) open the foam protector compartment by 14 Caution: Always close the chest strap first, then the Closure Remember System, and after that the speedbag. Check be- fore every takeoff and especially after a failed takeoff in par- ticular – by a physical tug –, that you have correctly closed both quick release buckles. If the chest strap is not closed you can fall out of the harness. Caution: Always check that the locks are correctly latched. Tip: The most important thing about chest strap adjustment is that you feel good in the harness. 15 Speed system Connect the speed system to the glider using Brummel hooks or an anchor hitch. The length of the speed system can be adjusted on the short orange lines inside the speedbag. Move the overhand knots symmetrically. The speed system is correctly adjusted if you can use the glider’s whole accelerate range. Make sure the lines are not adjusted so short that the glider is always accelerated. Closing the speedbag To close the speedbag lie the left over the right side and clip the plastic hook in the loop. After taking up the flying position and straightening your legs on the footboard the speedbag closes automatically and the cockpit goes into its correct position. Cockpit and instrument panel The cockpit is part of the speedbag and has a zip-fastened pocket on top. At delivery there is a foam blank in the pocket which supports the cockpit and makes the spoiler shape. You can leave the blank there or use the space for your own things. The instrument panel Velcros straight on to the cockpit. The panel 16 has enough room for a GPS and/or Vario, and there are loops at the side for securing these. The panel itself and the instruments can also be secured by line to loops on the cockpit. Stowage/Ballast compartment There is an 8 litre volume compartment in the perfect place under the seat, close to the centre of gravity, for your choice of equipment or ballast. More details Shoulder mountings Both IMPRESS 3 shoulder straps have a Velcro and a loop, suitable for fixing an emergency alarm or Solario. 17 Drink system In the back compartment there is a pocket for a drinks container (Camelbak). The drinks tube can be led out through either side of the compartment and secured to a shoulder strap through the neoprene band provided. Radio pocket The radio pocket supplied goes over a main carabiner. Pilot relief system routeing On the left side of the speedbag at knee height there is an opening in the neoprene for a relief tube to be led out of the speedbag. Installing the reserve The IMPRESS 3 reserve compartment is in an aerodynamically ideal position near the pilot’s centre of gravity. The harness V-connection runs to the reserve in a channel along the side of the harness, closed by a zip. To ensure simple and reliable function the reserve compartment is completely closed in by zip fastener: the reserve is thus well protected from outside influence, and accidental deployment is 18 most unlikely. A neat single-cable system guarantees reliable and fast opening. Caution: Correct installation of a reserve is not complicated, but it must be done accurately and carefully – your life may depend on it. If you are not sure how to do this do not hesi- tate to contact a qualified person or your ADVANCE dealer. Connecting the V-connection and the reserve bridle Connect the harness V-connection to the reserve bridle using a Maillon Rapide of at least 2400 daN strength FOTO. Fix the position of the harness connection and the bridle at the Maillon with O-rings to prevent them sliding out of position around the Maillon when the reserve is thrown. Joining the V-connection and bridle by directly looping one through the other should only be done by the harness manufacturer or a person trained and authorised by him. If the loops are not correctly positioned there is a risk that they will slip on each other when the reserve opens, creating much friction and heating, melting and failure. Caution: Do not use sticky tape instead of O-rings for stabi- lising the material on the Maillon. 19 Inner container with combined reserve handle The reserve handle is permanently connected to the four-flap inner container, designed so that the pull of the handle is evenly distributed along the whole width of the inner container. This guarantees a clean pullout, and avoids the risk of the inner container jamming or getting caught up in the reserve lines while sliding out. This reserve handle/ four-flap combination is a part of the harness, and conforms to the latest LTF certification requirements. Only the original reserve handle/ four-flap inner container may be used. 20 Packing the reserve in the inner container Pack your reserve so that it matches the size and shape of the supplied inner container. The size of the inner container can be changed by moving the positions of the knots on the elastic ropes. To install the inner container first lay the V-connection, bridle and lines in the reserve compartment, then the inner container itself. Make sure that the four closure flaps and their line loop face downwards (in flight) on the floor the compartment, and that the reserve handle connection is not twisted. Caution: Never connect the inner container to the reserve. Closing the reserve compartment The reserve handle ends up in its neoprene pocket on the right hand side of the harness. Put the container/handle connection in the space for it as shown. Inside the neoprene pocket lead the yellow cable through the (invisible) eyelet, and then up and out though the buttonhole. Close the outer container by pulling the closure loop through its eyelet and secure it with the yellow cable, and finish by leading the end of the yellow cable into its sleeve. The stowed handle stays close to the harness, is well visible and easy to reach. 21 To finish closing the outer container and the side channel carefully run the zips in reverse to the beginnings of their open tracks: they can now be smoothly closed. Leave the zippers stowed in their ‘garages’. Info: The outer container zip has a cover which should be folded back and replaced when zipping is complete. For nor- mal zipping use the pullers on the sliders. Reserve compartment capacity Reserves of approximately 3 – 7 litres volume can be contained in the reserve compartment without problem. Throwing of reserves within this volume range do not pose problems even under spiral dive accelerations. Caution: It is possible to install larger reserves, but ADVANCE do not recommend this because of the increasing probability of throwing problems under high g loading. Info: To calculate the volume of your reserve multiply its kilo weight by a factor of 2.7. The result is the volume in litres. All commercial steerable reserves can be accepted by the re- serve compartment. Special models should be compatibility tested individually. 22 Steerable reserves A steerable reserve can be attached directly, using two (similar) Maillons adding up to a minimum strength of 2400 daN, to the coloured suspension points under the shoulder harness covers. The risers should be led along the side channel into the reserve compartment. The harness V-connection (not used) can be stowed away through an opening in the top of the harness back, and into the comfort foam pocket. Caution: For the IMPRESS 3 you must only use the original release handle and its combined inner container. Caution: Before every flight check that the reserve handle is in its neoprene pocket, and that the yellow cable is routed correctly. Tip: We recommend that you check, briefly, the position of the reserve handle with the hand during every flight – so that you know where it is. QuickOut carabiners can easily be fitted to the IMPRESS 3. Compatibilty test Correct installation of a reserve must be tested by a test release. To do this hang the harness up by its carabiners and sit in it. In a flying position you should be able to pull the reserve out without interruption, and in accordance with the content of this manual. Make sure that the force required to release the reserve is not less than 4 daN – and not more than 7 daN. If you’re not sure about this do not hesitate to contact a qualified person or your ADVANCE dealer. 23 Using the harness in flight General Using the speedbag The IMPRESS 3 is flown in a reclining position. If you have adjusted the harness correctly information from the wing will be transmitted directly to your nether regions. Your weight will be even distributed from the thighs to the shoulder blades. This means that pressurepoints will be avoided, circulation will continue unimpeded, and you will keep your concentration on long flights. The aerodynamically optimised Speedbag protects you from the cold while serving as a foot support. Keep a forward upper body position after lift off and pick up the speedbag (which will be hanging slightly behind) with your right heel. With the help of the footboard you will then be able to push yourself into a comfortable reclining position. After taking up the flying position and stretching out your legs the speedbag closure system will automatically close the speedbag top and bring the cockpit into position. Do the following takeoff check before every takeoff: 1.Helmet and harness chest strap fastened, reserve ok 2.Lines free 3.Canopy open 4.Wind direction and strength checked 5.Airspace and view free For landing take both feet out of the speedbag in good time, and take up an upright position. Always make a stand up landing, so as to avoid damage to body or equipment. Tip: The speedbag is very warm; if it gets too warm let some air in by bending a leg. Using the speed system Caution: Always fasten the chest strap first, then the speed- bag. Check before every takeoff, but especially after a failed takeoff – by a physical pull with the hand – that you have closed both quick release buckles correctly. If the chest strap is not closed you can fall out of the harness. The speed loop is tensioned forward so you can always easily reach it. One leg should always be straight to keep tension in the speedbag. When you wish to use the second speed loop step, the foot already on the first speed step automatically takes over this function. Accelerating with one foot means you can feel the wing better and 24 use the speed system effectively for active flying. While pushing the speed system you must be careful not to push your heels into the speedbag floor in your enthusiasm to burn rubber. This could overstress the speedbag material. (See also “Fitting the speed system” in the section ”Using the harness“.) Caution: Always connect your speed system to the wing. Free-hanging speed lines could interfere with a reserve throwing. Throwing the reserve In an emergency pull the reserve handle out with a firm tug and throw it (and the inner container) into free airspace. The lines will pay out, which will open the inner container. The reserve canopy will extend and fill. Disable the paraglider by pulling down strongly on the B or C risers, so that it does not compete with the reserve and encourage scissoring. This happens when both canopies pull against each other on opposite sides of the vertical flight path. Winching All ADVANCE harnesses are suitable for winching. Connect your IMPRESS 3 to the tow link using rope loops or Maillons from the main carabiners. If in doubt always consult the winch driver, or someone authorised by the manufacturer. Acro flying The IMPRESS 3 is not suitable for acro flying. But freestyle manoeuvres pose no problem. Tandem flying The IMPRESS 3’s size and shape means that it is not at all suitable for tandem flying – whether for pilot or passenger. Using the harness with other brands of paraglider The IMPRESS 3 can be used with any glider. There is no restriction. 25 26 Replacing parts The IMPRESS 3 harness is delivered with a foam protector under the seat, comfort foam in the back and a fitted speedbag, footboard and speed lines. These parts can be removed for replacement or repair. Foam protector and comfort foam The foam protector compartment is under the seat, between the reserve and the ballast stowage. Open the zip fastener, and take out the foam protector. The comfort foam is in its own compartment in the back pocket. Open the zip fastener, and take out the comfort foam. 27 Speedbag To fit a new speedbag take both carabiners out of the red loops. Then open the two speedbag zips and the Velcro, and take the speed lines out. Remove the old speedbag and fit the new one, reversing the process – routeing the speed lines and closing the zips and Velcro. Caution: Hang all the red loops in the carabiners, otherwise the speedbag zips will be irreparably damaged by loading. Info: The footboard is a part of the speedbag, and provides an essential support for the reclining position. The IMPRESS 3 harness only works with the speedbag. Footboard A new footboard should be pushed into the footboard pocket in the speedbag, and the pocket secured with the Velcro. 28 Speed loop To fit a new speed loop start at the grey connecting loop on the end. This attaches to the bungee coming from the footboard inside the speedbag. Now lead the grey speed lines through the first pulleys, (1) then through the red markings (2). Pull them through the second pulleys, and out of the harness through the openings in the sides of the speedbag (3), where they can be connected to the wing by Brummel hooks or anchor hitches. Speed line length is set by the position of the knots on the orange lines on the speed loop inside the speedbag. These overhand (half hitch) knots should be moved symmetrically (same both sides). Caution: Check that the speed lines do not cross and rub against the lower speedbag straps. Caution: Only use the original speed lines and loop. Other lines, or a speedbar, could chafe and damage the speedbag and harness. 2 1 29 Maintenance, repair and care Maintenance The life of your harness depends very much on how you look after it. We recommend that you investigate any signs of wear, damaged seams and webbing and, if necessary, replace individual components. After a specially high loading (e.g. heavy crash) we recommend that you have your harness checked by a qualified person, and that you take it to an authorised Service Centre if a defect is suspected. (See also ‘Check’ in this section.) Caution: Do not modify your harness, and never fly a harness whose webbing shows any sign of damage. Caution: Only clean the harness with fresh water and neutral soap, if necessary - never solvents. Info: Ultraviolet light, heat, humidity, seawater, aggressive cleaning substances, careless storage and physical abuse (dragging over ground) speed up the ageing process. Info: Do not expose your packed harness to large changes of temperature, and make sure it gets enough ventilation; to prevent condensation forming. Info: Before and after flight do not leave the harness in the sun for no reason (UV-light). Reserve parachute Most reserve manufacturers recommend servicing or repacking every 6 months; this will guarantee reliable and fast opening every time (see the manufacturer’s information for your reserve). If the reserve gets wet, or just damp, or very hot, it needs immediate repacking. After every reserve throwing the reserve, and especially the connection between harness and reserve, must be carefully checked over. We strongly recommend that you let your reserve be packed by a trained and authorised person. In addition ADVANCE emphatically recommend that you regularly check the outer container, and the yellow cable running through the closure loop – the yellow cable should move easily through the loop. Foam protector The foam protector does not need special attention, but should definitely be checked for damage after a crash. If the outer cover is damaged the protector must be replaced. 30 Wet harness Repairs Your wet or damp harness must be allowed to fully dry out at room temperature, or outside in the shade. Take the foam protector out of its compartment under the seat, and the comfort foam out of the back (see ‘Foam protector and Comfort foam’ in section “Replacing parts“). Take the speedbag off the harness and leave it to dry separately (see ‘Speedbag’ in section “Replacing parts“). Take the reserve out (always repack it) and open all the compartments to dry. If the harness has been in contact with seawater it must be thoroughly rinsed with freshwater before drying. You should never repair your harness yourself. The various seams are sewn with great precision. Because of this you should only have repairs done by the manufacturer or an authorised Service Centre, using original parts. Check Disposal Environmental considerations play an important role in the choice of materials and the production of an ADVANCE product. We use only non-toxic materials that are subjected to continuous quality and environmental impact assessments. When your harness reaches the end of its life please remove all metal parts and dispose of the rest of the harness in a waste incineration plant. Your harness must have a check every 24 months. This inspection includes a visual assessment of the material, webbings and connections, the most important seams and the main carabiner supports. All parts are checked for tears, creases, worn seams, damage and serious wear. There is more information about the check in this manual in the section «Service» or on www.advance.ch. 31 32 33 Technical details IMPRESS 3 S M L Pilot height cm 155-170 171-185 186-200 Seatboard width cm n/a * n/a * n/a * Carabiner height cm n/a * n/a * n/a * Chest strap width cm 40-48 40-48 40-48 Weight of harness incl. Speedbag, 2 Alu carabiners kg 4.5 4.7 4.9 Load test Foam protector certification DIN EN 1651 / LTF 91/09, 120 kg LTF 91/09 *) Because the hammock system follows the body shape exactly the seating width together with the carabiner height will vary with the pilot dimensions. 34 Materials used Certification We routinely inspect and test the materials available to us many times over. Like all ADVANCE products the IMPRESS 3 is developed and produced using the latest developments and knowledge. We have chosen the materials very carefully, under the strictest quality demands. The IMPRESS 3 harness has been tested and approved in accordance with LTF II 91/09 and DIN EN-Norm 1651 at a weight of 120 kg. The foam protector has LTF certification. Outer fabric Oxford Ripstop 210D The most recent LTF certification requires that the harness may only be used with the original reserve handle and its attached four-flap inner container. Inner fabric Nylon Oxford 210D PU3 / Nylon Oxford Ripstop 210D Speedbag Neoprene 1.5 mm Straps Polyester 25 mm 800 kg Chest strap buckle system AustriAlpin Cobra Harness/reserve V-connection Dyneema 10 35 Service ADVANCE Service Centres ADVANCE operates two of its own service centres that carry out checks and repairs of any kind. These service centres, based in Switzerland and France, are official maintenance operations approved by the DHV, and they possess many years’ experience and in-depth product-specific expertise. The worldwide ADVANCE service network includes other authorised service centres which provide the same quality of service. All these facilities use original ADVANCE parts exclusively. You can find all the information about Checks and Repairs, and the relevant addresses on www.advance.ch. ADVANCE website On www.advance.ch you will find detailed information about ADVANCE and its products, and useful addresses to contact if you have a question. On the website you can: • complete the warranty card up to 10 days after purchase, and get the full advantage of the ADVANCE warranty. • find out about new, safety-related knowledge and advice about ADVANCE products. • download the PDF form you can use when sending your equip- ment to ADVANCE for a check. • find an answer to urgent questions in the FAQs (frequently asked questions). • sign up for the ADVANCE Newsletter so that you will be regularly informed by E-Mail about news and products. A regular visit to the ADVANCE Homepage is a good idea because the range of services is continually developing. Warranty To benefit from the comprehensive ADVANCE warranty please fill in the appropriate form within 10 days of purchase. This form is available on the website under «Warranty». As part of the ADVANCE warranty we undertake to rectify any defects in our products that are attributable to manufacturing faults. To make a claim on the warranty you must notify ADVANCE immediately on discovering the defect, and send the defective product in for inspection. The manufacturer will then decide how a possible manu36 facturing fault is to be rectified (repair, replacement of parts, or of the product). This warranty is valid for 3 years from the date of purchase of the product. The ADVANCE warranty does not cover any other claim. In particular it does not cover damage caused by careless or incorrect use of a product (e.g. inadequate maintenance, unsuitable storage, overloading, exposure to extreme temperatures etc.). The same applies to damage attributable to an accident or normal wear and tear. 37 Size guide Height (cm) ➔ Weight (kg) 45 50 55 60 65 70 75 80 85 90 95 100 105 110 115 120 155 160 S 165 170 175 M 180 185 190 L 195 200 generally fits well has to be tested individually (depends on the back and leg length) 38 39 List of components 1 2 3 4 5 6 7 8 9 10 11 12 13 14 15 16 17 18 19 20 Main suspension points Main strap Shoulder straps Back straps Chest strap Safe-T-System Leg straps Main support loadshare strap Speedbag Upper and lower speedbag straps Speed lines Stowage for stores/ballast Stowage for stores/ballast Harness/reserve V-connection cover Back pocket Hole for drinking tube Foam protector under the seat Comfort foam in the back Velcro for a Solario Vario / SPOT Speed system pullleys 40 19 3 3 16 1 15 4 5 6 2 7 13 8 10 9 10 14 20 11 18 12 17 6 41 42 43 advance thun ag u t t i g e n g s t r a s s e 87 ch 3600 thun f o n + 41 3 3 225 70 10 f a x + 41 3 3 225 70 11 w w w. a d v a n c e.c h i n f o @ a d v a n c e.c h