Download Creative: Nomad Jukebox 2 Getting Started

Transcript
Getting Started
Creative NOMAD Jukebox 2
Information in this document is subject to change without notice and does not represent a commitment on the part of Creative
Technology Ltd. No part of this manual may be reproduced or transmitted in any form or by any means, electronic or mechanical,
including photocopying and recording, for any purpose without the written permission of Creative Technology Ltd. The software
described in this document is furnished under a license agreement and may be used or copied only in accordance with the terms of
the license agreement. It is against the law to copy the software on any other medium except as specifically allowed in the license
agreement. The licensee may make one copy of the software for backup purposes.
Copyright © 2002 Creative Technology Ltd. All rights reserved.
Version 1.0
September 2002
Sound Blaster, the Sound Blaster logo, and the Creative logo are registered trademarks, and Sound Blaster Live!, PlayCenter and
EAX are trademarks of Creative Technology Ltd. in the United States and/or other countries.
NOMAD is a registered trademark of Aonix and is used by Creative Technology Ltd. and/or its affiliates under license.
Microsoft, MS-DOS, and Windows are registered trademarks of Microsoft Corporation. All rights reserved.
Intel and Pentium are trademarks of Intel Corporation in the U.S. and other countries.
CDDB is a trademark of CDDB, Inc.
SmartMedia is a trademark of Toshiba Corp.
EMusic, Emusic.com, and the EMusic.com logo are trademarks of EMusic.com Inc.
MP3.com and the MP3.com logo are trademarks of MP3.com, Inc.
Audible and the Audible logo are trademarks of Audible, Inc.
audiohighway.com and the audiohighway.com logo are trademarks of audiohighway.com.
All other products are trademarks or registered trademarks of their respective owners.
Contents
Contents
Safety and Handling Instructions
Caring For Your Player ............................................. xi
Caring For Your Battery ........................................... xii
Introduction
Introduction ............................................................. xiii
1 Before You Begin
Package Contents .................................................. xix
Hardware ................................................................ xix
Software ................................................................. xix
Creative PlayCenter 3 .............................. xvii
Creative File Manager ............................. xviii
Creative Audio Stream Recorder.............. xviii
NOMAD Jukebox 2 Interactive Tutorial ... xviii
System Requirements ............................................ xix
NOMAD Jukebox 2 System Requirements ............ xix
Additional Requirements For Audio Stream
Recorder ............................................................... xix
iv
2 A Tour of Your Player
Your Player At A Glance ........................................ 1-1
Using The Scroller ................................................. 1-5
Scroll Select ........................................................... 1-5
Selecting Menu Options ...................................... 1-6
Selecting List And Confirmation Box Options .... 1-6
Optional Player Accessories .................................. 1-7
3 Getting Started
Charging The Battery ............................................ 2-1
Power Source And Level Indicators ...................... 2-2
Installing Software ................................................. 2-3
Connecting Your Player To Your Computer .......... 2-4
Transferring Music ................................................. 2-5
Downloading Music From The Internet ................... 2-6
Ripping Content From A CD .................................. 2-6
4 Playing and Managing Your Music
Playing Music ........................................................ 3-1
Basic Music Playback ............................................ 3-1
v
Viewing The Playing List .......................... 3-1
Play Modes ............................................................ 3-2
Repeating Music ....................................... 3-3
Shuffling Music ......................................... 3-4
Playing Only One Track ............................ 3-5
Playing All Tracks In Sequence ................ 3-5
Track Bookmarks ................................................... 3-6
Organizing Your Music .......................................... 3-8
Music Library ......................................................... 3-8
Finding A Music Track In The Music
Library ....................................................... 3-9
Adding Music Tracks From The Music
Library To The Playing List ..................... 3-13
Viewing Track Information In The Music
Library ....................................................... 3-14
Deleting Music Tracks From The Music
Library ....................................................... 3-15
Playing List ............................................................ 3-18
Viewing Music Tracks In The Playing List 3-18
Viewing Track Information In The Playing
List ............................................................ 3-20
Removing Music Tracks From The Playing
List ............................................................ 3-21
vi
Rearranging The Playing List ................... 3-23
Saving The Playing List As A Playlist ...... 3-25
Music Enhancement ............................................. 3-27
Using EAX ............................................... 3-27
5 Software Applications
About Playcenter And File Manager ......................
Using Playcenter ...................................................
Ripping Tracks From An Audio CD .......................
Transferring Tracks ...............................................
Synchronizing Tracks In Your Music
Libraries ....................................................
Transferring SpecificTtracks From Your
Computer To Your Player And Back ........
Editing Audio track information ..............................
Creating And Editing Playlists With PlayCenter ....
Creating A Playlist ....................................
Adding Tracks To A Playlist ......................
Removing Tracks From A Playlist ............
Changing The Playback Order In A
Playlist ......................................................
Deleting A Playlist .....................................
To View Non-English Track Information ................
4-1
4-2
4-3
4-4
4-4
4-6
4-7
4-7
4-7
4-8
4-8
4-8
4-8
4-9
vii
Using File Manager .............................................
Transferring Data Files ........................................
Transferring A Data File By
Copying-and-pasting ..............................
Transferring A Data File By
Dragging-and-dropping ...........................
4-10
4-11
4-11
4-11
A Technical Specifications
Technical Specifications ........................................
Size ...........................................................
Weight ......................................................
Memory .....................................................
Capacity ....................................................
Battery type ..............................................
Battery Life (playback time) ......................
Interface ....................................................
Playback Formats .....................................
Signal to Noise Ratio ................................
Channel Separation ..................................
THD ..........................................................
Frequency Response ...............................
Harmonic Distortion ..................................
Operating System/Firmware .....................
A-1
A-1
A-1
A-1
A-1
A-1
A-1
A-1
A-1
A-2
A-2
A-2
A-2
A-2
A-2
viii
Headphone Out ........................................
LCD Display ..............................................
Data Connector ........................................
EAX ..........................................................
Playback Speed ........................................
Audio Codec Support ...............................
A-2
A-2
A-2
A-2
A-3
A-3
B Onscreen Diagram and Icon Guide
Onscreen Diagrams...............................................
Playback Icons ......................................................
Playing List Icons ...................................................
Play Mode Icons ....................................................
Navigational Icons .................................................
B-1
B-2
B-3
B-4
B-5
C Frequently Asked Questions and Error Diagrams
FAQs And Troubleshooting ...................................
AutoPlay ................................................................
General ..................................................................
Maintenance ..........................................................
Usage ....................................................................
Error Diagrams ......................................................
C-1
C-1
C-2
C-4
C-4
C-7
ix
D User Preferences
Setting User Preferences ......................................
Player Personalization ...........................................
Power Settings ......................................................
Language Settings .................................................
Using Menu Language .............................
Using Input Language ..............................
Player Reset ...........................................................
Player Lock ............................................................
Locking Your Player .................................
Unlocking Your Player ..............................
Information Screen ................................................
D-1
D-1
D-2
D-3
D-3
D-3
D-3
D-4
D-4
D-4
D-5
x
Safety and Handling Instructions
CARING FOR YOUR PLAYER
While your player is quite robust, observing these handling procedures will
prolong its life.
Do not store or
use it in areas
exceeding 45ºC
or 113ºF.
Do not subject it
to excessive force
or impact.
Do not expose it
to heat or
incinerate.
Do not expose it
to excessive
moisture.
Do not expose it
to strong
magnetic fields.
Do not dismantle
it.
xi
CARING FOR YOUR BATTERY
When charging or handling your player’s battery, take note of these
precautions:
Never modify or
disassemble the
battery. If there is
leakage, stench,
discoloration or
deformation during
charging or use,
remove the battery and
do not use it again.
Clean your hands well
before handling food
or touching sensitive
areas of your body, for
example, your eyes.
Do not expose it
to heat or fire.
Do not contact it
to metal objects
like keys or
necklaces.
Do not pierce or
crush it.
Do not expose it
direct sunlight.
Do not expose it
to moisture.
Do not store or
use it in areas
exceeding 45ºC
or 113ºF.
.
xii
Introduction
INTRODUCTION
Congratulations on making an excellent decision in purchasing the Creative
NOMAD Jukebox 2!
Your new multi-format portable player is lightweight, just about 8.8 ounces or
249.6 grams. You can store thousands of songs in the player’s music library.
Your player also comes equipped with a USB 2.0 connector, so you can
transfer audio tracks quickly and easily.
Unlike other hardware-based players, the NOMAD Jukebox 2 features an
onboard real-time digital signal processor (DSP) and a real-time effects
processor for superior audio playback and customization. Your player also
supports EAX™ so that you can enhance your audio with Advanced EQ
presets, headphone spatialization, environments and effects. Your portable
digital audio player supports multiple audio file formats, including MP3 and
WMA.
xiii
Before You Begin
PACKAGE CONTENTS
Hardware
❍
❍
❍
❍
❍
❍
❍
Software
❍
❍
❍
❍
❍
Creative
PlayCenter 3
NOMAD Jukebox 2 Player
Cylindrical Li-ion battery
DC Power Adapter
Installation CD incorporating PDF User Manual, warranty and technical
support information
Quick Start leaflet
Stereo headphones
USB 2.0 compatible cable
Creative PlayCenter™ 3
Creative File Manager
Creative Audio Stream Recorder
NOMAD Jukebox 2 Interactive Tutorial
Adobe® Acrobat® Reader®
Creative PlayCenter is your personal digital music center on the computer.
PlayCenter allows you to listen, organize, rip, and even create your own audio
CDs! It also lets you manage, organize and seamlessly transfer music
between Creative portable digital audio players and your computer. With
AudioSync™, you can also synchronize music between your Jukebox 2 and
your computer.
xiv
Creative File
Manager
Creative File Manager is a data file manager for your player. With its intuitive
interface, you can perform drag-and-drop operations between your computer
and player. With Creative File Manager, your player doubles as a portable data
storage device.
Creative Audio
Stream Recorder
(available only in
some regions)
The Creative Audio Stream Recorder (ASR) is a software application that
enables you to record streaming audio content from the Internet, and then play
it back on your computer or transfer it to your player.
NOMAD Jukebox
2 Interactive
Tutorial
We have included an online tutorial designed to guide you step by step around
your new player. The tutorial is useful for both new and experienced owners.
The ASR helps you to record Internet radio programs, sports events, company
earning calls, hourly news updates — most of the audio content you can find
online. You can specify the URL of the streaming content or select it from the
ASR content directory. ASR can also be scheduled.
xv
SYSTEM REQUIREMENTS
NOMAD
Jukebox 2
System
Requirements
❍
❍
❍
❍
The software
applications on the
installation CD may
have higher
requirements for basic
functionality. Refer to
each application’s
documentation for
details
❍
Additional
requirements for
Audio Stream
Recorder
❍
❍
❍
❍
❍
❍
❍
❍
Microsoft® Windows® 98, Windows 98 Second Edition (SE),
Windows 2000, Windows Millennium Edition (ME) or Windows XP
Intel® Pentium® II 350 MHz, AMD® K6-2® 450 MHz or better processor
(Pentium III 450 MHz or higher recommended for MP3 encoding)
Sound Blaster Live!™, Sound Blaster Audigy™ or Sound Blaster Extigy™
for EAX enhanced MP3 encoding
CD-ROM drive with digital audio extraction support
USB 2.0 port
64 Megabytes RAM (128 Megabytes recommended)
30 Megabytes free hard disk space (more needed for storing audio)
Internet connection for Internet content downloading and CDDB2™ support
(any charges incurred are the responsibility of the user)
Installed mouse
SVGA graphics adapter (256 colors, 800 x 600 resolution or better)
Sound Blaster Live!, Sound Blaster Audigy or Sound Blaster Extigy
Depending on the audio stream you want to record, at least Real Player™
7.0, RealOne™ or Windows Media Player 6.0
Microsoft Internet Explorer 4.0
xvi
DOCUMENT CONVENTIONS
Capital letters are used to refer to buttons on the player or on an application,
for example, “Press the MENU button to get to the Jukebox Settings screen.”
We also use icons to highlight useful or urgent information for you:
Tip. This tells you about shortcuts or hints relating to a feature.
Note. This highlights additional or important information about
a feature.
Caution! This highlights proper usage of your player. Use this
information to avoid situations involving risk.
Warning! This warns you of possible hazards to yourself or
your player, may result in injury or damage.
xvii
WEB SITE INFORMATION
Visit http://www.NOMADworld.com regularly for updates and information on:
❍ Firmware updates
❍ NOMAD accessories
❍ Tips and tricks
❍ FAQs
❍ Troubleshooting
❍ Documentation updates
❍ Software updates or purchases
❍ Technologies used in your player
❍ An online glossary
xviii
1
A Tour of Your Player
YOUR PLAYER AT A GLANCE
LCD Screen
Now Playing Button
Back/Cancel
Button
Find Button
Volume Increase Button
Menu Button
EAX Button
Volume Decrease Button
Reverse Button
Forward Button
Stop Button
Power Button
Scroller
Headphones Connector
connects to your headphones.
Play/Pause Button
Battery compartment
Power adapter connector
USB Connector
connects a USB cable from your
player to your computer to
transfer data/audio
1-2
Button
What It Does
Usage Tips
POWER
❍
turns the player on and off
SCROLLER
❍
❍
scrolls up and down menus
selects menu options
❍
exits a window or selection
❍
press and hold until the player
turns on or off.
❍
turn the Scroller to scroll through
menu options and press the
Scroller to select them. This
action is also referred to as
"Scroll Select".
BACK/CANCEL
NOW PLAYING
FIND
❍
❍
toggles between Playing Track and
Playing List screens
❍
searches tracks by playlist, artist, album,
genre or track name
❍
accesses most of your player’s features
the Playing Track screen shows
details about the track being
played.
❍ the Playing List screen shows
the contents of the playing list.
❍
use the Scroller to select the
type of search method.
MENU
1-3
Button
EAX
What It Does
❍
❍
Usage Tips
enables or disables EAX audio
sets the EAX environment
❍
FORWARD
❍
❍
skips to the next track
skips forward to portions of a track when
you press and hold the button
to skip to the next track, in the
Playing List screen, use the
Scroller and select the track to
skip to. Press this button.
❍ to forward in a track, in the
Playing List screen, press and
hold.
❍
REVERSE
❍
❍
skips to the previous track
skips to previous portions of a track when
you press and hold the button
❍ skips to the beginning of the current track
to skip to a previous track, in the
Playing List screen, use the
Scroller and select the track to
skip to. Press this button.
❍ to rewind in a track, in the
Playing List screen, press and
hold.
PLAY/PAUSE
❍
starts, pauses or continues playback
❍
Stops playback
STOP
1-4
Button
What It Does
Usage Tips
VOLUME INCREASE
❍
increases the volume
❍
decreases the volume
VOLUME DECREASE
❍
press and hold to increase the
volume quickly.
❍
press and hold to decrease the
volume quickly.
1-5
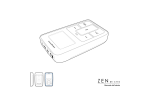
USING THE SCROLLER
Scroll Select
To "Scroll Select",
use the Scroller to
scroll to the option
you want, and select
the option by
pressing the Scroller.
The Scroller is one of the most important features of your NOMAD Jukebox 2.
In this document, we will use a new term, “Scroll Select”, to indicate that you
should use the Scroller to scroll through options and then select the option by
pressing the Scroller.
the Scroller
(side view)
Use the Scroller to scroll
through options
Press the Scroller to select an
option
Depending on the screen you are in, you can have different menu options. You
can also choose options from a list or a confirmation box.
1-6
Selecting menu
options
You can use the Scroller to make selections in menus. For example, if you are
looking at the Menu screen:
From the Menu screen to the Jukebox Settings screen
1. Use the Scroller to scroll up and down in the menu.
2. Press the Scroller to select the menu item.
Selecting list and
confirmation box
options
You can also use the Scroller to select options in lists and confirmation boxes.
Scroller options
Constructing a title from a list
Unlocking the player
1. Use the Scroller to scroll through the options.
2. Press the Scroller to select the option.
1-7
OPTIONAL PLAYER ACCESSORIES
Car Kit
❍
The Car Kit package comes with a cassette adapter that connects
your player to a car cassette player.
Visit www.NOMADworld.com to learn more about this accessory.
1-8
2
Getting Started
CHARGING THE BATTERY
The high performance Li-ion battery supplied with your player needs to be fully
charged before you use it. Your player’s built-in battery charger will fully charge
the battery (in approximately 4 hours) to obtain the maximum playback time.
Subsequent recharging should take 1-3 hours typically.
To charge your player’s battery:
1. Connect your player to a power outlet.
Your player will turn itself on.
2. Check the battery icon to see when the battery is fully charged.
DC adapter connector
2-1
Power Source
and Level
Indicators
Your player displays one of the following icons, depending on the battery’s
charged status or the power source (battery or electrical power).
Icon
What the icon means
❍
your player is running from electrical
power only
❍
your player is running from battery power
only
❍
your player’s battery is good for
approximately 12 hours of continuous
playback
❍
your player’s battery is good for
approximately 3 hours of continuous
playback
Notes
❍
this battery state icon shows that
the battery is fully charged
❍
recharge the battery at the earliest
opportunity
❍
❍
your player is running from electrical
power and is charging the battery
❍
your player is running from electrical
power and has finished charging the
battery
charge the battery fully before
disconnecting the player from the
power outlet
❍ while charging, the icon will
alternate between this icon and a
battery state icon, showing the
approximate level of charge
❍
to use battery power, disconnect
the player from the power outlet
2-2
INSTALLING SOFTWARE
Your NOMAD Jukebox 2 comes with software that helps you create audio
tracks, manage your music library and use your player.
You must restart your
computer before trying
out any of the installed
applications.
1. Make sure that your player is not connected to your computer.
2. Insert the Installation CD into your CD-ROM drive.
3. The disc supports Windows AutoPlay mode and starts running
automatically. If not, you need to enable your CD-ROM drive's auto-insert
notification feature. For more details, see "AutoPlay" on page C-1.
4. Select your preferred language. For more details, see "Language Settings"
on page D-3.
5. Click the Install software for NOMAD Jukebox 2 option to select it.
6. Click the OK button.
7. Click the Next button to register with Creative, so that you will be updated
on new developments for your player.
8. Follow the instructions on the screen.
9. When prompted to restart your computer, leave the CD in the CD-ROM
drive.
10. Click the Yes, I want to restart my computer now option to select it.
11. Click the Finish button.
12. Restart your computer.
2-3
CONNECTING YOUR PLAYER TO YOUR COMPUTER
After you have
connected your player
to your computer, go
through the NOMAD
Jukebox 2 Interactive
Tutorial found on your
Installation CD!
You are now ready to connect your player to your computer. Your NOMAD
Jukebox 2 comes with a USB 2.0 cable for fast data transfers to and from your
computer. Be sure that you have installed PlayCenter before connecting your
player.
2-4
TRANSFERRING MUSIC
Audio selections have been preloaded to the Playing List to get you started
quickly. If you wish to listen to music immediately, simply press the PLAY
button
You can listen to your
player’s preloaded
music immediately by
simply pressing the
PLAY button.
.
If, however, you wish to download additional music tracks to your player, you
can either download music tracks from Internet music sites or have them
"ripped" from audio CDs to your computer.
They must, however, be encoded into the supported formats (MP3 or WMA file
formats), then transferred to your player with the Creative PlayCenter
application.
Basic instructions on
how to use PlayCenter
are provided in "using
playcenter" on page 42
Data files can also be transferred and stored in your player, useful if, for
example, you want to transfer a large movie file from one computer to another.
Data can be transferred to your player with the Creative File Manager
application, which is a dedicated data file manager for your player.
2-5
Downloading
music from the
internet
It is illegal to encode
MP3 files for trade or
sale unless you have
the express or
explicit permission of
the copyright
holder(s).
To get MP3 files from the Internet, use a search engine to locate sites with MP3
content. You can also try out these sites (web sites listed here are correct at
the time of this document’s release):
❍
NOMADWorld
❍
SoundClick.com
❍
Epitonic.com
http://www.NOMADworld.com
http://www.soundclick.com
http://www.epitonic.com
❍
AMP3.com
❍
ArtistOne.com
❍
Soundbuzz.com
http://www.amp3.com
http://www.artistone.com
http://www.soundbuzz.com
Follow the instructions on the site and download the music files to your
computer.
Ripping content
from a CD
The first phase in making an MP3 file is extracting audio data from an audio
CD. To extract audio data, you will need a CD-ROM drive that can extract
digital audio data, and a program known as a Ripper. This program uses the
CD-ROM drive to read the audio tracks from the audio CD and stores it on your
hard disk. The time needed for a successful audio extraction depends on:
❍ CD-ROM drive speed
❍ defects, like scratches on the audio CD
❍ error-checking features on the CD-ROM drive
2-6
Encoding is the second phase of making an MP3 file. Encoders are used to
convert the stored audio tracks, usually WAV files, into MP3 files. MP3
encoding is considered lossy compression, which means that some data is lost
during compression. However, using the standard sampling rates and bitrates
will ensure that your MP3 files retain much of their audio quality. The standard
bitrate of most MP3 files is 128 Kbps, although some are set higher, at 160 or
192 Kbps. Higher bitrates will result in larger MP3 file sizes, with better audio
quality. Use PlayCenter to extract audio tracks and encode MP3s.
2-7
3
Playing and Managing Your Music
PLAYING MUSIC
Basic Music
Playback
To play audio, you can add audio selections from the NOMAD Jukebox 2's
Music Library to the player’s playing list as described in "Adding Music Tracks
from the Music Library to the Playing List" on page 3-14, then play back the
entire playing list.
Audio selections have been preloaded to the playing list to get you started
quickly.
Viewing the
playing list
Follow these steps to play the playing list .
1. Press the PLAY button
.
The Play icon
appears onscreen and the playing list is played back,
from the first track to the last.
2. Press the NOW PLAYING button
.
The upper-left corner of the screen will display the Playing List icon.
Playing
List
icon.
Audio
Selections
3-1
You can also display
the Playing Track
screen by pressing
the Scroller. A list
appears. Scroll
Select View Playing
Track.
Play Modes
3. Press the NOW PLAYING button again to display the Playing Track
screen, which shows the track that is being played back or the track that
has been selected. The upper-left corner of the screen will display the
Playing Track icon.
Playing
Track Icon
Album Title
Track Title
Elapsed
Time Bar
Your player has Play Modes that allow you to change how your playing list is
played back.
The following Play Modes are available:
❍ Repeat track
❍ Repeat all
❍ Shuffle
❍ Shuffle repeat
❍ Track once
❍ Normal
Play Modes are disabled by enabling Normal mode as described in "Normal
mode" on page 3-6.
3-2
Repeating music
If there is only one
track in the playing
list when "Repeat
All" is enabled, that
track will be
repeated
continuously.
You can choose to repeat a track or repeat the whole playing list.
1. Press the NOW PLAYING button
.
The Playing List screen appears.
2. Press the Scroller. A list appears.
3. Scroll Select Play Mode.
4. Depending on which mode you want, follow the corresponding step:
To repeat a track in the playing list
Scroll Select Repeat Track.
The Repeat Track icon
appears onscreen and the track is repeated
continuously until you stop it.
To repeat the whole playing list
Scroll Select Repeat All.
The Repeat All icon
appears onscreen and the playing list is
repeated continuously until you stop it.
3-3
Shuffling music
If there is only one
track in the playing
list when "Shuffle
Repeat" is enabled,
that track will be
repeated
continuously.
The Shuffle Play Mode can be used once (Shuffle) or continuously (Shuffle
Repeat).
1. Press the NOW PLAYING button
.
the Playing List screen appears.
2. Press the Scroller. A list appears.
3. Scroll Select Play Mode.
4. Depending on which mode you want, follow the corresponding step:
To Shuffle the playing list once
Scroll Select Shuffle.
The Shuffle icon
appears onscreen and a track is selected at
random and played back. The playing list stops playing once all the tracks
in the playing list are played back once.
To Shuffle Repeat the playing list continuously
Scroll Select Shuffle Repeat.
The Shuffle Repeat icon
appears onscreen and tracks are selected
at random and played back continuously until you stop playback.
3-4
Playing only one
track
When the playing list is played normally, each track in the playing list is played,
from the first track to the last. However, when Track Once Mode is enabled,
playback stops once the current track ends.
1. Press the NOW PLAYING button
The Playing Track screen appears.
.
2. Press the Scroller. A list appears.
3. Scroll Select Track Once. The Track Once icon
appears onscreen.
The playing list stops playback once the track ends.
Playing all tracks
in sequence
Once Normal mode is enabled, each track in the playing list is played, from the
first track to the last.
1. Press the NOW PLAYING button
.
The Playing List screen appears.
2. Press the Scroller. A list appears.
3. Scroll Select Play Mode.
4. Scroll Select Normal. The playing list plays back normally.
3-5
Track
Bookmarks
Bookmarking a track sets a playback point—you can jump to this point
whenever you play the bookmarked track. This is useful if, for example, you
want to bookmark an audio book.
1. Press the NOW PLAYING button
The Playing Track screen appears.
.
A track can only be
bookmarked once;
setting a new
bookmark will
automatically
remove any previous
bookmark in the
track.
2. Press the Scroller. A list appears.
3. Depending on which mode you want, follow the corresponding step:
To bookmark a track
Scroll Select Set Bookmark at the point where you want to set the
bookmark. A message box appears, telling you that the bookmark has
been set at the selected point.
To play the track from the bookmarked point
Scroll Select Go to Bookmark. The track plays from the bookmarked
point.
3-6
To remove a bookmark
Scroll Select Clear Bookmark. A message box appears, telling you that
the bookmark has been cleared.
3-7
ORGANIZING YOUR MUSIC
To effectively manage the music in your player, you should be familiar with the
Music Library, playing list and Playlists. These will be described extensively in
the following sections:
❍ "Using the Music Library" on page 3-9
❍ "Using the Playing List" on page 3-19
Music
Library
When audio tracks are transferred to your player, they are organized into the
following Music Library categories:
❍ Playlists
❍ Albums
❍ Artists
❍ Genres
❍ All Tracks
All transferred tracks can be found in the "All Tracks" category, but depending
on your PlayCenter settings, tracks can also be found in other categories. For
example, take a fictitious track called "Toffee Apple Smile", performed by "The
Nano Singers", from the soundtrack to the "The Big Sneeze" movie. Besides
"All Tracks", the "Toffee Apple Smile" song would also be found in the
"Soundtrack" genre, the "Songs from The Big Sneeze" album, and the "The
Nano Singers" artist category.
Tracks not belonging to any album, artist, or genre can only be found in the
“Unknown” category.
3-8
You can use the Music Library to:
❍ Add audio selections to the playing list
❍ Find tracks, playlists, albums, artists or genres
❍ View track information
❍ Delete tracks, playlists, albums, artists or genres
❍ Preview a track
Note: Modifying or renaming albums, artists, or genres, including renaming,
must be done in Creative PlayCenter. Only Playlists can be renamed in the
player.
Finding a music
track in the
Music Library
In the following example, we will show you how to find a track by navigating
through your Music Library. A quicker way of finding audio in your player is to
use the Find feature. Both ways of finding your music track are shown here.
To find a track in the Music Library
1. Press the MENU button
2. Scroll Select Music Library.
.
3-9
3. Scroll Select an audio category. For example, if you want to find a track in
a particular album, Scroll Select Album.
Note: If Scroll Selecting All Tracks, skip to Step 5.
4. Scroll Select the sub-category. For example, under Albums, Scroll Select
an album. A list appears.
5. Scroll Select Open. The tracks within the sub-category appear.
3-10
To find audio with the "Find" feature
1. Press the FIND button
2. The Find screen appears.
.
3. Scroll Select the audio category that you want to search. For example, if
you want to find a particular album, Scroll Select Find by Album and the
respective audio category screen, in this case the Albums screen,
appears with a list.
3-11
4. Scroll Select the letters on the list to form the name of the track, playlist,
album, artist or genre you want to find. The selected letters appear in the
box at the bottom of the screen. Also, each time an entry is made into the
box, the audio category you are in is searched, and the closest matching
result is displayed.
Note: When entering letters into the box, you can switch from upper to
lower case (or vice-versa) by simply Scroll Selecting the letter and holding
the Scroller until the letter changes to the case you want. You can also use
different character sets, such as accented characters or numerals, by
Scroll Selecting the Charset option on the list.
5. When you see the track, playlist, album, artist or genre you want, Scroll
Select the OK option to complete the search.
3-12
Adding music
tracks from the
Music Library to
the playing list
When a playlist is
added to the playing
list, only the
selections within
that playlist are
added. The playlist
itself is not added.
Audio selections from the Music Library can either be added sequentially after
selections already in the playing list (Add to Play) or placed at the front of the
playing list for immediate playback (Play Now).
1. Press the MENU button
.
2. Scroll Select Music Library.
3. Scroll Select an audio category. For example, if you want to add a track in a
particular album, Scroll Select Albums.
4. Scroll Select the sub-category. For example, under Albums, Scroll Select
an album. A list appears.
Note: If adding an entire album, artist, genre or playlist, skip to step 6.
3-13
5. Scroll Select Open. The tracks within the sub-category appear.
6. To add the audio selection to the back of the playing list, Scroll Select Add
to Play.
7. To add the selection to the front of the playing list and immediately play it
back, Scroll Select Play Now or press the Play button
.
Viewing track
information in
the Music Library
Detailed information about tracks in the Music Library is readily available. This
includes track title, the artist, album and genre that the track belongs to, as well
as track length.
To view information about tracks in the Music Library
1. Follow steps 1 through 5 in "To find a track in the Music Library" on page 310.
2. Scroll Select the track you want information on. A list appears.
3-14
3. Scroll Select Track Details. A message box appears, listing track
information.
Deleting music
tracks from the
Music Library
This action permanently deletes tracks, albums, artists, genres or playlists from
your NOMAD Jukebox 2.
To delete a track
1. Follow steps 1 through 5 in "To find a track in the Music Library" on page 310.
2. Scroll Select the track to delete. A list appears.
3-15
3. Scroll Select Delete Track. A confirmation box appears, asking you if you
want to delete the selected track.
You can also view
track information
from the playing list.
See "Viewing track
information in the
Playing List" on page
3-21
4. Scroll Select the check mark. The track is permanently deleted from your
player.
To delete an entire album, artist, genre or playlist
When a playlist is
deleted, the tracks,
albums, artists or
genres within the list
are not deleted; only
the list itself is
deleted.
1. Press the MENU button
2. Scroll Select Music Library.
.
3-16
3. Scroll Select an audio category. For example, if you want to delete a
particular album, Scroll Select Albums.
4. Scroll Select the sub-category. For example, under Albums, Scroll Select
the album you want to delete. A list appears.
5. Depending on what you are deleting, Scroll Select Delete Album, Delete
Artist, Delete Genre or Delete Playlist. A confirmation box appears,
asking you if you want to delete the selected album, artist, genre or
playlist.
6. Scroll Select the check mark. The album, artist, genre or playlist is
permanently deleted from your player.
3-17
Playing
List
You can do more than play audio selections in the playing list. You can:
❍ View audio in the playing list
❍ View information about tracks in the playing list
❍ Remove audio
❍ Rearrange the playing list
❍ Save the playing list as a playlist
Viewing music
tracks in the
playing list
When a playlist is added to the playing list, only the audio selections within that
playlist are added; the playlist itself is not added. However, when entire
albums, artists or genres are added to the playing list, the tracks within them
are hidden (or "collapsed"). To see these tracks, you must "Expand" the album,
artist or genre.
Similarly, to hide these tracks, you should "Collapse" the album, artist or genre.
This can be useful in reducing screen clutter.
To expand an album, artist or genre
1. Press the NOW PLAYING button
The Playing List screen appears.
.
3-18
2. Scroll Select the album, artist or genre to expand. A list appears.
3. Scroll Select Expand. The tracks in the selection appear beneath the
album, artist or genre.
To collapse an album, artist or genre
1. Press the NOW PLAYING button
The Playing List screen appears.
.
2. Scroll Select the expanded album, artist or genre. A list appears.
3. Scroll Select Collapse. Tracks within the formerly expanded album, artist
or genre are hidden.
3-19
Viewing track
information in
the playing list
Information about tracks in the playing list can be easily accessed and viewed.
The information provided is identical to that described in "To view information
about tracks in the Music Library" on page 3-15.
1. Press the NOW PLAYING button
.
Track information can be viewed in either the Playing List or Playing
Track screen.
2. In the Playing List screen, Scroll Select the track that you want to view
information about.
In the Playing Track screen, press the Scroller.
In either case, a list appears.
3. Scroll Select Track Details. A message box appears, listing track
information.
3-20
Removing music
tracks from the
Playing List
When tracks, albums, artists or genres are removed from your player’s playing
list, they are only removed from the playing list—audio still remains in the Music
Library. To delete audio completely, tracks, albums, artists or genres must be
deleted from the Music Library as shown in "Deleting Music Tracks from the
Music Library" on page 3-16.
1. Press the NOW PLAYING button
The Playing List screen appears.
.
2. Scroll Select the track, album, artist or genre to remove from the playing
list. A list appears.
3. Depending on whether you want to remove a track or remove all audio from
the playing list, follow the corresponding step:
3-21
To remove a track, album, artist or genre from the playing list
Scroll Select Remove. A confirmation box appears. The track, album,
artist or genre is removed from the playing list.
To remove all audio from the playing list
Scroll Select Remove All. A confirmation box appears, asking you if you
want to remove all tracks in the playing list.
Scroll Select the check mark. All audio selections are removed from the
playing list.
3-22
Rearranging the
playing list
If you prefer to hear, for example, a particular album before another in the
playing list, you can rearrange the album as well as any other artist, genre or
individual track in the playing list.
1. Press the NOW PLAYING button
The Playing List screen appears.
.
2. Scroll Select the album, artist, genre or individual track to move. A list
appears.
3. Scroll Select Collapse.
4. Press the Scroller.
3-23
5. Scroll Select Change Order. An icon appears next to the selected album,
artist, genre or individual track.
When you remove
audio tracks from the
playing list you are
not permanently
deleting the
selections from your
player.
6. Using the Scroller, move the album, artist, genre or individual track to the
preferred position in the playing list.
7. Press the Scroller to set the position you have selected.
3-24
Saving the
playing list as a
playlist
If you like the contents and arrangement of your current playing list, you can
choose to save it as a playlist for retrieval and playback later.
1. Press the NOW PLAYING button
The Playing List screen appears.
.
2. Press the Scroller. A list appears.
3. Scroll Select Save as Playlist. A list appears.
3-25
4. Scroll Select the letters on the list to form a name for your playlist. This
name appears in the box at the bottom of the screen.
Note: When entering letters into the box, you can switch from upper to
lower case (or vice-versa) by simply Scroll Selecting the letter and holding
the Scroller until the letter changes to the case you want. You can also use
different character sets, such as accented characters or numerals, by
Scroll Selecting the Charset option on the list.
5. Scroll Select the OK option to save the playlist with the name you have
entered.
3-26
Music
Enhancement
Using EAX
General information
about EAX is
available at
www.NOMADworld.
com.
Your player allows you to enhance your listening experience with EAX
technologies formerly available only with Creative's Sound Blaster Live! and
Audigy audio cards. EAX technologies (or "Settings") available in your player
include:
❍ Smart Volume Management (SVM), which intelligently controls the
dynamic range of audio, providing a superior audio experience in difficult
listening environments such as in a plane or car.
❍ Time Scaling, which allows you to speed up or slow down audio without
changing pitch or distorting sound quality. Select from 0.50x, 0.75x, 1.00x,
1.25x or 1.50x.
❍ Environment, a collection of presets that allows you to experience audio in
the virtual environment of your choice. Consists of Auditorium, Bath Room,
Cathedral, Concert Hall, Garage, Indoor Arena, Jazz Club, Living Room,
Opera House, Small Room and Theater.
❍ Advanced EQ, a collection of equalizer settings which can enhance audio
of a particular genre. Consists of Custom EQ, Acoustic, Classical, Disco,
Jazz, New Age, Pop, Rock and Vocal. Scroll Select Custom EQ to set it
from +12 dB (maximum) to -12 dB (minimum).
❍ Spatialization, which enhances your audio soundstage, useful if, for
example, you are listening to audio with headphones.
To use EAX with your currently playing audio:
1. Select an EAX setting.
2. Select a preset, rate or mode to use with the selected EAX setting.
3. Turn on EAX.
3-27
This simple process is described in the following instructions.
1. Press the EAX button
.
2. Depending on whether you want to turn on EAX, select an EAX setting or
preset, rate or mode you want to use with your EAX setting, follow the
corresponding step:
To turn on EAX:
Scroll Select EAX:On. The EAX active icon
applied immediately to the audio being played.
appears onscreen and is
To select an EAX setting
Scroll Select Setting:X (where X represents the EAX setting currently
selected). A list appears.
Scroll Select the EAX setting you want.
To select a preset setting for use with your EAX setting
Scroll Select Preset:X (where X represents the preset setting currently
selected). A list appears.
Scroll Select the preset, rate or mode you want to use with your EAX
setting.
3-28
4
Software Applications
ABOUT PLAYCENTER AND FILE MANAGER
Creative PlayCenter, Creative File Manager, and other useful software, are
included on your installation CD (see "installing software" on page 2-3).
Creative PlayCenter is the best way to organize and transfer audio to and from
your player. This chapter includes basic instructions on using PlayCenter to rip
audio CDs, transfer tracks by manual selection or with AudioSync, edit track
information as well as to create and edit playlists.
Creative File Manager is a dedicated data file manager for storing and
organizing Net downloads, videos, images or any sort of data file on your
player. This chapter includes basic instructions on using File Manager to
transfer data files.
Software Applications 4-1
USING PLAYCENTER
Only basic instructions on how to use PlayCenter with your player are provided
in this chapter— extensive instructions are found in the PlayCenter Help file.
An overview of the PlayCenter interface is provided below:
After PlayCenter is
installed, it stores all
transferred or ripped
audio tracks into a
default folder. You can
change the location of
this folder or default
folder name in
PlayCenter settings.
See the PlayCenter’s
Help file for details.
Media Bar
Main Window
AudioSync
Button
Transfer Window
Toolbar
To import existing
audio tracks in your PC
to the PC Music Library,
click the PC MUSIC
LIBRARY button in
PlayCenter's Main
Window, then click
"Auto Scan" on the
Toolbar.
Audio Playback
Buttons
Volume Slider
Transfer Buttons
Transfer Queue Bar
Software Applications 4-2
Ripping tracks
from an audio
CD
Rather than manually
entering track
information, retrieve
such audio CD
information from CDDB
before ripping tracks.
1. Insert an audio CD into your CD-ROM drive.
2. If the CD starts playing, click the STOP button. You cannot rip tracks while
the CD is playing.
3. In PlayCenter’s Main window, click the AUDIO CD button.
4. Click the check boxes next to the tracks you want to rip, to select them.
5. To rip to your hard disk, click either the MY COMPUTER or PC MUSIC
LIBRARY buttons in the Transfer window. Note that you can configure the
default location for storing ripped tracks in PlayCenter Settings.
6. To rip directly to your player, click the NOMAD JUKEBOX button in the
Transfer window.
7. Click the RIP TO button. The Current Transfer Queue dialog box appears
and the Transfer Queue bar shows the ripping progress.
8. To preview the song that you have just ripped in PlayCenter, click the song
title and then click the Preview button on the Toolbar.
Change the default
ripping format and
bitrate for higher or
lower quality audio.
Software Applications 4-3
Transferring
tracks
Transfer tracks to and from you player by manually selecting the tracks for
transfer or by using PlayCenter's AudioSync feature.
AudioSync is a fast and simple method for synchronizing the music libraries in
your PC and NOMAD Jukebox. To customize music library synchronization,
simply select the desired transfer modes and transfer options in PlayCenter
Settings.
Your player must be properly connected to your computer before transferring
tracks, as described in "installing software" on page 2-3.
Synchronizing
tracks in your
music libraries
1. In the Main window, click the NOMAD JUKEBOX button.
2. On the Toolbar, click the AudioSync button.
3. PlayCenter starts the AudioSync operation. A dialog box appears, showing
you the default transfer mode and track comparison information.
The information in the dialog box may take a while to appear, depending
on the number of tracks being analyzed. When the comparison is
complete, a summary of tracks and playlists that can be transferred for
both music libraries is shown.
4. Click the Continue button to proceed with the AudioSync operation or wait
until the dialog box disappears.
5. If you have not configured AudioSync to "Automatically transfer tracks after
track comparison", you can click the CANCEL button to cancel the
AudioSync operation.
6. If the music library to be updated has sufficient space for additional tracks,
the Current Transfer Queue dialog box appears and the Transfer Queue
bar shows the transferring progress.
Software Applications 4-4
7. The Transfer Queue dialog box disappears when the transfer is complete.
If the music library to be updated does not have enough space, a dialog
box appears asking you to select a transfer option or to reduce the size of
tracks to be transferred.
8. Click the tracks from selected genres or artists only or tracks from
selected playlists only option to select it.
9. Click the OK button.
10. If you want to transfer tracks from selected genres or artists only, click
either Genre or Artist in the Genre/Artist Selection List.
11. In the list that appears, select the required genres or artists to transfer. The
list may take a while to appear.
12. Select the required genres or artists so that the size of the "Tracks to be
transferred" does not exceed the "Space Available".
13. If you chose to transfer tracks from selected playlists only, select the
required playlists so that the size of the Tracks to be transferred does not
exceed the Space Available.
14. Click the OK button to start the transfer. The Transfer Queue dialog box
disappears when the transfer is complete.
Software Applications 4-5
Transferring
specific tracks
from your
computer to your
player and back
1.
2.
3.
4.
Turn on your player.
In the Transfer window, click the NOMAD JUKEBOX button.
In the Main window, click the PC MUSIC LIBRARY button.
Depending on whether you want to transfer tracks from your PC to your
player or from your player to your PC, follow the corresponding steps:
To transfer specific tracks from your PC to your player
Owing to copyright
limitations, preloaded
tracks in your player
cannot be transferred
to your PC.
1. Locate the folder where your tracks are stored.
2. Select the tracks you want to transfer to your player (use the Previous
button if necessary).
3. Click the lower TRANSFER button. The Current Transfer Queue dialog
box appears and the Transfer Queue bar shows the transferring progress.
The Transfer Queue dialog box disappears when the transfer is complete.
4. To use your player after the transfer, disconnect your player from the
computer.
To transfer specific tracks from your player to your PC
1. Locate the folder or album for storing the tracks.
2. Click the upper TRANSFER button. The Current Transfer Queue dialog
box appears and the Transfer Queue bar shows the transferring progress.
The Transfer Queue dialog box disappears when the transfer is complete.
3. To use your player after the transfer, disconnect your player from the
computer.
Software Applications 4-6
Editing audio
track
information
This function can be useful if, for example, you want to change the name of a
track, album, artist or genre in your player.
1. In the Main window, click the NOMAD JUKEBOX button. Your player’s
Music Library appears.
2. Locate and select the track or tracks you want to edit in your player.
3. On the Toolbar, click the Properties button (use the right arrow button if
necessary).
4. Under the Values column, double-click the property to edit, for example,
Album, Artist or Genre.
5. When complete, click the OK button.
Creating and
editing playlists
with
PlayCenter
Playlists can be created in your player, as described in "Saving the playing list
as a playlist" on page 3-25. They can also be created in PlayCenter. Extensive
editing options, such as adding or deleting tracks, are also available with
PlayCenter.
Creating a
playlist
1. In the Main window, click the NOMAD JUKEBOX button. Your player’s
Music Library appears.
2. Click the MEDIA BAR button, and then click Playlists.
3. On the Toolbar, click the New button.
4. Type the name of your new playlist, and then press the <Enter> key.
5. Click the MEDIA BAR, and select a category, for example, All Tracks or By
Album.
6. Select the album, genre or tracks you want to add to the playlist.
Software Applications 4-7
7. Right-click the selected album, genre or tracks, and then click Add to
Playlist. The Add tracks to playlist dialog box appears.
8. Select the playlist to add the tracks to, and then click the OK button.
Adding tracks to
a playlist
Follow steps 5 through 8 in "Creating a playlist" above.
Removing tracks
from a playlist
1.
2.
3.
4.
5.
Changing the
playback order in
a playlist
1.
2.
3.
4.
Deleting a
playlist
1. In the Main window, click the NOMAD JUKEBOX button.
2. Click the MEDIA BAR, and then click Playlists.
3. Click the playlist to delete.
In the Main or Transfer window, click the NOMAD JUKEBOX button.
Click the MEDIA BAR, and then click Playlists.
Double-click the playlist from which you want to delete tracks.
Select the tracks to delete.
On the Toolbar, click the Delete button (use the right arrow button if
necessary). The Delete PC Music Library Tracks? dialog box appears.
6. Click the OK button.
In the Main or Transfer window, click the NOMAD JUKEBOX button.
Click the MEDIA BAR, and then click Playlists.
Double-click the playlist for which you want to change the play order.
Click the track, and then click the Shift up or Shift down buttons on the
Toolbar (use the right arrow button if necessary).
Software Applications 4-8
4. On the Toolbar, click the Delete button (use the right arrow button if
necessary). The Delete PC Music Library Tracks? dialog box appears.
5. Click the OK button.
To view nonEnglish track
information
Before transferring non-English audio tracks from your PC to player as
described in "Transferring specific tracks from your computer to your player and
back" on page 4-6, do the following:
1. In the Transfer window, click the NOMAD JUKEBOX button.
2. Click the Settings button.
3. Click the Jukebox tab.
4. Click the Language box.
5. From the list that appears, click a language appropriate for the non-English
audio tracks you are transferring.
6. Click the Apply button.
7. Click the OK button.
8. Transfer the non-English audio tracks to your player.
9. Select the approriate Menu language in your player as described in "Using
Menu Language" on page D-3. For example, select "Japanese" as the
Menu language if the transferred audio tracks are in Japanese.
Note: Selecting a Menu language incompatible with your audio tracks may
result in illegible track information if these tracks are transferred back to
your PC.
Software Applications 4-9
USING FILE MANAGER
Instructions on how to use File Manager are in the File Manager Help file—only
basic instructions are provided here. An overview of the File Manager interface
is provided below:
Left Pane
Menus
Shortcut
Buttons
Right Pane
The Creative File
Manager application
can be copied to a
single floppy disk,
allowing you to install
the application onto
another PC.
Software Applications 4-10
Transferring
data files
Data files can be transferred to and from your player by either using the "copyand-paste" or "drag-and-drop" functions. Audio tracks in MP3, WAV or WMA
file formats will be stored as data files when they are transferred from your
computer they cannot be played by your player.
Transferring a
data file by
copying-andpasting
1. On the left pane, locate and click the drive that contains the file you want to
copy.
2. On the right pane, click the file.
3. Click the Copy button.
4. On the left pane, locate and open the folder or disk where you want to put
the copy.
5. Click the Paste button.
Transferring a
data file by
dragging-anddropping
1. Click and drag the file that you want to copy to the destination folder.
2. Release the mouse button.
The selected file or folder is copied to the destination drive.
Software Applications 4-11
A
Technical Specifications
TECHNICAL SPECIFICATIONS
Size
❑
4.84" (W) x 5.12" (H) x 1.26" (D) or 123 mm x 130 mm x 32 mm
Weight
❑
8.8 oz or 249.6 gms (without the battery)
Memory
❑
8/16 MB SDRAM buffer (depending on your player model)
Capacity
❑
10/20/30 GB hard drive (depending on your player model)
Battery type
❑
Removable Li-ion battery
Battery Life
(playback time)*
❑
Up to 16 hours of continuous play back from fully charged Lithium-Ion
batteries. The following may reduce the playback time:
• playback of tracks encoded at bitrates higher than 128 Kbps
• use of EAX effects or environments
• skipping, fast forward or reverse during playback
• using passive speakers or high-power headphones
• long backlight timeout setting (more than 10 seconds)
Interface
❑
❑
USB 1.1
USB 2.0
Playback
Formats**
❑
❑
MP3 (at 8, 11.025, 12, 16, 22.05, 24, 32 and 44.1 kHz)
WMA (at 16, 22.05, 24, 32 and 44.1 kHz)
* Battery life estimated for playback of tracks encoded at 128 Kbps.
** Audio codec support, firmware upgrades, and SDMI compliance are available from www.NOMADworld.com
Technical Specifications A-1
Signal to Noise
Ratio
❑
Up to 98 dB (Headphones)
Channel
Separation
❑
Up to 74 dB (Headphones)
THD
❑
<0.1%
Frequency
Response
❑
20 Hz~20000 Hz
Harmonic
Distortion
❑
<0.1%
Operating
System/Firmware
❑
Upgradable via Internet
Headphone Out
❑
1/8" stereo minijack, 100 mW (Wide, Narrow, Front only)
LCD Display
❑
Large 132 x 64 pixels, Green LED
Data Connector
❑
❑
USB 1.1
USB 2.0
EAX
❑
❑
❑
❑
❑
Environment effects
Parametric equalization
Headphone spatialization
4-channel surround and playback speed
Smart Volume Management
Technical Specifications A-2
Playback Speed
❑
Up to 1.5 times faster or 0.5 times slower for audio book content, WMA and
MP3 audio playback
Audio Codec
Support***
❑
Upgradable
***Audio codec support, firmware upgrades, and SDMI compliance are available from www.NOMADworld.com
Technical Specifications A-3
B
Onscreen Diagram and Icon
Guide
ONSCREEN DIAGRAMS
Diagram
Action / Meaning
❍
your computer is transferring files to
your player or vice versa. To use your
player, disconnect it from your
computer.
❍
your computer is transferring files to
your player or vice versa. To use your
player, disconnect it from your
computer.
❍
you are upgrading your player’s
firmware.
❍
the firmware upgrade is complete.
Reset your player to enable the new
firmware to take effect.
Onscreen Diagram and Icon Guide B-1
PLAYBACK ICONS
Icon
The following icons
appear onscreen when
the associated
playback action is
used.
Action / Meaning
❍
Play
❍
Pause
❍
Forward
❍
Reverse
❍
Skip forward
❍
Skip back
Onscreen Diagram and Icon Guide B-2
PLAYING LIST ICONS
Icon
The following icons are
commonly found in the
Playing List screen.
Action / Meaning
❍
Album
❍
Artist
❍
Genre
❍
Track
❍
Track within audio
category
❍
Audio selected for
playback or which
is currently playing
back
Onscreen Diagram and Icon Guide B-3
PLAY MODE ICONS
Icon
The following icons
appear onscreen when
the respective audio
enhancements are
active.
Action / Meaning
❍
Repeat Track
❍
Repeat All
❍
Shuffle
❍
Shuffle Repeat
❍
Track Once
Onscreen Diagram and Icon Guide B-4
NAVIGATIONAL ICONS
Icon
The following icons
appear onscreen when
you are in the
associated firmware
section.
Action / Meaning
❍
Menu
❍
Playing List
❍
Playing Track
❍
Music Library
❍
Playlists category
❍
All Tracks
category
❍
Albums category
Onscreen Diagram and Icon Guide B-5
Icon
The following icons
appear onscreen when
you are in the
associated firmware
section.
Action / Meaning
❍
Artists category
❍
Genre category
❍
EAX
❍
Find
❍
Jukebox Setting
❍
Jukebox
Information
❍
Personalization
Onscreen Diagram and Icon Guide B-6
C
Frequently Asked Questions and
Error Diagrams
FAQS AND TROUBLESHOOTING
In this section, we cover common problems you might encounter or questions
you might have while using your NOMAD Jukebox 2.
We have divided the Frequently Asked Questions (FAQs) into a few categories
for your easy reference.
AutoPlay
What do I do when installation does not start automatically after the
Installation CD is inserted?
The AutoPlay feature in your Windows system may not be enabled.
1. Click Start" -> Settings -> Control Panel.
2. Double-click the System icon. The System Properties dialog box
appears.
3. Click the Device Manager tab.
4. Click the arrow button next to CDROM.
5. From the list that appears, right-click your CD-ROM drive, and then click
Properties.
6. Click the Settings tab and click Auto Insert Notification check box to
select it.
7. Click the OK button.
Frequently Asked Questions and Error Diagrams C-1
Features
If I make a bookmark in a track, will the track play back from the
bookmarked point?
No, you have to manually Scroll Select Go to bookmark. For more
information, refer to "To play the track from the bookmarked point" on page 3-6.
If the Playing List already has a few albums in it, can I repeat playback of
just one album?
Unfortunately, no. You can only choose to repeat one track, or all tracks.
Why does my player show me track titles starting with "B" when I’m
looking for a track title starting with "A"?
When you look for a track using the FIND feature, your player looks for the
closest match. If you do not have any tracks starting with "A", the closest match
can be the one that begins with "B".
General
Where can I get official information on all Jukebox products?
Visit NOMADworld for updates and downloads relating to all Jukebox products,
Creative’s MP3 players and accessories.
Visit www.NOMADworld.com.
My player seems to have frozen. Is there anything I can do?
You can reset your player. Insert the end of a straightened paper clip into the
Reset button located at the back of your player.
Frequently Asked Questions and Error Diagrams C-2
Windows XP tells me that the software for the player is not certified. What
do I do?
At the time of this product's release, Microsoft strongly encouraged companies
to submit their hardware solutions for certification. If a hardware device driver
is not submitted, or does not qualify, for Microsoft certification, a warning
message similar to the one below appears.
You may see this message when installing this driver or update. If you do, you
may choose to click the Continue Anyway button. Creative has tested this
driver or update on Windows XP, and it does not impair or destabilize your
computer.
If you need more XP-related information, go to the product web site's Help or
speak with Creative Technical Support staff.
Frequently Asked Questions and Error Diagrams C-3
How can I get accessories for my Jukebox?
Visit www.NOMADworld.com for the latest news on accessories.
Maintenance
Do I need to defragment the player’s hard disk?
No, you will not need to defragment, format or clean up the hard disk at all. The
player’s unique file system ensures that you will not have to worry about hard
disk maintenance.
Usage
Can I jog with my NOMAD Jukebox 2?
You should not subject your player to continuous shocks, such as those that
are likely to occur while you jog or run. You can take a nice long walk with your
player, though.
Can I use the NOMAD Jukebox 2 for portable data storage?
Yes, this is a great storage device. Your player, however, is designed for
storing and playing audio, not as an extra hard drive. You can use the USB
cable for speedy transfers to and from your player. Your player will not be
recognized as a drive, nor does it support directories. Use the File Manager
application to help you manage data files.
Frequently Asked Questions and Error Diagrams C-4
I have to recharge the battery quite often. Is there anything I can do to
make it last longer?
Generally, any operation requiring the player to access the hard disk uses
battery power. Consequently, filling your player to capacity is not
recommended. However, some operations consume more battery power:
❍ a long backlight timeout setting. A shorter timeout conserves battery power.
❍ a high contrast setting. Position the player so that you can read the display
wihout using a high contrast setting.
❍ too much use of fast forward/reverse.
❍ turning the player on/off too many times.
❍ use of EAX effects or environments.
❍ use of passive speakers or high-powered headphones.
Proper charging and handling of the battery can also help in prolonging battery
life and charge. See "caring for your battery" on page xii.
Should I leave my player, when it is fully charged, plugged into the DC
power adapter?
For typical daily usage, you may leave it plugged into the DC power adapter. It
is recommended, however, that if you do not intend to use it for a long time
period, you should disconnect it from the DC power adapter and remove the
batteries from your player.
Frequently Asked Questions and Error Diagrams C-5
If I damage or lose my DC adapter, can I buy a similar, off-the-shelf
adapter?
No. The adapter may not be compatible with your player, and may even
damage it. You should get a replacement adapter from Creative at
www.NOMADworld.com, or your local Creative office/distributor.
Frequently Asked Questions and Error Diagrams C-6
ERROR DIAGRAMS
If an error occurs, you may see any one of the following diagrams, indicating
the general nature of the problem.
Diagram
Likely Causes
❍
❍
❍
❍
unexpected power
loss while saving
settings
physical defects
numerous highimpact shocks
battery is depleted,
player cannot start
up
Suggested Action
❍
download a newer
firmware version
reload firmware
❍
call Technical Support
❍
recharge the battery
use DC power
❍
❍
Frequently Asked Questions and Error Diagrams C-7
Diagram
Likely Causes
❍
firmware corruption
❍
unexpected power
loss during audio file
transfer
Suggested Action
❍
see actions for
Firmware Problems
❍
allow firmware to
complete the rebuilding
of the library
Frequently Asked Questions and Error Diagrams C-8
D
User Preferences
SETTING USER PREFERENCES
Your player offers many configuration options. You can
❍ personalize your player
❍ specify power settings
❍ select the default language
❍ reset your player
❍ lock and unlock your player’s buttons
❍ access the information screen
Player
personalization
To construct a name,
Scroll Select letters
and numbers until the
name is formed. Each
letter and number
selected is entered into
the entry area.
In this screen, you can personalize your player by setting the owner’s name,
specify the default start screen or return to the previous screen.
1. From the Jukebox Settings screen, Scroll Select Personalization.
2. Scroll Select one of the options.
3. From the menu, Scroll Select a setting or construct a name.
User Preferences D-1
Power Settings
In this screen, you can adjust the screen backlight duration. A lower number
setting conserves battery power for longer playback time. You can also set the
contrast level for your player’s screen (the lower the number, the lower the
contrast) or specify how long the player remains inactive before it automatically
shuts down.
1. From the Jukebox Settings screen, Scroll Select Power Settings.
2. Scroll Select one of the options.
3. From the menu, Scroll Select a setting.
User Preferences D-2
Language
Settings
You can change the default language used on your player’s screens and input
boxes.
Using Menu
Language
This option controls the language in which your player’s menus are displayed.
1. From the Jukebox Settings screen, Scroll Select Menu under Language.
2. From the menu, Scroll Select a language.
Selecting the ’English
Int’l’ option allows
you to view nonEnglish characters as
well as English text.
Using Input
Language
This option controls the language in which you input letters or characters in
input boxes, for example, when you search for a track or rename a playlist.
1. From the Jukebox Settings screen, Scroll Select Input under Language.
2. From the menu, Scroll Select a language.
Player Reset
If your player stops responding, reset the player. This
should not cause you to lose any data or audio tracks,
unless you were in the middle of recording or
transferring an audio track. You can check for the
audio track in your music library later. See "Music
Library" on page 3-8.
To reset the player: Insert the end of a thin object
(like a straightened paperclip) into the Reset button.
User Preferences D-3
Player Lock
Locking your NOMAD Jukebox 2 will disable all buttons on the player except
for the Scroller. This feature is useful when you don’t want any buttons, like
STOP, pressed accidentally.
If you press a button while the player is locked, a popup window appears for
you to unlock the player. This popup disappears if you don’t use the Scroller to
make a selection within a few seconds.
Locking your
player
1. Press the MENU button.
2. Scroll Select Button Lock.
3. The player is locked.
You can also lock
your player by
pressing the Power
button. Scroll Select
the check mark. The
player is locked.
Unlocking your
player
1. Press any button. A popup window appears.
2. Scroll Select the check mark. The player is unlocked.
User Preferences D-4
Information
Screen
The Jukebox Information screen shows you the player’s firmware version for
firmware upgrades, the total amount of space in your player for storing music or
data, the available space in your player for storing music or data, the number of
tracks stored in your player, the number of albums stored in your player and the
number of playlists stored in your player
To see this screen:
1. Press the MENU button.
2. Scroll Select Jukebox Settings.
3. Scroll Select Jukebox Information.
User Preferences D-5