1
How to use this manual
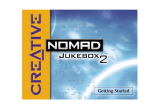
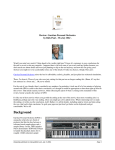
NOMAD Jukebox 3
Information in this document is subject to change without notice and does not represent a commitment on the part of
Creative Technology Ltd. No part of this manual may be reproduced or transmitted in any form or by any means, electronic or
mechanical, including photocopying and recording, for any purpose without the written permission of Creative Technology
Ltd. The software described in this document is furnished under a license agreement and may be used or copied only in
accordance with the terms of the license agreement. It is against the law to copy the software on any other medium except
as specifically allowed in the license agreement. The licensee may make one copy of the software for backup purposes only.
The Software License Agreement is found in a separate folder on the installation CD. The copyright and disclaimer, including
trademark issues are also found in the same folder.
Important: This PDF file has been designed to provide you with complete product knowledge. The
following are instructions on how to make use of this PDF file effectively by launching applications and help
files, as well as accessing relevant web sites, where applicable, via specially prepared links.
•
To launch applications, Help files or to access relevant web sites, click the blue text, or whenever the
•
or
symbol appears on the object or text.
For best viewing, this PDF is set by default to "Fit Width" so that the contents of each page is visible.
If the text is not clear enough, press “Ctrl” and “+” to zoom in or “Ctrl” and “-” to zoom out. To view
full screen, press “Ctrl” and “L”.
Note: To access the bundled applications and Help files, you must first install the manual and the
applications in your computer. Otherwise, you will receive error messages. When you click a link to launch a
program, a dialog box may appear to inform you that Adobe Acrobat Reader is going to launch the
application. Click the “All” button to run subsequent applications without the message appearing again. To
access linked web sites, your computer must be connected to the Internet.
Contents
Contents
Introduction
Creative NOMAD Jukebox 3 . . . . . . . . . . . . . . . . . . . . . . . . . . . . . . . . . . . . . . . . . . i
Supplied Software . . . . . . . . . . . . . . . . . . . . . . . . . . . . . . . . . . . . . . . . . . . . . . . i
Interactive Tutorial . . . . . . . . . . . . . . . . . . . . . . . . . . . . . . . . . . . . . . . . . . . . . iii
Terminology . . . . . . . . . . . . . . . . . . . . . . . . . . . . . . . . . . . . . . . . . . . . . . . . . . iii
System Requirements . . . . . . . . . . . . . . . . . . . . . . . . . . . . . . . . . . . . . . . . . . . iii
Using this document . . . . . . . . . . . . . . . . . . . . . . . . . . . . . . . . . . . . . . . . . . . . . . . . iv
Handling the player . . . . . . . . . . . . . . . . . . . . . . . . . . . . . . . . . . . . . . . . . . . . . . . . v
Handling the Battery . . . . . . . . . . . . . . . . . . . . . . . . . . . . . . . . . . . . . . . . . . . . . . . . vi
Website Information . . . . . . . . . . . . . . . . . . . . . . . . . . . . . . . . . . . . . . . . . . . . . . . vii
1 About NOMAD Jukebox 3
External views . . . . . . . . . . . . . . . . . . . . . . . . . . . . . . . . . . . . . . . . . . . . . . . . . . . 1-1
Top view . . . . . . . . . . . . . . . . . . . . . . . . . . . . . . . . . . . . . . . . . . . . . . . . . . . 1-1
Side views . . . . . . . . . . . . . . . . . . . . . . . . . . . . . . . . . . . . . . . . . . . . . . . . . . 1-2
Back view . . . . . . . . . . . . . . . . . . . . . . . . . . . . . . . . . . . . . . . . . . . . . . . . . . . 1-2
Bottom view . . . . . . . . . . . . . . . . . . . . . . . . . . . . . . . . . . . . . . . . . . . . . . . . 1-3
Player Buttons . . . . . . . . . . . . . . . . . . . . . . . . . . . . . . . . . . . . . . . . . . . . . . . . . . . 1-4
NOMAD Jukebox 3 Connectors . . . . . . . . . . . . . . . . . . . . . . . . . . . . . . . . . . . . 1-7
Using the Scroller . . . . . . . . . . . . . . . . . . . . . . . . . . . . . . . . . . . . . . . . . . . . . . . . 1-9
Selecting menu options . . . . . . . . . . . . . . . . . . . . . . . . . . . . . . . . . . . . . . . . 1-9
Selecting list and confirmation box options . . . . . . . . . . . . . . . . . . . . . . . 1-10
Player Accessories . . . . . . . . . . . . . . . . . . . . . . . . . . . . . . . . . . . . . . . . . . . . . . 1-11
i
2 Setting Up Your Player
Inserting the battery . . . . . . . . . . . . . . . . . . . . . . . . . . . . . . . . . . . . . . . . . . . . . . 2-1
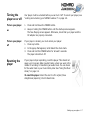
Powering your player . . . . . . . . . . . . . . . . . . . . . . . . . . . . . . . . . . . . . . . . . . . . . 2-2
Charging the battery . . . . . . . . . . . . . . . . . . . . . . . . . . . . . . . . . . . . . . . . . . . . . . 2-3
How to charge the battery . . . . . . . . . . . . . . . . . . . . . . . . . . . . . . . . . . . . . 2-3
Battery charge status . . . . . . . . . . . . . . . . . . . . . . . . . . . . . . . . . . . . . . . . . . 2-3
Installing Software . . . . . . . . . . . . . . . . . . . . . . . . . . . . . . . . . . . . . . . . . . . . . . . . 2-5
Connecting your player . . . . . . . . . . . . . . . . . . . . . . . . . . . . . . . . . . . . . . . . . . . 2-6
Interactive Tutorial . . . . . . . . . . . . . . . . . . . . . . . . . . . . . . . . . . . . . . . . . . . 2-6
Turning the player on or off . . . . . . . . . . . . . . . . . . . . . . . . . . . . . . . . . . . . . . . . 2-7
To turn your player on . . . . . . . . . . . . . . . . . . . . . . . . . . . . . . . . . . . . . . . . 2-7
To turn your player off . . . . . . . . . . . . . . . . . . . . . . . . . . . . . . . . . . . . . . . . 2-7
Resetting the player . . . . . . . . . . . . . . . . . . . . . . . . . . . . . . . . . . . . . . . . . . . . . . . 2-7
Locking and unlocking your NOMAD Jukebox 3 . . . . . . . . . . . . . . . . . . . . . . . . 2-8
To lock the player . . . . . . . . . . . . . . . . . . . . . . . . . . . . . . . . . . . . . . . . . . . . 2-8
To unlock the player . . . . . . . . . . . . . . . . . . . . . . . . . . . . . . . . . . . . . . . . . . 2-8
Changing the faceplate . . . . . . . . . . . . . . . . . . . . . . . . . . . . . . . . . . . . . . . . . . . . . 2-9
Checking Jukebox information . . . . . . . . . . . . . . . . . . . . . . . . . . . . . . . . . . . . . 2-10
Configuring your player . . . . . . . . . . . . . . . . . . . . . . . . . . . . . . . . . . . . . . . . . . . 2-10
Personalization . . . . . . . . . . . . . . . . . . . . . . . . . . . . . . . . . . . . . . . . . . . . . 2-11
Power Settings . . . . . . . . . . . . . . . . . . . . . . . . . . . . . . . . . . . . . . . . . . . . . . 2-11
Language . . . . . . . . . . . . . . . . . . . . . . . . . . . . . . . . . . . . . . . . . . . . . . . . . . . 2-12
Testing your player . . . . . . . . . . . . . . . . . . . . . . . . . . . . . . . . . . . . . . . . . . . . . . 2-13
3 Using Your Player
Playing Audio . . . . . . . . . . . . . . . . . . . . . . . . . . . . . . . . . . . . . . . . . . . . . . . . . . . . 3-2
Basic audio playback . . . . . . . . . . . . . . . . . . . . . . . . . . . . . . . . . . . . . . . . . . . 3-2
ii
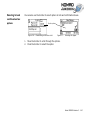
Managing Audio . . . . . . . . . . . . . . . . . . . . . . . . . . . . . . . . . . . . . . . . . . . . . . . . . . 3-4
Using the Music Library . . . . . . . . . . . . . . . . . . . . . . . . . . . . . . . . . . . . . . . 3-4
Using the Playing List . . . . . . . . . . . . . . . . . . . . . . . . . . . . . . . . . . . . . . . . . 3-10
Using Playlists . . . . . . . . . . . . . . . . . . . . . . . . . . . . . . . . . . . . . . . . . . . . . . 3-16
Enhancing Audio . . . . . . . . . . . . . . . . . . . . . . . . . . . . . . . . . . . . . . . . . . . . . . . . 3-17
Using Play Modes . . . . . . . . . . . . . . . . . . . . . . . . . . . . . . . . . . . . . . . . . . . 3-17
Using EAX . . . . . . . . . . . . . . . . . . . . . . . . . . . . . . . . . . . . . . . . . . . . . . . . . 3-22
Recording Audio . . . . . . . . . . . . . . . . . . . . . . . . . . . . . . . . . . . . . . . . . . . . . . . . 3-23
Wired Remote microphone recording . . . . . . . . . . . . . . . . . . . . . . . . . . . 3-24
Analog line-in recording . . . . . . . . . . . . . . . . . . . . . . . . . . . . . . . . . . . . . . 3-26
Digital/optical line-in recording . . . . . . . . . . . . . . . . . . . . . . . . . . . . . . . . . 3-28
4 Using Applications
Using PlayCenter . . . . . . . . . . . . . . . . . . . . . . . . . . . . . . . . . . . . . . . . . . . . . . . . .
Ripping tracks from an audio CD . . . . . . . . . . . . . . . . . . . . . . . . . . . . . . . .
Transferring tracks . . . . . . . . . . . . . . . . . . . . . . . . . . . . . . . . . . . . . . . . . . .
Editing audio track information . . . . . . . . . . . . . . . . . . . . . . . . . . . . . . . . . .
Creating and editing playlists with PlayCenter . . . . . . . . . . . . . . . . . . . . . .
Viewing non-English track information . . . . . . . . . . . . . . . . . . . . . . . . . . . .
Using File Manager . . . . . . . . . . . . . . . . . . . . . . . . . . . . . . . . . . . . . . . . . . . . . . .
Transferring data files . . . . . . . . . . . . . . . . . . . . . . . . . . . . . . . . . . . . . . . . .
4-2
4-3
4-3
4-5
4-6
4-7
4-8
4-9
Appendixes
A Glossary
Useful terms to know . . . . . . . . . . . . . . . . . . . . . . . . . . . . . . . . . . . . . . . . . . . . . A-1
iii
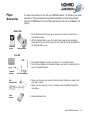
B Primers and Information
About MP3 . . . . . . . . . . . . . . . . . . . . . . . . . . . . . . . . . . . . . . . . . . . . . . . . . . . . . B-1
Where to get MP3 files . . . . . . . . . . . . . . . . . . . . . . . . . . . . . . . . . . . . . . . . B-2
About EAX . . . . . . . . . . . . . . . . . . . . . . . . . . . . . . . . . . . . . . . . . . . . . . . . . . . . . . B-2
About USB . . . . . . . . . . . . . . . . . . . . . . . . . . . . . . . . . . . . . . . . . . . . . . . . . . . . . . B-3
About IEEE1394 . . . . . . . . . . . . . . . . . . . . . . . . . . . . . . . . . . . . . . . . . . . . . . . . . . B-3
List of Scroller operations . . . . . . . . . . . . . . . . . . . . . . . . . . . . . . . . . . . . . . . . . . B-4
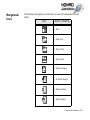
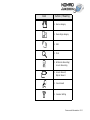
Information Diagram . . . . . . . . . . . . . . . . . . . . . . . . . . . . . . . . . . . . . . . . . . . . . . B-7
Playback Icons . . . . . . . . . . . . . . . . . . . . . . . . . . . . . . . . . . . . . . . . . . . . . . . . . . . B-7
Playing List Icons . . . . . . . . . . . . . . . . . . . . . . . . . . . . . . . . . . . . . . . . . . . . . . . . . B-8
Audio Enhancement Icons . . . . . . . . . . . . . . . . . . . . . . . . . . . . . . . . . . . . . . . . . . B-9
Navigational Icons . . . . . . . . . . . . . . . . . . . . . . . . . . . . . . . . . . . . . . . . . . . . . . . B-10
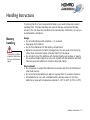
C Handling Instructions
Battery handling . . . . . . . . . . . . . . . . . . . . . . . . . . . . . . . . . . . . . . . . . . . . . . . . C-1
Player handling . . . . . . . . . . . . . . . . . . . . . . . . . . . . . . . . . . . . . . . . . . . . . . . . . C-2
D Technical Specifications & Error Diagrams
Technical Specifications for your NOMAD Jukebox 3 . . . . . . . . . . . . . . . . . . . D-1
Understanding Error Diagrams . . . . . . . . . . . . . . . . . . . . . . . . . . . . . . . . . . . . . D-3
E FAQs and Troubleshooting
Frequently Asked Questions (FAQs) . . . . . . . . . . . . . . . . . . . . . . . . . . . . . . . . . E-1
F Index
iv
Introduction
Introduction
Creative
NOMAD
Jukebox 3
Congratulations on making an excellent decision in purchasing the Creative NOMAD
Jukebox 3!
Your new multi-format portable player is lightweight, just about 10 ounces or 289
grams, without batteries. Even though it is no bigger than a normal CD player, you
can store thousands of songs in the player’s music library. You can create crystal
clear MP3, WAV recordings using the Line-In or optical connector, all without using
a PC. Your player also comes equipped with an SB1394™ connector, so you can
transfer audio tracks and data quickly and easily. It also has two Line Out
connectors, which are ideal for connecting to external speakers, like a Creative
Inspire™ 4.1 speaker system.
Unlike other hardware-based players, the NOMAD Jukebox 3 features an onboard
real-time digital signal processor (DSP) and a real-time effects processor for
superior audio playback and customization. Your player also supports EAX™ so that
you can enhance your audio with Advanced EQ presets, headphone spatialization,
environments and effects. Your portable digital audio player supports multiple
audio file formats, including MP3, WMA and WAV.
Supplied Software
The package comes with:
• Creative PlayCenter™ 3
• Creative File Manager
• Creative Audio Stream Recorder
• an interactive tutorial for your NOMAD Jukebox 3
• Adobe Acrobat Reader™
Introduction i
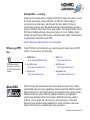
Creative
PlayCenter 3
Creative PlayCenter is your Personal Digital Music Center on the PC. Developed by
Creative, PlayCenter allows you to listen, organize, rip, and even create your own
audio CDs! it also lets you manage, organize and seamlessly transfer music
between Creative portable digital audio players and your PC. With AudioSync™,
you can also synchronize music between your PC and NOMAD Jukebox 3.
Creative File
Manager
Creative File Manager is a data file manager for your player. With its intuitive
interface, you can drag-and-drop data files between your computer and player.
With Creative File Manager, your player doubles as a portable data storage device.
Creative Audio
Stream Recorder
The Creative Audio Stream Recorder (ASR) is a software application that enables
you to record streaming audio content from the Internet, and then play it back on
your computer or transfer it to your player.
The ASR helps you to record Internet radio programs, sports events, company
earning calls, hourly news updates — most of the audio content you can find
online. You can specify the URL of the streaming content or select it from the ASR
content directory. ASR can also be scheduled.
Introduction ii
Interactive
Tutorial
We have included a tutorial designed to guide you step by step around your new
player. The tutorial is useful for both new and experienced owners.
Terminology
If you are not familiar with technology or terms used in this document, you can
refer to the "Glossary" on page A-1. Refer to this section to help increase your
understanding of your player and the technologies used in its creation.
System
Requirements
The applications (software) on the installation CD may have higher requirements
for basic functionality. Refer to each application’s documentation for details.
• Microsoft® Windows® 98, Windows 98 SE, Windows 2000, Windows ME or
Windows XP
• Intel® Pentium® II 200 MHz, AMD®-K6-2® 200 MHz or better processor
(Pentium II recommended for MP3 encoding)
• Sound Blaster Live!™, Sound Blaster Audigy™ or Sound Blaster Extigy™ for EAX
enhanced MP3 encoding
• CD-ROM drive with digital audio extraction support
• USB, 1394 or SB1394 (found on Sound Blaster Audigy series of audio cards)
port
• 64 Megabytes RAM (128 Megabytes recommended)
• 30 Megabytes free hard disk space (more needed for storing audio)
• Internet connection for Internet content downloading and CDDB2™ support
(any charges incurred are the responsibility of the user)
• Installed mouse
• SVGA graphics adapter (256 colors, 800 x 600 resolution or better)
Introduction iii
Additional
requirements for
Audio Stream
Recorder
• Sound Blaster Live!, Sound Blaster Audigy or Sound Blaster Extigy
• Depending on the audio stream you want to record, at least Real Player™ 7.0,
RealOne™ or Windows Media Player 6.0
• Microsoft Internet Explorer 4.0
Using this
document
Capital letters are used to refer to buttons on the player or on an application, for
example, “Press the MENU button to get to the Jukebox Settings screen.”
We also use icons to highlight useful or urgent information for you:
❍ Tip. This tells you about shortcuts or hints relating to a feature.
❍ Note. This highlights additional or important information about a
feature.
❍ Caution! This highlights proper usage of your player. Use this
information to avoid situations involving risk.
❍ Warning! This warns you of possible hazards to yourself or your player,
which may result in injury or damage.
Introduction iv
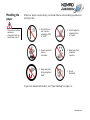
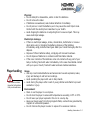
Handling the
player
This section contains
cautionary
information that you
should take note of.
While your player is quite robust, you should observe a few handling procedures to
prolong its life.
❍ Do not store or
use in areas
exceeding 45ºC
or 113ºF.
❍ Do not subject to
excessive force
or impact.
❍ Do not expose to
heat or
incinerate.
❍ Keep away from
excessive
moisture.
❍ Keep away from
strong magnetic
fields.
❍ Do not
dismantle.
To get more detailed information, see "Player handling" on page C-2.
Introduction v
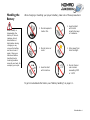
Handling the
Battery
Never modify or
disassemble the
battery. If there is
leakage, stench,
discoloration or
deformation during
charging or use,
remove the battery
and do not use it
again. Clean your
hands well before
handling food or
touching sensitive
areas of your body, for
example, your eyes.
When charging or handling your player’s battery, take note of these precautions:
❍ Do not expose to
heat or fire.
❍ Avoid contact
with metal
objects like keys
or necklaces.
❍ Do not pierce or
crush.
❍ Store away from
direct sunlight.
❍ Avoid contact
with moisture.
❍ Do not store or
use in areas
exceeding 45ºC
or 113ºF.
To get more detailed information, see "Battery handling" on page C-1.
Introduction vi
Website
Information
Visit www.NOMADworld.com regularly for updates and information on:
• firmware updates
• NOMAD accessories
• tips and tricks
• FAQs
• troubleshooting
• documentation updates
• software updates or purchases
Introduction vii
1
About NOMAD Jukebox 3
About NOMAD Jukebox 3
In this chapter, you can read about your player’s exterior features and accessories.
We will show and explain your player’s buttons, controls and exterior connectors.
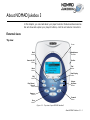
External views
Top view
Screen
Back
button
Headphones
connector
Scroller
Power On/Off
button
Find
button
Menu
button
Now Playing
button
EAX
button
Volume
Up/Down
buttons
Play/Pause/
Record
button
Reverse
button
Forward
button
Stop
button
Figure 1-1: Top view of your NOMAD Jukebox 3
About NOMAD Jukebox 3 1-1
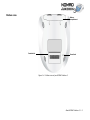
Side views
Scroller
Optical/
Line In
connector
Headphones
connector
Power On/Off
button
Figure 1-2: Side views of your NOMAD Jukebox 3
Back view
DC adapter
connector
Line Out
connectors 1
and 2
Battery
SB1394
compartment connector
USB
connector
Figure 1-3: Back view of your NOMAD Jukebox 3
About NOMAD Jukebox 3 1-2
Bottom view
Battery
compartment
CreativeLink
Reset hole
Figure 1-4: Bottom view of your NOMAD Jukebox 3
About NOMAD Jukebox 3 1-3
Player Buttons
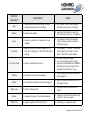
Button
The buttons on your NOMAD Jukebox 3 help you access many of your player’s
features. The table below describes each button and its function.
Function
POWER
❍ turns the player on and off
❍ activates LCD backlight
Notes
❍ press and hold until player turns on
or off
❍ press to turn LCD backlight on
MENU
❍ accesses most of your player’s features
EAX
REVERSE
❍ accesses EAX features
❍ use this button to enable or disable
EAX
❍ skips to the beginning of the current track,
or to the previous track
❍ skips to previous portions of a track when
you press and hold the button
❍ to skip to earlier tracks, press the
Now Playing button to get to the
Playing List screen. Use the Scroller
and select the track to skip to.
❍ starts, pauses or continues playback/
recording
❍ use your player’s Optical/Line-In
connector or the optional Wired
Remote to record
❍ to queue a track for playback, press
and hold this button in the Music
Library screens
PLAY/PAUSE/RECORD
About NOMAD Jukebox 3 1-4
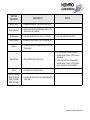
Button
Function
Notes
STOP
❍ halts playback
❍ halts recording
FORWARD
VOL -
VOL +
❍ skips to the next track
❍ skips forward to portions of a track when you
press and hold the button
❍ decreases the volume. Press and hold to
decrease the volume quickly.
❍ increases the volume. Press and hold to
increase the volume quickly
SCROLLER
❍ to skip ahead to a track, press the
Now Playing button to get to the
Playing List screen. Use the Scroller
and select the track to skip to.
❍ adjusts the volume level
❍ to adjust playback volume on
speakers connected to Line Out 1 or
2, use the speakers’ volume control
❍ scrolls up and down menus
❍ selects menu options
❍ turn the Scroller to scroll through
menu options and press the Scroller
to select them. This action is also
referred to as "Scroll Select".
❍ finds albums, tracks, playlists and genres
❍ the Find operation starts after you
enter the first letter, for example “D”
of “DJ playlist”
FIND
About NOMAD Jukebox 3 1-5
Button
NOW PLAYING
BACK
Function
Notes
❍ toggles between Playing Track and Playing
List screens
❍ the Playing Track screen shows
details about the track being played.
❍ the Playing List screen shows the
contents of the Playing List.
❍ stops current operation and returns to the
previous screen
❍ from the current screen, you can only
go back up to 10 screens
About NOMAD Jukebox 3 1-6
NOMAD
Jukebox 3
Connectors
Part
BATTERY COMPARTMENT
Your NOMAD Jukebox 3 has external connectors that can connect the player to
other devices. The table below explains what those connectors are.
Function
Notes
❍ holds the player’s battery
❍ use another battery to extend the
playback time
❍ use only the same type of battery as
the one supplied
❍ connects to your headphones
❍ use the FM Wired Remote or Wired
Remote, if you have one
❍ connects to a two or four speaker system,
for enhanced audio effects
❍ Line Out 1 is for front speakers
❍ Line Out 2 is for rear speakers
❍ Line-In recording from a digital or analog
source
❍ use an analog cable for an analog
source
❍ use a digital cable for a digital
source. The player automatically
detects the type of connector used.
HEADPHONES
CONNECTOR
LINE OUT CONNECTORS
1&2
OPTICAL/LINE IN
CONNECTOR
CREATIVELINK
❍ connects your player to the Creative Docking
Station.
About NOMAD Jukebox 3 1-7
Part
Function
Notes
DC ADAPTER
CONNECTOR
❍ connects to your player’s DC adapter
❍ use only the supplied DC adapter.
❍ resets your player if it stops responding
❍ insert the end of a thin object, like a
straightened paperclip into the hole
❍ connects your player to your computer
❍ connect a USB cable from your player
to your computer to transfer data/
audio or to upgrade your player’s
firmware
❍ when your player is connected to
your computer, use PlayCenter to
control your player
❍ connects your player to your computer.
Connect it to the Sound Blaster Audigy audio
card’s SB1394 jack or an IEEE 1394
connector, if you have one.
❍ connect an SB1394 or IEEE 1394
cable from your player to your
computer to transfer data/audio or to
upgrade your player’s firmware
❍ when your player is connected to
your computer, use PlayCenter to
control your player
RESET HOLE
USB CONNECTOR
SB1394 CONNECTOR
About NOMAD Jukebox 3 1-8
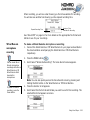
Using the
Scroller
The Scroller is one of the most important features of your NOMAD Jukebox 3. In
this document, we will use a new term, “Scroll Select”, to indicate that you should
use the Scroller to scroll through options and then select the option by pressing the
Scroller.
To "Scroll Select", use
the Scroller to scroll to
the option you want,
and select the option
by pressing the
Scroller.
the Scroller (side view)
Use the Scroller to scroll
through options
Press the Scroller to select an
option
Depending on the screen you are in, you can have different menu options. You can
also choose options from a list or a confirmation box.
Selecting menu
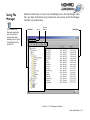
options
You can use the Scroller to make selections in menus. For example, if you are
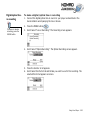
looking at the Menu screen:
Figure 1-5: From the Menu screen to the Jukebox Settings screen
1.
Use the Scroller to scroll up and down in the menu.
2.
Press the Scroller to select the menu item.
About NOMAD Jukebox 3 1-9
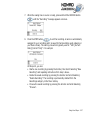
Selecting list and
confirmation box
options
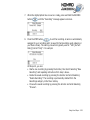
You can also use the Scroller to select options in lists and confirmation boxes.
Scroller options
Figure 1-6:
Constructing a title from a list
Figure 1-7:
1.
Move the Scroller to scroll through the options.
2.
Press the Scroller to select the option.
Unlocking the player
About NOMAD Jukebox 3 1-10
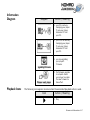
Player
Accessories
You have many devices to use with your NOMAD Jukebox 3 to enhance your audio
experience. These accessories are available separately, and can be purchased
online from NOMADworld. Some of these accessories may not be available in all
regions.
Home Kit
IR Remote
Control
❍ The IR Remote Control allows you to access your player’s controls from a
short distance away.
❍ With the Docking Station, you can forget about plugging and unplugging
cables each time you use the player—just connect your player peripherals to
the Docking Station once.
Docking Station
Car Kit
❍ The Cassette Adapter connects your player to a car cassette player.
❍ The Car Power Adaptor can be used to power your player by connecting it to
your car’s cigarette lighter.
Cassette
Adapter
LCD
Wired Remote
Extra
battery
Car Power Adapter
❍ Allows you to access your player’s controls without taking your player out of
your bag or carrier.
❍ Allows you to make voice, music or ambient sound recordings through the
microphone.
❍ Doubles playback time.
About NOMAD Jukebox 3 1-11
FM Wired
Remote
❍ Gives you the same functions as the Wired Remote, except that it also allows
you to tune-in to local FM radio broadcasts.
Visit www.NOMADworld.com to learn more about these accessories.
About NOMAD Jukebox 3 1-12
2
Setting Up Your Player
Setting up your player
This chapter will guide you on setting up your player, after which you should be
able to start playing back audio on your player.
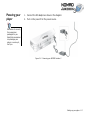
Inserting the
battery
Although your player
comes with one
battery, you can
purchase a second
battery to enjoy
double the playing
time.
1
2
3
Figure 2-1: Inserting the battery in your NOMAD Jukebox 3
The diagram above shows you how to insert one battery. You can acquire an
optional second Creative battery from www.NOMADworld.com.
1. Open the battery compartment in the direction of the arrows.
2.
Insert the battery as shown.
3.
Close the battery compartment.
Setting up your player 2-1
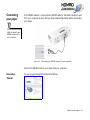
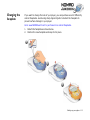
Powering your
player
1.
Connect the DC adapter as shown in the diagram.
2.
Turn on the power from the power source.
Remember to use only
the accessories
packaged for you.
Substitute accessories
may damage your
player, or worse yet,
hurt you.
Figure 2-2: Powering your NOMAD Jukebox 3
Setting up your player 2-2
Charging the
battery
The high performance lithium battery supplied with your player needs to be fully
charged before you use it. Your player’s built-in battery charger should fully charge
the battery in 4 hours to obtain the maximum playback time. If you are using two
batteries, both batteries should be fully charged in 8 hours.
How to charge the
battery
To charge your player’s battery, you should:
1. Insert the uncharged battery as shown in "Inserting the battery" on page 2-1.
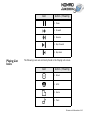
Battery charge
status
Your player displays one of the following icons, depending on the battery’s charged
status or the power source (battery or DC power).
Icon
2.
Connect your player to an DC power outlet as shown in "Powering your player"
on page 2-2.
Your player will turn itself on.
Check the battery icon to see when the battery is fully charged.
Power State
Notes
❍ your player is running from DC power only
❍ your player is running from battery power
only
❍ this battery state icon shows that the
battery is fully charged
❍ your player’s battery is good for
approximately 6 hours of continuous
playback
❍ if using two batteries, approximately
12 hours of continuous playback are
available
❍ your player’s battery is good for
approximately 3 hours of continuous
playback
❍ recharge the battery at the earliest
opportunity
❍ if using two batteries, approximately
6 hours of continuous playback are
available
Setting up your player 2-3
Icon
Power State
Notes
❍ your player is running from DC power and is
charging the battery
❍ charge the battery fully before
disconnecting the player from the DC
power outlet
❍ while charging, the icon will alternate
between this icon and a battery state
icon, showing the approximate level
of charge
❍ your player is running from DC power and
has finished charging the battery
❍ to use battery power, disconnect the
player from the DC power outlet
For detailed information, refer to "Battery handling" on page C-1.
Setting up your player 2-4
Installing
Software
You must restart your
computer before
trying out any of the
installed applications.
Your NOMAD Jukebox 3 comes with software that helps you create audio tracks,
manage your music library and use your player.
1.
Make sure your player is not connected to your computer.
2.
Insert the Installation CD into your CD-ROM drive.
The disc supports Windows AutoPlay mode and starts running automatically. If
not, you need to enable your CD-ROM drive's auto-insert notification feature.
For more details see "AutoPlay" on page E-1.
3.
Select your preferred language.
4.
Select "Install software for NOMAD Jukebox 3"
5.
Click "OK".
6.
Click "Next" to register with Creative, so that you will be updated on new
developments for your Jukebox.
7.
Follow the instructions on the screen.
8.
When prompted to restart your computer, leave the CD in the CD-ROM drive.
9.
Select "Yes, I want to restart my computer now".
10. Click "Finish".
11. Restart your computer.
Setting up your player 2-5
Connecting
your player
Your NOMAD Jukebox 3 comes with an SB1394 cable for fast data transfers to and
from your computer. Be sure that you have installed PlayCenter before connecting
your player.
You can also use a USB
cable to connect your
NOMAD Jukebox 3 to
your computer.
Figure 2-3: Connecting your NOMAD Jukebox 3 to your computer
Connect the SB1394 cable to your player and your computer.
Interactive
Tutorial
You can now go through the Interactive Tutorial.
Setting up your player 2-6
Turning the
player on or off
Your player must be unlocked before you can turn it off. To unlock your player, see
"Locking and unlocking your NOMAD Jukebox 3" on page 2-8.
To turn your player
1.
Press and hold down the POWER button.
on
2.
Keep on holding the POWER button until the startup screen appears.
The Now Playing screen appears. Otherwise, check that your player and the
DC adapter are properly connected.
To turn your player
off
If your player is locked, you must unlock your player.
1. Press any button.
Resetting the
player
2.
In the popup that appears, Scroll Select the check mark.
3.
Press and hold the POWER button for at least 5 seconds.
The player should turn off.
If your player stops responding, reset the player. This should not
cause you to lose any data or audio tracks, unless you were in the
middle of recording or transferring an audio track. You can check
for the audio track in your music library later. See "Using the Music
Library" on page 3-4.
To reset the player: Insert the end of a thin object (like a
straightened paperclip) into the Reset Hole.
Setting up your player 2-7
Locking and
unlocking your
NOMAD
Jukebox 3
Locking your NOMAD Jukebox 3 will disable all buttons on the player except for the
Scroller. This feature is useful when you don’t want any buttons, like STOP, pressed
accidentally.
To lock the player
1.
Press the MENU button.
2.
Scroll Select "Button Lock".
3.
Scroll Select the check mark.
The player is locked.
1.
Press any button.
A popup appears.
2.
Scroll Select the check mark.
The player is unlocked.
To unlock the
player
If you press a button while the player is locked, a popup window appears for you to
unlock the player. This popup disappears if you don’t use the Scroller to make a
selection within a few seconds.
Setting up your player 2-8
Changing the
faceplate
If you want to change the look of your player, you can purchase a set of differently
colored faceplates. Avoid using sharp-tipped objects to detach the faceplate to
prevent surface damage to your player.
Go to www.NOMADworld.com to purchase more colored faceplates.
1.
Detach the faceplate as shown below.
2.
Position the new faceplate and snap it into place.
1
2
3
Setting up your player 2-9
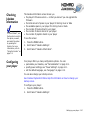
Checking
Jukebox
information
To "Scroll Select", use
the Scroller to scroll to
the option you want,
and select the option
by pressing the
Scroller. For more
information, refer to
"Using the Scroller" on
page 1-9.
Configuring
your player
The Jukebox Information screen shows you
• the player’s firmware version — so that you know if you can upgrade the
firmware
• the total amount of space in your player for storing music or data
• the available space in your player for storing music or data
• the number of tracks stored in your player
• the number of albums stored in your player
• the number of playlists stored in your player
To see this screen
1. Press the MENU button.
2.
Scroll Select "Jukebox Settings".
3.
Scroll Select "Jukebox Information".
Your player offers you many configuration options. You can:
• personalize your Jukebox, see "Personalization" on page 2-11.
• specify power settings, see "Power Settings" on page 2-11.
• set the default language, see "Language" on page 2-12.
You can also change your startup screen.
See Creative PlayCenter’s Online Help for information on how to change your
startup screen.
To configure your player:
1. Press the MENU button.
2.
Scroll Select "Jukebox Settings".
Setting up your player 2-10
3.
Scroll Select an option from the menu that appears:
Go to the relevant section in the pages that follow.
Personalization
To construct a name,
Scroll Select the letters
and numbers to form
the name. Each letter
and number selected is
entered into the entry
area.
In this
•
•
•
•
screen you can:
set the owner’s name
specify the default start screen
set the default backlight color, Blue or Green
return to the previous screen
1.
From the Jukebox Settings screen, Scroll Select "Personalization".
2.
Scroll Select one of the options.
3.
From the menu, Scroll Select a setting or construct a name.
Power Settings
Setting up your player 2-11
In this screen, you can:
• adjust the screen backlight duration. A lower number setting conserves
battery power for longer playback time.
• set the contrast level for your player’s screen. The lower the number, the
lower the contrast.
• specify how long the player remains inactive before it automatically shuts
down.
1.
From the Jukebox Settings screen, Scroll Select "Power Settings".
2.
Scroll Select one of the options.
3.
From the menu, Scroll Select a setting.
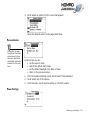
Language
You can change the default language used on your player’s screens and input
boxes.
Menu Language
This option controls the language in which your player’s menus are displayed.
1. From the Jukebox Settings screen, Scroll Select "Menu" under "Language".
2.
Input Language
From the menu, Scroll Select a language.
This option controls the language in which you input letters or characters in input
boxes, for example, when you search for a track or rename a playlist.
1. From the Jukebox Settings screen, Scroll Select "Input" under "Language".
2.
From the menu, Scroll Select a language.
Setting up your player 2-12
Testing your
player
Your player comes with
preloaded audio.
After setting up your NOMAD Jukebox 3, you can do a test run to make sure that it
is in working order.
1. Make sure that your NOMAD Jukebox 3 is properly connected to the DC
adapter and DC power outlet.
2.
Connect the headphones or speakers to the player.
3.
Turn on the DC power.
4.
Press and hold the POWER button on your player.
5.
Press the PLAY button.
You should hear some audio playing.
6.
Using the Volume control buttons, adjust the volume to a comfortable level.
7.
Press the FORWARD button.
The next track in the Playing List should play.
8.
Press the REVERSE button.
You should hear the beginning of the current track.
9.
Press the REVERSE button twice.
The previous track in the Playing List should play.
10. Press and hold the FORWARD button.
You should be skipping forward to other portions of the current track.
11. Press and hold the REVERSE button.
You should be skipping backward to previous portions of the current track.
12. Press the PAUSE button.
The audio playback should be paused.
13. Press the PLAY button again to continue playback.
14. Press the STOP button.
This ends the test run. You can now download and enjoy songs on your player.
Have fun!
Setting up your player 2-13
3
Using Your Player
Using Your Player
After setting up your player, you can use it to play, manage, enhance and record
audio.
When instructed to
Scroll Select, use the
Scroller to scroll to the
option you want, and
select the option by
pressing the Scroller.
For more information,
refer to "Using the
Scroller" on page 1-9.
Move back to previous
firmware screens or
cancel operations by
pressing the BACK
button or Scroll
Selecting the Back
arrow, which appears
at the bottom of
screens and lists.
Instructions on how to perform these functions are provided in the following
sections:
• "Playing Audio" on page 3-2
• "Managing Audio" on page 3-4
• "Enhancing Audio" on page 3-17
• "Recording Audio" on page 3-23
The software in your player that allows you to perform these functions is called the
firmware and is visually represented on the screen displays. The firmware can be
used together with the supplied applications, described in "Using Applications" on
page 4-1.
Navigational icons have been created to help you identify the different firmware
sections. These icons appear on your display when you navigate to the associated
firmware section. A useful table of these, and other icons that appear onscreen, is
available for reference in "Navigational Icons" on page B-10.
Using Your Player 3-1
Playing Audio
Buttons you can use
while playing audio are
listed in "Player
Buttons" on page 1-4.
The associated icons
that appear onscreen
("Playback Icons")
when these buttons
are used are described
in "Playing List Icons"
on page B-8, along
with a table of Playing
List icons.
Basic audio
playback
To play audio, you must first transfer audio tracks in supported formats to your
player. These tracks, in MP3, WMA or WAV file formats, are also played back in your
player as "tracks" but may be further categorized into "albums", "artists" or
"genres".
Audio tracks can be "ripped" from audio CDs to your computer or downloaded from
Internet music sites such as those listed in "Where to get MP3 files" on page B-2.
They must, however, be encoded into the supported formats, then transferred to
your player with the Creative PlayCenter application.
Basic instructions on how to use PlayCenter are provided in "Using PlayCenter" on
page 4-2.
Data files can also be transferred and stored in your player, useful if, for example,
you want to transfer a large movie file from one computer to another. Data can be
transferred to your player with the Creative File Manager application, which is a
dedicated data file manager for your player.
To play audio, you can either add audio selections from the NOMAD Jukebox 3's
Music Library to the player’s Playing List as described in "Adding audio selections to
the Playing List" on page 3-6, then play back the entire Playing List, or you can
preview individual tracks directly from the Music Library.
Audio selections have been preloaded to the Playing List to get you started quickly.
To play audio in the
Playing List one track
at a time, enable the
"Play Track Once"
mode, as instructed in
"Playing a track once"
on page 3-20.
. The Play icon
appears
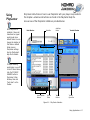
To play the Playing List: Press the PLAY button
onscreen and the Playing List is played back, from the first track to the last.
Note: The Playing List screen is not automatically displayed when you play a track.
To access it, press the NOW PLAYING button
. The upper-left corner of the
screen will display the Playing List icon.
Playing List Icon
Audio Selections
Using Your Player 3-2
Pressing the NOW PLAYING button again will display the Playing Track screen,
which shows the track that is being played back or the track that has been
selected. The upper-left corner of the screen will display the Playing Track icon.
Playing Track Icon
Track Title
Album Title
Elapsed Time Bar
To preview a track
1.
Press the MENU button
.
2.
Scroll Select "Music Library".
3.
Scroll Select an audio category. For example, if you want to preview a track in
a particular album, Scroll Select "Albums".
Note: If Scroll Selecting "All Tracks" or "Recordings", skip to Step 6.
4.
Scroll Select the sub-category that the track is categorized under. For
example, if you selected "Albums", Scroll Select the album where your track is
in. A list appears.
5.
Scroll Select "Open". The tracks within the sub-category appear.
6.
Scroll Select the track you want to preview. A list appears.
Using Your Player 3-3
7.
Managing
Audio
Using the
Music
Library
Scroll Select "Preview". The track is previewed once.
To effectively manage the audio in your player, you should be familiar with the
Music Library, Playing List and Playlists. These will be described extensively in the
following sections:
• "Using the Music Library" on page 3-4
• "Using the Playing List" on page 3-10
• "Using Playlists" on page 3-16
When audio tracks are transferred to your player, they are organized into the
following Music Library categories:
•
Playlists
•
Albums
•
Artists
•
Genres
•
All Tracks, and
•
Recordings
All transferred tracks can be found in the "All Tracks" category, but depending on
your PlayCenter settings, tracks can also be found in other categories. For
example, take a fictitious track called "Toffee Apple Smile", performed by "The
Nano Singers", from the soundtrack to the "The Big Sneeze" movie. Besides "All
Tracks", the "Toffee Apple Smile" song would also be found in the "Soundtrack"
genre, the "Songs from The Big Sneeze" album, and the "The Nano Singers" artist
category.
Tracks not belonging to any album, artist or genre, can only be found in “All
Tracks”.
Using Your Player 3-4
Recordings made with your player automatically become "tracks" and can be found
in "All Tracks" as well as the "Recordings" category. For the instructions that follow,
recordings will be known as "tracks".
Besides previewing tracks described earlier, you can also use the Music Library to:
• Add audio selections to the Playing List
• Find tracks, playlists, albums, artists or genres in your player
• View track information
• Delete tracks, playlists, albums, artists or genres in your player
Note that modifying or renaming albums, artists or genres, including renaming,
must be done in Creative PlayCenter. Playlists can also be renamed in the player,
as described in "Using Playlists" on page 3-16.
Exploring the Music
Library
In the following example, we will show you how to find a track by navigating
through your Music Library. A quicker way of finding audio in your player is to use
the Find feature, described in "To find audio with the "Find" feature" on page 3-7.
To find a track in the Music Library
1.
Press the MENU button
.
2.
Scroll Select "Music Library".
3.
Scroll Select an audio category. For example, if you want to find a track in a
particular album, Scroll Select "Albums".
Note: If Scroll Selecting "All Tracks" or "Recordings", skip to Step 5.
4.
Scroll Select the sub-category. For example, under Albums, Scroll Select an
album. A list appears.
Using Your Player 3-5
5.
Adding audio
selections to the
Playing List
When a playlist is
added to the Playing
List, only the selections
within that playlist are
added. The playlist
itself is not added.
Scroll Select “Open”. The tracks within the sub-category appear.
Audio selections from the Music Library can either be added sequentially after
selections already in the Playing List ("Add to Play") or placed at the front of the
Playing List for immediate playback ("Play Now").
To add audio selections
1.
Press the MENU button
.
2.
Scroll Select "Music Library".
3.
Scroll Select an audio category. For example, if you want to add a track in a
particular album, Scroll Select "Albums".
4.
Scroll Select the sub-category. For example, under Albums, Scroll Select an
album. A list appears.
Note: If adding an entire album, artist, genre or playlist, skip to step 6.
5.
Scroll Select “Open”. The tracks within the sub-category appear.
Using Your Player 3-6
6.
Scroll Select “Add to Play” to add the audio selection to the back of the Playing
List. Scroll Select "Play Now" or press the Play button
to add the
selection to the front of the Playing List and immediately play it back.
Finding audio
Finding your favorite song or album in the Music Library has been made easy with
your player's "Find" feature.
To find audio with the "Find" feature
1.
Press the FIND button
. If you are not already exploring the Music
Library, the Find screen appears.
If you press the FIND button when exploring the Music Library, a list appears
above the audio category you are in; skip to step 3.
2.
Scroll Select the audio category you want to search. For example, if you want
to find a particular album, Scroll Select "Find by Album" and the respective
audio category screen, in this case the Albums screen, appears with a list.
Using Your Player 3-7
3.
Scroll Select the letters on the list to form the name of the track, playlist,
album, artist or genre you want to find. The selected letters appear in the box
at the bottom of the screen. Also, each time an entry is made into the box, the
audio category you are in is searched, and the closest matching result is
displayed.
Note: When entering letters into the box, you can switch from upper to lower
case (or vice-versa) by simply Scroll Selecting the letter and holding the
Scroller until the letter changes to the case you want. You can also use
different character sets, such as accented characters or numerals, by Scroll
Selecting the "Charset" option on the list.
4.
Viewing track
information
When you see the track, playlist, album, artist or genre you want, Scroll Select
the "OK" option to complete the search.
Detailed information about tracks in the Music Library is readily available. This
includes track title, the artist, album and genre that the track belongs to, as well as
track length.
To view information about tracks in the Music Library
This same information
is already available in
the Playing List. See
"To view information
about tracks in the
Playing List" on page 312.
1.
Follow steps 1 through 5 in "To find a track in the Music Library" on page 3-5.
2.
Scroll Select the track you want information on. A list appears.
3.
Scroll Select “Track Details”. A message box appears, listing track information.
Using Your Player 3-8
Deleting audio
When you remove audio from the Playing List, as described later in "Removing
audio" on page 3-12, you are not permanently deleting the selections from your
player.
To permanently delete tracks, albums, artists, genres or playlists, you must
remove them from the Music Library in your NOMAD Jukebox 3.
To delete a track
1.
Follow steps 1 through 5 in "To find a track in the Music Library" on page 3-5.
2.
Scroll Select the track to delete. A list appears.
3.
Scroll Select "Delete Track". A confirmation box appears, asking you if you
want to delete the selected track.
4.
Scroll Select the check mark. The track is permanently deleted from your
player.
To delete an entire album, artist, genre or playlist
When a playlist is
deleted, the tracks,
albums, artists or
genres within the list
are not deleted; only
the list itself is deleted.
1.
Press the MENU button
.
2.
Scroll Select “Music Library”.
3.
Scroll Select an audio category. For example, if you want to delete a particular
album, Scroll Select "Albums".
Using Your Player 3-9
Using the
Playing List
Viewing audio in the
Playing List
4.
Scroll Select the sub-category. For example, under Albums, Scroll Select the
album you want to delete. A list appears.
5.
Depending on what you are deleting, Scroll Select “Delete Album”, "Delete
Artist", "Delete Genre" or "Delete Playlist". A confirmation box appears, asking
you if you want to delete the selected album, artist, genre or playlist.
6.
Scroll Select the check mark. The album, artist, genre or playlist is
permanently deleted from your player.
You can do more than play audio selections in the Playing List. You can:
• View audio in the Playing List
• View information about tracks in the Playing List
• Remove audio
• Rearrange the Playing List
• Save the Playing List as a playlist
When a playlist is added to the Playing List, only the audio selections within that
playlist are added; the playlist itself is not added. However, when entire albums,
artists or genres are added to the Playing List, the tracks within them are hidden
(or "collapsed"). To see these tracks, you must "Expand" the album, artist or
genre.
Similarly, to hide these tracks, you should "Collapse" the album, artist or genre.
This can be useful in reducing screen clutter.
Using Your Player 3-10
To expand an album, artist or genre
1.
Press the NOW PLAYING button
until the Playing List screen appears.
2.
Scroll Select the album, artist or genre to expand. A list appears.
3.
Scroll Select “Expand”. The tracks in the selection appear beneath the album,
artist or genre.
To collapse an album, artist or genre
Viewing track
information
1.
Press the NOW PLAYING button
until the Playing List screen appears.
2.
Scroll Select the expanded album, artist or genre. A list appears.
3.
Scroll Select “Collapse”. Tracks within the formerly expanded album, artist or
genre are hidden.
Information about tracks in the Playing List can be easily accessed and viewed.
The information provided is identical to that described in "To view information
about tracks in the Music Library" on page 3-8.
Using Your Player 3-11
To view information about tracks in the Playing List
Removing audio
1.
Press the NOW PLAYING button
. Track information can be viewed in
either the Playing List or Playing Track screen.
2.
In the Playing List screen, Scroll Select the track that you want to view
information about.
In the Playing Track screen, press the Scroller.
In either case, a list appears.
3.
Scroll Select “Track Details”. A message box appears, listing track information.
When tracks, albums, artists or genres are removed from your player’s Playing List,
they are only removed from the Playing List—audio still remains in the Music
Library. To delete audio completely, tracks, albums, artists or genres must be
deleted from the Music Library as shown in "Deleting audio" on page 3-9.
To remove a track, album, artist or genre from the Playing List
1.
Press the NOW PLAYING button
until the Playing List screen appears.
2.
Scroll Select the track, album, artist or genre to remove from the Playing List.
A list appears.
3.
Scroll Select “Remove”. A confirmation box appears if you have selected to
remove an album, artist or genre from the Playing List; skip to Step 4.
If you have selected to remove a track, it is removed from the Playing List.
Using Your Player 3-12
4.
Scroll Select "Yes". The track, album, artist or genre is removed from the
Playing List.
To remove all audio from the Playing List
Rearranging the
Playing List
1.
Press the NOW PLAYING button
until the Playing List screen appears.
2.
Scroll Select any track, album, artist or genre in the Playing List. A list
appears.
3.
Scroll Select “Remove All”. A confirmation box appears, asking you if you want
to remove all tracks in the Playing List.
4.
Scroll Select the check mark. All audio selections are removed from the
Playing List.
If you prefer to hear, for example, a particular album before another in the Playing
List, you can rearrange the album as well as any other artist, genre or individual
track in the Playing List.
Using Your Player 3-13
To rearrange audio in the Playing List
Saving the Playing
List as a playlist
1.
Press the NOW PLAYING button
until the Playing List screen appears.
2.
Scroll Select the album, artist, genre or individual track to move. A list
appears.
3.
Scroll Select “Change Order”. An icon appears next to the selected album,
artist, genre or individual track.
4.
Using the Scroller, move the album, artist, genre or individual track to the
preferred position in the Playing List.
5.
Press the Scroller to set the position you have selected.
If you like the contents and arrangement of your current Playing List, you can
choose to save it as a playlist for retrieval and playback later.
Using Your Player 3-14
To save a playlist
1.
Press the NOW PLAYING button
until the Playing List screen appears.
2.
Scroll Select any item in the Playing List. A list appears.
3.
Scroll Select “Save as Playlist”. A list appears.
4.
Scroll Select the letters on the list to form a name for your playlist. This name
appears in the box at the bottom of the screen.
Note: When entering letters into the box, you can switch from upper to lower
case (or vice-versa) by simply Scroll Selecting the letter and holding the
Scroller until the letter changes to the case you want. You can also use
different character sets, such as accented characters or numerals, by Scroll
Selecting the "Charset" option on the list.
5.
Scroll Select the "OK" option to save the playlist with the name you have
entered.
Using Your Player 3-15
Using
Playlists
As described earlier, a playlist is a Playing List which has been saved. Editing of
playlists, such as rearranging content, should be done in Creative PlayCenter.
However, you can rename playlists in your player.
To rename a playlist
1.
Press the MENU button
.
2.
Scroll Select “Music Library”.
3.
Scroll Select “Playlists”.
4.
Scroll Select the playlist to rename. A list appears.
5.
Scroll Select “Rename”. A list appears.
6.
Scroll Select the letters on the list to form your playlist’s new name, which
appears in the box at the bottom of the screen.
Note: When entering letters into the box, you can switch from upper to lower
case (or vice-versa) by simply Scroll Selecting the letter and holding the
Scroller until the letter changes to the case you want. You can also use
different character sets, such as accented characters or numerals, by Scroll
Selecting the "Charset" option on the list.
7.
Scroll Select the "OK" option to save the playlist with the new name you have
entered.
Using Your Player 3-16
Enhancing
Audio
A reference table of
Audio Enhancement
icons appear in "Audio
Enhancement Icons" on
page B-9.
Using Play Modes
You can enhance your listening experience when playing the Playing List by
applying Play Mode, EAX, or both at the same time. If you are previewing a track,
you will only be able to use EAX to enhance listening. Play Modes and EAX are
described in the following sections:
• "Using Play Modes" on page 3-17
• "Using EAX" on page 3-22
Your player has Play Modes that allow you to change how your Playing List is
played back. When a Play Mode is enabled, you can:
• Repeat audio as shown on page 3-17
• Shuffle audio as shown on page 3-18
• Bookmark audio as shown on page 3-19
• Play an audio track once as shown on page 3-20
Play Modes are disabled by enabling the “Normal” mode as described in "Disabling
Play Modes" on page 4-26.
Note: In the next few pages, we will assume that you are playing a track. If you
select a Play Mode when not playing a track, the Play Mode icon appears but the
mode itself is activated only when playback resumes.
Repeating audio
You can choose to repeat a track or repeat the whole Playing List.
To repeat a track in the Playing List
1.
Press the NOW PLAYING button
until the Playing List screen appears.
Note: If you are in the Playing Track screen, press the Scroller and skip to
step 4.
2.
Scroll Select the currently playing track. A list appears.
3.
Scroll Select "Play Mode...". A list appears.
Using Your Player 3-17
4.
Scroll Select “Repeat Track”. The Repeat Track icon
the track is repeated continuously until you stop it.
appears onscreen and
To repeat the whole Playing List
If there is only one
track in the Playing List
when "Repeat All" is
enabled, that track will
be repeated
continuously.
Shuffling audio
1.
Press the NOW PLAYING button
until the Playing List screen appears.
Note: If you are in the Playing Track screen, press the Scroller and skip to step
4.
2.
Scroll Select any selection in the Playing List. A list appears.
3.
Scroll Select "Play Mode...". A list appears.
4.
Scroll Select “Repeat All”. The Repeat All icon
appears onscreen and the
Playing List is repeated continuously until you stop it.
The Shuffle Play Mode can be used once (“Shuffle”) or continuously (“Shuffle
Repeat”).
To Shuffle the Playing List once
If there is only one
track in the Playing List
when "Shuffle Repeat"
is enabled, that track
will be repeated
continuously.
1.
Press the NOW PLAYING button
until the Playing List screen appears.
Note: If you are in the Playing Track screen, press the Scroller and skip to step
3.
2.
Scroll Select any selection in the Playing List. A list appears.
3.
Scroll Select "Play Mode...". A list appears.
4.
Scroll Select “Shuffle”. The Shuffle icon
appears onscreen and a track is
selected at random and played back. The Playing List stops playing once the
track ends.
To Shuffle Repeat the Playing List continuously
1.
Press the NOW PLAYING button
until the Playing List screen appears.
Note: If you are in the Playing Track screen, press the Scroller and skip to step
3.
2.
Scroll Select any selection in the Playing List. A list appears.
Using Your Player 3-18
Bookmarking a
track
3.
Scroll Select "Play Mode...". A list appears.
4.
Scroll Select “Shuffle Repeat”. The Shuffle Repeat icon
appears onscreen
and tracks are selected at random and played back continuously until you stop
playback.
Bookmarking a track sets a playback point—you can jump to this point whenever
you play the bookmarked track. This is useful if, for example, you want to
bookmark an audio book.
To bookmark a track
A track can only be
bookmarked once;
setting a new
bookmark will
automatically remove
any previous bookmark
in the track.
1.
Press the NOW PLAYING button
until the Playing Track screen appears.
2.
Press the Scroller. A list appears.
3.
Scroll Select “Set Bookmark” at the point where you want to set the
bookmark. A message box appears, telling you that the bookmark has been
set at the selected point.
Using Your Player 3-19
To play the track from the bookmarked point
1.
Press the NOW PLAYING button
until the Playing Track screen appears.
2.
Press the Scroller. A list appears.
3.
Scroll Select “Go to Bookmark”. The track plays from the bookmarked point.
To remove a bookmark
Playing a track once
1.
Press the NOW PLAYING button
until the Playing Track screen appears.
2.
Press the Scroller. A list appears.
3.
Scroll Select “Clear Bookmark”. A message box appears, telling you that the
bookmark has been cleared.
When the Playing List is played normally, each track in the Playing List is played,
from the first track to the last. However, when the Track Once Play Mode is
enabled, playback stops once the current track ends.
Using Your Player 3-20
To play a track once
Disabling Play
Modes
1.
Press the NOW PLAYING button
until the Playing Track screen appears.
2.
Press the Scroller. A list appears.
3.
Scroll Select “Track Once”. The Track Once icon
appears onscreen. The
Playing List stops playing back once the track ends.
Once the "Normal" mode is enabled, each track in the Playing List is played, from
the first track to the last.
1.
Press the NOW PLAYING button
until the Playing List screen appears.
Note: If you are in the Playing Track screen, press the Scroller and skip to
step 4.
2.
Scroll Select any selection in the Playing List. A list appears.
3.
Scroll Select "Play Mode...". A list appears.
4.
Scroll Select “Normal”. The Playing List plays back normally.
Using Your Player 3-21
Using EAX
General information
about EAX is available
in "About EAX" on page
B-2, while information
about specific EAX
settings can be found
in "Useful terms to
know" on page A-1.
Besides Play Modes, your player also allows you to enhance your listening
experience with EAX technologies formerly available only with Creative's Sound
Blaster Live! and Audigy audio cards. EAX technologies (or "Settings") available in
your player include:
• Smart Volume Management (SVM), which intelligently controls the dynamic
range of audio, providing a superior audio experience in difficult listening
environments such as in a plane or car.
• Time Scaling, which allows you to speed up or slow down audio without
changing pitch or distorting sound quality.
• Environment, a collection of presets that allows you to experience audio in the
virtual environment of your choice, such as in a Concert Hall or Cathedral.
• Advanced EQ, a collection of equalizer settings which can enhance audio of a
particular genre. Listen to the difference when you select "Jazz" in a jazz
recording.
• Spatialization, which enhances your audio soundstage, useful if, for example,
you are listening to audio with headphones.
To use EAX with your currently playing audio:
1. Select an EAX setting.
2.
Select a preset, rate or mode to use with the selected EAX setting.
3.
Turn on EAX.
This simple process is described in the following instructions.
To select an EAX setting
1.
Press the EAX button
.
2.
Scroll Select "Setting:X" (where X represents the EAX setting currently
selected). A list appears.
3.
Scroll Select the EAX setting you want.
To select a preset, rate or mode for use with your EAX setting
1.
If you are not already in the EAX screen, press the EAX button
.
Using Your Player 3-22
2.
Scroll Select "Preset:X", "Rate:X" or "Mode:X" (where X represents the preset,
rate or mode currently selected). A list appears.
3.
Scroll Select the preset, rate or mode you want to use with your EAX setting.
To turn on EAX
Recording
Audio
1.
If you are not already in the EAX screen, press the EAX button
.
2.
Scroll Select "EAX:Off". The EAX active icon
appears onscreen and is
applied immediately to the audio being played.
Note: If you have connected a Wired Remote to your player, you can also turn
on EAX by pressing the EAX button on the remote.
Another great NOMAD Jukebox 3 feature is its ability to record audio. Recorded
audio is encoded directly into the file format (WAV or MP3) and bitrate (quality) of
your choice.
You can record from:
•
A digital/optical line-in source ("Optical Recording") such as a DVD or
MiniDisc player, for superior audio quality.
•
An analog line-in source ("Line-in Recording") with stereo output such as
your CD player, VCR or home hi-fi system, for good audio quality.
•
The microphone on your optional Wired Remote or FM Wired Remote
("Wired Remote Recording") for lower quality recordings. Useful for
recording important interviews on the move.
When
•
•
•
recording, note that the available recording time is determined by:
Available hard disk space in your player.
File format and bitrate selected for recording.
Battery power remaining in your player.
Using Your Player 3-23
When recording, you will see a bar showing you the time available for recording.
You will also see another bar showing you the elapsed recording time.
Maximum Time
Available For Recording
Elapsed Recording Time
See "About MP3" on page B-1 for more details on the appropriate file format and
bitrate to use for your recordings.
Wired Remote
microphone
recording
You can make Wired
Remote microphone
recordings with either a
Wired Remote or FM
Wired Remote. Both
have built-in
microphones.
To make a Wired Remote microphone recording
1.
Connect the Wired Remote or FM Wired Remote to your player as described in
the documentation accompanying the Wired Remote or FM Wired Remote
respectively.
2.
Press the MENU button
3.
Scroll Select “W.Remote Recording”. The Voice Record screen appears.
.
Note: You can also quickly access the Voice Record screen by pressing and
holding the EAX button on the Wired Remote or FM Wired Remote.
To pause or resume
recording, press the
Pause button.
4.
Press the Scroller. A list appears.
5.
Scroll Select the file format and bitrate you want to use for this recording. The
selected file format appears onscreen.
Using Your Player 3-24
6.
When you are ready to record, press and hold the RECORD button
until the "Recording" message appears onscreen.
7.
Press the STOP button
to end the recording. A name is automatically
assigned to your recording and it is saved to the Recordings audio category in
your Music Library. The naming convention typically used is: "VOC [Current
Date] [Current Time]". For example:
At this point, you can:
• Start a new recording by pressing the Scroller, then Scroll Selecting "New
Recording" and repeating instructions from step 1 above.
• Delete the saved recording by pressing the Scroller and Scroll Selecting
"Delete Recording". The recording is permanently deleted from the
Recordings category in the Music Library.
• Preview the saved recording by pressing the Scroller and Scroll Selecting
"Preview".
Using Your Player 3-25
Analog line-in
recording
To pause or resume
recording, press the
PAUSE button.
To make an analog line-in recording
1.
Connect the analog line-in source to your player as described in the
documentation accompanying the line-in device.
2.
Press the MENU button
3.
Scroll Select “Line-in Recording”. The Recording screen appears.
4.
Scroll Select "Line-in Recording". The Line-In Record screen appears.
5.
Press the Scroller. A list appears.
6.
Scroll Select the file format and bitrate you want to use for this recording. The
selected file format appears onscreen.
.
Using Your Player 3-26
7.
When the analog line-in source is ready, press and hold the RECORD button
until the "Recording" message appears onscreen.
8.
Press the STOP button
to end the recording. A name is automatically
assigned to your recording and it is saved to the Recordings audio category in
your Music Library. The naming convention typically used is: "VOC [Current
Date] [Current Time]". For example:
At this point, you can:
• Start a new recording by pressing the Scroller, then Scroll Selecting "New
Recording" and repeating instructions from step 1 above.
• Delete the saved recording by pressing the Scroller and Scroll Selecting
"Delete Recording". The recording is permanently deleted from the
Recordings category in the Music Library.
• Preview the saved recording by pressing the Scroller and Scroll Selecting
"Preview".
Using Your Player 3-27
Digital/optical linein recording
To pause or resume
recording, press the
PAUSE button.
To make a digital/optical line-in recording
1.
Connect the digital/optical line-in source to your player as described in the
documentation accompanying the line-in device.
2.
Press the MENU button
3.
Scroll Select “Line-in Recording”. The Recording screen appears.
4.
Scroll Select "Optical Recording". The Optical Recording screen appears.
5.
Press the Scroller. A list appears.
6.
Scroll Select the file format and bitrate you want to use for this recording. The
selected file format appears onscreen.
.
Using Your Player 3-28
7.
When the digital/optical line-in source is ready, press and hold the RECORD
button
8.
until the "Recording" message appears onscreen.
Press the STOP button
to end the recording. A name is automatically
assigned to your recording and it is saved to the Recordings audio category in
your Music Library. The naming convention typically used is: "VOC [Current
Date] [Current Time]". For example:
At this point, you can:
• Start a new recording by pressing the Scroller, then Scroll Selecting "New
Recording" and repeating instructions from step 1 above.
• Delete the saved recording by pressing the Scroller and Scroll Selecting
"Delete Recording". The recording is permanently deleted from the
Recordings category in the Music Library.
• Preview the saved recording by pressing the Scroller and Scroll Selecting
"Preview".
Using Your Player 3-29
4
Using Applications
Using Applications
Creative PlayCenter, Creative File Manager, and other useful software, are included
on your installation CD (see "Installing Software" on page 2-5).
Creative PlayCenter is the best way to organize and transfer audio to and from
your player. This chapter includes basic instructions on using PlayCenter to rip
audio CDs, transfer tracks by manual selection or with AudioSync, edit track
information as well as to create and edit playlists.
Click here to see PlayCenter’s Online Help file.
Creative File Manager is a dedicated data file manager for storing and organizing
Net downloads, videos, images or any sort of data file on your player. This chapter
includes basic instructions on using File Manager to transfer data files.
Click here to see Creative File Manager’s Help file.
Using Applications 4-1
Using
PlayCenter
After PlayCenter is
installed, it stores all
transferred or ripped
audio tracks into a
default folder. You can
change the location of
this folder or default
folder name in
PlayCenter settings.
See the PlayCenter’s
Help file for details.
Only basic instructions on how to use PlayCenter with your player are provided in
this chapter—extensive instructions are found in the PlayCenter Help file.
An overview of the PlayCenter interface is provided below:
Media Bar
Main Window
AudioSync
Button
Transfer Window
To import existing
audio tracks in your PC
to the PC Music Library,
click the PC MUSIC
LIBRARY button in
PlayCenter's Main
Window, then click
"Auto Scan" on the
Toolbar.
Audio Playback
Buttons
Volume
Slider
Transfer
Buttons
Transfer
Queue Bar
Figure 4-1: PlayCenter Interface
Using Applications 4-2
Ripping tracks
from an audio CD
Rather than manually
entering track
information, retrieve
such audio CD
information from CDDB
before ripping tracks.
Change the default
ripping format and
bitrate for higher or
lower quality audio.
Transferring tracks
1.
Insert an audio CD into your CD-ROM drive.
If the CD starts playing, click the STOP button. You cannot rip tracks while the
CD is playing.
2.
In PlayCenter’s Main window, click the AUDIO CD button.
3.
Click the boxes next to the tracks you want to rip.
4.
To rip to your hard disk, click either the MY COMPUTER or PC MUSIC LIBRARY
buttons in the Transfer window. Note that you can configure the default
location for storing ripped tracks in PlayCenter Settings.
To rip directly to your player, click the NOMAD JUKEBOX button in the Transfer
window.
5.
Click the RIP TO button. The Transfer Queue bar shows the ripping progress.
6.
To preview the song that you have just ripped in PlayCenter, click the song title
and then click "Preview" on the Toolbar.
Transfer tracks to and from you player by manually selecting the tracks for transfer
or by using PlayCenter's AudioSync feature.
AudioSync is a fast and simple method for synchronizing the music libraries in your
PC and NOMAD Jukebox. To customize music library synchronization, simply select
the desired transfer modes and transfer options in PlayCenter Settings.
Your player must be properly connected to your computer before transferring
tracks, as described in "Installing Software" on page 2-5.
To synchronize
tracks in your music
libraries
1.
In the Main window, click the NOMAD JUKEBOX button.
2.
On the Toolbar, click "AudioSync".
PlayCenter starts the AudioSync operation.
Using Applications 4-3
3.
A dialog box appears, showing you the default transfer mode and track
comparison information.
The information in the dialog box may take a while to appear, depending on
the number of tracks being analyzed. When the comparison is complete, a
summary of tracks and playlists that can be transferred for both music libraries
is shown.
4.
Click the CONTINUE button to proceed with the AudioSync operation or wait
until the dialog box disappears.
If you have not configured AudioSync to "Automatically transfer tracks after
track comparison", you can click the CANCEL button to cancel the AudioSync
operation.
5.
If the music library to be updated has sufficient space for additional tracks, the
Transfer Queue appears.
The Transfer Queue disappears when the transfer is complete.
6.
If the music library to be updated does not have enough space, a dialog box
appears for you to select a transfer option, to reduce the size of tracks to be
transferred.
Select an option to transfer "tracks from selected genres or artists only or
tracks from selected playlists only".
7.
Click the OK button.
8.
If you chose to "transfer tracks from selected genres or artists only", select
either Genre or Artist in the Genre/Artist Selection List.
9.
In the list that appears, select the required genres or artists to transfer.
The list may take a while to appear.
Select the required genres or artists so that the size of the "Tracks to be
transferred" does not exceed the "Space Available".
10. If you chose to transfer tracks from selected playlists only, select the required
playlists so that the size of the Tracks to be transferred does not exceed the
Space Available.
11. Click the OK button to start the transfer.
The Transfer Queue disappears when the transfer is complete.
Using Applications 4-4
To transfer specific
tracks from your PC
to your player
To transfer specific
tracks from your
player to your PC
Owing to copyright
limitations, preloaded
tracks in your player
cannot be transferred
to your PC.
Editing audio track
information
1.
Turn on your player.
2.
In the Transfer window, click the NOMAD JUKEBOX button.
3.
In the Main window, click the PC MUSIC LIBRARY button.
Locate the folder where your tracks are stored. Select the tracks you want to
transfer to your player.
4.
Click the lower TRANSFER button.
To use your player after the transfer, disconnect your player from the
computer.
1.
Turn on your player.
2.
In the Transfer window, click the NOMAD JUKEBOX button.
Locate and select the tracks to be transferred from your player.
3.
In the Main window, click the PC MUSIC LIBRARY button.
Locate the folder or album for storing the tracks.
4.
Click the upper TRANSFER button.
To use your player after the transfer, disconnect your player from the
computer.
This function can be useful if, for example, you want to change the name of a
track, album, artist or genre in your player.
1. In the Main window, click the NOMAD JUKEBOX button. Your player’s Music
Library appears.
2.
Click the track or tracks you want to edit in your player.
3.
On the Toolbar, click "Properties".
4.
In the Properties window, double-click the property to edit, for example,
Album, Artist or Genre.
5.
Click the OK button.
Using Applications 4-5
Creating and
editing playlists
with PlayCenter
Playlists can be created in your player, as described in "Saving the Playing List as a
playlist" on page 3-14. They can also be created in PlayCenter. Extensive editing
options, such as adding or deleting tracks, are also available with PlayCenter.
To create a playlist
1.
In the Main window, click the NOMAD JUKEBOX button. Your player’s Music
Library appears.
2.
Click the MEDIA BAR, and select "Playlists".
3.
On the Toolbar, click "New".
4.
Type the name of your new playlist.
5.
Click the MEDIA BAR, and select a category, for example, All Tracks or By
Album.
6.
Select the tracks you want to add to the playlist.
7.
Right-click the selected tracks and select "Add to Playlist".
8.
Select the playlist to add the tracks to.
To add tracks to a
playlist
Follow steps 5 through 8 in "To create a playlist" above.
To remove tracks
from a playlist
1.
In the Main or Transfer window, click the NOMAD JUKEBOX button.
2.
Click the MEDIA BAR, and select "Playlists".
3.
Locate the playlist from which you want to delete tracks.
4.
Select the tracks to delete.
5.
On the Toolbar, click "Delete".
1.
In the Main or Transfer window, click the NOMAD JUKEBOX button.
2.
Click the MEDIA BAR, and select "Playlists".
3.
Locate the playlist for which you want to change the play order.
To change the
playback order in a
playlist
Using Applications 4-6
To delete a playlist
4.
Click the track and click the SHIFT-UP or SHIFT-DOWN icons on the Toolbar.
1.
In the Main window, click the NOMAD JUKEBOX button.
2.
Click the MEDIA BAR, and select "Playlists".
3.
Click the playlist to delete.
4.
On the Toolbar, click "Delete".
Viewing
non-English track
information
Track information for non-English audio tracks, such as Chinese, Japanese or
Korean tracks, can be displayed in their native fonts when you are using
PlayCenter or your player. You must, however, be using the operating system and
PlayCenter version of that language.
To view non-English
track information
1.
Before transferring non-English audio tracks from your PC to player as
described in "To transfer specific tracks from your PC to your player" on page
4-5, do the following:
• In the Transfer window, click the NOMAD JUKEBOX button.
• Click the SETTINGS button.
• Click the list in the "Language" box.
• Click a language appropriate for the non-English audio tracks you are
transferring.
• Click the Apply button.
• Click the OK button.
2.
Transfer the non-English audio tracks to your player.
3.
Select the approriate Menu language in your player as described in "Menu
Language" on page 2-12. For example, select "Japanese" as the Menu
language if the transferred audio tracks are in Japanese.
Note: Selecting a Menu language incompatible with your audio tracks may
result in illegible track information if these tracks are transferred back to your
PC.
Using Applications 4-7
Using File
Manager
The Creative File
Manager application
can be copied to a
single floppy disk,
allowing you to install
the application onto
another PC.
Extensive instructions on how to use File Manager are in the File Manager Help
file—only basic instructions are provided here. An overview of the File Manager
interface is provided below.
Left Pane
Menus
Shortcut
Buttons
Right Pane
Figure 4-2: File Manager Interface
Using Applications 4-8
Transferring data
files
Data files can be transferred to and from your player by either using the "copyand-paste" or "drag-and-drop" functions. Audio tracks in MP3, WAV or WMA file
formats will be stored as data files when they are transferred from your PC; they
cannot be played by your player.
To transfer a data
file by copying-andpasting
1.
On the left pane, locate and click the drive that contains the file you want to
copy.
2.
Click the file to copy.
3.
On the Edit menu, click "Copy".
4.
Open the folder or disk where you want to put the copy.
5.
On the Edit menu, click "Paste".
To transfer a data
file by dragging-anddropping
1.
Click and drag the file that you want to copy to the destination folder.
2.
Release the mouse button.
The selected file or folder is copied to the destination drive.
Using Applications 4-9
A
Glossary
Glossary
Useful terms
to know
This section provides you with a brief explanation of functional terms, technology
and abbreviations used or referred to in this manual.
1394
IEEE 1394 is a high-speed input/output technology for connecting devices to a
computer. While similar to USB, IEEE 1394 is more suited to high-speed
multimedia devices such as video camcorders, synthesizers, hard disks and other
mass data storage media. IEEE 1394 supports data transfer rates of up to 400
Mbps or 400 million bits per second. Like USB, IEEE 1394 offers incredible
convenience with “hot swap” capability. This means that you do not have to turn off
or restart your computer when attaching or detaching your 1394 device. You can
connect up to 63 devices to a single port.
Your player uses Creative’s SB1394 standard, which is compliant with IEEE 1394.
See "SB1394".
Advanced EQ
See "Equalization".
AIFF
The Audio Interchange File Format (AIFF) is an audio file format developed by
Apple®. AIFF files tend to be as large as WAV files.
Analog audio
Non-digital audio. An example of an analog audio source is a cassette tape, or a
vinyl record. Making an analog recording from an analog source, for example,
duplicating a cassette recording using a cassette recorder, can result in imperfect
recordings. Subsequent analog recordings from the first analog recording usually
suffer a progressive reduction in quality. See "Digital audio" on page A-4 for a
comparison.
Glossary A-1
Analog Line-In
Record audio from an analog source by using this connector. The connector
accepts both analog or optical line-in sources, automatically detecting whether the
source is analog or optical.
See "Optical Line-In"
AudioSync
AudioSync can synchronize the music libraries in your player and PC. If either
library has insufficent space, you can selectively transfer tracks by artist, genre or
playlist. You can also set up AudioSync so that either your player or PC is updated.
Use an SB1394 or IEEE 1394 cable for lightning-fast transfers.
Bitrate
A bitrate indicates the average number of bits in one second of a digital audio
track. MP3 encoders allow you to specify the bitrate when making MP3 files. The
higher the bitrate, the better the audio quality. Unfortunately, this also means a
larger file size.
Bitstream
A flow of information running through a device like an MP3 player. An MP3
bitstream can be translated back into audio using an MP3 codec, like the codec
developed by Fraunhofer IIS-A.
Bookmark
An electronic bookmark for an audio track. If you prefer to play an audio track
from the 12th second onwards, make a bookmark at 12 seconds. Bookmarks are
useful for long tracks. for example, a 45 minute narrative.
Category
A general grouping of audio tracks, for example, Artist, Album or Genre.
CDDB
This stands for Compact Disc DataBase. The GraceNote® Music Recognition
ServiceRS is a public information repository for thousands of audio CDs. Many
people who listen to audio CDs and music artists submit information about audio
CD albums to GraceNote. This service compares, edits and reconciles duplicate
entries and combines many submissions into individual records.
Glossary A-2
PlayCenter helps you get information about your audio CD by accessing this
massive database. This saves you the trouble of typing in track information and
ensures that track titles appear correctly in your player.
You can contribute to this database too. See PlayCenter’s Online Help for more
information.
Codec
This is a short form for COder/DECoder. An MP3 codec is an essential part of MP3
encoders and players. It helps to translate audio into MP3 bitstreams and back.
Confirmation box
A variant of the message box, this box appears for you to confirm an action. For
example, if your player is locked, and you press a button, the confirmation box
“Unlock Button?” appears. Use the Scroller to make a choice in the box.
Creative Audio
Stream Recorder
The Creative Audio Stream Recorder (ASR) is a software application that enables
you to record streaming audio content from the Internet, and then play it back on
your computer or transfer it to your player. You can record on-demand, or schedule
the recording.
Creative File
Manager
Creative File Manager is a data file manager for your player. With its intuitive
interface, you can drag-and-drop data files between your computer and player.
With Creative File Manager, your player doubles as a portable data storage device.
Creative
PlayCenter 3
Creative PlayCenter is your Personal Digital Music Center on the PC. Developed by
Creative, PlayCenter allows you to listen, organize, rip, and even create your own
audio CDs! it also lets you manage, organize and seamlessly transfer music
between Creative portable digital audio players and your PC. With AudioSync, you
can also synchronize music between your PC and NOMAD Jukebox.
See the PlayCenter Online Help for more information.
Glossary A-3
Creative Sound
Blaster Audigy
With the onboard 24-bit Analog-to-Digital Convertor (ADC) and Digital-to-Analog
Converter (DAC), the Sound Blaster Audigy card delivers high-definition sound of
astounding quality with 96 kHz SPDIF support. The Sound Blaster Audigy card,
with its Audigy processor, is four times as powerful as its nearest competitor. This
enables awesome EAX ADVANCED HD™ technologies for your games and music
listening experience.
The SB1394 port provides easy high-speed connectivity to NOMAD portable digital
audio players, external CD-RW drives and other IEEE 1394 compatible devices like
DV Camcorders, printers, scanners and digital still cameras. You can connect your
player to the Audigy’s SB1394 jack, without using a separate IEEE 1394 interface
card.
CreativeLink
A unique type of interface for use with other Creative devices.
Digital audio
When you convert sound waves into binary data (0s and 1s), you are creating
digital audio. Using proper cables (for example, optical cables) with a standard
encoding bitrate usually results in a perfect copy of the original, with no
degradation or noise. See "Analog audio" on page A-1 for a comparison.
Docking device
Depending on the manufacturer’s intention, a docking device can be used for:
• charging a device (like a mobile phone’s desktop charger)
• enhancing a device (like the Creative Docking Station)
• data transfer (like a handheld device’s docking station)
• any combination of the above
DRM
Digital Rights Management (DRM) is a technology which enables the copyright
owner of intellectual property, like a digital audio track, to control how you, the
listener, can use the file. It is normally used to allow you to download digital audio
tracks while preventing you from distributing the files to other people or other
devices. With DRM, digital audio tracks contain digital signatures. Creative
PlayCenter and your player are DRM-compliant.
Glossary A-4
EAX
EAX technology delivers advanced audio functionality and performance, adding
sophisticated audio processing capabilities, interactive and high-definition sound to
digital entertainment. With EAX technology-enabled products, you can shape and
customize your audio experience. Certain EAX features provide advanced audio
capabilities for music composition and sound design. To fully experience EAX,
connect a Creative Inspire 4.1 speaker set to your player, and with EAX enabled,
activate 4-channel surround sound in Jukebox Settings.
Encoder
While there are many types of encoders, an MP3 encoder is a tool capable of
translating audio into an MP3 bitstream. You need an MP3 encoder to create MP3s.
Environment
A collection of presets, for example, Opera House, Bath Room and Auditorium, that
you can choose to enhance your audio.
Equalization
A process that increases or decreases audio at certain frequencies, so that treble,
midrange or bass sounds are heightened or reduced. Advanced EQ provides
equalizer presets such as Acoustic, Classical and Jazz.
Firmware
The software in your player that allows you to to perform numerous functions
including playing and recording audio. The firmware can be used with the supplied
applications as described in "Using Applications" on page 4-1.
You can check to see if your player’s firmware is up-to-date by checking the
firmware version number against the firmware download available at
www.NOMADworld.com.
For information on how to check your firmware version number, see "Checking
Jukebox information" on page 2-10. To upgrade your firmware, see "Using Your
Player" on page 3-1.
Genre
A general category of music, for example, Soundtrack, Acid Rock or Classical.
Glossary A-5
Gigabyte (GB)
About a thousand million bytes. A 1 GB device can store 1000 MB worth of MP3
files. If your MP3 files are encoded at 128 kbps and each file is about 4 minutes
long, a 10 GB device can store about 2500 MP3 files.
GraceNote
See "CDDB".
Hard disk
The hard disk on your player is where all of your audio is stored. The hard disk is
also known as a Hard Disk Drive.
ID3 tag
ID3 tags are digitally embedded in MP3 files, providing you with information such
as the title, album, artist and genre of a song. This information is displayed when
the MP3 audio track is played back. ID3 tags can be edited.
InfraRed (IR)
A technology standard for transmitting data without cables, using infrared light
waves. Many devices like wireless remote controls use IR.
kbps
Kilobits-per-second. A measure of how good the bitrate is. 128 kbps is the
standard bitrate for MP3 files. 128 kbps MP3s are near-CD quality. However, you
can encode MP3s at 160 or 192 Kbps.
kHz
This stands for kiloHertz, literally a thousand cycles per second, a measure of
audio frequency.
Line-In Recording
A WAV or MP3 file made by recording audio through the Line-In connector of your
player. In general, recordings made via the Line-In connector are of better quality
than recordings made using the Wired Remote or FM Wired Remote. You would
normally use the Line-In connector to record music from CD players or other audio
playing devices. If you select a high sampling rate for a WAV recording, the audio
quality can easily match that of a MiniDisc recording or a DAT.
Glossary A-6
List
From a list, you can select one of many options listed. For example, a list can
contain available EAX environments, or letters and numbers for you to construct a
name for a recording.
Lithium-Ion battery
(Li-Ion)
A battery composed of Lithium, a light metal with high electrochemical potential.
Lithium batteries are light and store high amounts of electrical energy. Because of
this, Lithium-Ion batteries are ideal for portable devices like your player. LithiumIon batteries do not use poisonous metals, such as lead, mercury or cadmium, and
have no memory effect problems. However, they are more expensive than
conventional Nickel-Cadmium (NiCad) and Nickel Metal-Hydride (NiMH) batteries.
Your player uses Li-Ion batteries.
Match Volume
This is an EAX feature that keeps the playback volume of all the tracks on your
playlist at the same level. This is especially useful as songs are often recorded at
different volumes. With this activated, you don’t have to keep adjusting the volume
from song to song.
Megabyte (MB)
About 1 million bytes. Bytes, megabytes and gigabytes are measures of how much
data a storage device can hold. For example, a 3-minute MP3 encoded at standard
bitrates is approximately 3MB in size.
Memory Effect
A property of some NiCad batteries that can surface when a battery is not fully
used or discharged before it is recharged. This can cause the battery to have a
false ‘memory’ as to how much electrical energy it can store. This results in
significantly lower battery levels, even after a full charge.
Menu
A selection of options in your player’s screen. For
example, this screen shows a menu with four options,
Music Library, Recording, Jukebox Settings and Button
Lock.
Glossary A-7
Message box
A pop-up window that appears to give you information, for example, "Bookmark
set at 00:04:23".
MP3
A member of the MPEG compression family, MP3 is a commonly used compressed
digital audio format. MP3 encoding transforms digital audio files (like WAV) to
provide reasonable audio quality in relatively small file sizes. Recordings made
with the Wired Remote are in the MP3 or MP3 format.
Music Library
An organized collection of audio tracks in your player. Tracks are grouped by
categories, namely, "All tracks", "Albums", "Artists", "Genres", "Line-In
Recordings" and "Voice Recordings".
Nickel-Cadmium
(NiCad)
An older type of battery often used for portable devices. Some of these batteries
suffer from Memory Effect, and can store less electrical energy than Li-Ion
batteries.
Nickel Metal
Hydride (NiMh)
An older type of battery often used for portable devices. These batteries do not
suffer from Memory Effect problems, and can store about 50% more energy than
NiCad batteries, but not as much as Li-Ion batteries.
Now Playing screens
A series of screens—the Playing Track screen and Playing List screen—accessible
by pressing the NOW PLAYING button.
See "Playing Track screen" and "Playing List".
Optical Line-In
Using a digital audio source with this connector on your player allows you to make
digital recordings, eliminating unwanted ‘noise’ associated with analog recordings.
The connector accepts both analog or optical line-in sources, automatically
detecting whether the source is analog or optical.
See "Analog Line-In".
Glossary A-8
Playing Track screen
Shows the track that is being played back or the track
that has been selected in the Playing List for playback.
See "Playing List" and "Now Playing screens".
Playing List
The Playing List is like a long line of audio tracks,
waiting for their turn to be played. You can choose an
album or a playlist of tracks to be played. Their turn
comes when the tracks listed before them have been
played. In Normal mode, tracks are played in the
order that they are queued.
See "Playing Track screen" and "Now Playing screens".
Playlist
A grouping of audio tracks. Using a playlist, you can create a playback sequence of
audio tracks from multiple albums or categories without actually rearranging any
audio tracks in the player’s Music Library. You can also name a playlist, for
example, My Favorite Pop Songs.
Presets
A collection of EAX settings that you can select to enhance your audio. For
example, some of the presets you can choose in Advanced EQ include Acoustic,
Classical and Rock.
Ripping
The process of creating digital audio tracks from an audio CD. Using a CD ripper
and an MP3 encoder, you can extract favorite tracks from an audio CD and make
MP3 files. You can then transfer the audio tracks over to your player for your
enjoyment.
Sampling Rate
The sampling rate is a measure of how well an audio source is captured as a digital
audio file. For example, a normal audio CD has audio sampled at 44.1 kHz.
Glossary A-9
SB1394
SB1394 is Creative's IEEE-1394 compatible standard for high speed (about
400Mbps at peak) digital audio transfer. Creative's SB1394 standard offers you
maximum speed and compatibility with SB1394 peripherals and also provides you
with a seamless user experience for transferring massive MP3 collections, DV
editing, easy networking and more.
You can connect your player to your computer using the SB1394 cable. This cable
can be connected to the Audigy audio card’s SB1394 jack or a standard IEEE 1394
interface card. See "1394" on page A-1 for more details about IEEE 1394.
Screen
The current display on your player. For example, this is the Menu screen:
Scroll Select
A term for a two-step operation using your player’s Scroller. Scroll up or down
options in menus and lists, and press the Scroller to select the option.
SDMI
Secure Digital Music Initiative. Developed by a forum of 200 companies in the
worldwide recording industry, SDMI-compliant devices or software can play SDMI
encrypted formats, as well as conventional, unencrypted formats. It was
developed to allow consumers, like you, convenient access to music in online and
emerging digital distribution systems. SDMI promises copyright protection for the
artist, and the promotion of new music related technologies. Your player is SDMIcompliant.
Shock Buffer
This buffer is usually a temporary data storage area. When you carry your player
around, it is subjected to many minor bumps and shakes. To give you
uninterrupted audio playback, your player uses a five minute shock buffer.
Glossary A-10
Shuffle
A Play Mode that plays tracks at random from the Playing List. It is almost like
waiting in line at a popular nightclub. Sometimes some tracks don’t get played at
all.
Shuffle Repeat
Just like Shuffle, except that your player continues to select tracks at random to
play. Your player will continue doing this until it runs out of battery power, or until
you interrupt it.
Smart Volume
Management (SVM)
Smart Volume Management evens out the volume ‘bumps’ in an audio track. Some
types of music, for example, Mahler’s second symphony, have great contrasts in
volume. When you turn up the volume to listen to a quiet portion of the track, you
can get deafened and shocked when the louder portions are played. SVM also
compensates for ambient noise in your listening environment. Choose "Plane", for
example, when you listen to your player while flying, and the audio level is
automatically adjusted. You can turn this feature on or off from the EAX menu.
Spatialization
A feature of EAX that changes your perception of audio from a pair of stereo
headphones. Choose either Full, Narrow or Wide to suit your listening pleasure.
Time-Scaling
A feature of EAX that allows you to change the speed of audio playback without
changing the pitch or distorting the audio quality. For example, you can use this
feature to slow down a recording of a speech for easier note-taking. Choose a
setting from 0.5x to 1.5x, where 1.0x is normal speed.
USB
USB stands for Universal Serial Bus. It is a moderately high-speed input/output
technology for “hot swap” data transfers, meaning that you can connect or
disconnect a USB device without turning off your computer.
Voice Recording
Using the Wired Remote or FM Wired Remote, you can make recordings of
speeches, discussions and meetings. The recording is in the WAV or MP3 format,
and cannot be larger than 2 GB.
Glossary A-11
WAV (wave)
An uncompressed digital audio format, WAV files are often used in systems
running Microsoft Windows. Recordings made with the Wired Remote or FM Wired
Remote are in WAV or MP3 formats.
Wired Remote
An accessory for your player that you can use to access the player’s controls
without dragging the player out from your bag or pocket.
Windows Media
Audio (WMA)
Microsoft’s Windows Media Audio (WMA) format is suitable for lower bitrates but
can produce an audio quality that is almost indistinguishable from the original
audio when encoded at 128 kbps. Most full-featured player programs and portable
players can play WMA files. Some WMA files are protected by a digital signature.
See "DRM" on page A-4.
Glossary A-12
B
Primers and Information
Primers and Information
This chapter contains detailed information on key technologies used in the
development of your NOMAD Jukebox 3 as well as details of Scroller operations
and icons used in the player’s screens.
About MP3
It is illegal to encode
MP3 files for trade or
sale unless you have
the express and explicit
permission of the
copyright holder(s).
MP3 is the acronym for Moving Picture Experts Group (MPEG) Audio Layer 3, a
type of audio data compression technology that can significantly reduce a digital
audio file’s size by as much as one-twelth, with virtually no loss in quality. It is an
efficient way to store high-quality music or other audio content on your computer.
These compressed digital audio files have a file extension of .MP3, and can be
downloaded from many sites on the Internet. You can also produce them legally
for personal use, from your original audio CDs.
Making MP3s — audio extraction
The first phase in making an MP3 file is extracting audio data from an audio CD. To
extract audio data, you will need a CD-ROM drive that can extract digital audio
data, and a program known as a Ripper. This program uses the CD-ROM drive to
read the audio tracks from the audio CD and stores it on your hard disk. The time
needed for a successful audio extraction depend on:
• CD-ROM drive speed
• defects, like scratches on the audio CD
• error-checking features on the CD-ROM drive
Primers and Information B-1
Making MP3s — encoding
Encoding is the second phase of making an MP3 file. Encoders are used to convert
the stored audio tracks, usually WAV files, into MP3 files. MP3 encoding is
considered lossy compression, which means that some data is lost during
compression. However, using the standard sampling rate and bitrates will ensure
that your MP3 files retain much of their audio quality. The standard bitrate of most
MP3 files is 128Kbps, although some are set higher, at 160 or 192Kbps. Higher
bitrates will result in larger MP3 file sizes, with better audio quality. Use PlayCenter
to extract audio tracks and encode MP3s.
See the PlayCenter Online Help for more information.
Where to get MP3
files
The websites listed
here are correct at the
time of this document’s
release.
About EAX
To get MP3 files from the Internet, use a search engine to locate sites with MP3
content. You can also try out these sites:
❍ NOMADWorld
http://www.NOMADworld.com
❍ AMP3.com
http://www.amp3.com
❍ SoundClick.com
http://www.soundclick.com
❍ ArtistOne.com
http://www.artistone.com
❍ Epitonic.com
http://www.epitonic.com
❍ Soundbuzz.com
http://www.soundbuzz.com
EAX technology delivers advanced audio functionality and performance, adding
sophisticated audio processing capabilities, interactive and high-definition sound to
digital entertainment. EAX technologies are implemented across a range of audio
hardware solutions, system software, application software, and application
programming interfaces (APIs) from Creative. With EAX technology-enabled
products, you can shape and customize your audio experience. Certain EAX
features provide advanced audio capabilities for music composition and sound
design. EAX technology is redefining the audio experience.
Primers and Information B-2
In addition to its fully customizable 3D spatialization effects, 4-channel sound,
advanced EQ, time-scaling, and audio environment settings, EAX is bringing
"Smart Volume Management" (SVM) to your favorite digital audio player.
Employing advanced predictive analysis, SVM intelligently controls the dynamic
range of a song, providing a superior audio experience, especially in difficult
listening environments such as a plane or car. Additionally, a Match Volume feature
keeps the playback volume of all the tracks on your play list at the same level. You
no longer have to adjust the volume from song to song. With these awesome EAX
technologies, the NOMAD Jukebox delivers an unsurpassed listening experience.
For more information, please visit EAX.creative.com.
About USB
An older serial input/output technology than IEEE 1394, USB is commonly used for
lower-speed input devices, such as printers, scanners, mice, keyboards, cameras
and other devices connected to your computer. A USB device is self-configuring
and has the same “hot swap” capability as 1394. You can connect up to 127
devices per computer.
Although USB transfers are faster than most parallel or serial port transfers, high
speed devices like CD-Recorders and portable hard disk drives will probably be
1394-enabled.
About
IEEE1394
Also known as FireWire™, IEEE 1394 is high-speed serial input/output technology
for connecting devices to a your computer. Originally developed by Apple™, it is
now an official industry standard.
While similar to USB, 1394 is more suited to high-speed multimedia devices such
as video camcorders, synthesizers, hard disks and other mass data storage media.
Like USB, 1394 offers incredible convenience with “hot swap” capability. This
means that you do not have to turn off or restart your computer when attaching or
detaching your NOMAD Jukebox 3.
1394 supports up to 63 devices per computer, and provides devices with power. It
also features automatic configuration, with no device IDs or terminators required.
1394 ports support data transfer rates of up to 400 Mbps or 400 million bits per
second. 1394 devices are self-configuring.
Primers and Information B-3
List of Scroller
operations
Scroller
operation
ADD TO PLAY
Many operations are accessible from your player’s context-sensitive Scroller. Here
is a summary of all operations or selections available:
Description
❍ adds the selection to the Playing List
CANCEL
❍ gets out of menu selection without changing
anything
CHANGE ORDER
❍ changes the playback order of a selection in
the Playing List
CLEAR BOOKMARK
DELETE ___
EXPAND / COLLAPSE /
TRACK DETAILS
GO TO BOOKMARK
MP3, 64 KBPS
MP3, 96 KBPS
MP3, 128 KBPS
MP3, 160 KBPS
MP3, 192 KBPS
MP3, 256 KBPS
MP3, 320 KBPS
Notes
❍ the selection is played when its turn
comes
❍ removes the bookmark from a track
❍ deletes track, subcategory or selection from
the Music Library
❍ selection is permanently deleted
❍ expands or collapses a category in the
Playing List if an album, artist or genre
selected
❍ shows track details when track is selected
❍ goes to the bookmarked point in a track
❍ track must be playing when using
this feature
❍ available bitrate and format combinations for
recording
Primers and Information B-4
Scroller
operation
Description
Notes
❍ makes another recording using the same
settings as the previous recording
❍ Scroll Select "New" after saving or
discarding the previous recording
❍ disables Play Modes.
❍ press the PLAY button to play the
entire Playing List once, in sequence
❍ shows the contents of a category or subcategory
❍ for example, if Album is selected,
"Open" shows all albums stored in
the Music Library
❍ adds all tracks in the sub-category to the
front of the Playing List. The first track starts
playing.
❍ for example, if "The Visit" is selected
under Albums, all tracks from the
album "The Visit" will be added
❍ plays the selected track once
❍ no other tracks are played
❍ you must select the track to play
❍ pressing the FORWARD or REVERSE
buttons during play will skip to the
selected track, and play it once
PREVIEW
❍ samples a track within a category
❍ track being previewed is not added to
the Playing List
REMOVE
❍ removes the selection from the Playing List
❍ does not remove the selection from
the Music Library
❍ clears the Playing List
❍ you must confirm removal of all
tracks
❍ changes the name of the selected playlist
❍ rename a track from PlayCenter and
transfer it into your player
❍ repeats playback of the Playing List
❍ tracks play in sequential order
NEW
NORMAL
OPEN
PLAY NOW
PLAY TRACK ONCE
REMOVE ALL
RENAME
REPEAT ALL
Primers and Information B-5
Scroller
operation
REPEAT TRACK
SAVE AS PLAYLIST
Description
❍ repeats playback of the current track only
❍ saves the contents and playback order of the
Playing List as a playlist
SET BOOKMARK
❍ sets a bookmark at this point in the track
SHUFFLE REPEAT
❍ randomly plays tracks from the Playing List
SHUFFLE
❍ randomly picks and plays one track from the
Playing List
TRACK DETAILS
❍ shows details of current track
VOICE
❍ chooses voice recording mode
WAV, 11.025 KHZ
WAV, 22.05 KHZ
WAV, 32.0 KHZ
WAV, 44.1 KHZ
Notes
❍ only one bookmark per track
❍ in the Playing List screen, details
include name of track, artist, album
and genre
❍ in the Playing Track screen, details
include name of track, artist, album,
genre, sampling rate and bitrate
❍ available bitrate and format combinations for
recording
Primers and Information B-6
Information
Diagram
Diagram
Action / Meaning
❍ your PC is actively
managing your player.
To use your player,
disconnect it from
your PC.
❍ your PC is not actively
managing your player.
To use your player,
disconnect it from
your PC.
❍ you are upgrading
your player’s
firmware.
❍ the firmware upgrade
is complete. Reset
your player to enable
the new firmware to
take effect.
Playback Icons
The following icons appear onscreen when the associated playback action is used.
Icon
Action / Meaning
❍ Play
Primers and Information B-7
Icon
Action / Meaning
❍ Pause
❍ Forward
❍ Reverse
❍ Skip forward
❍ Skip back
Playing List
Icons
The following icons are commonly found in the Playing List screen.
Icon
Action / Meaning
❍ Album
❍ Artist
❍ Genre
❍ Track
Primers and Information B-8
Icon
Action / Meaning
❍ Track within audio
category
❍ Audio selected for
playback or which is
currently playing back
Audio
Enhancement
Icons
The following icons appear onscreen when the respective audio enhancements are
active.
Icon
Action / Meaning
❍ Repeat Track
❍ Repeat All
❍ Shuffle
❍ Shuffle Repeat
❍ Play Track Once
❍ EAX active
Primers and Information B-9
Navigational
Icons
The following icons appear on-screen when you are in the associated firmware
section.
Icon
Action / Meaning
❍ Menu
❍ Playing List
❍ Playing Track
❍ Music Library
❍ Playlists category
❍ All Tracks category
❍ Albums category
❍ Artists category
Primers and Information B-10
Icon
Action / Meaning
❍ Genre category
❍ Recordings category
❍ EAX
❍ Find
❍ W.Remote Recording/
Line-In Recording
❍ Line-In Record/
Optical Record
❍ Voice Record
❍ Jukebox Setting
Primers and Information B-11
Icon
Action / Meaning
❍ Jukebox Information
❍ Personalization
Primers and Information B-12
C
Handling Instructions
Handling Instructions
To prolong the life of your player and its battery, you need to take some care in
handling them. Improper handling can result in damage, excess heat buildup,
smoke or fire. We have also included some precautionary information, to help you
avoid hazardous situations.
Battery
handling
This section contains
important information
that you should know
about.
Usage
• Do not load batteries with polarities (-/+) reversed.
• Keep away from children.
• Do not force batteries into the battery compartment.
• Batteries may become hot after prolonged use. You can avoid minor burns by
letting them cool down before removing them from the player.
• Do not short-circuit the batteries with metallic objects such as keys or jewelry.
Do not allow metallic objects to come into contact with the batteries’ terminals.
This can cause the batteries to lose their electrical charge.
Environment
• Do not expose or subject the batteries to excessive heat from direct flames or
other heat sources.
• Do not immerse the batteries in water or expose them to excessive moisture.
• Store batteries in cool, well-ventilated and dry storage areas. Do not store
batteries in areas with temperatures outside of -10°C to 45°C (14°F to 113°F).
Handling Instructions C-1
Physical
• Do not attempt to disassemble, solder or alter the batteries.
• Do not remove the label.
• If batteries are swallowed, seek medical attention immediately.
• Do not pierce or crush the batteries, as it may cause the electrolyte to leak.
Contact with the electrolyte is hazardous to your health.
• Avoid dropping the batteries or subjecting them to severe impact. This may
cause electrolyte leakage.
Electrolyte leakage
• If there is electrolyte leakage, smoke, discoloration, deformation or noxious
odors while using or charging the batteries, dispose of the batteries
immediately using protective hand gear. Wash your hands thoroughly after the
disposal.
• Dispose of lithium batteries safely, complying with relevant local laws.
• Do not dispose of batteries in containers with flammable material.
• If the inner contents of the batteries come into contact with any part of your
body or clothing, flush with water immediately. In the case of accidental contact
with your eyes or mouth, flush with water and seek medical assistance.
Player handling
This section contains
important information
that you should know.
Usage
• Use only recommended batteries and accessories to avoid explosions, leaks,
injury and damage to self and surroundings.
• Avoid operating the player with wet or damp hands.
• Avoid storing the player within reach of young children and infants to prevent
accidents or injury.
Environment
• Store or use the player in a cool place.
• Do not store the player in areas with temperatures exceeding 113°F or 45°C.
• Do not leave your player exposed in the car on a sunny day.
• Keep your player away from strong magnetic fields, such as those generated by
magnets or unshielded speakers.
• Do not immerse the player in water or expose it to excessive moisture.
Handling Instructions C-2
Physical
• Do not attempt to disassemble or modify the player.
• Do not subject your player to excessive force or impact. Severe impacts can
seriously damage your player.
Handling Instructions C-3
D
Technical Specifications & Error
Diagrams
Technical Specifications & Error Diagrams
Technical
Specifications
for your
NOMAD
Jukebox 3
Size (W x H x D)
❑ 4.84" x 5.12" x 1.38" or 123 mm x 130 mm x 35 mm
Weight
❑ 10.2 oz or 289 gms without batteries
Memory
❑ 16 MB SDRAM buffer
Capacity
❑ 10/20/30/40 GB hard drive (depending on your player model)
Battery Life (playback time)*
❑ Up to 11 or 22** hours of continuous playback from fully charged Lithium-Ion batteries
The following may reduce the playback time:
• playback of tracks encoded at bitrates higher than 128Kbps
• use of EAX effects or environments
• skipping, fast forward or reverse during playback
• using passive speakers or high-power headphones
• long backlight timeout setting (more than 10 secs)
Interface
❑ USB 1.1, CreativeLink, IR remote control, SB1394
Playback Formats***
❑ Wave
❑ MP3 (at 8, 11.025, 12, 16, 22.05, 24, 32 and 44.1 kHz)
❑ WMA (at 16, 22.05, 24, 32 and 44.1 kHz)
Recording Formats
❑ Wave
❑ MP3 (at 8, 11.025, 12, 16, 22.05, 24, 32, and 44.1 kHz)
* Battery life estimated for playback of tracks encoded at 128Kbps.
** with a second Lithium-Ion battery
***Audio codec support, firmware upgrades, and SDMI compliance are available from
www.nomadworld.com
Technical Specifications & Error Diagrams D-1
Signal to Noise Ratio
❑ Up to 98 dB (Line-Out)
❑ Up to 96 dB (Headphones)
Channel Separation
❑ Up to 98 dB (Line-Out)
❑ Up to 75 dB (Headphones)
THD
❑ <0.1%
Frequency Response
❑ 20 Hz~20000 Hz
Harmonic Distortion
❑ <0.1%
Operating System/Firmware
❑ Upgradeable via Internet
Line Input
❑ Wired Remote Microphone
❑ Optical/Line-In
Line outputs
❑ Two 1/8" stereo minijacks for front and rear speakers
Headphone Out
❑ 1/8" stereo minijack, 100 mW (Wide, Narrow, Front only)
LCD Display
❑ Large 132 x 64 pixel EL backlit display, in Cool Ocean Blue or Breezy Green
Data Connector
❑ USB
❑ SB1394
EAX
❑ Environment effects
❑ Parametric equalization
❑ Headphone spatialization
❑ 4-channel surround and playback speed
❑ Smart Volume Management
Playback Speed
❑ Up to 1.5 times faster or slower for audio book content, WAV and MP3 audio playback
Technical Specifications & Error Diagrams D-2
Audio Codec Support****
❑ MPEG Audio Layer 3 (MP3), WAV, WMA (with DRM) and future formats
Understanding
Error
Diagrams
If an error occurs, you may see any one of the following diagrams, indicating the
general nature of the problem.
Diagram
Likely Causes
Suggested Action
❍ unexpected power loss
while saving settings
❍ download a newer firmware
version
❍ reload firmware
❍ call Technical Support
❍ physical defects
❍ numerous high-impact
shocks
❍ call Technical Support
❍ battery is too depleted,
player cannot start up
❍ recharge the battery
❍ use DC power
****Audio codec support, firmware upgrades, and SDMI compliance are available from
www.nomadworld.com
Technical Specifications & Error Diagrams D-3
Diagram
Likely Causes
Suggested Action
❍ firmware corruption
❍ see actions for firmware
problems
❍ unexpected power loss
during audio file
transfer
❍ allow firmware to complete
the rebuilding of the library
Technical Specifications & Error Diagrams D-4
E
FAQs and Troubleshooting
Frequently Asked Questions (FAQs) and Troubleshooting
Frequently
Asked
Questions
(FAQs)
In this chapter, we cover common problems you might encounter or questions you
might have while using your NOMAD Jukebox 3.
AutoPlay
The installation does not start automatically after the Installation CD is
inserted.
We have divided the FAQ into a few categories for your easy reference.
The AutoPlay feature in your Windows system may not be enabled.
To start the
installation program
through the My
Computer shortcut
menu
1.
Double-click the "My Computer" icon on your Windows desktop.
2.
Right-click the CD-ROM drive icon.
3.
On the shortcut menu, click "AutoPlay" and follow the onscreen instructions.
To enable AutoPlay
through Auto Insert
Notification
1.
Click "Start" -> "Settings" -> "Control Panel".
2.
Double-click the "System" icon. The "System Properties" dialog box appears.
3.
Click the "Device Manager" tab and select your CD-ROM drive.
4.
Click the "Properties" button.
5.
Click the "Settings" tab and select "Auto Insert Notification".
6.
Click the "OK" button.
Features
Why do I need two Line-out jacks?
They are for front and rear speakers. For example, if you have a Creative Inspire
4.1 speaker system, you can connect the front speakers to Line-Out Jack 1, and
the rear ones to Line-Out Jack 2.
Frequently Asked Questions (FAQs) and Troubleshooting E-1
If I make a bookmark in a track, will the track play back from the
bookmarked point?
No, you have to manually select "GO TO BOOKMARK". See "To play the track from
the bookmarked point" on page 3-20 for more information.
If the Playing List already has a few albums in it, can I repeat playback of
just one album?
Unfortunately, no. You can only choose to repeat one track, or all tracks.
Why does my player show me track titles starting with "B" when I’m
looking for a track title starting with "A"?
When you look for a track using the FIND feature, your player looks for the closest
match. If you do not have any tracks starting with "A", the closest match can be
"B".
Can I connect the player to an IEEE 1394 port on my computer? Do I have
to have an SB1394 port?
You can connect your player to a standard IEEE 1394 port. SB1394 and IEEE 1394
are compatible.
General
Where can I get official information on all Jukebox products?
Visit NOMADworld for updates and downloads relating to all Jukebox products,
Creative’s MP3 players and accessories.
Visit www.NOMADworld.com
My player seems to have frozen. Is there anything I can do?
You can reset your player. Turn your player over, and insert the end of a
straightened paper clip into the Reset hole. If your player is still unresponsive, call
Technical Support.
Frequently Asked Questions (FAQs) and Troubleshooting E-2
Windows XP tells me that the software for the player is not certified. What
do I do?
At the time of this product's release, Microsoft strongly encouraged companies to
submit their hardware solutions for certification. If a hardware device driver is not
submitted, or does not qualify, for Microsoft certification, a warning message
similar to the one below appears.
You may see this message when installing this driver or update. If you do, you may
choose to click the Continue Anyway button. Creative has tested this driver or
update on Windows XP, and it does not impair or destabilize your computer.
If you need more XP-related information, go to the product web site's Help or
speak with Creative Technical Support staff.
Frequently Asked Questions (FAQs) and Troubleshooting E-3
How can I get accessories for my Jukebox?
Visit www.NOMADworld.com for the latest news on accessories.
Can I hear audio from my player without using headphones?
Yes! Your player has 2 pairs of Line-Out connectors, to which you can connect
normal stereo speakers, or such speakers as the Creative Inspire 4.1 speakers for
immersive surround sound.
For a two speaker set, use Line Out 1.
For a great listening experience, use one of the following Creative range of
speakers to complement your player:
• Creative Inspire 2.1 2400
• Creative Inspire 2.1 Slim 2600
• Creative Inspire 4.1 4400
Note: Some of these models may not be available in your region. Check
www.creative.com for details.
Maintenance
Do I need to defragment the player’s hard disk?
No, you will not need to defragment, format or clean up the hard disk at all. The
player’s unique file system ensures that you will not have to worry about hard disk
maintenance.
Usage
Can I jog with my NOMAD Jukebox 3?
You should not subject your player to continuous shocks, such as those that are
likely to occur while you jog or run. You can take a nice long walk with your player,
though.
Can I use the NOMAD Jukebox 3 for portable data storage?
Yes, you can. However, the Jukebox is designed for storing and playing audio, not
as an extra hard drive. You can use the USB or SB1394 cable for speedy transfers
to and from your player.
Use the File Manager application to help you manage data files.
Frequently Asked Questions (FAQs) and Troubleshooting E-4
I have to recharge the battery quite often. Is there anything I can do to
make it last longer?
Generally, any operation requiring the player to access the hard disk uses battery
power. Consequently, filling your player to capacity is not recommended. However,
some operations consume more battery power:
• a long backlight timeout setting. A shorter timeout conserves battery power.
• a high contrast setting. Position the player so that you can read the display
wihout using a high contrast setting.
• too much use of fast forward/reverse.
• turning the player on/off too many times.
• use of EAX effects or environments.
• use of passive speakers or high-powered headphones.
Proper charging and handling of the battery can also help in prolonging battery life
and charge. See "Battery handling" on page C-1.
Should I leave my player plugged into the DC adapter?
No, you should not. After charging the battery or using the player, disconnect it
from the DC power adapter. Leaving it plugged in leads to heat buildup, which is
not good for the player or the battery.
I’m having some trouble using other types of rechargeable batteries with
my player. Can I use other types of batteries?
No, you should only use the recommended batteries, either supplied with your
package, or purchased from NOMADworld. We do not recommend that you use
other types of batteries. Usage of other batteries may cause damage to the player
or injury to yourself.
Frequently Asked Questions (FAQs) and Troubleshooting E-5
If I damage or lose my DC adapter, can I buy a similar, off-the-shelf
adapter?
No. The adapter may not be compatible with your player, and may even damage it.
You should get a replacement adapter from Creative at www.NOMADworld.com, or
your local Creative office/distributor.
Frequently Asked Questions (FAQs) and Troubleshooting E-6
F
Index
Index
Numbers
1394 .................................................................... A-1
about ............................................................ B-3
FireWire ........................................................ B-3
A
about EAX ............................................................ B-2
about IEEE 1394 .................................................. B-3
about MP3 ........................................................... B-1
about USB ........................................................... B-3
accessories ................................................... vii, 1-11
add to play .......................................................... B-4
Advanced EQ ....................................................... A-1
AIFF .................................................................... A-1
analog audio ........................................................ A-1
Audigy ................................................................. A-4
audio codec support ............................................. D-3
audio file formats ................................................. A-1
AudioSync ..................................................... 4-3, A-2
B
basic audio playback ............................................. 3-2
battery charge icons .............................................. 2-3
battery charge status ............................................ 2-3
battery disassembly ................................................ vi
battery modification ................................................ vi
bitrate .................................................................. A-2
bitstream ............................................................. A-2
bookmark ............................................................. A-2
bookmarking audio ............................................. 3-19
buttons
back .............................................................. 1-6
EAX ............................................................... 1-4
find ............................................................... 1-5
forward .......................................................... 1-5
menu ............................................................. 1-4
now playing ................................................... 1-6
pause ............................................................ 1-4
play ............................................................... 1-4
power ............................................................ 1-4
record ............................................................ 1-4
reverse .......................................................... 1-4
scroller .......................................................... 1-5
stop ............................................................... 1-5
volume control ............................................... 1-5
C
cancel .................................................................. B-4
category .............................................................. A-2
cautionary information .......................................... C-2
CDDB ................................................................... A-2
CDDB2 ................................................................. A-2
change order ........................................................ B-4
charging the battery ............................................. 2-3
checking the firmware version ............................. 2-10
clear bookmark .................................................... B-4
Index F-1
codec ................................................................... A-3
configuring your player ........................................ 2-10
confirmation box .................................................. A-3
connecting front speakers ...................................... 1-7
connecting rear speakers ....................................... 1-7
connecting the player
using a 1394 cable .......................................... 2-6
connecting your player .......................................... 2-5
connectors
AC adapter ..................................................... 1-8
battery case ................................................... 1-7
headphones .................................................... 1-7
Line Out 1 & 2 ................................................ 1-7
Optical/Line In ................................................ 1-7
reset hole ....................................................... 1-8
SB1394 .......................................................... 1-8
USB ............................................................... 1-8
Creative Audio Stream Recorder ........................ ii, A-3
Creative File Manager .......................... ii, 4-1, 4-8, A-3
Creative PlayCenter 3 .......................... ii, 4-1–4-2, A-3
CreativeLink ......................................................... A-4
D
DC adapter ........................................................... E-6
definitions ............................................................ A-1
delete from ... ...................................................... B-4
deleting tracks ...................................................... 3-9
deleting tracks from “All Tracks” ............................ 3-9
deleting tracks from the Playing List ..................... 3-12
dialog box ............................................................ A-4
digital audio ......................................................... A-4
digital rights management .................................... A-4
disabling advanced audio playback modes ............ 3-21
docking device ..................................................... A-4
document conventions ....................................... iv, vii
DRM ..................................................................... A-4
E
EAX
...................................... A-5, A-7, A-9, A-11, D-2
environments ................................................. A-5
match volume ................................................ A-7
presets .......................................................... A-9
smart volume management .......................... A-11
editing audio track information .............................. 4-5
electrolyte leakage ............................................... C-2
electronic tag ....................................................... A-6
encoder ................................................................ A-5
environment settings ............................................ A-5
equalization .......................................................... A-5
error codes ........................................................... D-1
expand/collapse/track details ................................ B-4
external views ...................................................... 1-1
F
FAQs ...................................................................... vii
File Manager ................................................. 4-1, 4-8
FireWire ............................................................... A-1
1394 ............................................................. B-3
about ............................................................. B-3
firmware .............................................................. A-5
G
genre ................................................................... A-5
gigabyte (GB) ....................................................... A-6
Index F-2
glossary ............................................................... A-1
go to bookmark .................................................... B-4
GraceNote ........................................................... A-6
H
handling batteries ................................................ C-1
handling instructions
batteries ........................................................ C-1
battery disposal ............................................. C-2
electrolyte leakage ......................................... C-2
player ........................................................... C-2
handling the battery ......................................... vi, C-1
Handling the player .............................................. C-2
handling the player ........................................... v, C-2
hard disk ............................................................. A-6
hot swap ....................................................... A-1, B-3
how to charge the battery ..................................... 2-3
how to use this document ........................................ iv
I
ID3 tag ................................................................ A-6
infrared (IR) ........................................................ A-6
inserting the battery .............................................. 2-5
installing supplied software .................................... 2-5
interactive tutorial ............................................ iii, 2-6
introduction .............................................................. i
J
Jukebox settings
language ..................................................... 2-12
personalization ............................................. 2-11
power settings ............................................. 2-11
K
kbps .................................................................... A-6
kHz ...................................................................... A-6
L
li-ion ....................................................................
line out ................................................................
line-in recording ............................................ 1-7,
lithium-ion battery ................................................
locking & unlocking ...............................................
locking the player .................................................
A-7
1-5
A-6
A-7
2-8
2-8
M
managing audio ....................................................
match volume ......................................................
meanings of terms ................................................
megabyte (MB) ....................................................
memory effect ......................................................
menu ...................................................................
message box ........................................................
3-4
A-7
A-1
A-7
A-7
A-7
A-8
Index F-3
MP3
..................................................................... A-8
a primer ........................................................ B-1
audio extraction ............................................. B-1
encoding ....................................................... B-2
standard bitrates ........................................... B-2
MP3 encoding ......................................... A-2–A-3, A-5
MP3 encoding bitrates .......................................... B-4
MP3 primer .......................................................... B-1
multi-language support ....................................... 2-12
music library ........................................................ A-8
music library categories ........................................ A-2
N
new ..................................................................... B-5
nickel metal hydride (NiMh) .................................. A-8
nickel-cadmium (NiCad) ....................................... A-8
NOMAD Jukebox 3 ..................................................... i
normal ................................................................. B-5
Now Playing screens ............................................. A-8
Playing List .................................................... A-9
Playing Track ................................................. A-9
O
open .................................................................... B-5
optical line in ....................................................... A-8
optical recording .................................................. A-6
P
play modes
disabling
play now .............................................................. B-5
play track once ..................................................... B-5
playback speed ..................................................... D-2
playback time ....................................................... D-1
PlayCenter ............................................. 4-1–4-2, A-3
player accessories .............................................. 1-11
player buttons ...................................................... 1-4
player external views ............................................ 1-1
back .............................................................. 1-2
bottom .......................................................... 1-3
rear ............................................................... 1-2
sides ............................................................. 1-2
top ................................................................ 1-1
playing audio ........................................................ 3-2
Playing List
deleting tracks ............................................. 3-12
rearranging tracks ........................................ 3-13
saving as a playlist ....................................... 3-14
playlist ................................................................. A-9
add tracks ..................................................... 4-6
change playback order ................................... 4-6
create ............................................................ 4-6
delete ............................................................ 4-7
remove tracks ................................................ 4-6
power adaptor ...................................................... 1-8
powering up ......................................................... 2-7
powering your player ............................................ 2-1
presets ................................................................ A-9
preview ................................................................ B-5
previewing a track from All Tracks ......................... 3-3
previewing tracks ................................................. 3-3
primers ................................................................ B-1
....................................................... 3-21
Index F-4
R
random audio playback ....................................... 3-18
rearranging tracks in the Playing List ................... 3-13
remove ................................................................ B-5
remove all ........................................................... B-5
rename ................................................................ B-5
repeat all ............................................................. B-5
repeat audio playback ......................................... 3-17
repeat track ......................................................... B-6
replacing the adapter ............................................ E-6
Reset Hole ............................................................ 2-7
resetting the player ........................................ 1-8, 2-7
ripping .......................................................... 4-3, A-9
S
save as playlist .................................................... B-6
saving the Playing List as a playlist ...................... 3-14
SB1394 ...................................................... A-1, A-10
screen ................................................................ A-10
Scroll Select ........................................................ A-10
Scroller
selecting list and confirmation box options ..... 1-10
selecting menu options ................................... 1-9
Scroller operations ................................................ B-4
add to play .................................................... B-4
cancel ............................................................ B-4
change order ................................................. B-4
clear bookmark .............................................. B-4
delete from ... ................................................ B-4
expand/collapse/track details ......................... B-4
go to bookmark .............................................. B-4
MP3 encoding bitrates .................................... B-4
new ............................................................... B-5
normal ........................................................... B-5
open .............................................................. B-5
play now ........................................................ B-5
play track once .............................................. B-5
preview ......................................................... B-5
remove .......................................................... B-5
remove all ..................................................... B-5
rename .......................................................... B-5
repeat all ....................................................... B-5
repeat track ................................................... B-6
save as playlist .............................................. B-6
set bookmark ................................................. B-6
shuffle ........................................................... B-6
shuffle repeat ................................................ B-6
track details ................................................... B-6
voice ............................................................. B-6
WAV encoding rates ....................................... B-6
Scroller operations list .......................................... B-4
SDMI ................................................................. A-10
Compliance ......................................................... i
secure digital music initiative .............................. A-10
set bookmark ....................................................... B-6
setting up your player ........................................... 2-1
shuffle ................................................................. B-6
shuffle repeat ....................................................... B-6
smart volume management ................................ A-11
Index F-5
software upgrades .................................................. vii
Sound Blaster Audigy ........................................... A-4
supported playback formats .................................. D-1
supported recording formats ................................. D-1
switching off ......................................................... 2-7
switching on ......................................................... 2-7
synchronizing music libraries ................................. 4-3
system requirements ............................................... iii
for PC users ...................................................... iii
T
technical specifications ......................................... D-1
terminology ............................................................ iii
testing your player .............................................. 2-13
track details ......................................................... B-6
transferring data files ............................................ 4-9
by copying-and-pasting ................................... 4-9
by dragging-and-dropping ............................... 4-9
transferring tracks ................................................. 4-3
from PC to player ............................................ 4-5
from player to PC ............................................ 4-5
with AudioSync ............................................... 4-3
troubleshooting ...................................................... vii
turning off ............................................................ 2-7
turning on ............................................................. 2-7
U
unlocking the player ............................................. 2-8
upgrade player firmware ....................................... 1-8
upgrading firmware ................................................ vii
USB ................................................................... A-11
using a four speaker system ................................. 1-7
using bookmarks ................................................ 3-19
using File Manager ................................................ 4-8
using PlayCenter .................................................. 4-2
using playlists .................................................... 3-16
using the Scroller ................................................. 1-9
using this manual ................................................... vii
V
voice
.................................................................... B-6
W
WAV (wave) ....................................................... A-12
WAV encoding rates .............................................. B-6
website information ................................................ vii
windows media audio (WMA) .............................. A-12
Windows XP ......................................................... E-3
wired remote ...................................................... A-12
Index F-6