1
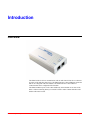
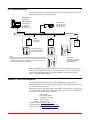
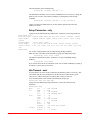
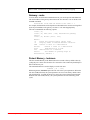
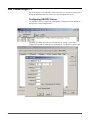
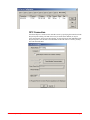
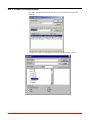
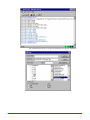
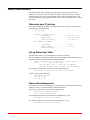
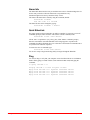
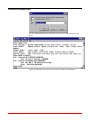
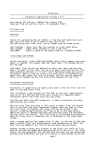
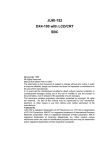
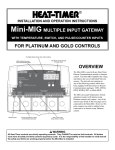
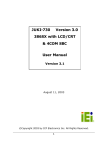
ASI EtherLink User Manual By ASI Controls DOC-1569 (07/06/04) ASI EtherLink User Manual This manual was produced using Doc-To-Help®, by WexTech Systems, Inc. Copyright 2000 - 2004 ASI Controls, All Rights Reserved July 2004 Liability for products provided by ASI Controls is subject to ASI Controls’ Terms and Conditions. ASI Controls reserves the right to make changes in this Users Manual, Software, or Standard Communications Protocol at any time without notice. Screen Displays and ASI Software, Copyright 2000 - 2004 ASI Controls. ASI Controls is always working to improve our products. Should you have any questions, or suggestions that would help our products better meet your needs, or that would help us serve you better, please call, write, or e-mail to: ASI Controls 2202 Camino Ramon San Ramon, CA 94583 Phone: (925) 866-8808 FAX: (925) 866-1369 Customer Support: [email protected] Technical Support: [email protected] Visit our Web site at http://www.asicontrols.com All trademarks are the property of their respective holders and are hereby acknowledged including: Microsoft and Windows are registered trademarks of Microsoft Corporation in the United States and/or other countries. Internet Explorer and the Internet Explorer Logo are trademarks and tradenames of Microsoft Corporation. OPC and the OPC Logo are trademarks and tradenames of the OPC Foundation. All other product names and logos are trademarks of their respective owners. ASI EtherLink User Manual DOC-1569 (07/06/04) Contents Introduction 1-1 Overview................................................................................................................................ 1-1 IP Connectivity ...................................................................................................................... 1-2 About This Document............................................................................................................ 1-2 EtherLink 2-1 Configuring EtherLink........................................................................................................... 2-1 Network Address - ifconfig ..................................................................................... 2-1 Setup Parameters - stty ............................................................................................ 2-2 Idle Timeout - snet................................................................................................... 2-2 Gateway - route ....................................................................................................... 2-3 Protect Memory - lockmem ..................................................................................... 2-3 ASI Visual Expert 3 ............................................................................................................... 2-4 Configuring ASI OPC Server .................................................................................. 2-4 OPC Connection...................................................................................................... 2-5 OPC Client Connections ........................................................................................................ 2-7 Alarm Notification ................................................................................................................. 2-9 Determine your IP address....................................................................................... 2-9 Set up Alarm Host Table ......................................................................................... 2-9 Alarm Acknowledgement........................................................................................ 2-9 Alarm Idle...............................................................................................................2-10 Quiet EtherLink ......................................................................................................2-10 Ping.........................................................................................................................2-10 Telnet Connection.................................................................................................................2-11 ASI Etherlink Firmware Releases.........................................................................................2-12 DOC-1569 (07/06/04) ASI EtherLink User Manual Contents • i ii • Contents ASI EtherLink User Manual DOC-1569 (07/06/04) Introduction Overview The EtherLink device allows communication with an ASI Control Network over ethernet by means of the ASI OPC Data Server. The EtherLink Device has an Ethernet connection that can be configured with an IP Address. The EtherLink Device has an RS-232 connection that can be configured with a baudrate. The EtherLink RS-232 port can be connected directly to the Modem Access Port of the SINC/3. When connecting directly to an ASIC/2-7040 or ASIC/2-8040 controller a null modem cable must be used. DOC-1569 (07/01/04) ASI EtherLink User Manual Introduction • 1-1 IP Connectivity The ASI Control networks can be connected over Ethernet using IP addressing using an RS-232 to Ethernet device such as EtherLink. Wonderware OPC Client ASI Expert OPC IBM Compatible ASI OPC Server 2 IP1:192.168.1.201 IP2:192.168.1.202 IP3:192.168.1.203 ... COM1 ASI OPC Server 1 IP1:192.168.1.10 IP2:192.168.1.11 IP3:192.168.1.12 ... COM2 Ethernet COM3 COM4 ASI-Net Ethernet 232 TCP/IP Power Link EtherLink 192.168. 1.10 232 EtherLink IP to RS-232 19200 baud Null TCP/IP Power Link EtherLink 192.168. 1.12 System Bus Local Bus Local RS-485 ASIC/2-7040 System SINC/3-3000 Modem Modem RS-232 Access Local RS-485 System Bus ASI EtherLink Can Connect to a single ASIC/2 Controller using a Null RS-232 Cable. Local Bus ASIC/2-7040 Notes: 1) ASI OPC Server has identified IP ports that can be assigned to devices. 2) Expert OPC can connect to those IP ports for backdoor communication. 3) To distribute the load more than one ASIOPC server can exist on the network serving different IP addresses. 232 EtherLink 192.168. 1.11 Direct System SINC/3-3000 Modem Modem RS-232 Access Direct Using RS-232 through SINC/3 isolates Ethernet from System Bus traffic TCP/IP Power Link EtherLink established point-to-point connection between the ASI OPC Server at one IP Address and the ASI EtherLink device at a second IP Address. Only one connection can be made to the ASI EtherLink device at a time. Multiple connections can be made, however, through the ASI OPC Server. About This Document This ASI EtherLink User Manual, DOC-1569, and Windows help system was produced using Microsoft® Word and Doc-To-Help®, by WexTech Systems, Inc. It was last revised or printed on 07/01/04. ASI Controls is always working to improve our products. Should you have any questions, or suggestions that would help our products better meet your needs, or that would help us serve you better, please call, write, or e-mail to: ASI Controls 2202 Camino Ramon San Ramon, CA 94583 Phone: (925) 866-8808 FAX: (925) 866-1369 Customer Support: [email protected] Technical Support: [email protected] Visit our Web site at http://www.asicontrols.com 1-2 • Introduction ASI EtherLink User Manual DOC-1569 (07/01/04) EtherLink Configuring EtherLink 1 2 3 4 5 6 7 8 RJ-45 Bottom View The EtherLink device allows communication with an ASI Control Network over Ethernet by means of the ASI OPC Data Server. The EtherLink Device has an Ethernet connection that can be configured with an IP Address. The EtherLink Device has an RS-232 connection that can communicate at 50 to 115,200 baud. An RJ-45 to DB-9 Male cable is provided. The EtherLink RS-232 port can be connected directly to the Modem Access Port of the SINC/3. The RS-232, 8-pin RJ-45 plug connector is wired as Data Communication Equipment, (DCE); Pins 1- DSR, 2- TRS, 3- GND, 4-RXD, 5-TXD, 6- CD, 7-CTS, 8-DTR. When connecting directly to an ASIC/2-7040 or ASIC/2-8040 controller the DB-9F to DB-9F null modem adapter provided must be used. Network Address - ifconfig The EtherLink RS-232 port is connected directly to a computer COM Port. The default baud rate is 9600 baud. EtherLink has a tiny Unix operating system and can be configured using simple commands over HyperTerminal. Establish communication with EtherLink via HyperTerminal. When EtherLink powers up it will display its current IP address and description. ASI EtherLink TCP/IP Interface. Copyright (c) 2001, ASI Controls. All rights reserved. Release A16 Ethernet address: 00:20:D0:00:43:34 Host name: Host address: EtherLink 192.168.1.12 EtherLink% Typing ifconfig will return the current IP configuration. EtherLink% ifconfig lo0: flags=49<UP,LOOPBACK,RUNNING> inet 127.0.0.1 netmask FF000000 ec0: flags=61<UP,NOTRAILERS,RUNNING> inet 192.168.1.10 netmask FFFFFF00 DOC-1569 (07/02/04) ASI EtherLink User Manual EtherLink • 2-1 The host IP address can be changed using EtherLink% ifconfig 192.168.1.11 The default Network Mask is 255.255.255.0 ( FFFFFF00). If it is necessary to change the mask for your network it can be done by adding a second argument to the ifconfig command. EtherLink% ifconfig 192.168.1.11 255.255.255.0 Contact your Network Administrator if you have further questions about network addresses or masks. Setup Parameters - stty Typing stty at the EtherLink prompt, EtherLink%, returns the current setup parameters. EtherLink% stty term settings: wyse50 24x80 9600 cs8 sb1 none clocal -cremote -rtscts input modes: ignbrk -brkint ignpar istrip icrnl -iuclc -ixon -ixany -ixoff output modes: -olcuc onlcr -tabs local modes: isig icanon echo echoe echok -echonl echoctl echoke control chars: intr (^C) erase (^H) kill (^U) eof (^D) start (^Q) stop (^S) EtherLink% Any of these setup parameters may be changed using the stty command. Make sure that X-on and X-off are disabled by typing at the EtherLink prompt: EtherLink% stty -ixon -ixoff The default communication speed is 9600 baud. Use the command stty change baudrates EtherLink% stty 19200 If you can not talk to the device, EtherLink can be reset to default conditions by turning it on and off 5 or more times is succession. Idle Timeout - snet It is good practice to release socket connections automatically if there is no activity. This can be done using the snet command to set the idle timeout to 600 seconds. Typical values are 0 to 3600 seconds where 0 indicates that it will never time out. To set the idle timeout to 600 seconds at the EtherLink prompt type: EtherLink% snet TCP idle 600 Typing snet at the EtherLink prompt, EtherLink%, returns the current network parameters. EtherLink% snet ARP: ttl = 600 seconds IP: addr = none rttl = 60 seconds ttl = 128 gateway hops TCP: icmd = on icon = on idle = 600 seconds msl = 2 seconds port = 3001 recon = off urgdata = one octet per packet rlogin: flshurg = off urgcnt = 3 octets 2-2 • EtherLink ASI EtherLink User Manual DOC-1569 (07/02/04) Note: If silent –sane has been set, then the Etherlink will not echo your typing. Gateway - route To access hosts on a different but attached network, you need to provide ASI EtherLink with the IP address of the gateway that connects the two networks. You can do this with the route command. EtherLink% route add net default 192.168.1.1 1 For example, the EtherLink sends all packets not destined for the local network signified by the keyword default, to the gateway 192.168.1.1 to be routed appropriately. The route command has the following options: route [-n] route [-f] add [host | net] destination gateway metric route [-f] delete [host | net] Where: -f Flush the routing table (start over) -n Display names in dotted decimal notation. add Create a route to a destination delete Remove a route to a destination host destination is a host net destination is a network metric The number of gateway hops to destination, default 1 Protect Memory - lockmem The Non-Volatile Memory in the EtherLink can be restored to factory default values by cycling the power to the unit off and on five consecutive times without keyboard input or data on the RS-232 port. The command lockmem is used to display or set the lock state lockmem [ on | off ] Without arguments, lockmem reports the lock state of the system parameters. When the lock state is off (unlocked), the system parameters are reset to the factory default values after the EtherLink is turned off and on five consecutive times without keyboard input. When the lock state is on (locked), , the system parameters are not affected by power cycles. DOC-1569 (07/02/04) ASI EtherLink User Manual EtherLink • 2-3 ASI Visual Expert 3 ASI Visual Expert 3.x and other OPC clients can connect to a network of ASI controllers through the ASI EtherLink. This connection is done through the OPC server. Configuring ASI OPC Server The ASI OPC Server is configured by selecting Edit | Configuration which changes the settings in the current configuration file. This brings up a dialog box to set the COM and Network settings. Select Add to configure the IP Address assigned to the ASI EtherLink. The IP Port is typically 3001. 2-4 • EtherLink ASI EtherLink User Manual DOC-1569 (07/02/04) OPC Connection ASI Visual Expert 3 connects to the ASI OPC Server by specifying the connection in the Project Properties dialog. The OPC Server may be on the same machine, or may be across the network. Select Create New Project, or select the Project Icon and Right Click Project Properties. Set the OPC Link Check Box. If the OPC Server is remote, you may also enter the node name. DOC-1569 (07/02/04) ASI EtherLink User Manual EtherLink • 2-5 Once ASI Visual Expert 3 is connected to the ASI OPC Server, then you can connect to the EtherLink device by selecting the appropriate IP Port from the System Options Dialog which shows the ports available on the OPC Server. 2-6 • EtherLink ASI EtherLink User Manual DOC-1569 (07/02/04) OPC Client Connections Any OPC Client that can browse an OPC Server can be used to connect to the ASI Network. The OPC Server makes the appropriate connection to the EtherLink port devices. DOC-1569 (07/02/04) ASI EtherLink User Manual EtherLink • 2-7 You can then browse the server for specific parameters from specific controllers. 2-8 • EtherLink ASI EtherLink User Manual DOC-1569 (07/02/04) Alarm Notification The ASI EtherLink can be configured for Alarm Notification. In the mode the ASI EtherLink is given a host table of IP addresses. Whenever the EtherLink sees a Notify Message that has been sent to a special Global Device Address, 0x5AE0, 23264, it will forward the message using Unguaranteed Packet Delivery to the IP addresses in its Alarm Host Table. Determine your IP address You can determine your IP address in Windows 2000 or XP by going to a DOS window and typing the command ipconfig. C:\>ipconfig Ethernet adapter elnk31: IP Address. . . . . . . . . : 192.168.1.104 Subnet Mask . . . . . . . . : 255.255.255.0 Default Gateway . . . . . . : 192.168.1.1 PPP adapter NdisWan5: IP Address. . . . . . . . . : 0.0.0.0 Subnet Mask . . . . . . . . : 0.0.0.0 Default Gateway . . . . . . : Set up Alarm Host Table The Alarm Host Table is a list of IP addresses for alarms notification. You can configure the Alarm Host Table while communicating with the EtherLink device using HyperTerminal and the EtherLink Command alarmhst. usage: alarmhst [-f] [(add host) | (delete host)] where -f - flush host table add 192.168.1.104 - add host IP address delete 192.168.1.104 delete host IP address For example to add IP address 192.168.1.104 to the host table type: EtherLink% alarmhst add 192.168.1.104 <Enter> To show the current host table type EtherLink% <Enter> 192.168.1.104 192.168.1.107 Alarm Acknowledgement The Notification can be acknowledged or un-acknowledged. If using EtherLink with ASI Monitor software we recommend using Acknowledged Service. To show the current status of alarm acknowledgement type: EtherLink% alarmack <Enter> ACK is not required (off) For Unacknowledged Service turn alarm acknowledgement off. Type: EtherLink% alarmack off <Enter> For Acknowledged Service turn alarm acknowledgement on. Type: EtherLink% alarmack on <Enter> DOC-1569 (07/02/04) ASI EtherLink User Manual EtherLink • 2-9 Alarm Idle The Alarm Idle determines how may seconds between retries in Unacknowledged service or how many seconds we allow the alarm host to respond before retry. Unacknowledged service always sends the Notify 3 times. The status of the alarm idle is found by using the command, alrmidl : EtherLink% alarmidl ACK idle time is 5 seconds The alarm idle time can be changed by typing: EtherLink% alarmidl 7 <Enter> Quiet EtherLink For proper operation when connected to an ASIC/2 controller it is necessary to turn off commands, prompts, banner and echo. This is done with the command, silent. EtherLink% silent -sane <Enter> "Silent -sane" is equivalent to {stty -echo} plus {silent -banner -command -prompt} Once this command is issued the Etherlink will no longer appear to respond to the commands from HyperTerminal. However it does take action based on commands sent to it. It just does not echo back responses. To restore the echo of commands type: EtherLink% silent sane <Enter> You are now ready to begin monitoring Notify messages through the Etherlink. Ping You can use Ping to verify that your computer can see the EtherLink device in Windows 2000 or XP by going to a DOS window ( Run command or Run cmd) and typing the command . C:\>ping 192.168.1.11 Pinging 192.168.1.11 with 32 bytes of data: Reply from 192.168.1.11: bytes=32 time=10ms Reply from 192.168.1.11: bytes=32 time<10ms Reply from 192.168.1.11: bytes=32 time<10ms Reply from 192.168.1.11: bytes=32 time<10ms 2-10 • EtherLink ASI EtherLink User Manual TTL=127 TTL=127 TTL=127 TTL=127 DOC-1569 (07/02/04) Telnet Connection Once the ASI Etherlink has been configured you can make a telnet connection to the device. It gives you terminal access to the device to verify or modify its configuration. DOC-1569 (07/02/04) ASI EtherLink User Manual EtherLink • 2-11 ASI Etherlink Firmware Releases Release 2.1 2004-06-30 o Added hardware watchdog reset to prevent lockup. Release 2.0 2004-05-30 o Port to new hardware Release 1.7 2001-09-28 o Download routine now handles the AMD AM29F010B part as well as the Atmel AT29C010A flash memory. You can download 1.7 to the older 1.6 units if you wish. However, you should never download 1.6 to the new 1.7 units. Release 1.6 2001-01-19 o Supports flash firmware download using dnl command. A16.dnl - A16 downloadable image Release 1.4 2000-11-21 o Adds SNMP debug information Release 1.3 2000-11-04 o ROM image files - high.a12 in U21 and low.a12 in U20. Release 1.1 2000-10-23 o ROM image files - high.a11 in U21 and low.a11 in U20. 2-12 • EtherLink ASI EtherLink User Manual DOC-1569 (07/02/04)