1
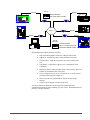
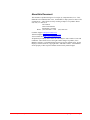
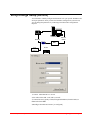
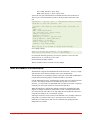
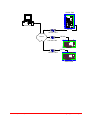
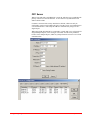
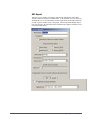
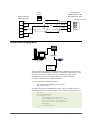
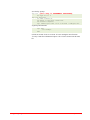
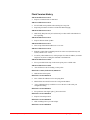
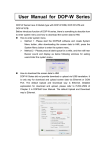
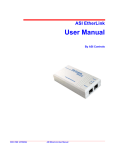
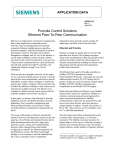
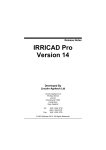
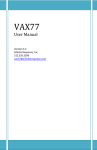
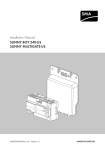
ASI EtherLink/2
User Manual
ASI Controls
DOC-1643 (2008-09-16)
ASI EtherLink/2 User Manual
Copyright 2004 - 2008 ASI Controls, All Rights Reserved
September 2008
Liability for products provided by ASI Controls is subject to ASI Controls’ Terms
and Conditions.
ASI Controls reserves the right to make changes in this Users Manual, Software, or
Standard Communications Protocol at any time without notice.
Screen Displays, and ASI Expert Software, Copyright 2002 - 2008 ASI Controls.
This manual was produced using ComponentOne Doc-To-Help.™
ASI Controls is always working to improve our products. Should you have any
questions, or suggestions that would help our products better meet your needs, or that
would help us serve you better, please call, write, or e-mail to:
ASI Controls
2202 Camino Ramon
San Ramon, CA 94583
Phone: (925) 866-8808
FAX: (925) 866-1369
Customer Support: [email protected]
Technical Support: [email protected]
Visit our Web site at http://www.asicontrols.com
All trademarks are the property of their respective holders and are hereby
acknowledged including:
Windows 2000/XP are trademarks of Microsoft Corporation.
Microsoft and Windows are registered trademarks of Microsoft Corporation in the
United States and/or other countries
JavaScript is a trademark of Sun Microsystems, Inc.
Internet Explorer and the Internet Explorer Logo are trademarks and tradenames of
Microsoft Corporation.
OPC and the OPC Logo are trademarks and tradenames of the OPC Foundation.
All other product names and logos are trademarks of their respective owners.
ASI EtherLink/2 User Manual
DOC-1643 (2008-09-16)
Contents
Configuring EtherLink/2
1-1
Summary.................................................................................................................................1-1
About this Document................................................................................................1-3
Connecting with Internet Explorer..........................................................................................1-4
EtherLink/2 System Configuration...........................................................................1-5
User Account Setup..................................................................................................1-9
Network Time Configuration .................................................................................1-10
Save ........................................................................................................................1-12
Verify/Change Setup (RS-232).............................................................................................1-13
ASI Software Connections....................................................................................................1-14
OPC Server.............................................................................................................1-16
ASI Expert..............................................................................................................1-17
ASI Network Connections ....................................................................................................1-18
RS-232 Connection. ...............................................................................................1-18
RS-485 Connection ................................................................................................1-18
EtherLink/2 Upgrade ............................................................................................................1-19
Flash Version History.............................................................................................1-21
DOC-1643 (2008-09-16)
ASI EtherLink/2 User Manual
Contents • i
ii • Contents
ASI EtherLink/2 User Manual
DOC-1643 (2008-09-16)
Configuring EtherLink/2
Summary
The ASI EtherLink/2 can be the primary access to the ASI network of controllers.
You can connect to the system bus of an ASIC/2-7540 or ASIC/2-8540 controller
using either RS-232 or RS-485 connections. You can also connect to a network of
ASIC/1-8655 or ASIC/1-6000 controllers using the EtherLink/2 RS-485 cable.
DOC-1643 (2008-09-16)
EtherLink/2 User Manual
Configuring EtherLink/2 • 1-1
RS-232
ASIC/1-8655
WS-0XX
C
LED
LED
C
P6 P1
P3
P5
C8 051F000
U1
C
L ED
ASIC/1-8655
24~
BO1
A
RG
BO2
PS1
PS5
JMPR1
BO3 BO4 BO5 AOCO M IN1
TB4 Damper
C G
PS5
COM
J3
R2
IN2
IN3
ASI Controls
LOW
HIGH
Integrated VAVU7
AIR1
ASIC/1-6000
30052-A
H
H
24~
IN5
1 0 AV
TB2Cont rols Integr ated V
24 V ac Po werA SI
T B1
J2
1
2 U9
3
J1
U2
IN 6
CO M
J7 PROG
U3
-
J6 SW Dir
+
RS-485
Ethernet
1 2 3
ASIC/2-8540
TB3
ASIC/1-6000
RS-485
RS-232
ASIC/2-7540
RS-485
Half-Duplex
Ethernet
1 2 3 4
RS-485 Requires
SW-1,2,4=OFF, SW-3=ON
EtherLink/2 RS-485 Cable
ASIC/2-7540
Network GUI
The Etherlink/2 has enhanced features including:
•
High performance Ethernet to RS-232 or RS-485 Serial router
•
Support for simultaneous remote TCP/IP and UDP connections
•
TCP/IP Tunnel – single IP port supports one socket connection at a
time
•
UDP Tunnel – single IP port supports up to 3 simultaneous client
connections
•
Intelligently detects ASI System Bus alarm events and relays them over
Ethernet to ASI Monitor.NET Alarm Suite
•
Can be configured via easy to use web interface or via serial port and
terminal program (HyperTerminal, etc...)
•
Built-in network time synchronization (SNTP) and time-keeper
function
•
Capable of flash upgrade via built-in FTP server
You must configure the Etherlink/2 for the Specific IP address and serial
communication parameters before installing it in your system. Each Etherlink device
must have a unique IP address.
1-2 • Configuring EtherLink/2
EtherLink/2 User Manual
DOC-1643 (2008-09-16)
C
INPUTS
IN 6
IN 7
IN 8
IN 4
C
IN 5
L ED
OUT5 OUT6 OUT7 OU T8
R
N C NO N C N O NC NO NC NO
IN 2
DS8
IN 3
DS7
IN 1
R
DS6
INPUTS
OU T1 OUT2 OUT3 OUT4
R
N C NO NC NO N C NO N C N O
DS5
L ED
LED
DS4
OUTPUTS
R
DS3
L ED
L ED
TB2
OUTPUTS
BT1
DS2
L ED
U8
C2
DS1
L ED
ASI Controls ASIC/1-8655
D3
AO1
AOut
L1
L2
AO2
R8 R7 R6 R5 R4 R3 R2 R1
Y1 PWR
LED
J3
Relay
Relay
Relay
Relay
U12
U11
C1
Pull-ups
24 Vac/dc
NEU HOT
P4
P2
Relay
Relay
J1
Rx
Relay
Tx
Relay
-
RS-485
2 A Fuse
+
TB6
D2
J2
JTAG
U9
R29
VR7
24 Vac
1 2 3 4
RS-485
RS-232 Requires
SW-1=ON, SW-2,3,4=OFF
VR6
RS-232
About this Document
This manual was produced using Doc-To-Help®, by Component One, LCC. This ,
EtherLink/2 User Manual, DOC-1643, and Windows™ help system was last revised
on 2008-09-16. ASI Controls is always working to improve our products. Please
call, write, or e-mail us at:
ASI Controls
2202 Camino Ramon
San Ramon, CA 94583
Phone: (925) 866-8808 FAX: (925) 866-1369
Customer Support: [email protected]
Technical Support: [email protected]
Visit our Web site at http://www.asicontrols.com
All products provided by ASI Controls are sold subject to ASI Controls’ Terms and
Conditions. ASI Controls reserves the right to make changes in products, Users
Manuals, Software, or Communications Protocol at any time without notice. Screen
Displays, and ASI Software, Copyright 2000 - 2008 ASI Controls. All trademarks
are the property of their respective holders and are hereby acknowledged.
DOC-1643 (2008-09-16)
EtherLink/2 User Manual
Configuring EtherLink/2 • 1-3
Connecting with Internet Explorer
You will need to initially configure the EtherLink/2 for your specific IP address and
serial port parameters. If you know the IP address then you can change the
parameters by connecting to the EtherLink/2 using Internet Explorer.
Once you have established an IP address for the EtherLink/2 you may do all of your
configuration by connecting with Internet Explorer.
The EtherLink/2 is shipped with Default IP Address: 192.168.1.201 . If it does not
answer to that address, then you must communicate with the device as described
below in Verify/Change Setup.(RS-232)
You will be asked to login. The default user/passwords are ASI/ASI and asi/asi. You
may change these once you have connected.
1-4 • Configuring EtherLink/2
EtherLink/2 User Manual
DOC-1643 (2008-09-16)
EtherLink/2 System Configuration
The configuration consists of the Network Setup, the Monitor.Net, and the Serial
Port parameters. Typical parameters are shown.
You must save any changes before changing to another screen.
DOC-1643 (2008-09-16)
EtherLink/2 User Manual
Configuring EtherLink/2 • 1-5
1-6 • Configuring EtherLink/2
EtherLink/2 User Manual
DOC-1643 (2008-09-16)
DHCP
Do not let the DHCP server assign IP addresses except temporarily during initial
network configuration. The remote client software must connect to the EtherLink/2
to a specific IP address.
IP Address and Port
You need to assign IP Address, Subnet Mask, Gateway and Port consistent with your
Local Area Network. The default IP Port is 3001.
IP User Limit
The EtherLink2 supports 1 TCP/IP Connection and up to 3 simultaneous UPD
connections based on the IP User Limit setting. You may limit the number of
simultaneous UDP connections by setting the IP User Limit.
The TCP/IP connection is required by the ASI OPC server. The first UDP
connection is usually used by ASI Expert for system testing and maintenance. If
there are any UDP connections, the TCP/IP connection gets every other turn to send
messages on the serial communication bus..
The UDP connections take turns with the remaining bandwidth. This can slow down
communications and generate occasional COM errors for the UDP connections.
Monitor IP Address and Port
The EtherLink/2 can forward Notify Messages from the ASI serial bus, to the
Monitor Software. You must specify the IP Address and Port of the ASI Monitor
software.
WebLink IP Address and Port
If Remote Point Trends is checked, the EtherLink/2 can forward Remote Points
received on the serial port to WebLink at a specific IP Address and Port.
Serial Port
You must specify the Baud Rate, Stop bits [Default 2] and Timeout [Default 1000
ms] for the ASI serial bus.
Notify Address
Any Notify sent to the Notify Address will be forwarded to the Monitor IP Address
and Port. If the Notify Address is not a Global Address, then the EtherLink/2 will the
EtherLink/2 does send an acknowledge, ACK, response to the ASI device on the
serial port. It turns out that global notify messages sent to the global address 23264
DOC-1643 (2008-09-16)
EtherLink/2 User Manual
Configuring EtherLink/2 • 1-7
(0x5AE0) are better at cutting through a busy serial bus than non-global
acknowledged messages.
1-8 • Configuring EtherLink/2
EtherLink/2 User Manual
DOC-1643 (2008-09-16)
User Account Setup
The default user/passwords are ASI/ASI and asi/asi. You may change these once you
have connected. Be sure to remember your new password!
You must save any changes before changing to another screen.
DOC-1643 (2008-09-16)
EtherLink/2 User Manual
Configuring EtherLink/2 • 1-9
Network Time Configuration
A new feature of the EtherLink/2 is the use of Simple Network Time Protocol
(SNTP) to obtain the current time from the internet, and broadcast the ASIC/1 and
ASIC/2 times periodically on the network. It also can correct for Time Zone and
Daylight Savings.
You must save any changes before changing to another screen.
SNTP time servers are ideally stand alone systems used by computers to receive time
from a time source. The SNTP server then sets and synchronizes the time on a
computer IT system or enterprise. Time can be passed from one time source to
another, typically starting from a reference clock (Stratum 0) connected to a Stratum
1 SNTP server. A time servers synchronized to a Stratum 1 server will be Stratum 2.
The further away a network is from a primary source, the greater the chance of signal
degradations due to variations in communications lines, and so forth.
1-10 • Configuring EtherLink/2
EtherLink/2 User Manual
DOC-1643 (2008-09-16)
The Primary and Secondary SNTP Server IP are obtained from the internet. For
example from the NIST Internet Time Service. http://tf.nist.gov/service/its.htm .
The Time Zone refers to off set from Greenwich Mean Time:
Eastern Standard Time is GMT-5:00
Pacific Standard Time is GMT-8:00
The EtherLink/2 can synchronize an ASI Network at hourly intervals. The ASIC/1
Synchronize Address is typically the global address 23125, 0x5A55. . The ASIC/2
Synchronize Address is typically the global address 23152, 0x5A70.
The EtherLink/2 automatically corrects for Daylight Savings Time.
The DST Adjustment is usually +01:00 HH:MM.
DOC-1643 (2008-09-16)
Spring Forward
Fall Back
USA 2005, 2006
1st Sunday April 2:00 AM
Last Sunday October 2:00 AM
USA 2007 onward
2nd Sunday March 2:00 AM
First Sunday November 2:00 AM
EU 1996 onward
Last Sunday March 2:00 AM
Last Sunday October 2:00 AM
Southern
Hemisphere
Last Sunday October 2:00 AM
Last Sunday March 2:00 AM
EtherLink/2 User Manual
Configuring EtherLink/2 • 1-11
Save
When Save is selected, the current values of the configuration parameters on that
screen are saved in non-volatile memory in the Etherlink/2. And a summary page is
displayed.
Note: You must wait 60 seconds while the EtherLink/2 reboots.
1-12 • Configuring EtherLink/2
EtherLink/2 User Manual
DOC-1643 (2008-09-16)
Verify/Change Setup (RS-232)
You will need to initially configure the EtherLink/2 for your specific IP address and
serial port parameters. Once you have the IP address configured for your network,
you can change the parameters by connecting to the EtherLink/2 using Internet
Explorer.
Switch
IBM Compatible
Ethernet
RS-232
COM1
Null
Power
9-30 Vdc
Center(+)
RS-232
1 2 3 4
1) Connect ASI EtherLink/2 to Power
2) Set DIP switches SW-1=ON, SW-2,3,4=OFF
3) Connect RS-232 (typically COM1) through Null Modem (Female-Female) to
EtherLink/2 Serial DB9
4) Run HyperTerminal and Connect [as configured]
DOC-1643 (2008-09-16)
EtherLink/2 User Manual
Configuring EtherLink/2 • 1-13
Port: COM1, Data bits 1 Parity: None;
Baud: 9600; Stop bits: 2; Flow Control: None!
5) Press the reset pin on the EtherLink/2 It should return the status of the Device.
The reset pin is located in the hole just above the dip switches on the back of the
unit.
EtherLink/2 -- Version 1.00.0 -- Configurable Network Interface
Copyright (c) 2005, ASI Controls, Inc.
Location = ASI Controls, 2202 Camino Ramon, San Ramon, CA
94583
DHCP = off
MAC = 00:40:9D:28:7E:B7
IP = 192.168.1.201 [IP port 3001]
Subnet = 255.255.255.0
Gateway = 192.168.1.1
Monitor IP = 0.0.0.0 [IP port 2001]
Notify Address = 23264 (5AE0 hex)
Notify Retry = 5 seconds
Serial = 9600 bps, 2 stopbit
Timeout = 1000 milliseconds
Press any key in 15 seconds to change these settings.
6) To Change settings
Press A to Accept the settings, or M to Modify? m
Enter the root password: ********** [Netsilicon]
For each of the following questions, you can press <Return> to select the value
shown in braces, or you can enter a new value.
Do NOT change the MAC Address!
Wait 60 seconds for device to reboot to accept changes.
ASI Software Connections
The EtherLink/2 supports both UDP/IP and TCP/IP connections. Access to a single
ASI serial bus can be shared to multiple remote users simultaneously.
The ASI OPC Server is usually the primary connection. If more than one Etherlink/2
is on the network then the primary connection should be via TCP/IP.
Like the EtherLink/1 before it, the EtherLink/2 can host only one TCP/IP connection
at a time. The TCP/IP connection is automatically reset after 15 seconds of
inactivity. Use of TCP/IP is recommended when you don't want to have to open up a
unique IP port on the host's firewall for each remote EtherLink/2.
While the EtherLink/1 could not host multiple connections, the EtherLink/2 adds
support for multiple simultaneous connections via UDP. If multiple EtherLink/2's
are connected to the same OPC server using UDP, then each EtherLink/2 must use a
unique IP port number so as to avoid traffic crosstalk. .
ASI Expert can also be used to connect to the Etherlink/2 as a secondary connection
using UDP. It is possible to have one or more Expert users connected to an
EtherLink/2 via UDP while an OPC Server is simultaneously polling that same
EtherLink/2 over TCP/IP.
1-14 • Configuring EtherLink/2
EtherLink/2 User Manual
DOC-1643 (2008-09-16)
ASIC/2-7540
Ethernet
Network GUI
`
`
`
RS-232
192.168.1.201
RS-232
Ethernet
192.168.1.202
RS-232
192.168.1.203
ASIC/2-8540
DOC-1643 (2008-09-16)
EtherLink/2 User Manual
Configuring EtherLink/2 • 1-15
OPC Server
When a front-end such as ASI WebLink is used, the ASI OPC Server establishes the
primary connection to the ASI Network. It can connect to any EtherLink/2 with
either TCP/IP or UDP.
Customers concerned with security should select TCP/IP, which can easily be
configured to work securely behind a firewall. The OPC Server can communicate to
over 100 EtherLink/2’s with unique IP addresses simultaneously using TCP on a
single IP port.
When using UDP, all EtherLink/2’s connected to a single OPC server will need to be
assigned unique IP ports, or the messages will collide. If UDP is not prohibited
because of the multiple IP ports, UDP can yield performance increases over TCP/IP
communications.
1-16 • Configuring EtherLink/2
EtherLink/2 User Manual
DOC-1643 (2008-09-16)
ASI Expert
ASI Expert is a secondary connection to ASI Network and supports either direct
TCP/IP or UDP connections to an EtherLink/2. If the ASI OPC server is connected
an EtherLink/2 over a TCP/IP connection, then Expert must use the UDP connection
in order to gain secondary access to the project. When using UDP, Multiple Expert
users can connect to the same EtherLink/2 from different computers and share access
to networked ASI devices.
DOC-1643 (2008-09-16)
EtherLink/2 User Manual
Configuring EtherLink/2 • 1-17
ASI Network Connections
You can use the EtherLink/2 to connect to an ASI Network using either RS-232 or
RS-485 connections. Each Etherlink device must have a unique IP address.
RS-232
RS-232 Requires
SW-1=ON, SW-2,3,4=OFF
ASIC/1-8655
WS-0XX
C
LED
LED
C
P6 P1
P3
P5
C8 051F000
U1
C
L ED
ASIC/1-8655
24~
BO1
A
RG
BO2
PS1
PS5
JMPR1
BO3 BO4 BO5 AOCO M IN1
TB4 Damper
C G
PS5
COM
J3
R2
IN2
IN3
ASI Controls
LOW
HIGH
Integrated VAVU7
AIR1
ASIC/1-6000
30052-A
H
H
24~
IN5
J2
1
2 U9
3
J1
U2
IN 6
CO M
J7 PROG
U3
-
J6 SW Dir
+
RS-485
1 0 AV
TB2Cont rols Integr ated V
24 V ac Po werA SI
T B1
Ethernet
1 2 3
ASIC/2-8540
TB3
ASIC/1-6000
RS-485
RS-232
ASIC/2-7540
RS-485
Half-Duplex
Ethernet
1 2 3 4
RS-485 Requires
SW-1,2,4=OFF, SW-3=ON
EtherLink/2 RS-485 Cable
ASIC/2-7540
Network GUI
RS-232 Connection.
The Etherlink/2 can connect directly to the RS-232 connection of an ASIC/2, or the
Direct port of a SINC/3-3000. To connect to the Modem port of a SINC/3-3000
requires the use of a Female-Female Null Modem Cable. It requires setting the DIP
switches to SW-1=ON and SW-2,3,4=OFF.
RS-485 Connection
Connection via RS-485 requires a special EtherLink/2 RS-485 Cable, available
from ASI, and setting the DIP switches to SW-3=ON and SW-1,2,4=OFF.
1-18 • Configuring EtherLink/2
EtherLink/2 User Manual
DOC-1643 (2008-09-16)
C
INPUTS
IN 6
IN 7
IN 8
IN 4
C
IN 5
L ED
OUT5 OUT6 OUT7 OU T8
R
N C NO N C N O NC NO NC NO
IN 2
DS8
IN 3
DS7
IN 1
R
DS6
INPUTS
OU T1 OUT2 OUT3 OUT4
R
N C NO NC NO N C NO N C N O
DS5
L ED
LED
L ED
DS4
OUTPUTS
R
DS3
L ED
DS2
TB2
OUTPUTS
BT1
DS1
L ED
U8
C2
L ED
ASI Controls ASIC/1-8655
D3
AO2
AOut
L1
L2
AO1
R8 R7 R6 R5 R4 R3 R2 R1
Y1 PWR
LED
J3
Relay
Relay
Relay
Relay
U12
U11
C1
Pull-ups
24 Vac/dc
NEU HOT
P4
P2
Relay
Relay
J1
Rx
Relay
Tx
Relay
-
RS-485
2 A Fuse
+
TB6
D2
J2
JTAG
U9
R29
VR7
24 Vac
1 2 3 4
RS-485
VR6
RS-232
To RS-485 Port
ASIC/2-7540 TB-1, TB-2
ASIC/2-8040 TB1, TB18
RS-485
Half-Duplex
To EtherLink/2 Port
DB-09S (Female)
1 2 3 4
TB1 ASI PN 11116,
6
9
TXD+
Green
GND
RS-485 GND
White
1
2
C
5
Red
-
3
RS-485+
+
2
RXD+
3
RXDShield
TXD-
EtherLink/2 Upgrade
Switch
Ethernet
IBM Compatible
Power
9-30 Vdc
Center(+)
You may upgrade the firmware in the Etherlink/2 by establishing an ftp connection
with the device and uploading new firmware to it. The latest version will be in a zip
file with the version name, image-1.00.0.zip. Unzip the file image.bin to the
\ASI\EtherLink2 folder. Note: the image.bin file CAN NOT be renamed.
1) Connect ASI EtherLink/2 to Ethernet and Power
2) Verify Connection with Internet Explorer
For example, if the IP address is 192.168.1.201
http:\192.168.1.201
3) Connect using ftp from command line prompt. You will be asked for the user
name and password. The default user name is “asi” and the default password is “asi”.
Run cmd
cd \ASI\EtherLink2
ftp 192.168.1.201
Connected to 192.168.1.201.
220 NET+ARM FTP Server 1.0 ready.
User (192.168.1.201:(none)): asi
331 User asi OK, send password.
Password:
230 Password OK.
ftp >
DOC-1643 (2008-09-16)
EtherLink/2 User Manual
Configuring EtherLink/2 • 1-19
4) At the ftp> prompt
ftp> bin [This step is EXTREMELY IMPORTANT]
200 Type set to I.
ftp> put image.bin
200 PORT command Ok.
150 About to open data connection.
226 Transfer complete
ftp: 449326 bytes sent in 61.2 Seconds 7.37Kbytes/sec.
5) Quit ftp and command
ftp> quit
221 Goodbye.
exit
6) Wait 90 seconds. for device to reboot. It is now running the latest firmware.
7) Verify Connection with Internet Explorer The version is shown in the IE status
bar.
1-20 • Configuring EtherLink/2
EtherLink/2 User Manual
DOC-1643 (2008-09-16)
Flash Version History
2007-03-09 EtherLink/2 1.0.1.5
•
Improves communication at 1200 baud.
2006-10-13 EtherLink/2 1.0.1.4
•
Fixed TCP/IP stack problems when running for a long time.
•
Improved performance from the TCP/IP and UDP messaging.
2006-09-07 EtherLink/2 1.0.1.3
•
Adds Notify Retry Interval [no less than 60s] to reduce traffic when Monitor is
not responding.
2006-05-03 EtherLink/2 1.0.1.2
•
Improves Remote Point Updates
2006-04-20 EtherLink/2 1.0.1.1
•
Now accepts WebLink IP address set to "0.0.0.0"
2006-04-17 EtherLink/2 1.0.1.0
•
Embeds a simple UDP command protocol for remote reset (hard reboot), and
restart (software reset - faster).
•
new utility called etherboot.exe, which prompts for remote IP address, username
and password, before sending the command to the EtherLink.
2006-03-07 EtherLink/2 1.0.0.9
•
Fixes a potential infinite loop in the remote point post to weblink code.
2006-02-16 EtherLink/2 1.0.0.8
•
New HTTP Post code for sending remote points
EtherLink/2 1.0.0.6 (Not Released) 2006-01-19
•
Adds Remote Point capture
EtherLink/2 1.0.0.5 2005-09-30
•
Now validates IP addresses before accepting them.
•
DHCP Waits 60 seconds for network to assign an IP address.
•
"reset" pushbutton always available to recover the unit via the serial port
configuration dialog.
EtherLink/2 1.0.0.4 2005-08-19
•
Fixes problems with single-quote ['] in location field.
EtherLink/2 1.0.0.3 2005-08-09
•
Improves internal operation.
EtherLink/2 1.0.0.2 2005-08-05
•
Adds watchdog timer to prevent lockups.
EtherLink/2 1.0.0.1 2005-08-02
DOC-1643 (2008-09-16)
EtherLink/2 User Manual
Configuring EtherLink/2 • 1-21
•
Adds IP User Limit 1 TCP/IP and up to 3 UDP connections to IE System
Window.
•
Fixes problem with contention with multiple UDP connections.
EtherLink/2 1.0.0.0 2005-07-28
•
1-22 • Configuring EtherLink/2
Adds version and Location to IE User Window.
EtherLink/2 User Manual
DOC-1643 (2008-09-16)