1
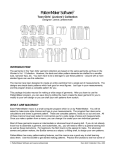
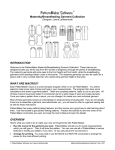
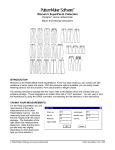
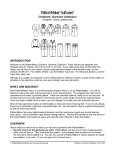
PatternMaker Software Women’s Coat/Robe Macro Designer: Leena Lahteenmaki INTRODUCTION This package includes one macro for making a ladies’ coat or robe garment. Just type in your measurements, and the program draws a complete pattern for you. After you learn to use the PatternMaker program, you can save time by letting the macro create the basic garment for you to modify to your own design or you can draft your own patterns from scratch. WHAT ARE MACROS? Each PatternMaker macro is a small computer program which is run by PatternMaker. You will be asked to make a few style choices and type in your measurements. The program then does some calculations and draws a garment pattern. This is a complete pattern, ready to cut out and sew. Most of these garments require an intermediate or advanced level of sewing skill. Some sewing instructions are included, but you may need to refer to a general sewing text as well. PatternMaker has many patternmaking features, and the macros are a good way to start learning about them. Use this booklet to get started making patterns. Practice the tutorials to see how some of the PatternMaker commands are used, and read the User’s Manual to learn the details. OVERVIEW Here’s what you need to do to make your new garments with PatternMaker: • Take your measurements. Everything else depends on having good measurements. The PatternMaker Software and Leena Lahteenmaki Women’s Coat/Robe Rev. 2/01 Women’s Coat/Robe measurement form included in this package provides detailed instructions on how to take the measurements. Read the instructions carefully, and be very careful when taking the measurements. • • • • If you want to make clothes for more than one person, photocopy the measurement form (both sides) for each subject. Don’t write on the original before you copy it! You will use these measurements for all the macros, so keep the form in a safe place for future reference. Don’t forget to fill in the name and date – you may not remember whose measurements these are a few months from now. Run the macro for the garment you want. PatternMaker will ask you for some measurements, which you will type in. Then it will draw the pattern. You can now use all of PatternMaker’s various features to modify your pattern, if you wish. Or you can just print it out and sew it. Arrange for printing. You may need to use the MOVE and ROTATE commands to arrange the pieces for the most efficient printing. Print your pattern. If you have a small desktop printer, you will need to tape the pages together. The pages will be marked to make it easy to assemble them. Cut out and sew your new garment. This booklet gives you most of the sewing instructions you need, but always rely on your common sense. We hope you enjoy your new clothes! RUNNING A MACRO When you first start the PatternMaker program, you will see a blank drawing area. To run the macros, select the MACRO command from the File menu, or click on the icon which has the word MAC. (Users of PatternMaker Basic should select OPEN from the File menu, or click the OPEN icon.) A dialog box will ask you to select a file. Each macro is a separate file in your PatternMaker directory. The file name for this macro is: • COAT_ROBE Click on the name of the file, and then click “OK”. It may take a few seconds for PatternMaker to load the macro. You will now see a series of dialog boxes which ask questions and offer choices. To continue through the macro, you must select one of the options. If you click "Cancel" the macro will abort and you will be returned to the drawing screen. Also, be aware that you cannot move backwards through the options. You may wish to write down which options you choose. Refer to the enclosed pages for a “map” of the macro options. After you’ve made your garment style choices, a dialog box will ask you for the measurements. The illustration at the right shows the first of two measurements dialog boxes. Fill these in from your measurement chart. Remember to use decimal numbers: 1/8----------.125 1/4----------.25 3/8----------.375 1/2----------.5 5/8----------.625 3/4----------.75 7/8----------.875 Be careful to enter the right numbers in the right spaces. When you are ready, click “OK” or press the <Enter> key. 2 Women’s Coat/Robe You may have to wait a minute for the macro to run, especially if you don’t have a fast computer. You will know the macro is done when the hourglass cursor changes back to an arrow and the word Command: appears on the prompt line. IF YOU CANNOT SEE THE PATTERN PIECES, OR IF YOU ONLY SEE PART OF THEM, PRESS THE <END> KEY TO VIEW ALL THE PIECES IN THE DRAWING. Look at your macro The macro will draw your new pattern in the drawing area. If you already had something on the screen, the new items will be added to the existing ones. To zoom out and see the entire pattern, press the <END> key. To zoom in, use <F2> or <F3>. Use the arrow keys to move up, down, left, and right. (See the PAN and ZOOM commands in the Help file.) ARRANGE YOUR PATTERN Now, you can use the PatternMaker editing features to make changes to your pattern. PatternMaker has tools to make almost any alteration. Some simple changes you may want to make before you print are: • Erasing an object (ERASE command) • Moving an object (MOVE command) • Rotating an object 90 or 180 degrees (ROTATE command) • Label your pieces (TEXT command) Refer to the User’s Manual or the Help file for detailed instructions on these commands. IF YOU MAKE A MISTAKE If you make a mistake in one of the above operations, you can use the UNDO command to undo your last change. The Undo icon looks like a letter “U.” If you make a really big mistake, you can use the New command (on the File menu) to start all over. Luckily, this isn’t hard to do. READ THE MANUAL Here are some other commands you’ll want to learn before long. Look them up in the User’s Manual or the on-line Help system. • MOVE VERTEX to adjust shapes • SET LINE to draw dotted lines • COLOR to draw in different colors • GROUP to keep groups of things together • DIM and SET/MEASURE DISTANCE to check measurements • POLY to draw your own objects • COPY and MIRROR to copy objects • LAYER to hide things from view Note: These commands are available only in the Home Version and higher. PRINT YOUR PATTERN Before you print out your pattern, you should use the MOVE command to arrange the pieces in the most efficient way you can, to save paper. The pieces aren’t arranged for you, because the best arrangement will depend on your measurements and the size of the printer you have. If possible, arrange the pieces to fit within a rectangle no wider than your printer’s page size. Make sure you leave enough room for seam allowances, if you didn’t already have the macro add them. 3 Women’s Coat/Robe We assume you already have your printer set up and working. PatternMaker works with any Windowsdriven printing or plotting device. If you have a printer with tractor-feed paper, print in Landscape mode to make the pages connect in the correct order. See “Printing a pattern” in the Help file for details about the various Print commands, and “Assembling a printed pattern” for instructions on putting the pages together. COAT/ROBE OPTION DESCRIPTIONS: NO HOOD/COLLAR ONLY This model has a collar and lapels, but no hood. Choose between round and pointed collar. HOOD/LAPELS NO COLLAR In this version, the hood is cut as a separate piece and attached to the neckline of the garment instead of a collar. HOOD AND COLLAR In this model, the garment has a collar and lapels, and the hood is a separate piece. Choose between round and pointed collar. The hood is made to be detachable, and can be fastened under the collar with snaps, buttons, or a zipper. INTEGRATED HOOD This version has a shawl collar/lapels and an attached hood. The hood and the body of the garment are cut as a single piece. ABOUT EASE This garment has three ease choices (bust ease): Minimum, Normal, and Maximum. Be sure to notice the numbers given in the Ease dialog box. They will tell you how much ease is to be added. Since this garment is intended as an overcoat or a loose-fitting robe, the amount of ease added is greater than in other PatternMaker macros. Keep in mind that the type of fabric you choose will also affect the amount of ease that will be appropriate. SEWING INSTRUCTIONS FOLLOW THESE STEPS FOR WORRY-FREE CONSTRUCTION GENERAL INSTRUCTIONS • When you buy your fabric, ask how much it will shrink when washed. In all cases, when the fabric is washable and when you are not sure that the fabric won't shrink, it is safe to wash and iron it before cutting. Don't forget to preshrink lining as well. • Cut pattern pieces on folded fabric, right side of the fabric folded inwards. Make the necessary marks on the fabric with chalk or pencil. If the fabric is plaid, striped or checkered, align the hem lines at the same point on the repeating pattern. For sleeves, the repeating pattern should match where the bottom of the armscye and bottom of sleeve cap meet. Vertical centerline of sleeve 4 Women’s Coat/Robe should be placed at a vertical stripe or at center of a plaid square. The coat front center should be placed the same way. • Transfer notch marks from your pattern to the fabric by cutting snips (depth 1/4 inch/5 mm) into seam allowances. When joining garment pieces, place corresponding notch marks in the two pieces together. • If you are making a coat, cut and iron interfacing onto facings, belt, and pocket flap. For a neat hem at the bottom of the coat, apply interfacing to the hem seam allowance as well. For a robe, you generally do not need to use interfacing. • Cut lining along with garment patterns without space for facings (but remember to add seam allowances) and hem seam allowances. Do not cut lining for collars. Lining fabric usually is not as elastic as garment fabric, so cut it with about 1/8 inch (0.3 cm) wider seam allowances than for the garment pieces. • Use the longest possible machine stitches for basting. It is quick and the stitches can easily be removed. • You will get the best result if you always press seams and darts as you sew. First iron seams or darts flat without turning them to either direction. Then press them towards center, side seam towards front. Two-piece sleeve seams are both pressed towards shoulder mark. Use a steam iron. If you press seams from right side of the fabric, use pressing cloth if necessary. • Edgestitching gives a well-finished look to garment, but only if it is straight and even. Long stitches of 1/4 inch (4-5 mm) look best in edgestitching. Sew edgestitching only after you have ironed the seam. HOW TO SEW POCKETS Flap, welt or buttonhole pocket: The techniques for these three kinds of pockets are similar. The difference lies in treatment of the pocket opening. 1. Garment preparation: First, decide on the width of the pocket opening, also called the pocket line or cutting line. Mark the pocket line with a pencil on the wrong side of the garment. Transfer markings to the right side with basting thread (2). 2. Cut a piece of interfacing measuring 1¼ in. (3 cm) wide and 1½ in. (4 cm) longer than pocket line. Baste or press interfacing to wrong side of garment. 3. Stitch a rectangle or “box” around pocket line as in picture (3). The edge pieces for flap, welt, or buttonhole opening are attached to the garment along this stitched “box.” The rectangular “box” is about ¾ inch (2 cm) high and the length of the pocket opening. 4. Cut flap, welt, or buttonhole pieces along the straight grain of fabric, as described below. Always include seam allowances. Press interfacing to wrong side of pieces. Fold pieces as described, and place on right side of garment. With machine basting, fasten edge pieces to stitched “box” as described below. a) Flap Cut two pieces with a finished width equal to the cutting line plus seam allowances and a finished length sufficient to cover the stitched “box.” Interface. Place pocket flaps right sides together and stitch along sides. Leave raw edge to be fastened to garment. Turn piece right side out, open seams well and press. Edgestitch if desired (1). b) Buttonhole The buttonhole pocket mouth has two narrow folded strips of fabric meeting in the center of the stitched “box.” Cut a strip of fabric, width 1½ “ (4 cm) and long enough for all the pockets. For the length of the strip, multiply the length of each pocket plus seam allowances, by twice the number of pockets. 5 Women’s Coat/Robe Iron interfacing to strips, fold them in half lengthwise, wrong sides together. Press lightly. Overlock raw edges of strips. Machine baste strips ¼” (6 mm) from the folded edge to mark stitching line. Place two strips on the rectangular “box,” with the folded edges meeting over the pocket cutting line, and machine basting over the stitch lines of the “box.” Zigzag the folded edges together to hold them in place until the pocket is completed, then remove the zigzag. Stitch rectangle again from wrong side. c) Welt Cut welt piece with a length two seam allowances longer than the stitched rectangle. Welt piece height is twice the stitched box height, plus two seam allowances. Normal height of finished welt piece is ½” (1-2 cm). Interface welt, overlock raw edges and fold lengthwise wrong sides together. Place welt on the stitched rectangle with the welt seam line along lower stitching line of “box.” Folded edge faces down, and raw edge is turned upward toward the “box” center. From wrong side, stitch around “box” rectangle again. 5. Attach pocket piece: Cut a rectangle with width 2½ -4½ inches (4-6 cm) greater than pocket line and length twice the desired pocket depth, about 16 inches (40 cm) total (4). If you don’t have enough garment fabric, the lower half can be of pocket lining fabric. 6. Pin pocket fabric to right side of garment over the pocket opening and the attached edging. Place the horizontal centerline of pocket fabric onto the upper edge of the stitched rectangle. Working from the wrong side of garment (5), stitch again over the stitched “box.” 7. On wrong side of garment, slash rectangle along pocket center line and diagonally to the rectangle corners. Cut the garment and pocket material carefully along cutting line, being careful not to cut stitching (6). DO NOT CUT POCKET FLAP, BUTTONHOLE, OR WELT pieces. 8. Pull pocket through the opening; turn pocket to inside and press well. Edgestitch over the rectangle. 9. Turn pocket downwards, sew and overlock pocket edges (8) together. Press. 10. Turn pocket edging to its correct position on the right side of garment, press well (7). Topstitch the edging treatment as appropriate to make sure it lies flat. SEWING A COAT/ROBE Iron interfacing to coat's front and back facings, under collar and pocket flaps. It is also good to iron interfacing to coat's hem seam allowance. When cutting the collar pieces, cut upper collar about 1/4 inch (1/2 cm) bigger at the neck edge. This forces the collar to turn down to its correct position when it is done. Only vertical coat seams need to be overlocked. Collar, shoulder and sleeve seams do not need to be overlocked as they will be inside the lining. Press all seams after sewing and overlocking them. Cut a seam at the linings CB and add extra width to the seam, to form a pleat. Sew pocket flaps together along the outer edge right side to right side. (Picture 1A). Clip seam allowances at corners. Turn flaps right side out and iron. Edgestitch at a distance of 3/4" (1.5 cm) from the edges. 6 Women’s Coat/Robe Sew pockets to the front pieces. Mark the pocket mouth line on the front pattern pieces by machine basting. Place pocket flap on the line raw edges towards side seam. Place one pocket bag on top of the flap and the other opposite it on the pocket mouth line. (Picture 1B). Sew a rectangle around the pocket mouth line, sewing through all thicknesses. (Picture 1C). Cut along the line and diagonally at the ends at the corners. Push pocket bags to the wrong side of the garment and press. Turn pocket flap to its right position and press. Attach the flap ends to the garment along the edgestitching, sewing through all thicknesses. For more instructions of how to sew pockets, refer to the general sewing instructions, above. Sew the coat's shoulder and side seams. (Picture 2A). Prepare collar. Sew under collar and top collar together right side to right side. Clip at corners and turn right side out and iron. (Picture 2B). Machine baste the raw edges of the collar (neck seam) together. Place collar on the coat's neckline, with right side of under collar against the coat's right side. Match collar shoulder mark with the coat's shoulder seam. Machine baste the collar to the coat's neck from lapel corner (Picture 2C, point c) to other lapel corner. Clip the seam allowance at the lapel corners. 7 Women’s Coat/Robe Prepare sleeves. Sew sleeve elbow darts and sleeve seams. Sew sleeves to the armscyes. Easestitch sleeve cap, allowing a seam allowance of 1/4 inch (1/2 cm). Turn sleeves right side out and coat wrong side out. Place sleeves inside coat (right side against right side) so that sleeves' shoulder marks match with the coat's shoulder seams. Insert sleeves by sewing along easestiches Adjust ease by pulling on the stitching in the ease cap. If there tends to be too much ease at sleeve cap (some fabrics tolerate more ease than others do), you can adjust this by placing sleeves lower at the armpit. There should be as much ease as possible, but no wrinkles at cap seams, when done. HINT: In the design tutorial there are instructions of how to use a facing in sleeve cap to helps to get nicely formed sleeve heads. Prepare lining. Sew the side and the back seams of the lining. Fold the lining's hem seam allowance twice in and sew. Sew front facings to the lining front edges and back neck facing on top of the right side of the lining's back neck. Sew lining's shoulder seams. Sew lining's sleeves and sew the sleeves to the lining. To join the jacket and the lining, place the lining on top of the coat with right side against right side. Leave collar in between and upside down. (Picture 2D). Sew a continuous seam as follows: across hem of front facing, along one front edge, around neck to other front edge and finally across hem of other front facing. Clip seam allowance at neck seam at about 1 inch (2 cm) intervals. Cut corners diagonally (including the corner at the front of hem) and turn the lining inside the jacket. Open seams well and press. Edgestitch along the front edges and around the collar at a distance of 3/4" (1.5 cm) from the edges. If you sew a hood to your coat, attach it to the the coat the same way you attach the collar. You can sew the coat with hood with or without collar. The latter one is sewn the same way a shawl collar is sewn. If you choose to sew a normal or a detachable hood, cut the hood pieces in 4 copies. If you use different fabric to the hood lining, cut 2 hood pieces from the coat fabric and 2 from lining fabric. Sew the back seam of the hood, hood pieces right side aganst right side (Picture 3A). Sew the back seam of the lining the same way. Place the lining inside the hood, right side against right side and sew along front edge (Picture 3B). Turn hood right side out, open seams, press and edgestitch at a distance of 3/4" (1.5 cm) from the edge. Baste the neck edges of the hood together. Attach the hood to the coat the same way you attach the collar. You can sew both the collar and the hood to your coat. If you want to sew a detachable hood, sew its neck seam from the wrong side - before turning the hood right side out. Leave an opening for turning the hood right side out. Close the opening with hand stitches. Then press and edgestitch. Sew buttonholes to the neck edge of the hood and buttons to the 8 Women’s Coat/Robe coat neck (Picture 3B). Or use snaps. If you use zipper as the fastener, sew one half of it to the coat neck seam under the collar and the other half to the hood neck seam. If you choose the integrated hood, sew the coat's shoulder (Picture 4A, a) and side seams (Picture 4A, b) and the back seam of the hood (Picture 4A, d-g). Cut the seam allowance at the shoulder/neck corner of the coat (Picture 4A, arrow) and sew the hood neck (Picture 4A, c) to the coat neck (Picture 4A, g). Cut clips to the seam allowances with intervals of about 1" (2 cm). Prepare the lining as for coat with collar and attach the front facing with the integrated hood to the front edges of the lining (Picture 4B ). Sew shoulder seam. Cut seam allowance at the shoulder/neck corner. Sew the back seam of the hood and sew the hood neck to the coat neck in the lining as in the coat. Cut clips to the seam allowances. Press coat and lining. Put them right side against right side and sew across the hem of one facing and around front and hood edges and across the hem of the other front facing. Turn the coat right side out, open seams and press. Edgestitch front edge at a distance of 3/4" (1.5 cm) from the edge. Fold sleeve cuff seam allowances in and sew with invisible stitches. Attach the lining to the sleeve ends. Sew hem with invisible stitches. Sew buttons and buttonholes. Do the final pressing 9 PatternMaker Software Measuring for Women's Macros 1. 2. 3. 4. 5. 6. 7. 8. 9. 10. 11. 12. 13. 14. 15. 16. 17. 18. neck circumference bust circumference waist circumference abdomen circumference hip circumference bust span bust height waist height back length back width shoulder waist-abdomen waist-hip biceps wrist circumference overarm outside seam crotch depth Measure bust height (7) and waist height (8) around neck (double) and divide by 2. Following are the instructions on how to measure for PatternMaker women's macros. Don't try to take the measurements yourself. Ask someone else to take them. Stand straight but relaxed when you are being measured. You will receive the best results if the measurements are taken over underwear. Place 1-inch wide elastic bands around your waist and hip. Search carefully for the correct places of these elastic bands. Keep these elastic bands on their places during the whole measuring process. Hip elastic is fastened on the level where hip circumference is maximum. Examine whether it is on your buttocks (7-8 inches/18-20 cm below the waist) or on top of your thighs (10-12 inches/25-30 cm below the waist). Measurements are taken from the bottoms of the bands. Except for pants' cuff circumference and skirt/dress length, all measurements are body measurements. DO NOT ADD ANY EASE to the measurements. The program does it for you. DO NOT TIGHTEN MEASURING TAPE. Please, refer to the picture related to this measuring form. BE ESPECIALLY CAREFUL WHEN TAKING THE MEASUREMENTS WRITTEN IN CAPITAL LETTERS. They are crucial for good fitting patterns. After having taken all the measurements, take these important measurements once again. You can use either centimeters or inches. Give inches in fractions. PatternMaker Software Women’s Measuring Chart Name: ___________________________ Date: ___________ 1 Neck Circumference: Measure around lowest part of neck, at the base 2 Bust Circumference: Marked with elastic. Measure around the fullest part of the bust, keeping the tape high at the back 3 Waist Circumference: Measure waist at the elastic tape 4 Abdomen Circumference: Measured on the level where abdomen circumference is maximum 5 Hip Circumference: Measured over the largest part of your bottom/thighs (at elastic) 6 Bust Span: Horizontal distance between bust apexes (also called bust bridge). Measured along bust elastic. 7 Bust Height: Measure from center of back neck over shoulder to apex of one breast 8 WAIST HEIGHT: Measure from center of back neck over shoulder to breast apex and from there vertically to lower edge of waist elastic. To be sure to get right measurements, take this and bust height as a link around neck (=double) and divide the result by 2 (see picture). 9 BACK LENGTH: Measure from center of back neck to lower edge of waist elastic 10 BACK WIDTH: hang your arms relaxed on your sides. The measurement is taken horizontally between shoulder blades (i.e. from sleeve seam to sleeve seam), from and to the point where your arm meets your body (but not to armpit) about 4" (10 cms) from neck downwards. 11 Shoulder length: Measure from neck to shoulder tip. Shoulder tip is found when you raise your arm to horizontal position and feel where there is hollow/pit between shoulder and arm bones. Hold your arm horizontal, if necessary, to find this point. 12 Waist-Abdomen: Measure vertically from lower edge of waist elastic to lower edge of abdomen elastic. Measure at front center. 13 Waist-Hip: Measure vertically from lower edge of waist elastic to lower edge of hip elastic. Measure at the side. 14 Biceps circumference: Measure at widest point of upper arm. 15 Wrist circumference: Measure over wrist bone 16 Overarm: Arm length from shoulder tip (as described above) to wrist. Bend arm slightly and measure over outside of elbow. 17 Outside seam: Measure from waist over the outside curvature of the hip to the desired cuff length. 18 CROTCH DEPTH: Sit on unpadded bench or chair. Measure vertically from waist elastic to chair level on both sides, and use the longer measurement. Measure in a straight line, not along the outside hip curve. (Crotch depth can also be measured from a pair of old, well fitting pants.) Crotch depth is the difference between outside and inside length of pants. Desired cuff circumference, not ankle circumference Desired jacket length from waist elastic to hem Desired skirt /dress length from waist elastic to hem Important things to be taken into consideration when measuring The most important measurements are the ones written in on the measuring chart in BOLD CAPITAL LETTERS: waist height, back length, back width, and pants' crotch depth. If one of these four measurements is wrong, the result may be a distorted pattern and it is difficult to figure what measurement is wrong. If some other measurement is wrong, you get either a too-tight or a too-loose garment and you can easily see what measurement to correct and to what direction. Figure 3: normal sloper Figure 2: back width wrong Figure 1: waist height/back length wrong Normally the pattern for basic sloper is more or less like Figure 1. Front and back shoulders slope downwards to shoulder tip. Armscyes curve inward. Back armscye can be rather straight but should never bulge outward. If the pattern is like in Figure 2 -- i.e. front armscye curves strongly inward (a) and back armscye bulges outward (b), back width has been measured wrong and is too much. Measure back width anew. Please note that this measuring error causes the garment to be too loose at back and too tight at front. Therefore the situation cannot be corrected by only reducing width of back piece. The pattern must be redrawn using the correct back width measurement. If waist height in relation to back length is wrong (refer to Figure 3), the result is either a shoulder that slopes to wrong direction (a) or a shoulder which is too steep (b). If you measure waist height as instructed in PatternMaker measuring instructions i.e. double around back neck and divide the result by 2, there seldom is any error in waist height. Therefore the error usually is in back length. If shoulder slopes in wrong direction (a), back length is too much and if shoulder is too steep (b), back length is too little. Change back length 2-3 cm in the needed direction and see if it is enough to correct the situation. If it looks good, you see to which point at neck back length has to be measured to be OK. If the subject stands in a very upright, military position with bust out and abdomen in, also waist height may be too much. Please make sure that the subject stands in a relaxed position when she is being measured. In some cases a steep shoulder may be due to the subject's body shape. This is the case if the subject has a very prominent bust. And conversely, if a subject has a very flat bust and/or a very round back, the shoulder can be rather straight. Thus, there are cases, where the patterns are all right even if they look "odd". When the patterns are drawn according to a person's own measurements, they should not be compared with patterns drawn according to "normal" or "average" measurements. If you are not sure of the measurements taken, you have a very good and simple way to check them: sew a muslin with the basic bodice patterns. If it fits on the subject, you can be sure that all other garments sewn with PatternMaker macros will fit well. If you get an error message: value out of range in line … coord (32,33,sqrt(op*op-oke*oke),-oke); it means the measuring error is so drastic that the program is unable to draw the patterns at all. Front shoulder does not meet armscye line. Then either back length is too little or waist height too much. It may also be that shoulder length has some influence: shoulder length may be too short. Also, in some other cases there may be reason for checking shoulder length measurement. If shoulder is too short, there will be a corner inward where front and back shoulder meet at shoulder tip and vice versa.