1
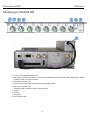
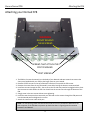
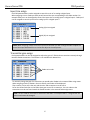
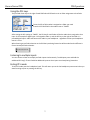
USER MANUAL
Published July 2014
Software Version Nomad 7.10
Nomad FP8
Expand Your Horizons
1
KNOWING YOUR NOMAD FP8 ....................................................................................................................... 3
ATTACHING YOUR NOMAD FP8 ..................................................................................................................... 4
NOMAD FP8 OPERATIONS ............................................................................................................................. 5
ASSIGNING FP8 KNOBS ............................................................................................................................................... 5
Fader assign ....................................................................................................................................................... 5
Input trim assign ................................................................................................................................................ 6
Transmitter gain assign ...................................................................................................................................... 6
USING THE PFL KEYS ................................................................................................................................................... 7
Listening to multiple inputs ............................................................................................................................... 7
Exiting PFL mode ................................................................................................................................................ 7
FUNCTION KEY ........................................................................................................................................................... 8
AUTOPAN KEY ........................................................................................................................................................... 8
RECORD AND STOP KEYS .............................................................................................................................................. 8
PRODUCT SUPPORT ...................................................................................................................................... 9
ZAXCOM WARRANTY POLICY AND LIMITATIONS...........................................................................................10
2
Zaxcom Nomad FP8
FP8 Layout
Knowing your Nomad FP8
1
2
3
4
5
6
7
8
1. F1 Key - User assignable function key.
2. Fader Knob - each of the 8 faders on the FP8 can be assigned to act as an analog fader, digital fader, ZaxNet
wireless control or input trim control.
3. Pre Fader Listen Key - PFL
Press to listen to Pre Fader audio from the corresponding fader.
4. Auto-Trim / Auto Pan LED
Indicates a fader is active for AutoTrim and AutoPan.
5. Pan Key
6. Stop Key
7. Record Key
8. Interconnect Cable
3
Zaxcom Nomad FP8
Attaching the FP8
Attaching your Nomad FP8
WARNING
DO NOT REMOVE
THESE SCREWS
SCREWS THAT ATTACH THE
FP8 TO NOMAD
POST SCREWS
1. The FP8 has 2 screws that attach it to the body of your Nomad. And two screws that connect the
short post (supplied with your FP8) to the longer posts on your Nomad.
2. Remove the two screws on the top of Nomad’s case that line up with the FP8 screws.
3. Remove the screws from the top of Nomad’s posts while leaving the bottom screws attached.
4. Install two screws through the FP8 – the screw on the left side may need to be wiggled a bit to clear
the interconnect cable within the FP8. You should see the screws come through the bottom of the
FP8.
5. Snugly screw in the two screws without over tightening.
6. Install the two short posts that came with your FP8 and run the screws through the FP8 posts and
into the Nomad posts and tighten the screws.
7. Attach the interconnect cable serial port.
NOTE: The FP8 shares ground with Nomad and needs to be firmly attached to Nomad for the
FP8 to operate. If the FP8 does not power up check that there is a good ground connection
between it and Nomad.
4
Zaxcom Nomad FP8
FP8 Operations
Nomad FP8 Operations
Your Nomad will need to be running software version 6.46 or higher for the FP8 to operate.
Assigning FP8 Knobs
Each individual potentiometer (pot) on the Nomad FP8 are user assignable as an analog or digital fader, a
TRX transmitter gain controller or an input trim controller. Any combination of assignments can be made.
To assign a pot go to the Main Menu and select external faders.
Nomad Fader Assign
FP8 Fader Assign
When you enter the external fader assign menu you will have to ability to individually assign each fader.
Fader assign
The external fader assign menu allows you to assign any FP8 fader to mix any of the 6 analog inputs, 4 return
inputs or 8 AES digital inputs. Individual faders can be assigned in any order or in any combination.
Analog inputs assigned
Digital inputs assigned
Return inputs assigned
NOTE: When assigning faders make sure that any input is only assigned to only one fader – which
includes the 6 faders on Nomad. So if you assign an input to the FP8 make sure it is not assigned to any
other FP8 fader nor assigned to any of Nomads faders.
5
Zaxcom Nomad FP8
FP8 Operations
Input trim assign
Each FP8 potentiometers can be assigned to control the trim of an analog or digital input.
When assigning trim to a fader pot each pot will control the trim corresponding to the fader number. For
example fader pot 1 can be assigned to control the input trim for analog input 1 or digital input 1. Fader pot 2
can be assigned to control input trim for analog input 2 or digital input 2.
Analog (A) trim assigned
Digital (D) trim assigned
NOTE: When assigning a fader to act as an input trim controller you will no longer be able to adjust the
trim of that input with AutoTrim or via the trim adjust in the setup menu.
Transmitter gain assign
Each potentiometer can also be assigned to adjust the gain of a TRX wireless transmitter remotely through
Nomad’s ZaxNet transmitter. This feature is not available with Nomad Lite.
ZaxNet unit codes
To remotely change the gain of a transmitter you would select ZaxNet in the external fader assign menu.
When assigning a fader to ZaxNet - the unit code for each fader will be displayed.
That number (11 thru 18) is the unit code that the TRX transmitter must be set to.
So for the chosen fader pot on the FP8 to have gain control of a transmitter - the unit code on that
transmitter must be set to and match the ZaxNet number in the external fader assign menu.
NOTE: The unit code for each fader is discrete for that fader. For example Fader 1 is assigned the unit
code 11 and cannot be changed.
6
Zaxcom Nomad FP8
FP8 Operations
Using the PFL keys
The pre fader listen key to the right of each FP8 fader will follow the trim or fader assignment to that fader.
To set the PFL to follow what is assigned to a fader you need
to set the PFL ROUTING in the mode menu to “FADER”
After setting the PFL routing to “FADER”, the PFL Key for each fader will be the audio that is assigned to that
input. So for example if digital input 1 is assigned to fader 1, and the PFL key to the right of the fader 1 is
pressed digital input 1 audio will become the audio in your headphone - regardless to what your headphone
matrix is set to.
When listening to pre fader selection on the FP8 the input being listened to will be underlined to different it
from a Nomad pre fader selection.
Listening to multiple inputs
You can choose to listen to multiple pre fader inputs simultaneously. To add inputs press and hold the
additional PFL key(s). That will add the additional inputs to what inputs are already being listened to.
Exiting PFL mode
To exit PFL mode press the headphone knob. This will return you to the last headphone preset matrix that you
were listening to prior to pressing the PFL key.
7
Zaxcom Nomad FP8
FP8 Operations
Function Key
The F1 is a user assignable function key. The F1 key on the FP8 acts as a shortcut that will take you to the
selected menu item.
F1
Key assignment
From the mode menu you can choose to assign the F1 Key to be a short cut to the record enables menu, the
track naming menu, the primary CF menu the metadata page or the mirror CF menu.
AutoPan Key
AutoPan is a feature that lets you use the PAN Key to digitally pan an input to Left, Center or Right.
AutoPan needs to be set to ON
When AutoPan is turned on in the mode menu and you adjust a fader the blue LED next to that fader will
illuminate indicating the input associated with that channel will be panned when you the PAN Key is pressed.
The PAN Key on the FP8 will also pan a fader that is illuminated on Nomad. AutoPan is active from any meter
screen.
When pressing the PAN Key the panning for the illuminated channel will cycle from Left to Center to Right to
Blank - unless “Prevent Empty Pan” in the advanced set-up menu is turned ON. If it is turned ON then the
blank option will not be cycled through. If you press and hold the PAN Key panning will cycle in reverse.
As you change the panning the headphone display will temporally show which input is panned to which
position. A is an analog input, D is a digital input and R is a return input.
Analog input 1 panned Left, Center, Right
Record and Stop Keys
The Nomad FP8 has dedicated record and stop keys. These keys will start and stop Nomad’s recorder with a
short key press. The REC and STOP keys on the FP8, unlike the REC and STOP key on Nomad, will function
from any screen even in a menu screen or when you are in PFL mode.
.
8
Zaxcom Nomad FP8
Support
Product Support
Register your product with Zaxcom:
Download the latest Firmware from:
Download the latest User Manuals from:
Submit Technical Questions at:
Submit information for Repair Services at:
Join the Zaxcom User Forum at:
Join the Zaxcom Face Book User Group at:
http://zaxcom.com/support/product-registration/
http://zaxcom.com/support/updates/
http://zaxcom.com/support/updates/
http://www.zaxcom.com/submit-a-technical-question
http://www.zaxcom.com/support/repairs
http://www.zaxcom.com/forum/forum.php
https://www.facebook.com/groups/682199065139938/
9
Zaxcom Warranty Policy and Limitations
Zaxcom Inc. values your business and always attempts to provide you with the very best service.
No limited warranty is provided by Zaxcom unless your Nomad FP8 (“Product”) was purchased from an authorized distributer or authorized reseller.
Distributers may sell Product to resellers who then sell Product to end users. Please see below for warranty information or obtaining service. No warranty
service is provided unless the Product is returned to Zaxcom Inc. or a Zaxcom dealer in the region where the Product was first shipped by Zaxcom.
Warranty Policy
The Product carries a Standard Warranty Period of one (1) year.
NOTE: The warranty period commences from the date of delivery from the Zaxcom dealer or reseller to the end user.
There are no warranties which extend beyond the face of the Zaxcom limited warranty. Zaxcom disclaims all other warranties, express or implied,
regarding the Product, including any implied warranties of merchantability, fitness for a particular purpose or non-infringement. In the United States, some
laws do not allow the exclusion of the implied warranties.
Troubleshooting & Repair Services
No Product should be returned to Zaxcom without first going through some basic troubleshooting steps with the dealer you purchased your gear from.
To return a product for repair service, go to the Zaxcom Repair Services page http://www.zaxcom.com/repairs and fill in your information; there is no
need to call the factory for an RMA. Then send your item(s) securely packed (in the original packaging or a suitable substitute) to the address that was
returned on the Repair Services page. Insure the package, as we cannot be held responsible for what the shipper does.
Zaxcom will return the warranty repaired item(s) via two-day delivery within the United States at their discretion. If overnight service is required, a FedEx
or UPS account number must be provided to Zaxcom to cover the shipping charges.
*Please note a great resource to troubleshoot your gear is the Zaxcom Forum: http://www.zaxcom.com/forum.
Warranty Limitations
Zaxcom’s limited warranty provides that, subject to the following limitations, each Product will be free from defects in material and workmanship and will
conform to Zaxcom’s specification for the particular Product.
Limitation of Remedies
Your exclusive remedy for any defective Product is limited to the repair or replacement of the defective Product.
Zaxcom may elect which remedy or combination of remedies to provide in its sole discretion. Zaxcom shall have a reasonable time after determining that
a defective Product exists to repair or replace a defective Product. Zaxcom’s replacement Product under its limited warranty will be manufactured from
new and serviceable used parts. Zaxcom’s warranty applies to repaired or replaced Product for the balance of the applicable period of the original
warranty or thirty days from the date of shipment of a repaired or replaced Product, whichever is longer.
Limitation of Damages
Zaxcom’s entire liability for any defective Product shall, in no event, exceed the purchase price for the defective Product. This limitation applies even if
Zaxcom cannot or does not repair or replace any defective Product and your exclusive remedy fails of its essential purpose.
No Consequential or Other Damages
Zaxcom has no liability for general, consequential, incidental or special damages. These include loss of recorded data, the cost of recovery of lost data, lost
profits and the cost of the installation or removal of any Product, the installation of replacement Product, and any inspection, testing or redesign caused
by any defect or by the repair or replacement of Product arising from a defect in any Product.
In the United States, some states do not allow exclusion or limitation of incidental or consequential damages, so the limitations above may not apply to
you. This warranty gives you specific legal rights and you may also have other rights, which vary from state to state.
Your Use of the Product
Zaxcom will have no liability for any Product returned if Zaxcom determines that:
•
The Product was stolen.
•
The asserted defect:
•
Is not present,
•
Cannot reasonably be fixed because of damage occurring when the Product is in the possession of someone other than Zaxcom, or
•
Is attributable to misuse, improper installation, alteration, including removing or obliterating labels and opening or removing external covers (unless
authorized to do so by Zaxcom or an authorized Service Center), accident or mishandling while in the possession of someone other than Zaxcom.
•
The Product was not sold to you as new.
Additional Limitations on Warranty
Zaxcom’s warranty does not cover Product, which has been received improperly packaged, altered or physically abused.
10