1
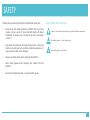
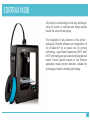
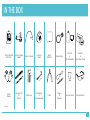
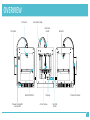
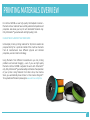
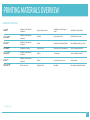
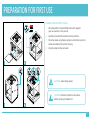
MANUAL
ENTER AN ENVIRONMENT OF
PROFESSIONAL 3D PRINTING
CONTENTS
INTRODUCTION
Thank you for choosing Zortrax M200®
SAFETY
Before you start working with Zortrax M200®
read safety tips
ZORTRAX M200
In the box
Filaments
PREPARATION FOR FIRST USE
Prepare your printer to work
Loading filament
Auto-calibration
SOFTWARE&FIRMWARE
Z-Firmware™ update
Z-Suite® software installation
PRINTING
Start printing
Removing print
Removing support
SUPPORT & MAINTENANCE
Periodic maintenance
Changing the filament
Cleaning the nozzle
4
4
5
5
5
6
7
9
11
11
13
16
16
16
17
17
18
19
20
21
22
22
Cleaning the platform
Straightening perforated plate
Drive belts maintenance
Drive pulleys maintenance
Lubricating
Extruder maintenance
TROUBLESHOOTING
DICTIONARY
SPECIFICATIONS
23
24
25
27
31
33
37
38
40
3
INTRODUCTION
Thank you for choosing Zortrax M200®
Zortrax M200® manual allow you to easily and securely install and
configure our product. Keep it in a safe place so you can use it if
needed.
In the Contents you will find a description of the solutions used
in Zortrax M200® 3D printer. To use current software version,
download latest updates from www.zortrax.com
of this manual may be copied, sent over, stored in an information
retrieval systems or translated to any language in any way using any
media (electronic, mechanical, photocopying, recording or other)
without the written permission of Zortrax sp. z o.o.
Zortrax® company may possess patents, copyright, trademarks
and other intellectual property rights for content and documents.
Transmission of this document and other documents is not
tantamount to granting a license to this patents, copyrights,
trademarks and other intellectual property, unless it was explicitly
stated in the written license given by Zortrax sp. z o.o.
Lear more about all Zortrax® products. Contact us via email
[email protected] or go to www.zortrax.com
Information given in all Zortrax® documents and help system
related to this software may change without prior notice. No part
4
SAFETY
Before you start working with Zortrax M200® read safety tips:
•
•
Never touch the model, hotend or platform during printing
process – there is a risk of burns and deformation of model.
Remember to always wait until the printer parts cool down
(~30min.).
Stay away from workspace during printing process – do not put
hands or any other parts of your body inside the workspace - it
may cause burns and printer damage.
•
Always use safety gloves when removing the platform.
•
Wear safety glasses when removing the model from the
platform.
•
Never touch heated extruder – even with safety gloves.
SAFETY SIGNS USED IN THIS TEXT:
Caution – these actions may harm you if you won’t follow the instruction.
Wear safety glasses - risk of injury to eyes.
Wear safety gloves - risk of burns.
5
ZORTRAX M200
3D printing is a technology for industry and design.
Using 3D printer in technical and design studios
lowers the costs of prototyping.
The integration of key elements of the printer dedicated Z-Suite® software and composition of
the Z-Filaments™ let us create new 3D printing
technology – Layer Plastic Deposition (LPD™). With
LPD™ technology you can create precisely projected
model. Precise layered process of the filament
application makes printed elements suitable for
prototyping models in molding technology.
6
IN THE BOX
Zortrax M200®
3D Printer
Filament Spool
Holder
Filament Guide
Filament
Spool
Build
Platform
Power Cable
SD Card
&
SD Card Reader
Z-Suite®*
&
Quick Start Guide
Safety
Gloves
Cutting Knife
&
Scalpel
Allen Keys
Nozzle Key
&
Nozzle Needle
Pliers
Spatula
&
Tweezers
Service Grease
Safety Glasses
* online
7
OVERVIEW
Extruder
Extruder Cable
Filament
Guide
Filament
Build Platform
Power Connector
and Switch
Hotend
Display
Z Axis Screw
Filament Mount
Control
Knob
8
PRINTING MATERIALS OVERVIEW
For Zortrax M200® we use high quality thermoplastic material –
filaments. All our materials have carefully selected composition and
properties. We advise you to print with dedicated filaments only.
Only Z-Filaments™ guarantee safe and high quality prints.
USING OTHER FILAMENTS THAT DEDICATED
Unlike inkjet printers, printing materials for 3D printers need to be
prepared strictly for a particular model of the machine. Filaments
from all manufacturers have different physical and chemical
properties, even at similar terminology.
Using filaments from different manufacturers you risk printing
problems and extruder clogging – even if you use high quality
filaments. Zortrax M200® is adjusted to work with Z-Filaments™
only. Only Z-Filaments™ guarantee safely and trouble-free operation
of your printer. Using filaments from other store, than Zortrax
Store, you automatically loose Z-Care 1-st Year Service Program™.
To buy dedicated filaments please go to www.zortrax.com/store
9
PRINTING MATERIALS OVERVIEW
MATERIAL PROPERTIES
Z-ABS™
Suitable for mechanical
treatment
High printing precision
Available in a wide range of
colors
Suitable for utility models
Z-ULTRAT™
Suitable for mechanical
treatment
Durable
High quality prints
Suitable for large prints
Z-FLEX™*
Suitable for mechanical
treatment
Elastic
Models are flexible and elastic
For malleable models e.g. seals
Z-PCABS™*
Resistant to cracking
Highly durable
Resistant to high temperature
Used for automotive parts
Z-GLASS™*
Suitable for mechanical
treatment
Fragile
Transparent
Used for decorative parts
Z-ALU™*
Suitable for mechanical
treatment
Fragile
Unique texture of prints
Imitates metal
Z-NYLON™*
Elastic, extensile
Highly durable
Bendable
For elements subjected to load
* available soon
10
PREPARATION FOR FIRST USE
PREPARE YOUR PRINTER TO WORK
1. Place the platform inside M200® and match magnets
(you can see them in the picture).
2. Carefully connect both connectors to the platform.
3. Place the cables using fastening clamps. Attach clamps to the
cables and cables to the printer housing.
4. Plug the cable into the connector.
CAUTION! Wear safety gloves!
CAUTION! Disconnect platform connectors
before removing the platform!
11
PREPARATION FOR FIRST USE
PREPARE YOUR PRINTER TO WORK
1. Attach power supply cable.
2. Mount filament guide.
3. Mount filament spool holder.
4. Mount spool of the Z-ABS™ on the spool holder. Spool should
rotate anti-clockwise. Lead the filament through the filament
guide to the printer.
CAUTION! Always connect the power cable into
a grounded outlet.
12
PREPARATION FOR FIRST USE
LOADING FILAMENT
Select “Filament” option from the mean menu.
To load the filament, select “Load filament” option.
Zortrax M200® is heating the extruder.
When the display shows the message “Please insert filament”, insert the end of the filament into the
extruder. When Zortrax M200® finishes loading filament, printer is ready to print. Remove filament
remains using tweezers.
13
PREPARATION FOR FIRST USE
AUTO-CALIBRATION
Select “Maintenance” option from the mean menu.
Now select “Platform auto-calibration” option.
Tighten 3 pcs screws on the bottom of the platform.
Zortrax M200® is checking level of the back part of the platform.
Zortrax M200® is showing information which screw should be tighten and which should be loosen.
Follow the instruction on the display.
14
PREPARATION FOR FIRST USE
AUTO-CALIBRATION
When the back of the platform is levelled, Zortrax M200® checks level of the front part of the
platform.
Zortrax M200® displays the message which way to tighten the front screw.
If the level is incorrect, Zortrax M200® will check the level of the front part of the platform and
displays information in which way the screw should be tighten.
When the auto-calibration is finished, Zortrax M200® displays the information about calibration
points survey.
15
SOFTWARE & FIRMWARE
Z-FIRMWARE™ UPDATE
Information about latest version for the firmware can be found at
www.zortrax.com and through our newsletter. Download the latest
update for Z-Firmware™ at www.zortrax.com/downloads.
To update the firmware, upload Update.bin file to SD card, insert
the card into the printer and run the machine. Z-Firmware™ updates
automatically.
Z-SUITE® SOFTWARE INSTALLATION
Use .stl, .obj or .dxf format files to work with your Zortrax M200®.
Most CAD and 3D modeling software allows you to convert 3D files
to this format. To prepare a file for 3D printing (in the .zcode format)
install Z-Suite™ on your computer. The newest software version and
the Z-Suite® can be found at www.zortrax.com
To install Z-Suite® software, you need a serial number. The serial
number is provided with the printer.
16
PRINTING
START PRINTING
Insert SD card with prepared models into the printer. Models should be placed in the main catalog
(next to the Update.bin file). To choose the model for printing, select “Models” option from the main
menu.
Select the model in the a .zcode™ format file.
Now the printing procedure will run automatically. The display shows information about extruder
and platform heating level.
After heating elements, M200® starts printing. Progress bar shows the percentage of print
advancement.
17
PRINTING
REMOVING PRINT
1. When the printing process ends, turn off your Zortrax M200®.
Disconnect the cables from the platform.
2. Remove the platform.
3. Remove the models using spatula. Wear safety glasses and
gloves. Place the platform inside the M200® and plug the
connectors. To prevent the deformation, wait until M200® and
model cool down (~30min.)
CAUTION! Wear safety gloves.
CAUTION! Disconnect platform connectors
before removing the platform.
18
PRINTING
REMOVING SUPPORT
Models printed on Zortrax M200® composed of bottom part (raft),
support and the print. Remove raft and support. Remember to wear
safety gloves and glasses.
Removing raft is easy – simply detach it from the model with your
hands. In places where raft is strongly connected to the model, use
spatula and cutting knife.
1
Be careful when removing support, especially from models with
many small and thin elements. Support generated with SES™
technology is designed to be easily removed. Usually you can remove
it with your hands. In spots where elements are gently supported,
use cutting knife or pliers. From hard to reach places, remove
support using tweezers.
CAUTION! Wear safety gloves.
CAUTION! Wear safety glasses.
2
19
SUPPORT & MAINTENANCE
Keep your M200® efficient and safe – run maintenance regularly.
CAUTION! Turn off the power and unplug connectors when carrying maintenance tasks.
CAUTION! Never use compressed air to clean your
printer. It can damage bearings and guides.
20
SUPPORT & MAINTENANCE
LP.
1
4
MIEJSCE
CZYNNOŚCI
CZĘSTOTLIWOŚĆ
1
Main
Cleaning the machine and its environment, especially bottom plate of the
printer
Before each printing
2
Head
Check if the head is not clogged with the filament remains
Before each printing
3
Build plate
5
2
4
X, Y axes
6
3
5
6
Extruder
Lifting mechanism
Remove the filament remains
Before each printing
Cleaning perforated platform
Before each printing
Checking perforated platform deformation
Before each printing
Levelling the platform
Each 50 working hours
Cleaning the bottom of perforated platform
Each 100 working hours
Perforated platform straightening
Each 100 working hours or
if necessary
Checking if axes are not contaminated with filament remains
Before each printing
Remove filament remains from XY axes
Before each printing
Checking the drive belt tension on XY axis
Each 100 working hours
Checking the drive belt tension between XY motors and the axes
Each 100 working hours
Checking if screws blocking pulleys on XY axis and pulleys on motor axis are
tighten
Each 100 working hours
Checking if the extruder moves freely when printer is off
Each 100 working hours
Lubricating XY axes
Each 250 working hours
Checking if screws blocking heating block are tighten
Each 100 working hours
Removing the filament remains and solids from the extruder
Each 100 working hours
Checking if the fan is working
Each 250 working hours
Checking if vertical line shafts and propulsion screw are not contaminated
with filament remains
Before each printing
Checking if ball screw and ball nut are tighten
Each 100 working hours
Propulsion screw lubricating
Each 100 working hours
Linear shafts lubricating
Each 250 working hours
21
SUPPORT & MAINTENANCE
CHANGING THE FILAMENT
To change the filament, from the “Filament” menu select “Unload filament” option.
Zortrax M200® is heating the extruder.
The display shows the message “Withdrawing filament”. Filament begins to withdraw from the
extruder. When the process is complete –remove the filament. To load new filament, follow the
instruction on page 13.
CLEANING THE NOZZLE
Nozzle contaminate with filament remains with time. It can cause
black coating on the nozzle. Remove the coating so black spots will
not appears in your prints.
CAUTION! Wear safety gloves.
CAUTION! Clean the nozzle when it’s cooled.
22
SUPPORT & MAINTENANCE
CLEANING THE PLATFORM
1
Turn off the printer and detach the platform connectors.
4
Unscrew screws mounting platform. Use allen key
included in the set.
2
Carefully remove the platform.
5
Clean the bottom part of the perforated platform using
spatula. It is not necessary to clean the perforation.
3
Clean the perforated platform using spatula.
6
Remove remains from the aluminum plate.
23
SUPPORT & MAINTENANCE
STRAIGHTENING PERFORATED PLATE
If between the center of the perforated plate and aluminum heated
plate you can sense space, it means platform has deformed. This is
a result of normal use. To straighten the platform, please bend it
as you can see in the photo. Repeat for both directions. Mount the
perforated plate to the aluminum heated plate – use screws and
allen key. Attach the connectors and run the printer.
1
CAUTION! Wear safety gloves.
CAUTION! Do not use to much strength - it could
damage the platform.
24
SUPPORT & MAINTENANCE
DRIVE BELTS MAINTENANCE
Properly tensioned belts guarantee correct work of your machine.
Provided machine has properly tensioned belts. Check if none of
them is loose. To check, gently tug. Properly tensioned belt vibrates
making sounds. If belts are loose please visit our Support Centre at
www.zortrax.com/support-center
1
2
25
SUPPORT & MAINTENANCE
DRIVE BELTS MAINTENANCE
Loosen 4 pcs screws mounting motor (pic. 3). Press the motor
down, make sure that the belt is tighten (pic.4). Tighten the screws
mounting motor, keep the belts tighten. Attach motor connectors.
3
4
26
SUPPORT & MAINTENANCE
DRIVE PULLEYS MAINTENANCE
Check if the XY axes pulleys working with short motor belt are
tighten. To check if pulleys are tighten, remove XY axes motor.
Unplug motor connector (pic. 1) and unscrew 4 pcs screws mounting
motor (pic. 2).
1
2
27
SUPPORT & MAINTENANCE
DRIVE PULLEYS MAINTENANCE
Remove the motor and spacer (pic. 3). Tighten screws mounting
pulley (pic. 4).
3
4
28
SUPPORT & MAINTENANCE
DRIVE PULLEYS MAINTENANCE
Mount the motor, spacer and tighten the screws (partly). Motor
should move vertically on screws (pic. 5). Press the motor down,
so that the belt is tightened (pic. 6). Keep tense, tighten screws
mounting motor and attach connector.
5
6
29
SUPPORT & MAINTENANCE
DRIVE PULLEYS MAINTENANCE
Please check if blocking pulleys are tighten when maintaining your
M200®. There are 2 screws on each pulley. First check the tightness
of the rack on the X axis and the Y axis which cooperates with a short
drive belt on the motor X or Y (pic. 7). Also, check if 8 pulleys on XY
axes working with long drive belt are tighten.
7
8
30
SUPPORT & MAINTENANCE
LUBRICATING
Use service grease to lubricate the linear guide on XY axes
(pic. 1 and pic. 2) – you can find grease in the set that came with the
printer (white tube). Apply a thin layer on each guide. You can also
use silicone grease.
1
2
31
SUPPORT & MAINTENANCE
LUBRICATING
Remember to regularly lubricate linear guide of Z axis (pic. 3) and
Z axis screw (picture 4 shows trapezoidal screw). Apply thin layer
of the service grease, which came with the printer (white tube).
You can also use silicone grease*.
3
4
* you can find trapezoidal screw in HX2 version of Zortrax M200®. Version HW1 and
HW3 do not require smearing of Z axis screw.
32
SUPPORT & MAINTENANCE
EXTRUDER MAINTENANCE
Extruder maintenance allows you to print high quality models.
To start, please withdraw filament from the extruder (pic. 1). Turn
on your M200® and select “Filament” -> “Unload filament” option
from main menu. Zortrax M200® is withdrawing the filament and
the LCD display shows “Withdrawing filament” option. When action
is complete – please withdraw the filament. Now you can turn off
your machine and disconnect the extruder connectors (pic.2).
1
2
33
SUPPORT & MAINTENANCE
EXTRUDER MAINTENANCE
Remove top part of the plastic cover - cover is mounted on latches
(pic. 3). Unscrew 2 pcs screws mounting platform (pic. 4).
3
4
34
SUPPORT & MAINTENANCE
EXTRUDER MAINTENANCE
Disconnect motor plug (pic. 5) and remove the motor – unscrew
4 pcs screws from the front of the extruder (pic. 6).
5
6
35
SUPPORT & MAINTENANCE
EXTRUDER MAINTENANCE
Clean the pulley on the motor shaft. Remove filament remains
(pic. 7). Assemble everything following the steps in a reverse order.
7
36
TROUBLESHOOTING
PROBLEM
SOLUTION
No power
Check if power cord is connected firmly
Hotend is not heating up
Check if wide strip connector is plugged firmly – if hotend is not heating up, please
contact our Support Center
Platform is not heating up
Check if 2 platform connectors are plugged firmly – if they are but platform is still not
heating up, please contact our Support Center
Printer stops working during printing process
Check:
•
if printer is connected to the power supply;
•
if there wasn’t any power outage;
•
if the filament spool rotate freely;
•
if the filament is not finished;
•
if the nozzle is not blocked
Nozzle does not provide filament or provides it discontinuously
Please go to support.zortrax.com
Printed models are deformed
Please go to support.zortrax.com
Printer has troubles printing small models
Increase speed fan. If that won’t help,
please go to support.zortrax.com
Nozzle hits model when printing / black spots on a model
Please go to support.zortrax.com
Model lifts on platform during printing process
Please go to support.zortrax.com
Fan stopped working
Please go to support.zortrax.com
The printer is making strange noises while printing (clicking)
Please go to support.zortrax.com
The LCD display is not working correctly
Please go to support.zortrax.com
Other
Please go to support.zortrax.com
37
DICTIONARY
.dxf – Vector file format that allows you to save your 2D draught with 3D elements
.obj – Universal format file, describing solid as a mesh of triangles
.stl – Universal format file for 3D printing, describing solid as a mesh of triangles
.zcode™ – Format file used to save the models prepared for 3D printing
Auto-leveling – Activities performed automatically before each printing which
compensates for the curvature of platform and allows first layer to be printed on
optimal height
Heating block – Part of hotend responsible for heating the material. Inside heating
block you will find thermistor and the heater
Lower extruder fan – Fan providing additional cooling to filament. Controlled manually
using the Additional fan speed slider in Z-Suite®. It turns on when the raft is printed.
DRS™ – Dual Raft Support – technology for forming first double base layer which
allows for a stable seating of the model on the build plate.
Nozzle – The lowest part of hotend which applies filament to the model.
Extruder – Movable part of Zortrax M200® which provides filament to the hotend.
Upper extruder fan – The fan cooling extruder. It helps in maintaining filament
temperature during printing process.
Hotend – The set of heating block, nozzle and filament supply slot. This is the most
important part of M200® - here the material is heated to the required temperature,
plasticized and applied layer after layer to the platform.
LPD™ – Layer Plastic Deposition - 3D technology from Zortrax®. It involves precise
deposition of the plasticized material on a perforated platform layer after layer.
XYZ axes – Directions in which the extruder (X axis – “left-right”, Y axis – “front – back”)
and build plate (Z axis – “up-down”) are moving.
Control panel – OLED display with knob and SD card slot which allows machine to work
without participation of the computer. Standalone mode.
Build platform – Removable plate. Model is secured to the platform during the
printing process. The platform has its own heater, thermistor and system which allows
for automatic calibration.
Perforated plate – Part of the build platform. Model sticks directly to the perforated
plate. It requires maintenance.
Levelling the platform – Action carried out periodically by the user. It ensures the
parallelism between the build plate and the extruder. Levelling is important for
printing large models.
Filament guide – Teflon tube leads the filament from spool to the extruder.
Linear guides – Smooth bars which guides the extruder. Require periodic lubrication.
Raft – Removable print base. Model is attached to the raft.
SES™ – Single Extruder Support – Technology which generates easy to remove
supporting material. Support is made of the same filament as the model.
38
DICTIONARY
Support – Supporting material generated with model which let you print difficult
models. Zortrax M200® is using SES™ technology which means that support is
removable.
Z axis screw – Screw which allows the platform to move up and down. It requires
maintenance.
Z-Firmware™ – Printer software which stores information about parameters of the
machine.
Z-Filament™ – Plastic printing material in the form of cord. It is used as a base for 3D
models.
Z-Suite® – Software used for three-dimensional model preparation on
Zortrax M200®.
Extruder pulley – Element settled on the extruder motor axis responsible for filament
movement.
39
SPECIFICATIONS
PHYSICAL DIMENSIONS
PRINTING
Without Spool
345 x 360 x 430 mm [13.6 x 14 x 17 in]
Print technology
LPD™ - Layer Plastic Deposition
With Spool
345 x 430 x 430 mm [13.6 x 17 x 17 in]
Build volume
Shipping Box
460 x 470 x 570 mm [18 x 18.5 x 22.4 in]
200 x 200 x 185 mm
[7.87 L x 7.87 W x 7.28 H in]
Weight
13 kg [28.7 lbs]
Layer resolution settings
Advanced: 25-50* microns
[0.000984-0.0019685 in]
Shipping weight
20 kg [44 lbs]
Standard: 90-400 microns
[0.003543-0.015748 in]
TEMPERATURE
Ambient Operation Temperature
15°-35° C [60°-95° F]
Storage Temperature
0°-35° C [32°-95° F]
Wall thickness
Minimal: 400 microns
Optimal: 800+ microns
ELECTRICAL
Resolutution of single printable point
400+ microns
AC input
110/240V ~ 2 A 50/60 Hz
Filament Diameter
1.75 mm [0.069 in]
Power requirements
24 V DC @ 11 A
Filament Type
Z-Filaments™
Power consumption
~ 190W
Nozzle diameter
0.4 mm [0.015 in]
SD card (included), WiFi*
Minimum single positioning
1.5 microns
SOFTWARE
Positioning precision X/Y
1.5 microns
Software bundle
Z-Suite®
Z single step
1.25 microns
File types
.stl, .obj, .dxf
Extruder maximum temperature
380° C [716° F]
Supports
Mac OS X / Windows XP, Windows Vista,
Windows 7, Windows 8
Heated platform maximum temperature
110° C [230° F]
Connectivity
* available in future update
40
CONTACT
Technical Support: zortrax.com/support-center
www.zortrax.com