1
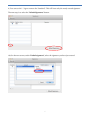
User Manual
Creating a signature in Outlook 2011 e-mail
Mac OS 10.8
Version: 1.0
Signature
Outlook 2011 e-mail
Date: 6-11-2013
This user manual explains how to automatically include your signature when composing a new email and/or replying to or forwarding e-mail.
Configuring your signature
1) Open Microsoft Outlook Mac 2011, go to “Outlook” (upper left-hand corner of the menu bar)
and select “Preferences”.
2) Select the option “Composing”.
2
3) The screen below will appear. Check the option “Compose messages in HTML by default”. This
ensures that graphic elements, such as internet links, remain visible in your signature.
You can now close this screen.
4) Go to “Outlook” and select “Preferences”.
3
5) Select the option “Signatures”.
6) Click on the “+” sign in the lower left-hand corner. This will create a new signature.
4
7) The new signature will automatically be called “Untitled”. Under “Signature” (right-hand side of
the screen) you can finalize your signature.
8) You can change the name “Untitled” to a name of your choice.
5
9) You can use the ‘-‘ sign to remove the ‘Standard’. This will leave only the newly created signature.
The next step is to select the ‘Default Signatures’ button.
10) On the next screen, under ‘Default signature’, select the signature you have just created.
6
11) Now click the ‘OK’ button.
12) When composing a new e-mail (as well as when replying to or forwarding e-mail), the signature
will automatically appear.
7