1
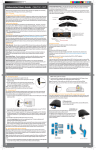
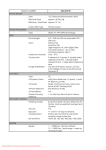
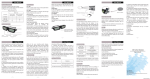
Neuros MPEG-4 Recorder 2:
A mini digital recorder for your handhelds
Remote Control
Power
Return/
Stop
Menu
Record/
Stop
Enter
Play/
Pause
Set up
1. Connect the AC/DC adapter to a power outlet and the DC power port on the back of
the Recorder.
2. Connect one A/V cable to the video source (Red, White and Yellow connections),
and the other end of the cable to the AV in port on the back of the recorder.
3. Connect the second A/V cable to your TV (Red, White and Yellow connections), and
the other end of the cable to the AV out port on the back of the recorder.
Powering on the Recorder 2
Set your TV on the right video channel to see the on screen menu and press the Power
button on the remote.
Navigate through the menu
The main menu has 6 different categories: Photo, Music, Video, Recorder, Setup, File
Browser. Navigate the main menu using the remote control. Once highlighted, you can
enter a category by pressing the Enter button
on the remote.
Recording a Video
1. Insert a memory card in the appropriate slot on the front of the unit.
2. Once the recorder is ON, pressing the Recording button on the remote will
immediately start a recording. Pressing the Recording button again will stop the
recording.
Neuros Technology International, LLC. 650 W. Lake Street, Suite 330. Phone: 312 756 0061, www.neurostechnology.com
Copyrights 2006 Neuros Technology International, LLC. All Rights Reserved, Chicago, IL.
a. To change the recording options, use your remote to highlight the Recorder
category using the left and right arrow buttons, then press the Enter button .
b. Once in the Recorder category, press the Menu button
c. Select the appropriate recording Resolution (177x120, 320x240, 368x208,
640x480) and Video Quality (Economy, Normal, Fine, Superfine). (Please
the Suggested Recording Resolution table included in your package for more
information)
d. Press the Return button to go back to the previous screen.
e. You will be in recording preview screen.
f. Press the Recording button on the remote to start a recording manually.
g. See the User’s Manual for timed recording.
Video Playback
1. On a TV
To watch a recording on your TV:
a. Highlight the Video category using the remote and press Enter .
b. Highlight the video file you want to play back using the up and down arrow
on the remote.
c. Press the Play button on the remote.
d. To stop the video playback, press the Return button .
2. On a PSP
a. After recording a video on the memory stick, remove the card from the
recorder’s slot.
b. Insert the card into the memory stick slot of the PSP.
c. Select the Video category on your PSP and press enter. Thumbnails of all the
video on the memory stick will be displayed. Scroll to the video you wish to
play and press enter.
3. On an iPod Video
a. Transfer the videos recorder on the flash card onto your computer with a USB
card reader.
b. Open iTunes and add the video files to your library like you would with audio
files.
c. Sync your iPod.
d. The new videos will be in the Video category.
For more information, step by step tutorials, visit our website
www.neurostechnology.com
Neuros Technology International, LLC. 650 W. Lake Street, Suite 330. Phone: 312 756 0061, www.neurostechnology.com
Copyrights 2006 Neuros Technology International, LLC. All Rights Reserved, Chicago, IL.