1
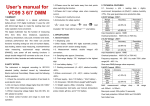
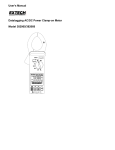
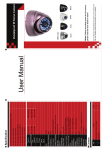
User's Manual
AC Clamp Meter + Phase Rotation Tester
Model 380974
Hz
CAT III
600V
CAT III
600V
Introduction
Congratulations on your purchase of the Extech 380974 AC Clamp Meter + Phase
Rotation Tester. This professional 1000A Clamp meter also provides phase rotation
testing where motor direction (clockwise or counter-clockwise) and phase sequences
(L1, L2, & L3) can be displayed. Careful use of this meter will provide years of reliable
service.
Specifications
Clamp jaw size
Battery type
Range Selection
Display
Overload Indication
Power
Low Battery Indication
Auto Power Off
Display update rate
Operating Temperature / RH
Storage Temperature / RH
Dimensions/Weight
Function
Range
AC Current
40A
400A
1000A
AC Voltage
400V
600V
3-Phase
80V to 480V
sequence
Resistance
40KΩ
Frequency
4KHz
1.6” (40mm)
9V
Manual
3 ¾ digit (4000 count) multi-function LCD with 40segment bargraph indication
‘OL’ displays on LCD
9V battery (200 hour life typical)
Battery icon displays on LCD
After 30 minutes (feature can be disabled)
1.3 updates/second (digital display); 13.3
updates/second (bargraph)
o
o
o
32 to 122 F (0 C to 50 C) / <80%
o
o
o
14 to 140 F (-10 C to 60 C) / <70%
9 x 3 x 1.5” (228 x 76 x 39mm) / 13 oz. (370g)
Resolution
Accuracy (% of reading + digits)
0.01
±(2.0% + 5d)
Freq. range: 40 to 400Hz
0.1A
1A
0.1V
±(1.2% + 5d) (40 to 400Hz)
1V
±(3.0% + 5d) (40 to 400Hz)
Frequency Response 40Hz to 400Hz
±(1.0% + 5d)
10Ω
1Hz
±(0.5%rdg + 5d)
Sensitivity: 10A (clamp), 30V (leads)
Capacitance
Continuity
400uF
1uF
±(3% + 5d)
Audible alert <40 ohms
(open circuit < 3V, short circuit: 0.8mA)
PEAK HOLD AC Voltage
Resolution
Accuracy (of reading)
(Capture
±(2.5% + 10d)
400V
0.1
time:
600V
1V
100ms)
AC Current
40A
0.01A
±(2.5% + 10d)
400A
0.1A
1000A
1A
Overload Protection
AC Current, Frequency (clamp)
1100A
AC Voltage, Sequence, Resistance, Capacitance, Frequency (leads)
600V rms
o
Specification notes: Accuracy is % of reading + number of digits at 64 to 82 F (18 to
o
28 C) <80% RH. The accuracy specs apply to measurements taken in the largest circle
inside the clamp jaw (see diagram).
Circle inside clamp jaws
2
Model 380974 V1.8 Sept 2003
Safety Information
• Read the following safety information carefully before attempting to operate or service
the meter
• To avoid meter damage, do not exceed the maximum specified input limits
• Do not use the meter if the test leads appear damaged
• Use caution when working near bare conductors or bus bars
• Accidental contact with a conductor may cause electrical shock
• Use this meter only as specified in this manual, otherwise the protection provided by the
meter may become impaired
• Read the operation manual before use and follow all safety instructions
• Use caution when working with voltages that exceed 60VDC or 30VAC, such signals
pose a shock hazard
• Disconnect circuits under test from the main power supply and disconnect all loads
before taking resistance, capacitance, and continuity measurements
• Environmental Conditions:
1.
2.
3.
4.
Installation Category III
Pollution Degree 2
Altitude 2000 meters max.
Indoor use only
• International Safety Symbols:
CAUTION:
CAUTION:
Risk of
Electrical
Shock
Refer to
documentation
3
Double
Insulation
Model 380974 V1.8 Sept 2003
Meter Description
1.
Transformer jaws
2.
Jaw opening trigger
3.
LCD Display
4.
PEAK HOLD button
5.
DATA HOLD button
6.
Rotary select switch
7.
COM or L2 (S) Input
8.
VOLT/OHM or L1 (R) input
9.
Positive, L3 (T), and CAP input
1
5
4
2
10. Frequency (Hz) button
6
11. MAX/MIN button
11
10
Hz
3
9
CAT III
600V
CAT III
600V
8
7
Automatic Shut-Off Feature
The meter shuts off automatically after 30 minutes to conserve energy. To defeat this feature:
1. Turn the meter off.
2. Hold down the PEAK or the MAX/MIN button while turning the meter on.
3. The Auto Power Off feature will now be disabled.
4. Note that when the meter is turned off the Auto Power Off feature is enabled again.
4
Model 380974 V1.8 Sept 2003
Meter Operation
Measurement Preparation
1. Use the rotary selector switch to choose the appropriate range and function. Ensure
that the selected range matches the measurement to be taken.
2. If the measured current is higher than the selected range for long periods of time,
overheating can result which may damage the meter.
3. Do not measure current on high voltage conductors (> 600V).
AC Current Measurements
Warning: Ensure that all test leads are disconnected from the meter’s terminals before
proceeding.
1. Set the Rotary selector
switch to the 40, 400 or
1000 Amps AC (~ A)
range.
2. Open the jaw via the
trigger and clamp
around one of the
conductors (see
diagram). Close clamp
completely around the
conductor.
3. Read the displayed
measurement value.
CAT III
600V
CAT III
600V
CAT III
600V
CAT III
600V
AC Voltage Measurements
INCORRECT
CORRECT
Warning: Maximum AC
input voltage is 600V. To
avoid electrical shock or damage to the instrument, do not attempt to measure any voltage
exceeding this limit.
1. Set the rotary selector switch to AC Volts (~ V).
2. Connect the black test lead to the COM terminal and the
red test lead to the V/Ω terminal.
3. Connect the other ends of the test leads to the circuit,
component, or other device under test. See diagram.
4. Read the displayed measurement value on the LCD.
Frequency Measurements
Note: Current (with clamp) and voltage (with test leads)
frequency measurements are possible with this instrument. At
least 10A (minimum threshold) must be available when
measuring the frequency of a current signal with the clamp.
1. Set the rotary selector switch to a voltage or current
position. Then Press the Hz button.
2. For measuring the frequency of a voltage (using test
leads), connect the black test lead to the COM terminal
and the red test lead to the V/Ω terminal. Note that in the 400V range, the minimum
threshold is 30V.
3. Connect the other ends of the test leads to the circuit, component, or other device
under test
4. For measuring the frequency of a current signal (using the clamp), fully enclose the
conductor under test in the jaws.
5. Read the displayed measurement value on the LCD.
CAT III
600V
5
CAT III
600V
Model 380974 V1.8 Sept 2003