1
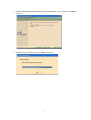
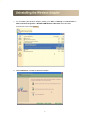
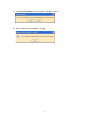
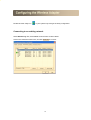
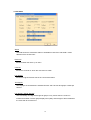
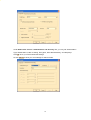
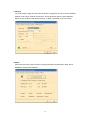
WLAN USB Adaptor
User Manual
WLG25USB
Table of Contents
I.
II.
Introduction
2
Package Contents
2
Minimum System Requirements
2
Connecting the Wireless Adapter
3
III. Status LEDs
4
III.
Installing the Wireless Adapter
5
IV.
Uninstalling the Wireless Adapter
8
V.
Configuring the Wireless Adapter
10
Connecting to an Existing Network
10
Configuration
11
2004-09-03
Introduction
Thank you for purchasing the Wireless Adapter.. This Wireless Adapter is easy to use and
easy to setup. If you are tired of all those messy wires needed to connect a lap-top to your
Home network, then take your networking to the next level with the Wireless Adapter. You will
be able to share files, printers and even your High-Speed Internet access wirelessly.
Package Contents
Make sure the following items came in this package:
!
Wireless Adapter
!
Wireless Adapter Installation and User’s Manual CD
Minimum System Requirements
!
Microsoft Windows 98 Second Edition (SE), Windows ME, Windows XP, or Windows
2000 installed
2
Connecting the Wireless Adapter
1.
Your computer can be on or off, it will not affect the installation process. Locate an
available USB slot on your PC. If you are not sure where this may be, please consult your
computer’s User Manual.
2.
Insert the Wireless Adapter into the appropriate USB slot. Your hardware is now installed.
3
Status LEDs
LED
MEANING
POWER
Indicates that the Wireless Adapter is powered on when the LED lights up.
LINK
Indicates link status. If the light is blinking, it means there is data
sending or receiving via wireless.
4
Installing the Wireless Adapter
Note: If you have installed the Wireless Adapter driver before, please uninstall the old version
first.
1.
After you have installed the Wireless Adapter your computer will display a Found New
Hardware Wizard screen, click Cancel to continue.
2.
Insert Wireless Adapter Installation and User’s Manual CD into your CD-ROM, then the
installation will be activated automatically. Or you may go to the directory where the
Wireless Adapter Installation stored, then double-click InstallShield Setup Launcher to
begin the installation.
5
3. RALINK Wireless Network Card Setup will install the driver on your system, click Next to
continue.
4.
Select the Country Channel, and click Next to continue.
6
5.
The installation is now complete.
Note:
Please click Finish.
When you complete the installation, the utility icon
will appear on the system
tray. If not, it means that the installation failed. Please uninstall the driver and repeat
the process.
6. Right-click the utility icon
, Utility Selection screen will display, select the utility you
want to use.
7
Uninstalling the Wireless Adapter
1.
For uninstalling the Wireless Adapter, please go to: Start -> Settings -> Control Panel ->
Add or Remove Programs -> RT2500 USB Wireless LAN Card under Windows
environment. Then click Remove.
2.
Select Remove to uninstall the Wireless Adapter.
8
3. The Confirm Uninstall screen will display, click OK to confirm.
4. After completing the uninstallation, click OK.
9
Configuring the Wireless Adapter
Double-click the utility icon
in your system tray to begin the utility configuration.
Connecting to an existing network
Select Site Survey Tab, all available Access Points would be listed.
Click on the desired Access Point, and click Connect to connect.
10
Configuration
!! Profile
The Profile Tab allows you to set values for all parameters by selecting a previously defined
profile. To create a profile, click Add, type a profile name and set the corresponding
parameters. If one of the profiles is no longer used, you may remove it by
clicking the Delete button. After changing parameters, click the Activate
button to take effect. You can have multiple profiles and modify the profile at any time.
11
! Link Status
Status
The field shows the association status to available Access Point with SSID<->MAC
address of the Access Point.
Extra Info
Shows whether the link is up or down.
Channel
Shows the channel on which the connection is made.
Link Speed
Shows the highest transmit rate of the current association.
Throughput
This displays the instantaneous wireless Receive and Transmit throughput in Kbits per
second.
Link Quality / Signal Strength
The Link Quality and Signal Strength bar graph is only active when the node is in
Infrastructure Mode. The bar graph displays the quality and strength of the link between
the node and its Access Point.
12
Noise Level
This displays the noise level of the link between the node and its Access Point.
! Site Survey
Site Survey Tab lists the features of the available Access Points within range of the Wireless
Adapter's signal.
Click on the desired Access Point, and click Connect to connect.
You may click Rescan to refresh the list.
Add to Profile
You may select an Access Point, and click Add to Profile to include it to Profile List.
Under Add Profile screen / Configuration Tab, you may set Power Saving Mode,
Network Type, Transmit Power, RTS Threshold, and Fragment Threshold.
13
Under Add Profile screen / Authentication and Security Tab, you may set Authentication
Type, Disable 802.1x, 802.1x Setting, Encryption, WPA Preshared Key, and Wep Keys.
Click OK when you have finished the settings.
Or click Cancel to abort your new settings for Add to Profile.
14
Select Profile Tab, you may find the new added profile in Profile List.
! Statistics
The Statistics Tab provides information about the Transmit and Receive frames.
15
! Advance
The Configuration Utility also offers the advanced configuration for user to set the Wireless
Adapter under certain network environment. These advanced options include Wireless
Mode, Ad hoc wireless mode, B/G Protection, Tx Rate, TX BURST, and Turn Off RF.
! About
About Tab shows the product version including the detail of Configuration Utility, Driver,
EEPROM, and NIC MAC Address.
16