1
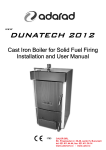
Solidmaster -F
Cast iron boiler for solid
fuel firing
Models
Solidmaster
Solidmaster
Solidmaster
Solidmaster
Solidmaster
4F
5F
6F
7F
8F
Rev.october.2010
Installation
and
User Manual
1783
3
Thank you for purchasing ADARAD Solidmaster-F boiler. Please read this manual carefully before installation and
operation of your product, and keep it during the whole operation life. Do not touch or interfere any part of the product
SM 4F
other than those allowed.
The installation, maintenance and service of this boiler requires skilled technicians. For the
installation of the boiler and proper room selection, installation of water circuit, chimney design, this manual and
mandatory regulations must be considered.
Solidmaster-F is a cast iron sectional boiler for solid fuel firing which is constructed in three pass horizontal flue gas
circulation principle. It is designed for hot water heating systems, should not be used for direct sanitary water supply.
Thanks to its cast iron body design with flexible casting technology, your boiler is quite resistant to corrosion that could
be caused by low return water and flue gas temperatures respectively, and high water content of the fuel being charged.
The unique three pass flue circulation principle of Solidmaster-F boiler will give higher water efficiencies among similar
products in the market, as well as lower pollutants and flue gas temperatures released from the chimney. Those
features will result in save in energy usage.
Solidmaster-F boiler can be used either in forced or natural water circulation systems thanks to its large waterways
inside the boiler and medium sized delivery and return connections.
You can fire different solid fuels whose specifications are given further in this manual. As calorific values of solid fuel
types differ from each other, The output power of the boiler will vary between a maximum and a minimum range
specified.
Delivery term
Solidmaster-F boiler is delivered in two packges:
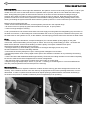
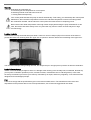
1. Boiler pack, holds cast iron body assembled and tested at the factory, fan, control panel (dismantled).
2. Accessory pack, holds sheet metal jacket, body insulation, primary air damper, cleaning
brush, ash scraper, fuel poker.
Optional accessory: A safety heat exchanger kit is delivered upon special request. This kit holds an copper heat
exchanger against excessive heat accumulation inside the boiler, a safety valve to activate the heating system at
high water temperatures, and auxillary accessories for installation.
Whether the hydraulic circuit is open vented or pressurised, this safety heat exchanger system should be utilized within
the system for meeting the regulations of related European standard for this product, as well as the safety of whole
heating installation and the boiler itself.
Safety warnings
Please, follow the safety instructions before installation and operation of Solidmaster-F boiler:
* Solidmaster-F boiler must be connected to an appropriate chimney whose construction complies with the instructions
given further in this manual, and mandatory regulations.The chimney must perform the requested draft values for
related boiler model. Your boiler should not be fired unless the chimney connection is made, and there is enough
draft for combustion.
* Always allow enough amount of fresh air in the boiler room. Refer to the instructions for room arrangement.
* Do not install the boiler in a space, shared or used by people, or in a place with direct openings to a living room.
* The boiler must be installed in an open vented hydraulic circuit unless the hydraulic circuit is equipped with safety
heat exchnager kit according to the directions given further in this manual.
* Do not drain water in hydraulic circuit unless in case of maintenance or risk of freezing. 15% of anti-freezer should be
added to hydraulic circuit to avoid freezing danger. In case of cast iron radiators, the hydraulic circuit should be washed
* Do not feed cold water directly to the boiler overheated by any reason. This may result in cracks on boiler sections.
* Do not fire boiler with front doors open. In case operation with fan, never open front doors without switching the fan off.
* The system design must provide water flow rates commensurate with boiler output and the temperature difference
between flow and return should not exceed 20 C.
* Any irregular electricity installations in boiler room should be replaced
* Water levels should be checked regularly and any leakages corrected in order to keep system water make-up to a
minimum, because excessive make-up will lead to salt deposits forming in the boiler waterways causing local
overheating and damage to the boiler sections.
* The quality of water is important. The recommended hardness of water: 1-3 mol/m3 (1 mol/m3=5.6 dH), PH:8-9.5
* The boilers should be installed directly onto a smooth level floor of non-combustible material. It is recommended that
the hight of the plinth should be at least 50 mm, and sized larger than the dimensions of casing of the boiler. This plinth
is kept the boiler from water on the floor.
* If the boiler is going to be installed in an old heating system, the system should washed away and cleaned from any
partıcules before Solidmaster-F is attached
4
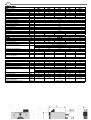
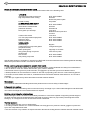
TECHNICAL DATA
Model
Number of sections
Fuels
Output range
Net weight
Water content
Combustion chember volume
Fuel loading volume
Max fuel loading height
Temperature control range
Maximum operating temperature
Minimum return temperature
Safety system activated at
Maximum operating pressure
Flue outlet diameter
Water flow/return connections
Water side resistance (dt=20 C)
Height (H2)
Width (A)
Length (L)
Fuel type
Output
Efficiency
Boiler class
Maximum fuel charge
Combustion period at max load
Requested fuel parameters
Average flue gas temperature
Flue gas mass flow
Required draft at chimney
Waterside resistance for ∆t=20 °K
Waterside resistance for ∆t=20 °K (with
safety heat exchanger)
Average content of CO to %10 O₂
Fuel type
Output
Efficiency
Boiler class
Maximum fuel charge
Combustion period at max load
Requested fuel parameters
Average flue gas temperature
Flue gas mass flow
Required draft at chimney
Waterside resistance for ∆t=20 °K
Waterside resistance for ∆t=20 °K (with
safety heat exchanger)
Average content of CO to %10 O₂
SM 4F
4
SM 5F
5
SM 6F
6
SM 7F
7
SM 8F
8
kW
kg
lt
cm3
cm3
cm
C
C
C
C
bar
mm
R
mbar
mm
mm
mm
23 - 33
245
28
51678
31320
30 - 42
290
34
70389
42660
38 - 53
340
40
89100
54000
28
30 to 90
100
50 (recommended)
95
3
160
1 1/2"
48 - 65
385
46
107811
65340
58 - 75
430
52
126522
76680
785
890
kW
%
No
kg
h
23
68
2
20
C
g/s
mbar
mbar
mbar
235
13.9
0.15-0.25
0.51
1.36
470
575
Wood logs
38
48
70
70
2
2
29
33.5
2
Maximum water content 20%
Maximum cross section 10 cm x 10 cm
Average calorific value 17.000 - 20.000 kJ/kg
250
265
280
18.1
22.9
28.9
0.15-0.26
0.15-0.27
0.15-0.28
1.03
1.81
2.92
2.50
4.18
6.53
30
69
2
24.5
58
71
2
38
300
34.3
0.15-0.3
4.63
10.14
2200 - 2600
mg/Nm³
kW
%
No
kg
h
33
70
2
22
C
g/s
mbar
mbar
mbar
260
20.8
0.15-0.25
0.76
1.90
mg/Nm³
1070
520
680
Hard coal
53
65
71
71
2
2
32
37
4
Maximum water content 15%
Average size between 30 to 60 mm
Average calorific value 26.000 - 35.000 kJ/kg
275
290
305
26.9
33.8
41.5
0.15-0.26
0.15-0.27
0.15-0.28
1.46
2.47
3.90
3.41
5.59
8.61
42
70
2
27
3100 - 3800
75
72
2
42
320
46.5
0.15-0.3
5.84
12.66
5
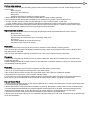
Handling of the product
Solidmaster-F is a heavy product, and care should be taken when carrying the boiler to the room where it is going to be
installed. The total weight of each boiler is indicated in Technical data section. Carrying equipments of product must
be of enough capacity to support that weight.
Room selection
Solidmaster-F boiler must be installed in an individual boiler room particularly organized for heating. The boiler room
should be of enough volume for installation, firing, and maintenance of the boiler. There should be enough fresh
air circulation for combustion, the chimney design must ensure an adequate draught for related boiler type, and must
comply with construction criteria given further in this manual and in mandatory regulations. Your boiler must never be
installed in open spaces or balconies, in spaces occupied by people like kitchen, living room, bathroom, bedroom, in
spaces where there are explosive and combustible materials.
The boiler room should have air ventillation holes through outside to let fresh air in. One air ventillation hole must be
built maximum 40 cm below the level of room ceiling, the other must be built maximum 50 cm above the floor level.
These ventillation holes should always be kept open. The upper hole should be at least 40x40 cm in size, the
lower hole at least 30x30 cm.
All hydraulic and electrical circuits must be arranged by authorized staff in accordance with mandatory regulations
specified by legal organizations.
Solid fuels should be stored by keeping minimum 800 mm distance from the boiler. We recommend you to keep the
solid fuel in another room.
Solidmaster-F boiler should be installed on a concrete plinth made of a fireproof material. For minimum sizes of the
plinth following table should be referred
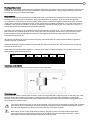
Model
Plinth height (mm)
Plinth width (mm)
Plinth length (mm)
SM
4F
SM
5F
490
595
SM
6F
50
600
700
SM
7F
SM
8F
805
910
Clearances around boiler
At least the following clearances should be achieved around the boiler
Circulation pump
We recommend to build a forced water circulation system accompanied with a sufficient pump. To size the pump, refer
the boiler water side resistance level given in Technical data section, taking the other resistances created by the
hydraulic circuit into account. Refer to the system diagrams given further in this manual to find the right position of the
pump wtithin the hydraulic circuit.
Your boiler switches the pump on and off automatically. The control panel commands to the fan and circulation
pump that is why you should keep the panel switched on switched on, when the boiler temperature is above
the cold water temperature or there is fuel firing inside the combustion chamber.
Never switch off the control panel when the boiler is operated to prevent excessive water temperature.
Control panel has a set temperature value that can be adjust during the operating of the boiler . Control
panel switch off the fan when the water temperature reach set value.
6
Hydraulic circuit
Open vented hydraulic circuit
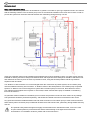
Solidmaster-F boilers are preferred to be installed in a hydraulic circuit with an open type expansion tank in accordance
with the following schemes. The circulation pump in the circuit should be installed on the return line to boiler in order to
prevent the system from excessive thermal stresses and overheating during electricty cuts off:
Open type expansion tank must be installed at the heighest level of whole hydraulic system. No globe valves must be
installed on delivery and return safety lines between boiler and expansion tank. Safety lines should be attached to inlet
and outlet lines of boiler at points as close as possible to boiler, using the shortest possible vertical way between
expansion tank and boiler.
If "h" distance in above scheme can not be arranged within the construction of present system, the circulation pump
must be installed on delivery line from boiler. "h" distance refers to the head pressure of circulation pump at operated
speed. If "h" distance can not be arranged in a system with circulation pump on return line, there will be air suction
from radiators at the highest level of system. In this case,the other scheme where pump is installed on the delivery
line must be referred.
A hydrometer must be installed on the delivery line to monitor the pressure level and to check if there is any leakage.
The hydrometer should be purchased separately, and should be installed at the same level with the boiler outlet.
A by-pass line should be installed between inlet and outlet connections of circulation pump in order to allow maximum
water delivery when circulation pump is switched off and there is fuel fired in boiler, particularly during sudden electricty
cuts off.
The optional safety heat exchanger kit is highly recommended to be used with the boiler, even in the case
of open vented systems to protect the boiler and the whole heating circuit against excessive heat
accumulation. For installation of this kit, please refer to the next section
7
Design parameters for open expansion tank
Expansion tank protects the hydraulic curcuit from excessive temperatures by allowing free volume for expanding
water and keeping the water pressure from exceeding the static pressure. Expansion tank may be built in rectangular
prism or cylindirical shape, may be installed in horizontal or vertical position in the system. Safety lines between
boiler and expansion tank should be installed by an increasing slope up to tank. Following scheme shows the
maximum vertical distances between safety lines and boiler:
The size of expansion tank can easily be calculated
regarding the total expanding water contained in
whole system. If the total volume of water in the system
is Vs; the volume of expanison tank should be:
Vg= 8.Vs / 100 (in liters)
SV: Deliver safety line
SR: Return safety line
In more practical way, just using the nominal heat output
of boiler (Qk) in terms of kW, the volume of expansion
tank can be caluculated as;
Vg= 2,15.Qk (in liters)
Sizing safety lines between boiler and open expansion tank
Size of the safety line for delivery
Size of the safety line for return
where Qk is the boiler output in kW.
d SV = 15 + 1,5. Qk (mm)
d SR = 15 + Qk
(mm)
8
Pressurised hydraulic circuit
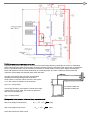
Solidmaster-F boiler can be installed in a pressurised heating system if following scheme is referred with addition of the
safety heat exchanger kit which is supplied as a separate accessory.
maximum
pressure: 3 bar
Safety heat exchanger includes the following items:
1. Safety heat exchanger (copper serpantine integrated with outlet stub pipe)
2. Safety valve
3. Auxillary fittings
To install the safety heat exchanger system:
1. Remove the existing outlet stub pipe with flange of the boiler
2. Install the safety heat exchanger to the delivery port on the rear section
3. Attach the hot water delivery line to the port on top of the flanged pipe of the safety heat exchanger
4. Remove the bulb of boiler thermometer from the front section, and insert it into the pocket on the flanged
pipe of the safety heat exchanger
5. Attach the safety valve on cold sanitary water line to the safety heat exchanger as shown in above scheme.
6. Insert the couple thermostat bulb of the safety valve inside the pocket on the front section of the boiler.
7. Drain the hot sanitary water outlet of the safety heat exchanger.
If the boiler water temperature exceeds 95 oC, thermostat of the safet valve lets cold sanitary water flows through the
serpantine of the safety heat exchanger. Serpantine with cold water circulating inside cools down the boiler water
temperature. When the boiler temperature decreases below the safe degree, safety valve shuts the cold sanitary
water circulation, and the boiler goes back to normal operation.
The valves on the sanitary connections of safety heat exchanger must always be kept open.
Solidmaster-F can only be used with origial safety heat exchanger kit which is tested and approved for each
boiler model.
Cold water must never be delivered directly to boiler inlet in order to solve overheating porblems as this
will result in serious damage on boiler body. That application will end the warranty of the boiler.
9
Chimney connection
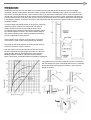
Solidmaster-F boiler must be connected to an individual chimney that will provide at least the minimum draught
requested. The flue canal between the boiler and the chimney should be insulated using a glass wool material. The
flue canal to chimney and chimney must be made of steel or an equivalent material that can be used at temperatures
around 400 C All connections on the flue system must be sealed in order to perform a good combustion and efficiency.
The flue canal must be connected to the chimney using the shortest way and in accordance with the dimensions given
in the following scheme. Horizontal connections and equipments that will increase the pressure loss such as elbows
should be avoided
A vertical single steel piping should not be used as a chimney.
Chimney must be made of one internal and one external
surface. External surface may be made of steel or brick.
For internal surface stainless steel chimney elements should
be preferred against corrosion. The space between internal
and external surfaces of the chimney should be insulated to
prevent condensation in flue gasses.
At the lowest level of chimney, there should be a cleaning
cover which is made of steel, and sealed for any leakage.
The length of flue canal between the boiler and the chimney
should not exceed ¼ height of chimney.
The size of flue canal and chimney should not be less than
the size of the boiler flue gas outlet connection. For the total
height and the minimum internal diameter of the chimney,
following diagram should be referred in respect with the
boiler output power, if otherwise stated in mandatory regulations.
The heighest level of chimney outside should be in accordance
with the dimensions given in following sketch so as to minimize
the harmful effect of flue gasses on ambient, and to improve
draught in chimney.
10
ASSEMBLY INSTRUCTIONS
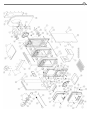
Numbers between paranthesis refer to bubble numbers in exploded drawing of the boiler that can be found
at the end of this manual
Solidmaster-F boiler should be installed on a concrete plinth made of a fireproof material. We recommend you to
place two pieces of steel sheetmetals underneath the front and rear elements of the boiler preferably with the
dimensions H 3 mm X L 500 mm X D200 mm.
Follow the instructions to finish the assembly of boiler accessories supplied together with the boiler
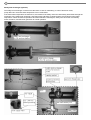
1. Fit the fan adaptor (63) onto the deep plate (6) using four pieces M6 nut (D). Place insulation material (62) between
adaptor and deep plate to prevent air leakage.
62
6
48
63
2. Place body insulation (48) squarely onto the boiler body. Place rear insulation board onto rear section as seen in the
pictures above.
3. Fit four pieces of M12 nuts (A) onto free ends of the four tie rods at the rear side of the boiler as shown in the following
picture. These nuts will be used to lock side panels after their assembly.
38
38
F
A
H
4. Fit left hand side panel (38) by passing its rear bend over upper and lower tie rods at the end. First secure the left
hand side casing to the front element of the boiler by using three pieces of M8x15 fillester countersunk head bolts (H)
and A8.4 flat washers (F) as shown in the pictures above.
5. At the rear, secure the rear bend of left hand side panel, locking between two M12 nuts (A) and A13 flat washers (B)
as shown in the following picture.
11
6. Likewise, fit the right hand side panel (39). When you work at the front side of the boiler, loose three M8 nuts (G)
that are used to secure front door hinges (28, 29) a little, drive the front bend of the panel through the free space
behind A8.4 flat washer (F). After driving the panel to right position secure it by screwing the same M8 nuts. You can
set the hinges by loosing or screwing to provide that the doors are closing properly.
28
B
G-F
A
39
7. Fix the control panel (60) onto top casing (40) as shown in the picture before assembling top casing over the boiler.
Then attach sensing bulb of control bulb inside the pocket on the front element of the boiler.
60
40
8. If the top is not fitted squarely between two side panels, loose the nuts securing the side panels, and re-adjust the
positions of the side panels to match the top panel. Secure the side panels again. Fix the front panel (41) by six pieces
of S4.2x9.5 self tapping screws (L) to side and top panels. Fix the rear bend of the top panel to both side panels by
the same screws (see following pictures)
40
L
39
L
41
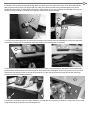
9. Fit primary air damper (19) on the lower front door (17) with the help of primary air damper rod (20), and secure it with
a help of M4 nut (E) as shown in the following picture.
12
E
20
17
19
J
10. Keep close the primary air damper (19) by screwing M6x30 fillester countersunk head bolt (J). Ensure that the
damper does not stand open. Otherwise while fan is working air or smoke can come out from this opening.
11. During the cleaning of the boiler the dumper (50) is suppose to be removed as shown in the pictures.
50
50
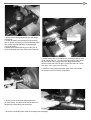
12. by fixing the rear casing follow the instructions:
― Dismount the damper and the rod.
― Remove the damper rod from the upper hole. It does not
disturb the flange as it is seen in the picture. There is no need to
remove the upper flange.
― Then fit the rear panel as it is seen in the pictures.
― Fit the rod onto the smokehood again.
― Finally fit the damper onto the rod.
please see the following pictures.
50
2
13
63
42
62
D
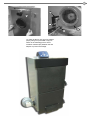
14. finally fix the fan (61) onto fan adaptor
(63) by using four pieces M6 nut (D) as
shown in the following picture. Place
insulation material (62) between fan and
adaptor to prevent air leakage.
61
14
Safety heat exchanger (optional)
The safety heat exchanger is used to save the boiler in case of overheating. In case of electrical cutout,
pump defect etc. the boiler water temperature can be overheated.
If the boiler water temperature exceeds 95 ºC, thermostat of the safety valve lets cold sanitary water flows through the
serpantine of the safety heat exchanger. Serpantine with cold water circulating inside cools down the boiler water
temperature. When the boiler temperature decreases below the safe degree, safety valve shuts the cold sanitary
water circulation, and the boiler goes back to normal operation.
15
1. Remove the existing outlet stub pipe with flange
of the boiler
2. Install the safety heat exchanger to the delivery
port on the rear section by four pieces M10X25 bolts.
Use gasket supplied with safety heat exchanger
to provide sealing.
3. Attach the hot water delivery line to the port on
top of the flanged pipe of the safety heat exchanger.
4. Fit the safety valve to the safety heat exchanger with the help
of 1/2" nipple and 1/2" - 3/4" hex reducing bushing. Then attach
the valve to the main supply water line. Make sure that the
direction of the safe valve is right. On the valve there is a arrow
that refers main supply water direction.
5. Insert the couple thermostat bulb of the safety valve inside
the pocket on the front section of the boiler.
6. Remove the bulb of boiler thermometer from
the front section, and insert it into the pocket on the
flanged pipe of the safety heat exchanger
7. Drain the hot sanitary water outlet of the safety heat exchanger.
16
CONTROL PANEL
Features of Digital Control Panel:
►
►
►
►
►
►
►
►
System water temperature can be followed
Adjustable operating temperature
Smart blower control function
Gives warning when boiler is overheated
Automatic shutdown of blower
All settings are stored in case of electrical cutout
Pump is OFF when the boiler temperature is under 40 °C
Fuse protection
220-230 V 50 Hz
4A
L : PHASE (Brown)
N: NOTR (Blue)
E : EARTH (Yellow-Green)
Note : Do not change Phase and Notr
cable connection.
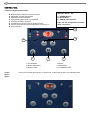
6
4
5
1
1. On-Off Button
2. Blower Adjustment
3. Warning Leds
On-Off
Button
(Item1)
2
3
4. Display
5. Menu Button
6. Increase/Decrease
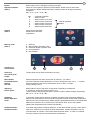
It turns the controller ON and OFF. In OFF mode, control panel is seen as in followed picture.
17
Blower
Adjustment Button
(Item 2)
Blower speed can be changed by touching of button.
When the control panel is opened by On/Off button, blower works in Auto mode.
By pressing the blower adjustment button, operation mode will change respectively
as follows :
Au – 0 – 1 – 2 – 3 – 4 – 5 – Au
Au
0
1
2
3
4
5
:
:
:
:
:
:
:
Automatic operation
Blower is OFF
Blower works at 1st level
Blower works at 2nd level
Blower works at 3rd level
Blower works at 4th level
Blower works at 5th level
Display
(Item 4)
During normal operation,
display shows the boiler
temperature.
Warning Leds:
(Item 3)
12345-
Operation of
Control Panel
Manual Operation
Modes
Stand by
Manual blower operation mode
Automatic blower operation mode
Pump operation
Not Available
1
2
3
4
Switching
the control panel
On/Off
Control panel can be switched On/Off by touching
Menu Button
Increase/Decrease
Buttons
Item 5-6)
Boiler temperature set value can be seen by touching " M " button.
Set value is blinking during adjustment. In order to change the value, use "+ / - " buttons.
Boiler temperature value can be set between 40-90 °C with 5 °C steps.
Factory setting is 60 °C.
Adjusting
blower speed
Blower starts in Auto mode when control panel is opened by On/Off buton.
If you want to change the speed of blower, use
mode of blower. By pressing the button, operation mode of blower changes respectively :
Au – 0 – 1 – 2 – 3 – 4 – 5 – Au
Automatic
Blower Operation
mode
In Automatic mode, blower speed is controlled according to the temperature difference
between set temperature and current boiler temperature. While current boiler temperature
approaches to the set temperature, blower speed is gradually decreased. If the temperature
difference is less than 10 °C, blower will run at minimum level. Auto mode enables
stable boiler temperature and prevents overshooting.
Automatic Blower
Shutdown feature
If the boiler temperature decreases below 40 °C after the first start of pump, control panel
waits for a certain time to increase the boiler temperature. If boiler temperature can not
increase within 45 minutes, control panel shuts the blower down. In order to re-operate
the boiler, please reset the control panel with On/Off button.
18
OPERATING INSTRUCTIONS
Pre-firing checks
Before the first operation of boiler right after installation, the hydraulic circuit must be ready for operation. To fill an open
vented circuit, the valve on start level line from expansion tank is opened, and the circuit is filled with main supply
water. During filling the system all valves and accessories on the lines must be checked for leakage. Filling is
stopped, when water from start level line is observed, closing the valve on this line. Right after that,the hydraulic
pressure is marked on screen of the hydrometer. This will make re-filling operations during heating season much
easier, just feeding the system with fresh water until the hydraulic pressure on screen reaches the pre-marked value.
Before every firing make sure that;
* Boiler and circuit are filled with water, and the hydraulic pressure is in the required range.
* All valves on the line (except by-pass lines and start leve line) are in open position.
* There is enough draught in chimney.
To fill a pressurised circuit, feed the fresh water from main supply line using either the filling/drilling tap connection on
the boiler rear sectiion, or the feeding line constructed within the circuit. To purge the air contained in the system, use
air relief valves on the hydraulic circuit, on the radiators, and also spring pressure relief valve at boiler hot water outlet.
Firing
* Set the Kindling. Place firestarters, crumpled newspaper (3 or 4 sheets balled up fairly tightly) on the grate
of the boiler. Place small kindling over the paper or starter. The more dry, small kindling you have - the easier and
better the fire will start. Crisscross the kindling so there is plenty of air space in between each piece.
Wood that is packed too tight will not burn properly.
* Set larger wood on top of the kindling, and continue to set larger and larger pieces on top until
the fuel exceeds the 1/3 level of the filling chamber.
* Ensure that the chimney dampers are open. Then light the newspaper on the bottom
* Desired temperature value is set by digital control panel. The essential combustion air is provided by fan working
manually.
* The fire should be well established within approximately 15 minutes, then filling chamber can be loaded completely
but check to make sure that the firelighters have not been extinguished.
* After the boiler reach a appropriate condition select auto mode on control panel.
* Keep the fire going Always keep a “flame” on your fire - a smoking or smoldering fire is a cold and inefficient fire
and also produces pollutants and creosote (tar in the chimney)
Manual operating
When the boiler reaches a required combustion condition and the chimney gets warm draught will increase on the
chimney. If the conditions of boiler room and chimney are appropriate for the boiler operating without fan, it can be
deactivated. In order to operate the boiler without fan adjust opening by M6x30 fillester countersunk head bolt (J).
as shown in the pictures. It extends combustion period comparatively to fan operating.
J
19
19
Stand-by
*You can slow-down the combustion by
a. Decreasing the set temperature on control panel
b. Selecting manual mode and first level of fan
c. Closing the flue damper fully
Your control panel switches the pump on and off automatically. That is why, you should keep the control panel
switched on, when the boiler temperature is above the cold water temperature or there is fuel firing inside
the combustion chamber. Never switch the control panel off unless the fire is completely put off.
Never let the boiler water temperature reach high values sharply with leaving the pump switched off. In this
case, the instant cold water delivey to the very hot boiler may result in cracks on boiler body due to high
thermal energy.
Loading the boiler
Solitech Plus is a fully horizontal three pass boiler. There is a cast iron dumper (50) on front section of the boiler to
prevent the boiler from smoking when the upper door is opened. It will also obviate the overheating of the upper door.
You can lift this dumper during loading new fuel, but always keep it in its right place to perform an efficient combustion.
Lack of chimney draugt
If there is lack on chimney draught or there is no draught at the chimney (such as badly built, uninsulated, blocked etc)
you may face combustion problems (no fire, excessive smoke, condensation due to cold flue gasses). In this case,
we strictly recommend you to have your chimney controlled by an expert, and fix any irregularity. Your boiler has been
designed for forced draught principle.
Fuel
Fuels must comply with the specifications given in the technical data section. The manufacturer will not be held
responsible for the problems due to lack of fuel specifications, use of fuels not suggested for this boiler.
20
HEALTH AND SAFETY INFORMATION
Control of substances hazardous to user health
For the type of material and where used in Solitech Plus boiler refer to the following chart
1. PAINTS:
General purpose black undercoat
High temperature black coating
Powder coating
2. INSULATION AND SEALS
Rock-wool insulation board
Glass-wool insulation board
(aluminum backed)
Fibre-glass rope and tape
Ceramic-fibre board
CFC free polyurethane spray/foam
Refractory brick
Asbestos products
3. SEALANTS
Red-lead dye
Ceramic/mineral compound gasket
(Isoplan/Frenzelit)
Water jointing flax
Grey paste jointing compound
(Unipak A/S)
Fire cement
Gas jointing compound
NOT APPLICABLE
Sections
Boiler body bottom plate
All jackets
NOT APPLICABLE
Sections
Smokehood
Front door
Between bottom plate and
sections
Front door
NOT APPLICABLE
NOT APPLICABLE
NOT APPLICABLE
Nipples
Flanged stub pipes
Tappings on sections
Inter section joints
NOT APPLICABLE
NOT APPLICABLE
Specific data sheets are available on request from HEATLINE for those materials but the following material handling
and first aid procedures should in all cases be observed.
Paints, sealants, grey paste compound, ceramic-fibre boards
1. These materials contain organic solvents and should be used in a well ventillated area away from naked flames.
2. Do not allow to come into contact with the skin, eyes, inhale or swallow.
3. Use barrier cream or gloves to protect the skin, and goggles to protect the eyes from accidental contact.
4. Small quantities can be removed from clothes or skin with a proprietary paint remover or hand cleaning prdouct.
5. If inhaled, remove sufferer into fresh air, if swallowed clean mouth with and drink fresh water but do not induce
vomitting.
6. If in the eye, irrigate the eye with clean water and seek medical attention.
Sharp edges
Care should be taken when handling sheet metal panels that do not have safety or folded edges
Lifting cast iron sections
Care should be taken when lifting cast iron sections as they can weigth up to a few hundred kilograms and HEATLINE
can confirm the weight of each individual section if required
Building and servicing the boiler/sections
When building the boiler, the section should always be built on a level base capable of supporting the full weight of
the boiler and the sections should always be supported on blocks of wood or props when positioning before final
bolting up. An unsupported section should never be left unattended.
Thermal insulation
1. Avoid contact with skin, eyes or inhaling dust.
2. If cutting insulation then do so in a well ventillated area using gloves to protect the hands, goggles to protect the
eyes, and a disposable dust mask
3. If a skin reaction or eye irritation is experienced then discontinue working with the material and seek medical advice.
21
Devices under pressure
1. Avoid contact with the parts of heating system under pressure during operation of boiler. These dangerous parts
are such that:
Boiler sections
Boiler inlet and outlet lines
Safety lines
Pressure relief devices installed on heating system
2. Never attempt to drain water from heating system when the boiler is being operated
3. Never feed the boiler directly with cold water to cool it down for any reason, when the boiler is hot.
4. In some way the circulation pump can stop working or it may not work properly. In that case:
In open vented system an open expansion tank that is assembled according to instructions in manual prevents
overheating and overpressure. Besides activating the By-Pass line that is laid as a condition on both system (open
vented and pressured system) protects the system against these type risks.
High temperature surfaces
Avoid contact with parts and surfaces having high temparutares which will be hazardous for human such as:
Boiler front door
Fire door on the front section
Water delivery and return lines (even if isolated), safety lines
Flue spigot
Connection between flue outlet and chimney
Circulator pumps, expansion vessels
Boiler room
1. Ensure that the boiler room has an easy access to outside in case of danger in heating system
2. Do not leave the solid fuels and auxillary substances (chips, paper etc) to ignite the boiler, with the distance less
than 800 mm from the boiler
3. Do not cover the fresh air openings of the boiler room, as it is very important for the combustion
Flue gases
1.There could be a little gas release from the front side of the boiler, when the front loading door is opened. Never
breathe this gas flow.
2. When adding solid fuel when there is active fire bed inside the combustion chamber, protect your hands and face.
If needed wear protective gloves.
Firing fuel
1. Do not take the firing fuel out from the combustion chamber while it is still burning
2. Do not try to put the firing fuel off using water or any other liquids.
3. Do not leave the front doors and fire door open when there is fire inside the combustion chamber
4. To slow down or stop the fire, close air inlets, and flue outlets..
5. Your boiler can only be fired with the solid fuels whose characteristics have been given in Technical data section.
Never use any other solid fuel that would be harmfull for boiler section design, any liquid or gaseous fuels.
Fan and Control Panel
1. Before opening the boiler doors the fan must be switched off on control panel. Otherwise it causes injuries and harms
to control panel and casing sheets.
2. Never switch off the control panel while the boiler is operating. Because the control panel runs the circulation pump.
3. Control panels should absolutely be protected against external agents such as water, humidity and dust and they
should not be mounted under or near the parts such as valves and pipe connections which may leak water.
4. Electrical connection of the devices must be installed on 220 V 50 Hz a grounded wiring.
5. Never close the air inlet of the fan. If it is closed there is break down risk of the motor and the fan can not provide fresh
air for the combustion.
22
MAINTENANCE AND CLEANING
Regular maintenance by qualified staff, strictly in accordance with the manufacturers instructions is essential for the
efficient operation of system.
Periodic inspections
* Check the water level or pressure either in open vented or pressurised systems. The hydrometer must be marked
after first filling of the boiler. So water level can be checked regularly. If the water level or pressure is under the level
of static pressure or the system set-up, a water make-up is needed. The make-up water should be softened according
the local regulations before feeding into the system to prevent corrosion inside the heating circuit and the boiler.
* Front doors of the boiler should be checked for properly closing. Fibre-glass ropes must be replaced if necessary.
* Check the condition of refractory inside the front section. If it is damaged, you will have higher surface temperatures
on front doors. In this case the refractory should be replaced to save energy and prevent further crack.
* Check if there is flue gas leakage from the chimney connections of the boiler, and have it fixed if necessary.
* Check the heat transfer surfaces of cast iron sections. The soot formation will change according to fuel type you use,
and the combustion air amount. So if you feel that the outlet water temperature can not reach the usual values with
the same conditions, heating surfaces therefore should be cleaned
Cleaning of boiler
Before cleaning the boiler, switch the pump and other electrical appliances in boiler room off.
To clean the boiler:
* Clean all heating surfaces using the brush supplied with the boiler.
* Clean the by-pass holes between combustion chamber and second flue gas passages with supplied fuel poker
* Clean the fresh air inlet section at the bottom level of intermediate sections with supplied fuel poker
* Collect all soot deposits inside
* Remove the disposals.
Maintenance
Before each heating season we would recommend you to call for the contracted service agent to check the boiler,
heating system, electrical connections, and chimney conditions. Do not attempt to carry any maintenance work
without getting help from qualified people.
Safety heat exchanger
*The valves on the sanitary connections of safety heat exchanger must always be kept open.
*Solitech Plus can only be used with origial safety heat exchanger kit which is tested and approved for each
boiler model.
*Cold water must never be delivered directly to boiler inlet in order to solve overheating porblems as this
will result in serious damage on boiler body. That application will end the warranty of the boiler.
* Make sure that the valves on the drain valves are open.
23
ADARAD DÖKÜM ÜRÜNLERİ SANAYİ VE TİCARET A.Ş.
ORGANİZE SANAYİ BÖLGESİ 3. CADDE
İNEGÖL / BURSA
TEL : +90 224 714 82 00
FAX : +90 224 714 87 49
www.adarad.com.tr