1
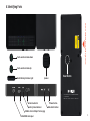
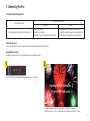
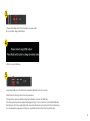
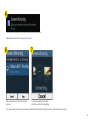
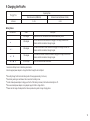
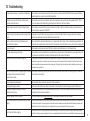
User Manual
Table of Contents
1. Safety Precautions
FCC Compliance Information
FCC Class Notice
FCC Caution
FCC RF Radiation Exposure Statement
Industry Canada Statement
CE Caution
IEC-60825-1 Caution
2. Certifications
3. Environmentally Friendly Disposal and Recycling
4. Package Contents
5. Product Features
6. Identifying Parts
7. Connecting PicoPro
a. Compatible Operating Systems
b. Wired Connection
c. Wireless Connection
d. Switching Connection Mode
e. Reset Switch
8. Making Adjustments
a. Volume Adjustment
b. Speaker / Earphone Usage
c. Laser Alignment
d. APC Setting
e. Engine High Temperature Protection Mode
9. Charging the PicoPro
10. Troubleshooting
11. Specifications
12. Warranty
3
1. Safety Precautions
This product is not waterproof – avoid using it near water or wet places.
There is a risk of malfunction if product is used in places where sudden or extreme temperature changes occur.
Applying excessive force or impact to this product may result in product damage, and will void warranty.
Never attempt to disassemble or service this product yourself. Doing so can result in electrical shock and void warranty.
This is a Class 3R Laser product. For your safety, do not stare directly into the laser source. Doing so could damage your eyes.
FCC Compliance Information
This device complies with Part 15 of the FCC Rules. Operation is subject to the following two conditions:
1. This device may not cause harmful interference to another device.
2. This device must accept any interference received, including interference that may cause undesired operation.
FCC Class Notice
This equipment has been tested and found to comply within the limits for a Class B digital device, pursuant to Part15 of the FCC Rules.
These limits are designed to provide reasonable protection against harmful interference when the equipment is operated in a residential environment.
This equipment generates, uses, and radiates radio frequency energy, and if not installed and used in accordance with the instructions, may cause harmful interference
to radio communications.
However, there is no guarantee that interference will not occur with special installation.
If this equipment does cause interference to radio or television reception, which can be determined by turning the equipment off and on, the user is encouraged to correct
the interference by one of the following measures:
■ Reorient or relocate the receiving antenna.
■ Increase separation between the equipment and receiver.
■ Connect the equipment to an outlet on a circuit different from which the receiver is connected.
■ Consult the dealer or an experienced radio/TV technician.
FCC Caution
Any changes or modifications in construction of this device which are not expressly approved by the party responsible for compliance could void the user’s authority
to operate the equipment.
4
FCC RF Radiation Exposure Statement:
This equipment complies with FCC RF radiation exposure limits set forth for an uncontrolled environment. This equipment should be installed and operated with
a minimum distance of 20 centimeters between the radiator
and your body. This transmitter must not be co-located or operating in conjunction with any other antenna or transmitter.
Industry Canada Statement
This device complies with Industry Canada license- exempt RSS standard(s). Operation is subject to the following two conditions:
1. This device may not cause interference.
2. This device must accept any interference, including interference that may cause undesired operation of the device.
CE Caution
Risk of explosion if battery is replaced by an incorrect type. Dispose of used batteries according to the instructions.
IEC-60825-1 Caution
Use of control or adjustments or performances of procedures other than those specified here in may result in hazardous radiation exposure.
5
2. Certifications
LASER APRETURE
KC : MSIP-CMM-CLK-PICOPRO
FCC ID : TCLPICOPRO
CE1177
LASER RADIATION
AVOID DIRECT EYE EXPOSURE
CLASS 3R LASER PRODUCT
Output: Red(90mW)/Blue(85mW)/Green(50mW)
λ= Red(639nm)/Blue(445nm)/Green(522nm)
Pulse frequency : 60Hz
IEC 60825-1:2007
compliant
RoHS
IC No : 10211A-PICOPRO
IEC-60825-1 : Class 3R Laser
3. Environmentally Friendly Disposal and Recycling
To protect the environment, dispose this product separately from household waste once it has
reached its end of life, or take it to your local electronic waste disposal center.
Built-in Battery
Battery Type
Rechargeable Lithium-ion Polymer Battery
Battery Operating Time
Approx. 120 minutes (with continuous use)
Battery Capacity
3140 mAh @ 3.7V
Charging the Battery
Use supplied USB power adapter to begin charging the battery.
Battery status is indicated by four blue LED indicators while charging.
(4 LED : 100% / 3 LED : 75% / 2 LED : 50% / 1 LED : 25%)
Battery Charging Time
Approx. 270 minutes
6
4. Package Contents
PicoPro
User Manual
Power Adapter
MHL Cable
Holding Mount
Pouch
5. Product Features
PicoPro is a laser-based HD pico projector that always stay focused and easily fits in your pocket.
It enables you to share contents from your mobile device onto any surface via HDMI connection or Miracast (Screen Mirroring) capability.
7
6. Identifying Parts
Laser radiates from this aperture
LASER APRETURE
LASER RADIATION
AVOID DIRECT EYE EXPOSURE
CLASS 3R LASER PRODUCT
Output: Red(90mW)/Blue(85mW)/Green(50mW)
λ= Red(639nm)/Blue(445nm)/Green(522nm)
Pulse frequency : 60Hz
IEC 60825-1:2007
Touch-sensitive Volume Down
Touch-sensitive Volume Up
Backlit Battery Indicator Light
Reset Button
Speaker
FCC ID : TCLPICOPRO CE1177 KC : MSIP-CMM-CLK-PICOPRO
IC : 10211A-PICOPRO
Model : PicoPro DC : 5V 2A
3.5mm Audio Out
Battery Status Indicator
Celluon, Inc.
Made in Korea
Power Button
Mode Switch Button
CHARGE – Micro USB port for charging
MHL/HDMI cable input
8
7. Connecting PicoPro
a. Compatible Operating Systems
For Wireless Connection
For HDMI Connection
Any digital device that supports HDMI capability
Miracast
Android OS 4.2 or later
Windows OS 8.1 or higher
Any OS that supports Screen Mirroring functionality
DLNA
Any digital device that supports DLNA protocol
* Using DLNA connection requires downloading DLNA
streaming app from the App Store or Play Store.
b. Wired Connection
**For proper operation of PicoPro, please do not insert HDMI cable during Miracast connection.
Using HDMI Connection :
Use plug-n-play connection for any digital/mobile device via HDMI connection.
1
2
1. Turn on PicoPro by pressing the power button for about 2-3 seconds.
2. Celluon logo will display upon powering on, followed by a “Preparing
wireless connection… To go to HDMI mode, press Mode Switch button” screen.
9
3
3. Press and hold “Mode Switch” button located next to power button
for 2~3 seconds to change to HDMI mode.
4
4. PicoPro is now in HDMI mode.
5
5. Locate MHL/HDMI port on the PicoPro and use supplied HDMI cable to connect to a device.
6. PicoPro will start mirroring contents from connected device.
* For Apple devices, please use additional Apple Digital AV Adapter to connect via HDMI cable.
* For Samsung devices, please use supplied Samsung adapter (5pin to 11pin converter) to connect to MHL/HDMI cable.
*During the use of PicoPro via supplied MHL cable, connected mobile device may charge from PicoPro's internal battery.
It is recommended to supply power via USB port on supplied MHL cable to maintain PicoPro's operating time.
10
c. Wireless Connection
Using Miracast :
The Miracast capability is called different names on difference devices. ( i.e. Samsung/Sony = Screen Mirroring, HTC = Media Output)
Please find this in device settings.
1
1. Turn on PicoPro by pressing the power button for about 2-3 seconds.
2
2. Celluon logo will display upon powering on, followed by a “Preparing
wireless connection… To go to HDMI mode, press Mode Switch button”
screen.
3
3. After about 20-30 seconds, “Ready to Connect” screen for Miracast will display.
11
4
4. On a desired mobile device, find and select Screen Mirroring / Media Output.
5. Mobile device will search for nearby devices to connect.
6
6. When device discovers “Celluon PicoPro”, tap
to connect.
7
7. Mobile device will say “Connected”
and PicoPro will start mirroring display.
* It is recommended to disconnect any previously connected WiFi network before attempting to connect via Miracast (screen mirroring).
12
Using DLNA :
* To connect to a device using DLNA capability, you must install a DLNA streaming app on your mobile device. Applicable apps can be downloaded from App Store/ Play Store.
1
1. Turn on PicoPro by pressing the power button for about 2-3 seconds.
2
2. Celluon logo will display upon powering on, followed by a “Preparing
wireless connection… To go to HDMI mode, press Mode Switch button”
screen.
3
3. After about 20-30 seconds, “Ready to Connect” screen for Miracast will
display. (Default wireless connection mode is Miracast)
13
4
4. Lightly press “Mode Switch” button again to change to DLNA mode.
5
5. DLNA “Ready to Connect” screen will display upon completion of mode switch.
14
6
6. On a desired mobile device, go to WiFi setting, and connect to “Celluon PicoPro”.
Use password “12345670” to connect.
8. When WiFi is successfully connected, open the installed DLNA streaming application
on the mobile device.
9. Select desired content to display.
10. Select display location: Celluon PicoPro.
11. Mobile device will say “Connected” and PicoPro will start display selected media contents.
*** For DLNA connection with iOS devices:
1. Follow above steps 1-11.
15
d. Switching Connection Mode
PicoPro allows you to easily switch from wired connection mode to wireless mode, and vice versa.
From HDMI mode to Miracast mode
1. From HDMI mode, press and hold "Mode Switch" button for about 2 seconds.
2. Celluon logo will display.
3. After the logo, “Preparing wireless connection… To go to HDMI mode, press Mode Switch button” screen will display.
4. After about 20-30 seconds, “Ready to Connect” screen will display for Miracast connection, indicating that the mode is successfully switched.
From Miracast mode to HDMI mode
1. From HDMI mode, press and hold "Mode Switch" button for about 2 seconds.
2. Celluon logo will display briefly, and "Please connect using HDMI cable or Press Mode Switch button to change to wireless mode" screen will display.
3. Use HDMI cable to connect device.
From Miracast mode to DLNA / DLNA mode to Miracast mode
1. From Miracast mode, lightly press “Mode Switch” button.
2. “Ready to Connect” screen for DLNA mode will display.
** Booting up time may take up to 3 seconds.
e. Reset Switch
Please use this switch to manually power off the product.
Lightly press the button with a sharp pin. (Please do not press and hold the switch for more than 3 seconds)
16
8. Making Adjustments
Volume Adjustment
*Volume is controlled directly from PicoPro.
Locate touch volume control area on top of device. Adjust the volume by lightly touching the + or – pattern.
Speaker / Earphone Usage
Please connect a speaker or an earphone to the 3.5mm audio out jack.
Laser Alignment
When the images seem blurry and/or the colors appear skewed, please visit Celluon website at www.celluon.com for Laser Alignment instructions.
APC (Auto Power Control) Setting
This setting is to efficiently control the amount of light emitting from PicoPro's laser diodes.
Due to this setting, users may see a thin white line on the bottom of screen.
Engine High Temperature Protection Mode
During the use of PicoPro, if the surrounding environmental temperature becomes higher, PicoPro's engine enters "High Temperature Protection Mode".
When the temperature of the engine reaches 131°F, a thermometer symbol will appear on the screen as a warning sign.
When the temperature of the engine reaches 140°F, the engine will power off automatically to prevent damages from the heat.
For the safety of the product, it is recommended to use PicoPro in the areas with specified operating temperature, and use the product again after cooling.
17
9. Charging the PicoPro
Charging Time
Operating Time
Wired Connection (HDMI/MHL)
4-5 hours
Wireless Connection (Miracast / DLNA)
3+ hrs
2+ hrs
Battery Status
LED Indicator
Status
Description
0% charged
Volume control + & - sensors will blink to indicate low battery status
25% charged
First LED indicator remains solid. When charging at this stage, the second LED
indicator will blink to indicate it is being charged.
50% charged
First two LED indicators remain solid. When charging at this stage, the third LED
indicator will blink to indicate it is being charged.
75% charged
First three LED indicators remain solid. When charging at this stage, the fourth LED
indicator will blink to indicate it is being charged.
100% charged
All four LED indicators will remain solid.
1. Locate micro USB port next to the battery status button.
2. Use the supplied power adapter to charge the PicoPro through the micro USB port.
Please fully charge PicoPro’s internal battery before first use (approximately 3 to 5 hours).
A low battery warning icon will show on the screen when the battery is low.
Use the included power adapter to charge your PicoPro. If the battery is too low, PicoPro will automatically turn off.
■ Please use included power adapter or any adapter supports 5V 2A to charge PicoPro.
** Please note that using other adapters than the one provided may result in longer charging times.
■
■
■
18
10. Troubleshooting
No signal when a device is connected via HDMI cable
Please make sure the cables are inserted into the correct port. Please note that different devices require different
gender/adapter to convert to micro HDMI compatible.
Mobile device cannot find Celluon PicoPro during
Miracast connection search
Please make sure PicoPro is on Miracast mode. This may also be due to particularly heavy wireless traffic. If this
is the case, please reset the device by pressing the reset button on the back of device.
Cannot stream contents through DLNA application
Please make sure device’s WiFi is properly connected to PicoPro’s WiFi. For DLNA connection, please make sure to
connect using the password “12345670”
It takes a long time to display contents through DLNA
mode
It depends on each DLNA streaming app to project contents through PicoPro. For large media files, it may take
some time to load and convert the video to the correct format.
PicoPro is connected, but only the black screen is
projected from the device
Please check if the connected mobile device is on sleep mode. If the screen of the connected device goes black, the
projected screen will go black as well. Note that if the volume control LED patterns are on, the PicoPro is powered on.
There is no sound
Please make sure the volume level of the PicoPro and/or connected device is not in the mute status.
The video stops playing periodically
Please make sure connected device has enough battery to play the video. If both devices have enough battery, this
may be due to unstable WiFi connection. Please disconnect and reconnect the device.
Device automatically shuts down during use
This may be due to the depletion of battery or high temperature of the product. If the product is left in a place where the enviornmental
temperature is high (such as in a blanket or near heater), the power will turn off automatically in protection of fire hazard. Please cool the
product to specified operating temperatures before using again. If the prdouct has shut down due to battery depletion, please charge the
device before turning it back on.
PicoPro's screen is frozen; it stopped playing the video / Please reset the device by pressing the reset button on the back of device. (Refer to “Identifying Parts” section for
the location of reset button.)
no response from buttons when pressed /
cannot convert modes
Product makes abnormal noises
Please contact Celluon Customer Service for further assistance
The projected image is unclear
This is due to the shifts in laser diode. Please refer to Laser Alignment instruction page to adjust shifted lasers.
Connection through Miracast intermittently
disconnects during use
This is due to the noise occurred by double wireless connection. Try to connect again after disconnecting all the
previously connected wireless networks.
Can users update PicoPro’s firmware
Please visit Celluon website www.celluon.com for instructions to update PicoPro’s firmware.
The occasional discrepancy between audio and visual
display
When users stream media content from an online source while using PicoPro, audio discrepancy with video output may occur depending
on wireless environment. The cause may be from the wireless connection between your mobile device and WiFi network or between your
mobile device and PicoPro. A slight delay in mirroring (Miracast) from your mobile device to PicoPro may also occur.
PicoPro turns off while charging
Please make sure PicoPro is being charged with the dedicated adapter. Other adapters may not meet the optimal power supply required
for PicoPro. Therefore, using other adapters than the one provided may lead to the PicoPro turning off until sufficient battery power is stored.
19
11. Specifications
Item
Spec.
Display Method
Display Performance
Product Lifetime
10,000 hours
Brightness
32 ANSI Lumens
Aspect Ratio
16:9
Throw Ratio
1.3
Sequential Contrast Ratio
80,000 : 1
Resolution
1920 x 720p
Color Depth
16.7 M Colors (RGB 24bit)
Laser Safety
The perceived brightness of laser projectors with a given ANSI
brightness is 50%+ higher than that of the LED based projectors
HD resolution
Focus
Focus Free (always in focus)
No focus wheel required
Max. Image (Screen) Size
250 inches
In optimal lighting conditions
Size
150 x 73 x 13.4 mm
(6 x 3 x 0.5 inches)
Measurement
Electrical Characteristics
Remark
Laser
Weight
181g
( 0.4lbs )
Battery Capacity
3140mAh @ 3.7V
Battery Operation Time
Wireless Connection: 2+ hrs
Wired Connection: up to 3+ hrs
Speaker
1.0W
Audio Interface
3.5mm ear phone jack
WiFi
Dual (2.4, 5G)
Classification
IEC Class 3R
Consumer safe device
Output
Red 90mW / Blue 85mW / Green 50mW
Laser Spec
The operating time may slightly vary depending on the environment of use
Wavelength
Red 639nm / Blue 445nm / Green 522nm
Divergence Angle
42.1 deg
Pulse Frequency
60Hz
20
Item
Environmental Condition
Spec.
Operating Temperature
Remark
0°C - 35°C
Wired Connection
Compatibility
Android/Windows OS
Micro HDMI/MHL cable
iOS
Micro HDMI
Additional Apple Lightning Digital AV Adapter required
Wireless Connection
Android/Windows OS
Miracast
iOS
DLNA
Screen Mirroring
Download of DLNA streaming application required for DLNA connection
Adapter
MicroUSB Type
5V / Max 2A
Please use the included power adapter or any adapter supports
5V 2A to charge PicoPro. ** Using other adapters than the one
provided may result in longer charging times.
MHL Cable
MHL to HDMI with USB
When PicoPro is paired to your mobile device via provided MHL cable,
the connected device will charge from PicoPro’s internal battery.
Please make sure to supply additional power using the USB port on
the provided cable.PicoPro’s battery will deplete faster if additional
power is not supplied.
The MIT License (MIT)
Copyright (c) <2015> <Celluon, Inc.>
Permission is hereby granted, free of charge, to any person obtaining a copy of this software and associated documentation files (the "Software"), to deal in the Software
without restriction, including without limitation the rights to use, copy, modify, merge, publish, distribute, sublicense, and/or sell copies of the Software, and to permit
persons to whom the Software is furnished to do so, subject to the following conditions:
The above copyright notice and this permission notice shall be included in all copies or substantial portions of the Software.
THE SOFTWARE IS PROVIDED "AS IS", WITHOUT WARRANTY OF ANY KIND, EXPRESS OR IMPLIED, INCLUDING BUT NOT LIMITED TO THE WARRANTIES OF
MERCHANTABILITY, FITNESS FOR A PARTICULAR PURPOSE AND NONINFRINGEMENT. IN NO EVENT SHALL THE AUTHORS OR COPYRIGHT HOLDERS BE
LIABLE FOR ANY CLAIM, DAMAGES OR OTHER LIABILITY, WHETHER IN AN ACTION OF CONTRACT, TORT OR OTHERWISE, ARISING FROM, OUT OF OR IN
CONNECTION WITH THE SOFTWARE OR THE USE OR OTHER DEALINGS IN THE SOFTWARE.
21
12. Warranty
■
Celluon warrants this product to be free from defects in materials and workmanship under normal use for a period of one (1) year from the date of purchase,
as evidenced by the receipt of purchase.
■
During the warranty period, Celluon shall repair or replace the product if defective. If replaced, the replacement shall be with a product of equal or greater value.
■
This warranty is limited to the purchaser and is not transferable.
Please contact [email protected] for warranty supports.
22
Version 1.1