1
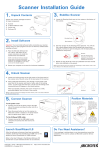
1
Scanner
What your 1 year warranty means
Great care has gone into the manufacture of this product and it should therefore provide you with years of good service when used properly. In the event of product failure
within its intended use over the course of the first year after the date of purchase, we
will rectify the problem as quickly as possible once it has been brought to our attention.
In the unlikely event of such an occurrence, or if you require any information about the
product please contact us via our after sales support services, details of which can be
found in this manual and on the product itself.
Copyright © 2007
All rights reserved.
This manual is protected by Copyright.
Trademarks:
MS-DOS® and Windows® are registered trademarks of Microsoft®.
Pentium® is a registered trademark of Intel®.
Other trademarks are the property of their respective owners.
Medion® makes no warranty of any kind with regard to this material, including, but
not limited to, the implied warranties of merchantability and fitness for a particular purpose.
Medion® shall not be liable for errors contained herein or for incidental or consequential damages in connection with the
furnishing, performance, or use of this material.
Medion® assumes no responsibility for the use or reliability of its software on equipment that is not furnished by Medion®.
This document contains proprietary information that is protected by copyright. All rights are reserved. No part of this document may be photocopied, reproduced, or translated to another language without the prior written consent of Medion®.
The information in this document is subject to change without notice.
After Sales Support
TEL: 1 300 884 987 WEB Support: www.medion.com.au
2
Contents
Safety and service....................................................................................................................... 4
Safety notes ............................................................................................................................................ 4
Operating safety ............................................................................................................................... 4
Point of use ......................................................................................................................................... 5
Environment conditions................................................................................................................. 5
Electro-magnetic compatibility ................................................................................................... 5
Connecting ......................................................................................................................................... 6
Data security....................................................................................................................................... 6
Service ...................................................................................................................................................... 7
Repairs.................................................................................................................................................. 7
Cleaning............................................................................................................................................... 7
Recycling and Disposal ................................................................................................................... 7
Introduction.................................................................................................................................. 8
Notes on these instructions .............................................................................................................. 8
Our target group............................................................................................................................... 8
Quality .................................................................................................................................................. 8
Service .................................................................................................................................................. 8
What can be reproduced or copied?.............................................................................................. 8
Box includes.................................................................................................................................. 9
System requirements ................................................................................................................ 9
Technical Data ...........................................................................................................................10
Views .............................................................................................................................................11
Setup .............................................................................................................................................12
1. Installation of software.................................................................................................................12
2. Unlock the scanner ........................................................................................................................14
Locking the scanner.......................................................................................................................14
3. Connecting to the power supply..............................................................................................15
4. Connecting to the PC....................................................................................................................16
After Sales Support
TEL: 1 300 884 987 WEB Support: www.medion.com.au
3
Operation ....................................................................................................................................17
Scanning................................................................................................................................................17
Preview scanning............................................................................................................................18
Scanning the template .................................................................................................................18
Scanner button controls...................................................................................................................19
For more help.......................................................................................................................................20
The User interface of ScanWizard..................................................................................................21
Scanning positive and negative films..........................................................................................22
Mounting a 35mm slide or film negative ...............................................................................23
Getting the best results ................................................................................................................25
Optical Character Recognition (OCR) Software .............................................................26
Technical Questions and Answers......................................................................................27
Which resolution for which purpose?..........................................................................................27
Memory requirement for different resolutions ....................................................................27
What does the following mean?....................................................................................................27
Service...........................................................................................................................................28
First aid for malfunctions .................................................................................................................28
Troubleshooting .............................................................................................................................28
Check connections and cables...................................................................................................28
Errors and possible causes...........................................................................................................29
Technical support...........................................................................................................................30
Do you need additional help? ....................................................................................................30
Copying this manual..........................................................................................................................30
After Sales Support
TEL: 1 300 884 987 WEB Support: www.medion.com.au
4
Safety and service
Safety notes
Please read through this section carefully. Following all the instructions will guarantee
reliable operation and years of enjoyment from your new flat bed scanner.
Always keep these instructions near your flat bed scanner for easy reference.
Keep these instructions and packaging safe. Use the original packaging in the event
that you need to ship or transport your flat bed scanner.
Operating safety
• Never open the housing of the flat bed scanner! This could lead to an electrical
short-circuit, damage to your flat bed scanner or fire.
• Slots and openings in the flat bed scanner serve for ventilation and prevent
overheating. Do not cover these openings.
• Never insert any objects through the slits and openings into the inside of the flat
bed scanner. Doing so could lead to an electrical short circuit or damage to your
flat bed scanner.
• Do not allow children to play unattended with any electrical appliances. Children
may not always correctly recognize possible safety hazards.
Keep the packing materials, such as foil away from children. The danger of suffocation
could arise in the case of misuse.
This flat bed scanner is intended for personal use only. It is not intended for commercial
use in a heavy industrial environment.
• In the first hours of operation, new devices may emit a typical, unavoidable but
completely harmless smell, which will decline increasingly in the course of time.
We recommend you to ventilate the room regularly, in order to counteract the
formation of the smell. During the development of this product, we have made
sure that the applicable limits are clearly fallen below.
After Sales Support
TEL: 1 300 884 987 WEB Support: www.medion.com.au
5
Point of use
• Keep your flat bed scanner and all connected equipment away from moisture,
dust, heat and direct sunlight in order to avoid malfunctions.
• Set up and operate all components on a stable, level and vibration-free surface
to prevent damage to the flat bed scanner.
• Do not subject the device to dripping or spraying water and do not place any
containers, such as vases, filled with water on the device. Fluid seeping into the
device can impair electrical safety.
• Only use in a suitable ambient temperature.
Environment conditions
• The flat bed scanner can be operated at an ambient temperature of 10°C / 40°F
to 40°C / 104°F and a relative humidity of 35% to 80% (not condensing).
• When switched off the flat bed scanner can be stored at temperature from -10° /
14 °F to 60°C/140°F at a relative humidity of 20% to 80% (not condensing).
After transporting your flat bed scanner wait until it has reached the
ambient temperature before putting it into operation. In the event
of major variations in the temperature or humidity, condensation can
form on the inside of the flat bed scanner which can cause an electrical
short-circuit.
Electro-magnetic compatibility
• When connecting the flat bed scanner observe the guidelines for electromagnetic compatibility (EMC).
• Please use only the AC adapter supplied.
• Maintain a distance of at least 3 feet from sources of high frequency and magnetic interference (television sets, loudspeakers, mobile telephones, etc.), in order to avoid malfunctions and data loss.
After Sales Support
TEL: 1 300 884 987 WEB Support: www.medion.com.au
6
Connecting
Power supply
• Do not open the power adapter housing. When the housing is open there is a danger of severe electric shock. It contains no user-serviceable parts.
• The power socket must be in the vicinity of the scanner and within reach of the
power adapter cables. DO NOT stretch the power cables tightly to reach a power
socket.
• To disconnect your scanner from the power source remove the power cord from
the power socket.
• Do not cover the power pack, in order to avoid damage because of an impermissible increase in temperature.
• Cease using the power pack if the casing or the lead to the device is damaged.
Replace it with a power pack of the same type.
• Only use the power adaptor provided with this flat bed scanner (HDAD15W101125) operating at AC 200-240V~/50 Hz.
• To avoid power consumption when the device is switched off either pull out the
power plug when the device is not used or connect the device to a master-/slave
power bar.
• If using an extension cord, make certain that it meets your local safety requirements. If in doubt, consult a qualified electrician.
• To provide additional protection against electric shock, power surges, lightning
strikes, or other electrical damage to your scanner, we recommend the use of a
surge protector.
Observe the following instructions to connect your flat bed scanner properly:
• Route the cable so that no one can step on it or stumble over it.
• To avoid damage to the cable do not place any objects or furniture on the cable.
• Please unlock the scanner before use. When you intend to transport the scanner
lock it again (see page 14).
Data security
Every time you update your computer’s data make back-up copies on
an external storage medium, i.e. CDR disc. We cannot assume a liability
for data loss or associated subsequent damage.
After Sales Support
TEL: 1 300 884 987 WEB Support: www.medion.com.au
7
Service
Repairs
Please contact the MEDION Help Desk at 1 300 884 987 if you have any problems with
your flat bed scanner. ALWAYS have repairs completed only by our authorised service
centre.
Contact the MEDION Help Desk when...
• Liquid has got into the flat bed scanner
• The flat bed scanner does not operate properly
• The scanner is dropped or the housing is damaged.
Cleaning
• Ensure that the scanner, particularly the glass plate,
is not dirty.
• Clean the flat bed scanner with a moist cloth.
• Do not use any type of solvents, caustic or gaseous
cleaning agents.
• Use glass cleaner to clean the scanner glass plate.
Recycling and Disposal
Device
At the end of its life, the appliance must not be disposed of in household rubbish. Enquire about the options for environmentally-friendly disposal at your retail store.
Packaging
The packaging from your flat bed scanner is produced mostly from materials which can
be disposed of in an environmentally friendly manner and be professionally recycled.
Should you have any questions concerning the disposal please contact your dealer or
our service. Please refer to the hotline number in the footnote.
After Sales Support
TEL: 1 300 884 987 WEB Support: www.medion.com.au
8
Introduction
Notes on these instructions
We have arranged these instructions so that you can quickly find the subject related
information in the table of contents. The purpose of these instructions is to help you
operate your scanner safely, quickly and easily.
Our target group
Thank your for purchasing this flat bed scanner. We thank you for your confidence in
our products and are pleased to welcome you as a new customer. These instructions
are intended for novice users as well as advanced users. Regardless of possible professional functions, this flat bed scanner is intended for domestic home use only.
Quality
We focused on great features, ease of use, safety and reliability in manufacturing this
flat bed scanner. The balanced hardware and software design offers you an advanced
flat bed scanner design which will provide you a great deal of functionality for business
or entertainment purposes.
Service
Service and support is available any time you use your flat bed scanner. Contact us, we
will be glad to help you. This manual contains a separate chapter on the subject of service beginning on page 28.
What can be reproduced or copied?
Unless you own the copyright or have the permission of the owner of
the copyright unauthorised reproduction (e.g. of bank notes) can violate domestic or international law and be subject to severe penalties. In
questions of doubt please consult a lawyer.
After Sales Support
TEL: 1 300 884 987 WEB Support: www.medion.com.au
9
Box includes
Please check the contents of the box. Notify us within 14 days of purchase if your flat
bed scanner is not complete. Your flat bed scanner includes:
• USB flat bed scanner unit
• Film Adapter
• USB cable
• AC Adapter (HDAD15W101-125)
• Installation and application software
• This user manual with integrated guarantee document
System requirements
• Computer
PC/AT compatible computer
• Processor type
Pentium III class 500 MHz or higher
• Operating system
Windows® XP/Vista®
• Memory
512 MB, recommended: 1024 MB or more
• Hard disc capacity
min. 800 MB free storage capacity
• Installation
CD-ROM drive
• Connections
USB interface
After Sales Support
TEL: 1 300 884 987 WEB Support: www.medion.com.au
10
Technical Data
• Type of scanner:
USB flat bed scanner
• Scanning method:
Single Pass
• Scanning modes:
Colour:
Gray scale:
Text/line:
• Document size:
Format:
A4/Letter (216 x 297 mm)
Film stripes: 35 mm miniature
Slide frame: 50 x 50 x 2,6 mm w/o glazing
• Resolution:
4800 x 9600 dpi
• Interface:
USB 2.0 Hi-Speed
• Input voltage
12V
• Dimensions:
approx. 443.5 mm (l) x 278.6 mm (w) x 51 mm (h)
• Weight:
2.5 Kg
2.9 Kg (incl. film adapter)
• Operating environment:
Temperatures:
10°C to 40°C / 50°F to 104°F
Humidity (relative): 35 % – 80 %
48 Bit (internal)
12 Bit (internal)
1 bit (internal)
1,25 A
Power Pack
• Model
HDAD15W101-125
• Input voltage
200-240V~ , 50/60Hz, 0,5A
• Output voltage
12V
After Sales Support
1,25 A
TEL: 1 300 884 987 WEB Support: www.medion.com.au
11
Views
Scanner cover
Ruler
Scanner surface
Ruler
Scanner buttons
PDF
OCR
Email
Copy
Scan
On-/
Off button
Power supply indicator
USB connection
Additional 9-pin connection
Mains connection
After Sales Support
TEL: 1 300 884 987 WEB Support: www.medion.com.au
12
Setup
1. Installation of software
Important
You should install the necessary software (drivers and image processing) first, before you connect the scanner.
Warning!
During software installation your important files can be changed or
deleted. To avoid problems in using older files after installation, make
sure you backup your hard disk.
Important
Do not install the Adobe® Acrobat® Reader when your computer has
this Software already installed.
1. Insert the CDROM Driver + Application supplied to automatically start the installation.
Note
If installation does not start automatically, probably the so-called
Autorun feature is deactivated.
Manual installation without Autorun feature:
1. Open the Start menu and select Run.
2. Then enter the letter for the CD-ROM drive followed by a colon
and the name of the program: CD-Setup.
3. Confirm by clicking OK.
Note
If your operating system is configured so that the installation procedure accepts only signed drivers and software (the default) an information screen will appear. Although the software lacks the digital
signature it may still work properly. Click on Tell me why this testing
is important to get detailed information. Confirm by clicking on Continue.
After Sales Support
TEL: 1 300 884 987 WEB Support: www.medion.com.au
13
2. Select the language that you want to use to install the software with the mouse.
You will end the installation with Exit.
3. A window for the installation of the software will then appear:
ScanWizard 5
(driver and configuration program of the scanner)
Adobe Acrobat Reader (for viewing PDF files)
ABBYY FineReader
(text recognition)
Install ScanWizard first and then the software that you require.
You will find the following programs on the second disk:
Ulead Photo Impact (professional image processing)
Intervideo MediaOne Gallery (music, video and photo administration).
The serial password for the installation is HRHBEPEPYZGHEFJ and is also to be
found on the CD.
4. Restart your computer after the installation, in order to complete the process.
After Sales Support
TEL: 1 300 884 987 WEB Support: www.medion.com.au
14
2. Unlock the scanner
1. Turn the scanner, switched off, on to its side and look for the safety switch on the
bottom of it:
Unlocked
Locked
2. Push the safety switch to the position illustrated above, so the symbol is positioned at unlocked.
3. Turn the scanner back carefully.
Locking the scanner
Proceed as follows if you have to transport the scanner.
1. Switch the scanner off, pull the mains plug from the socket and remove all connection cables and those supplying electricity.
2. Remove the slide attachment before you secure the scanner, if it is installed. Inform yourself from the appropriate installation instructions.
3. Lift the scanner as described above to relock it.
4. Push the safety switch, which will now be visible, so the symbol displays locked.
5. Transport the scanner in the original packaging if possible.
After Sales Support
TEL: 1 300 884 987 WEB Support: www.medion.com.au
15
3. Connecting to the power supply
1. Observe the notes in chapter Safety and service (page 4).
2. Position the computer and scanner so that you can work with them easily and
safely. Connect the supplied power adapter to your scanner as shown in the diagram above.
3. Connect the power adapter to a power socket in close proximity of your flat bed
scanner.
After Sales Support
TEL: 1 300 884 987 WEB Support: www.medion.com.au
16
4. Connecting to the PC
Make sure your scanner software has been installed already (see page 12). Connect your
flat bed scanner as follows:
1. Switch on the computer and all connected peripheral equipment (monitor,
printer, external hard drive, etc.) and wait until the operating system has booted
completely.
2. Connect one end of the USB cable to a free USB connection socket on your computer and the other end to the scanner.
3. Connect the other end to the scanner.
4. Switch the device on by means of the On/Off Switch. The LED will indicate readiness for operation.
5. The scanner will be recognized and the installation process will be concluded by
the operating system.
Note
If your operating system is configured so that the installation procedure accepts only signed drivers and software (the default) an information screen will appear. Although the software lacks the digital
signature it may still work properly. Click on “Tell me why this testing is
important” to get detailed information. Confirm by clicking on “Continue”.
After Sales Support
TEL: 1 300 884 987 WEB Support: www.medion.com.au
17
Operation
You will find new Program Groups with various programs and Help files on your computer when the software installation has been concluded.
Scanning
1. Open the Scanner cover.
2. Place the original to be scanned on the scanner bed. The top of the original
should be positioned towards the right end of the scanner with the surface to
be scanned facing down.
3. Close the scanner cover.
After Sales Support
TEL: 1 300 884 987 WEB Support: www.medion.com.au
18
Preview scanning
To launch ScanWizard, double-click the ScanWizard icon on your desktop.
By default, the scanner will detect the settings (under Original, Scan Type, and Purpose),
and automatically performs a fast preview of your image based on those settings.
1. To launch ScanWizard, double-click the ScanWizard icon on your desktop. You
can also launch the program via Start Ö Programs.
2. ScanWizard will be opened in the standard setting and will create the preview
scan of the scanning template automatically.
3. You can use the following tool buttons to change the settings according to your
preferences:
Original
defines the category of the original (scan material).
Scantype
selects the output image type (colour, grey, or B&W).
Purpose
defines the image resolution to match your target application.
Note
Click the Scale Output, Adjust, and Reset buttons if you need to
make further adjustments.
Scanning pages
1. Click on the Scan to Button in ScanWizard.
2. Enter the target Directory, a file name and the file format and then click on Save.
Note
Send image to application after saving: If this option is checked, the
scanned image is saved first, then automatically delivered to an image-editing application, an e-mail editor, or a web browser as indicated in the destination box.
After Sales Support
TEL: 1 300 884 987 WEB Support: www.medion.com.au
19
Scanner button controls
The Scanner is equipped with six scanner buttons, providing quick access to the
most frequently used functions:
Scan
Captures images that can be saved as files or sent to an image-editing application.
Copy
Scans the image and sends it to your printer.
Email
Scans the image and delivers it directly to your email application.
After Sales Support
TEL: 1 300 884 987 WEB Support: www.medion.com.au
20
OCR
Scans a text document, converts, and saves it in text file format.
PDF
Scans in the document and stores it in the PDF format.
The parameters for each button can be set through the Scanner Configuration
(SC) utility.
Note
You need to exit ScanWizard before accessing the SC utility.
For more help
If you experience problems with installation, refer to the Troubleshooting file in the
Techinfo folder on your CD-ROM.
For more information on operating your scanner with ScanWizard, launch your Internet
browser to view the software manual (in HTML format).
After Sales Support
TEL: 1 300 884 987 WEB Support: www.medion.com.au
21
The User interface of ScanWizard
ScanWizard offers you two different modes and consequently two different user interfaces: Standard and Professional.
The Standard mode will always be displayed during the first operation.
Standard
Professional
Proceed as follows, to change the user interface from Standard to Professional:
1. Click on the Switch Symbol
above right in the Standard interface.
2. An information window will open, informing you that the user interface can be
switched. Confirm with OK.
3. The Professional user interface will be displayed.
4. Click on the Switch Symbol
again, which will be above in the symbol taskbar this time, if you would like to change from the Professional to the Standard
view.
5. An information window will open, informing you that the user interface can be
switched. Confirm with OK.
6. The Standard interface will be displayed again.
After Sales Support
TEL: 1 300 884 987 WEB Support: www.medion.com.au
22
Scanning positive and negative films
The Film Adapter is an accessory included with your scanner. It gives you the ability to
scan 35mm slides and film negatives on your flatbed scanner. We recommend the use
of this accessory to scan slides for on-screen display purposes or where high resolution
is not critical.
Please note
Scanning of colour transparencies may vary, depending on the quality
of your film original.
1. Switch off the scanner.
2. Remove the scanner lid.
3. Connect the Film
Adapter to your scanner.
To do this: Connect the
9-pin connector of your
Film Adapter
to the accessory port at
the back panel of your scanner.
After Sales Support
TEL: 1 300 884 987 WEB Support: www.medion.com.au
23
Mounting a 35mm slide or film negative
4. Place the 35mm slide in the slot provided for it on the Film Adapter with the
front facing upward.
The lower slot is intended for
loading 35mm slides.
Do not cover the
calibration window!
Place the film negative strips into the slot of the FA planned for them with the
shiny side facing upward.
The upper slit is intended for loading 35mm
film strips.
Do not cover the
calibration window!
5. Place the FA vertically on the scanner surface in the indentation at the upper
ruler of the scanner.
6. Switch the scanner on and double-click on the ScanWizard Symbol on your
Desktop or start ScanWizard under Start Ö Programs.
After Sales Support
TEL: 1 300 884 987 WEB Support: www.medion.com.au
24
7. ScanWizard will be opened in the Standard setting and will create a Preview of
the scanning template automatically.
8.
Important!
Select the respective template (positive or negative) under the Original/Film Option and start a Preview scan again.
9. Click on the Scan to Button in ScanWizard.
10. Enter the target Directory, a file name and the file format and then click on Save.
11. The scanning process will be started and the template will be saved in the Directory selected.
12. Important!
Set the template under Original back to Photo after using the TA, because a failure to do so could cause problems when ScanWizard is restarted.
After Sales Support
TEL: 1 300 884 987 WEB Support: www.medion.com.au
25
Getting the best results
To obtain the best results when scanning with the Film Adapter LightLid 35, set the
scan Resolution to a minimum 600 dpi and the Scaling to 100%. Refer to the diagrams
below for more information on how to set these values in ScanWizard 5 Standard and
Advanced Control Panels.
Standard:
After Sales Support
Professional:
TEL: 1 300 884 987 WEB Support: www.medion.com.au
26
Optical Character Recognition (OCR) Software
If you want to read in text which is to be subsequently edited with a word processing
program, you require an OCR program. This program reads in a document and attempts to recognise all of the letters, special characters and numbers present in the
text. In order to achieve the highest possible recognition rate, the program uses the
newest OCR technologies as well as intelligent error correction.
The recognition rate depends on:
Recognition Rate
very high
good
problematic
Poor print qualHigh print qual- Standard print
ity, multiple
ity, high contrast, quality, twocolour, low
colour, good
example: black
contrast
contrast. Examand white broOriginal
ple: newspapers,
chures
magazines,
books
Standard fonts
Slightly modified Abstract fonts,
from printed
standard fonts of hand writing.
Fonts
media: Times,
the same type
Arial, etc.
All other resolu1 bit, b/w line
Scanning quality
tions.
drawing
After Sales Support
TEL: 1 300 884 987 WEB Support: www.medion.com.au
27
Technical Questions and Answers
Which resolution for which purpose?
Purpose
Resolution
Colour depth
colour picture, print-out
150 dpi
24-48 Bit
greyscale pictures/photos 200 dpi
10-Bit
text recognition
300 dpi
1-Bit
For greater quality requirements, higher values can be set, but these require far more
memory and therefore slow down the speed of the scanning process.
Text recognition functions optimally with the settings given.
Memory requirement for different resolutions
Scanning an original with an area of 10 x 10 cm uses the following amount of memory
with the resolution stated:
100 dpi
150 dpi
300 dpi
600 dpi
line picture
19.5 Kb
44 Kb
175 Kb
703 Kb
greyscale
156 Kb
352 Kb
1.37 MB
5.5 MB
colour
469 Kb
1 MB
4.12 MB
16.5 MB
What does the following mean?
Colour depth
Dpi
OCR
Pixel
Resolution
TWAIN
Number of colours which can be represented simultaneously.
1-Bit = 2^1 = 2 colours = black/ white
8-Bit = 2^8 = 256 colours
16-Bit = 2^16 = 65.536 colours
24-Bit = 2^24 = 16.777.216 colours
Unit of resolution, number of dots per inch.
Text recognition
Picture dot
The ratio of the pixels (dpi) shown in the area.
Standard – this makes the exchange between the scanner and the computer possible.
After Sales Support
TEL: 1 300 884 987 WEB Support: www.medion.com.au
28
Service
First aid for malfunctions
Troubleshooting
In most cases, scanner problems have simple causes. We would like to give you some
tips to solve the most common problems. Should these tips not help you solve your
problems, please call the MEDION Help Desk at 1 300 884 987.
Check connections and cables
Start by carefully checking all cable connections visually. Ensure that the computer and
all peripheral equipment is properly connected to the power supply.
• Switch off the computer and check all cable connections. If the computer is connected to any peripherals, check the plug connections on all cables.
Do not mix the cables for the various pieces of equipment. Though they may appear identical, the pin assignments in the connectors may differ from product to
product.
Once you have ensured the power supply to the equipment is in working order
and all connections are intact, switch the computer back on.
After Sales Support
TEL: 1 300 884 987 WEB Support: www.medion.com.au
29
Errors and possible causes
Flat bed scanner is not recognized:
• Have you connected the cable provided, according to the installation instructions? Please check all cable connections.
• Did you restart the computer after installing the software from the supplied
CDROM?
• Is it possible that an active scanning operation has not been completed? Check
whether any programs that have access to the scanner are open.
If applicable, close any scanner applications not required at the moment (e.g.
OCR) to continue the desired operation.
The scanned images require too much memory.
• The resolution selected is too high. If you require the scanned material for printout. A lower resolution is usually sufficient and decreases the size of the file.
• The file was stored in an uncompressed format (e.g.: BMP). File formats such as
JPG can store images without noticeable loss of details and require only a fraction of the original storage space.
Optical character recognition does not function properly or not at all.
• Is the original document of good enough quality?
It is not possible to recognise some poor quality faxes, hand writing or abstract
fonts. Fonts used in newspapers should be OK.
• Wrong resolution set.
The material scanned in cannot be processed by the application program....
• The application program used must support the format you selected for the file.
For example if a scanned document is a form, it is usually a mixture of both text
and graphics.
In order to process such a file, it is usually necessary for file to be incorporated as
graphics with the property "behind the text".
• Under certain circumstances an error message may be displayed in certain word
processing programs. However, optical character recognition still functions.
Information about connecting the USB device to a USB 1.1 Port under Windows
XP:
• The operating system will display the message that a high-speed USB device is
connected to a non-high-speed USB hub. This is not an error message, but
merely a message that the speed will be adjusted, as required by the slower USB
1.1 connection.
After Sales Support
TEL: 1 300 884 987 WEB Support: www.medion.com.au
30
Technical support
This flat bed scanner has been vigorously tested in our laboratories in conjunction with
a wide variety of devices and peripherals.
However, it is not unusual, that drivers are updated from time to time. This is due to
possible compatibility problems with other components, programs and equipment not
yet tested with the flat bed scanner.
The latest information on your products and the most current driver updates are available at the following URL address on the Internet:
Internet: www.medion.com.au
Do you need additional help?
Should our suggestions in this manual not solve your specific problem, please contact
the MEDION Help Desk at 1 300 884 987. We will try and help you over the telephone.
However, before you contact us, it would be helpful to have the following information
available:
• What is your computer configuration?
• What additional peripheral devices do you use?
• What error messages, if any, appear on your screen?
• What software program(s) were you using when the error occurred?
• What steps have you already undertaken to solve the problem?
• If you have received a customer number before, please refer to this number
when you call.
Copying this manual
This document contains legally protected information. All rights reserved. Copying in
mechanical, electronic and any other form without the written approval of the manufacturer is prohibited.
After Sales Support
TEL: 1 300 884 987 WEB Support: www.medion.com.au