1
StarSuite Portal
User Manual
AlvariSTAR Infrastructure Software Version: 5.0
January 2012
P/N: 215978
Document History
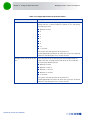
Document History
Changed Item
Description
First publication of a User Manual for a new product
Date
June 2011
“About StarSuite Portal”
Sections 1.3.1, 2.6.3.5, 2.7.3.1,
2.7.3.4, 2.7.4.4, 2.7.4.5, 2.7.4.6.3,
2.8.2.2,
Support for Extreme
Infrastructure 4.8.3
August 2011
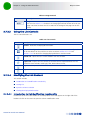
Prerequisites
Section 1.2
Updated supported browsers
Infrastructure 4.8.3
August 2011
Viewing Site Details
Section 2.7.4.6
3 KPI tabs for Extreme instead of 1: Sector KPIs, BS
KPIs, BTS KPIs
Infrastructure 4.8.3
August 2011
New KPIs (in BS KPI tabs): UL Frame Utilization, DL
Frame Utilization
Simple Search
Section 2.6.2
Improved search functionality
Infrastructure 5.0
August 2011
Performing a Custom Search
Section 2.6.3.2
Updated, improved search functionality
Infrastructure 5.0
August 2011
Performing a Previously Saved Search
Section 2.6.3.3
Updated (tool-tip support), changed location in
manual.
Infrastructure 5.0
August 2011
Deleting a Previously Saved Search
Section 2.6.3.4
New feature
Infrastructure 5.0
August 2011
Accessing the Portal
Section 2.1
New: HTTPS support
Infrastructure 5.0
August 2011
Sectors Tab
Section 2.7.4.6.2
New features: Show Neighbor(s), Show CPEs
Infrastructure 5.0
August 2011
Link To Third Party Web Location
Sections 1.3.8, 2.2, 2.3
New feature
Infrastructure 5.0
August 2011
Equipment selection
Section 2.2
New feature
Infrastructure 5.0
August 2011
“User Name” drop-down menu
Section 2.2
GUI changes (Settings and Logout in drop-down
menu), New feature (CPEs Import)
Infrastructure 5.0
August 2011
Switching to Map View for a selected
CPE
Section 2.7.3.3.2
Improved functionality
Infrastructure 5.0
August 2011
CPEs Import
Section 2.4
New feature
Infrastructure 5.0
August 2011
StarSuite Portal User Manual
ii
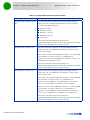
Document History
Changed Item
Description
Date
Managing the KPIs tab Contents
Removed (standard table functionality)
Infrastructure 5.0
August 2011
Configuration History
Section 2.7.3.2.4
New feature
Infrastructure 5.0
August 2011
CPE Searches/List Types
Table 2-3, Table 2-6,
New Searches/List Types: CPEs without Lat/Long, CPEs
without Address
Infrastructure 5.0
August 2011
Pre-Defined Searches Lists
Section 2.7.3.4
Added definition for Creation Date (CPEs Registered
Since search list)
Infrastructure 5.0
August 2011
Edit location
Section 2.7.3.5
New feature
Infrastructure 5.0
August 2011
Configuration Utility
Removed Apply button from screens.
Infrastructure 5.0
December 2011
Added Test Connection to Database Connection
screens
StarSuite Portal User Manual
iii
Legal Rights
Legal Rights
© Copyright 2012 Alvarion Ltd. All rights reserved.
The material contained herein is proprietary, privileged, and confidential and owned by Alvarion or its
third party licensors. No disclosure thereof shall be made to third parties without the express written
permission of Alvarion Ltd.
Alvarion Ltd. reserves the right to alter the equipment specifications and descriptions in this publication
without prior notice. No part of this publication shall be deemed to be part of any contract or warranty
unless specifically incorporated by reference into such contract or warranty.
Trade Names
Alvarion®, BreezeCOM®, WALKair®, WALKnet®, BreezeNET®, BreezeACCESS®, BreezeMAX®,
BreezeLITE®, 4Motion®, and/or other products and/or services referenced herein are either registered
trademarks, trademarks or service marks of Alvarion Ltd.
All other names are or may be the trademarks of their respective owners.
“WiMAX Forum” is a registered trademark of the WiMAX Forum. “WiMAX,” the WiMAX Forum logo,
“WiMAX Forum Certified”, and the WiMAX Forum Certified logo are trademarks of the WiMAX Forum.
Statement of Conditions
The information contained in this manual is subject to change without notice. Alvarion Ltd. shall not be
liable for errors contained herein or for incidental or consequential damages in connection with the
furnishing, performance, or use of this manual or equipment supplied with it.
Warranties and Disclaimers
All Alvarion Ltd. ("Alvarion") products purchased from Alvarion or through any of Alvarion's authorized
resellers are subject to the following warranty and product liability terms and conditions.
Exclusive Warranty
(a) Alvarion warrants that the Product hardware it supplies and the tangible media on which any
software is installed, under normal use and conditions, will be free from significant defects in materials
and workmanship for a period of fourteen (14) months from the date of shipment of a given Product to
Purchaser (the "Warranty Period"). Alvarion will, at its sole option and as Purchaser's sole remedy, repair
or replace any defective Product in accordance with Alvarion' standard R&R procedure.
(b) With respect to the Firmware, Alvarion warrants the correct functionality according to the attached
documentation, for a period of fourteen (14) month from invoice date (the "Warranty Period"). During
the Warranty Period, Alvarion may release to its Customers firmware updates, which include additional
performance improvements and/or bug fixes, upon availability (the "Warranty"). Bug fixes, temporary
patches and/or workarounds may be supplied as Firmware updates.
Additional hardware, if required, to install or use Firmware updates must be purchased by the Customer.
Alvarion will be obligated to support solely the two (2) most recent Software major releases.
ALVARION SHALL NOT BE LIABLE UNDER THIS WARRANTY IF ITS TESTING AND EXAMINATION DISCLOSE
THAT THE ALLEGED DEFECT IN THE PRODUCT DOES NOT EXIST OR WAS CAUSED BY PURCHASER'S OR
ANY THIRD PERSON'S MISUSE, NEGLIGENCE, IMPROPER INSTALLATION OR IMPROPER TESTING,
UNAUTHORIZED ATTEMPTS TO REPAIR, OR ANY OTHER CAUSE BEYOND THE RANGE OF THE INTENDED
USE, OR BY ACCIDENT, FIRE, LIGHTNING OR OTHER HAZARD.
StarSuite Portal User Manual
iv
Legal Rights
Disclaimer
(a) The Software is sold on an "AS IS" basis. Alvarion, its affiliates or its licensors MAKE NO
WARRANTIES, WHATSOEVER, WHETHER EXPRESS OR IMPLIED, WITH RESPECT TO THE SOFTWARE AND
THE ACCOMPANYING DOCUMENTATION. ALVARION SPECIFICALLY DISCLAIMS ALL IMPLIED
WARRANTIES OF MERCHANTABILITY AND FITNESS FOR A PARTICULAR PURPOSE AND
NON-INFRINGEMENT WITH RESPECT TO THE SOFTWARE. UNITS OF PRODUCT (INCLUDING ALL THE
SOFTWARE) DELIVERED TO PURCHASER HEREUNDER ARE NOT FAULT-TOLERANT AND ARE NOT
DESIGNED, MANUFACTURED OR INTENDED FOR USE OR RESALE IN APPLICATIONS WHERE THE
FAILURE, MALFUNCTION OR INACCURACY OF PRODUCTS CARRIES A RISK OF DEATH OR BODILY
INJURY OR SEVERE PHYSICAL OR ENVIRONMENTAL DAMAGE ("HIGH RISK ACTIVITIES"). HIGH RISK
ACTIVITIES MAY INCLUDE, BUT ARE NOT LIMITED TO, USE AS PART OF ON-LINE CONTROL SYSTEMS IN
HAZARDOUS ENVIRONMENTS REQUIRING FAIL-SAFE PERFORMANCE, SUCH AS IN THE OPERATION OF
NUCLEAR FACILITIES, AIRCRAFT NAVIGATION OR COMMUNICATION SYSTEMS, AIR TRAFFIC CONTROL,
LIFE SUPPORT MACHINES, WEAPONS SYSTEMS OR OTHER APPLICATIONS REPRESENTING A SIMILAR
DEGREE OF POTENTIAL HAZARD. ALVARION SPECIFICALLY DISCLAIMS ANY EXPRESS OR IMPLIED
WARRANTY OF FITNESS FOR HIGH RISK ACTIVITIES.
(b) PURCHASER'S SOLE REMEDY FOR BREACH OF THE EXPRESS WARRANTIES ABOVE SHALL BE
REPLACEMENT OR REFUND OF THE PURCHASE PRICE AS SPECIFIED ABOVE, AT ALVARION'S OPTION.
TO THE FULLEST EXTENT ALLOWED BY LAW, THE WARRANTIES AND REMEDIES SET FORTH IN THIS
AGREEMENT ARE EXCLUSIVE AND IN LIEU OF ALL OTHER WARRANTIES OR CONDITIONS, EXPRESS OR
IMPLIED, EITHER IN FACT OR BY OPERATION OF LAW, STATUTORY OR OTHERWISE, INCLUDING BUT
NOT LIMITED TO WARRANTIES, TERMS OR CONDITIONS OF MERCHANTABILITY, FITNESS FOR A
PARTICULAR PURPOSE, SATISFACTORY QUALITY, CORRESPONDENCE WITH DESCRIPTION,
NON-INFRINGEMENT, AND ACCURACY OF INFORMATION GENERATED. ALL OF WHICH ARE EXPRESSLY
DISCLAIMED. ALVARION' WARRANTIES HEREIN RUN ONLY TO PURCHASER, AND ARE NOT EXTENDED
TO ANY THIRD PARTIES. ALVARION NEITHER ASSUMES NOR AUTHORIZES ANY OTHER PERSON TO
ASSUME FOR IT ANY OTHER LIABILITY IN CONNECTION WITH THE SALE, INSTALLATION, MAINTENANCE
OR USE OF ITS PRODUCTS.
Limitation of Liability
(a) ALVARION SHALL NOT BE LIABLE TO THE PURCHASER OR TO ANY THIRD PARTY, FOR ANY LOSS OF
PROFITS, LOSS OF USE, INTERRUPTION OF BUSINESS OR FOR ANY INDIRECT, SPECIAL, INCIDENTAL,
PUNITIVE OR CONSEQUENTIAL DAMAGES OF ANY KIND, WHETHER ARISING UNDER BREACH OF
CONTRACT, TORT (INCLUDING NEGLIGENCE), STRICT LIABILITY OR OTHERWISE AND WHETHER BASED
ON THIS AGREEMENT OR OTHERWISE, EVEN IF ADVISED OF THE POSSIBILITY OF SUCH DAMAGES.
(b) TO THE EXTENT PERMITTED BY APPLICABLE LAW, IN NO EVENT SHALL THE LIABILITY FOR DAMAGES
HEREUNDER OF ALVARION OR ITS EMPLOYEES OR AGENTS EXCEED THE PURCHASE PRICE PAID FOR
THE PRODUCT BY PURCHASER, NOR SHALL THE AGGREGATE LIABILITY FOR DAMAGES TO ALL PARTIES
REGARDING ANY PRODUCT EXCEED THE PURCHASE PRICE PAID FOR THAT PRODUCT BY THAT PARTY
(EXCEPT IN THE CASE OF A BREACH OF A PARTY'S CONFIDENTIALITY OBLIGATIONS).
StarSuite Portal User Manual
v
Important Notice
Important Notice
This user manual is delivered subject to the following conditions and restrictions:
This manual contains proprietary information belonging to Alvarion Ltd. Such information is supplied
solely for the purpose of assisting properly authorized users of the respective Alvarion products.
No part of its contents may be used for any other purpose, disclosed to any person or firm or
reproduced by any means, electronic and mechanical, without the express prior written permission of
Alvarion Ltd.
The text and graphics are for the purpose of illustration and reference only. The specifications on
which they are based are subject to change without notice.
The software described in this document is furnished under a license. The software may be used or
copied only in accordance with the terms of that license.
Information in this document is subject to change without notice. Corporate and individual names
and data used in examples herein are fictitious unless otherwise noted.
Alvarion Ltd. reserves the right to alter the equipment specifications and descriptions in this
publication without prior notice. No part of this publication shall be deemed to be part of any
contract or warranty unless specifically incorporated by reference into such contract or warranty.
The information contained herein is merely descriptive in nature, and does not constitute an offer for
the sale of the product described herein.
Any changes or modifications of equipment, including opening of the equipment not expressly
approved by Alvarion Ltd. will void equipment warranty and any repair thereafter shall be charged for.
It could also void the user's authority to operate the equipment.
StarSuite Portal User Manual
vi
About StarSuite Portal
About StarSuite Portal
Alvarion's Star management suite is a comprehensive, robust, carrier-grade network management
solution for enabling rapid network deployment and seamless, cost-effective operation of WiMAX
services. The Star Suite includes:
AlvariSTAR: A comprehensive, a carrier-class, field-proven Network Management System (NMS) for
managing Alvarion’s WiMAX base stations.
StarACS: a scalable solution for unified management of any TR-069-enabled WiMAX CPE and end
user device.
StarQuality: Performance and traffic monitoring system that helps operators optimize WiMAX
network usage, maximize traffic capacity, maintain high level quality services and comply with service
level agreements for ensuring customer satisfaction and loyalty.
StarReport: A Powerful business objects-based tool providing predefined and ad hoc network reports
for improved decision support.
The StarSuite Portal provides the user with a single-point web access to all Alvarion's Star Suite
components. This is accompanied by:
Integration of data received from the various Alvarion management systems in a comprehensive
manner.
Attractive graphic / tabular display of network level information, including projection of information
over dynamic geographic maps.
Means of accessing relevant management entities, in order to define and execute network / device
related operations.
The current version supports management information related to 4Motion and Extreme devices. The
available functionality and content depend on managed device family and availability of relevant
management applications. The supported Star Suite components are:
AlvariSTAR version 4.8.3 (with a Device Driver for the managed system)
StarQuality version 3.1
StarACS version 3.1
StarReport for 4Motion (not applicable for Extreme)
StarSuite Portal User Manual
vii
About this Manual
About this Manual
This manual describes the StarSuite Portal, a single-point web access to all Alvarion’s Star Suite
components. The manual describes the full functionality of the StarSuite Portal. It is assumed that the
user is familiar with the operation and functionality of the relevant Star Suite components and the
managed WiMAX system.
This manual includes:
“Before You Start” on page 1
“Using the StarSuite Portal” on page 17
StarSuite Portal User Manual
viii
Contents
Contents
Chapter 1 - Before You Start ................................................................................. 1
1.1 Introduction.........................................................................................................2
1.2 Prerequisites........................................................................................................3
1.3 Configuring the StarSuite Portal ...........................................................................4
1.3.1
Preparing Required Configuration Details ........................................................... 4
1.3.2
The Portal Configuration Utility ........................................................................... 5
1.3.3
Configuring the StarQuality Application Parameters ........................................... 7
1.3.4
Configuring the StarACS Application Parameters ................................................ 8
1.3.5
Configuring the CSR Application Parameters....................................................... 9
1.3.6
Configuring the StarReport Application Parameters ........................................... 9
1.3.7
Configuring the Database Connections Parameters.......................................... 10
1.3.8
Configuring Miscellaneous Settings ................................................................... 13
1.3.9
Completing the Portal Configuration ................................................................. 14
1.4 Creating a StarSuite Portal User and Verifying Proper Configuration....................15
1.5 AlvariSTAR Functional Permissions for StarSuite Portal.......................................16
Chapter 2 - Using the StarSuite Portal ................................................................. 17
2.1 Accessing the Portal ...........................................................................................18
2.2 The Portal Screen ...............................................................................................19
2.3 Using the Cut-through Buttons ...........................................................................21
2.4 Using the CPEs Import Utility ..............................................................................22
2.4.1
Importing CPE Files ............................................................................................ 22
2.4.2
Using Bing Spatial Data Services ....................................................................... 24
2.5 Re-sizing the Search and Network sections.........................................................26
2.6 Entities Search ...................................................................................................27
2.6.1
Introduction to Entities Search Functionality .................................................... 27
2.6.2
Simple Search .................................................................................................... 27
2.6.3
Advanced Search ............................................................................................... 28
2.7 Map/List Views ...................................................................................................35
StarSuite Portal User Manual
ix
Contents
2.7.1
Switching between Map and List Views............................................................. 35
2.7.2
Managing List Views .......................................................................................... 35
2.7.3
List Types .......................................................................................................... 40
2.7.4
Map View ........................................................................................................... 50
2.8 Managing Graphs, Charts and Reports ................................................................61
2.8.1
The Settings Section.......................................................................................... 61
2.8.2
The Graphs/Charts/Reports Section .................................................................. 62
StarSuite Portal User Manual
x
Tables
Tables
Table 1-1: Prerequisites............................................................................................................................. 3
Table 1-2: Required Configuration Details................................................................................................. 4
Table 1-3: Portal Configuration Buttons..................................................................................................... 6
Table 1-4: Summary of Functionality per User Profile Membership ........................................................ 16
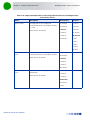
Table 2-1: 4Motion BTS Pre-Defined Searches ...................................................................................... 32
Table 2-2: Extreme BTS Pre-Defined Searches...................................................................................... 33
Table 2-3: CPE Pre-Defined Search........................................................................................................ 33
Table 2-4: Page Controls......................................................................................................................... 36
Table 2-5: List Controls............................................................................................................................ 37
Table 2-6: List Types ............................................................................................................................... 41
Table 2-7: Map View Controls ................................................................................................................. 50
Table 2-8: Map Refresh and Detach Controls ......................................................................................... 51
Table 2-9: 4Motion KPI Details ................................................................................................................ 52
Table 2-10: KPI Representative Colors ................................................................................................... 52
Table 2-11: Extreme KPI Details ............................................................................................................. 53
Table 2-12: KPI Representative Colors ................................................................................................... 54
Table 2-13: Uplink Modulation Number ................................................................................................... 57
Table 2-14: Downlink Modulation Number............................................................................................... 58
Table 2-15: Graph/Chart Controls ........................................................................................................... 63
Table 2-16: Supported Graphs/Charts and Configurable Parameters (excluding Extreme
Performance Charts) ............................................................................................................ 63
Table 2-17: Supported Extreme Performance Charts ............................................................................. 68
Table 2-18: Report Controls .................................................................................................................... 71
Table 2-19: Supported StarReport For StarACS Reports........................................................................ 72
StarSuite Portal User Manual
i
Tables
Table 2-20: Supported StarReport for WiMAX Reports (from AlvariSTAR)............................................. 73
StarSuite Portal User Manual
ii
Figures
Figures
Figure 1-1: Portal Configuration-Sign In Window ....................................................................................... 6
Figure 1-2: Portal Configuration-Main Window........................................................................................... 6
Figure 1-3: Portal Configuration-Application Configuration-StarQuality ..................................................... 7
Figure 1-4: Portal Configuration-Application Configuration-StarACS ......................................................... 8
Figure 1-5: Portal Configuration-Application Configuration-CSR................................................................ 9
Figure 1-6: Portal Configuration-Application Configuration-StarReport.................................................... 10
Figure 1-7: Portal Configuration-Database Connections-General View ................................................... 11
Figure 1-8: Portal Configuration-Database Connections-Add StarQuality Database Connection ............ 11
Figure 1-9: Portal Configuration-Database Connections-Add StarACS Database Connection................ 12
Figure 1-10: Portal Configuration-Miscellaneous-Settings ....................................................................... 13
Figure 2-1: Portal Sign In Window ............................................................................................................ 18
Figure 2-2: The Portal Screen (Map View) ............................................................................................... 19
Figure 2-3: The Portal Screen (List View)................................................................................................. 19
Figure 2-4: The CPEs Import Window ...................................................................................................... 23
Figure 2-5: The Search Bar (Advanced Search Hidden) .......................................................................... 27
Figure 2-6: Advanced BTS Search ........................................................................................................... 28
Figure 2-7: Advanced CPE Search........................................................................................................... 29
Figure 2-8: Save Search........................................................................................................................... 31
Figure 2-9: List View ................................................................................................................................. 36
Figure 2-10: Page and List Control Bar .................................................................................................... 36
Figure 2-11: Column Modification Menu................................................................................................... 38
Figure 2-12: Filter by Option(s)................................................................................................................. 38
Figure 2-13: Text String Filter ................................................................................................................... 39
Figure 2-14: Value Range/Specific Value Filter........................................................................................ 39
Figure 2-15: Date Range/Specific Date Filter ........................................................................................... 40
Figure 2-16: The Configuration History Request Window ........................................................................ 43
Figure 2-17: The Configuration History Report......................................................................................... 44
StarSuite Portal User Manual
i
Figures
Figure 2-18: Edit CPE location ................................................................................................................. 49
Figure 2-19: Map View.............................................................................................................................. 50
Figure 2-20: Site Tab (4Motion)................................................................................................................ 55
Figure 2-21: Sectors Tab (4Motion).......................................................................................................... 55
Figure 2-22: KPIs Tab (4Motion) .............................................................................................................. 56
Figure 2-23: KPIs Tab (Extreme).............................................................................................................. 57
Figure 2-24: The Settings Section ............................................................................................................ 61
StarSuite Portal User Manual
ii
Chapter 1 - Before You
Start
In This Chapter:
“Introduction” on page 2
“Prerequisites” on page 3
“Configuring the StarSuite Portal” on page 4
“Creating a StarSuite Portal User and Verifying Proper Configuration” on
page 15
“AlvariSTAR Functional Permissions for StarSuite Portal” on page 16
Chapter 1 - Before You Start
1.1
Introduction
Introduction
To verify proper operation of the StarSuite Portal application follow carefully the following steps:
1 Verify that all prerequisites are met (see “Prerequisites” on page 3).
2 Access the Portal Configuration utility, configure all necessary parameters and reset AlvariSTAR to
apply the new configuration (see “Configuring the StarSuite Portal” on page 4).
3 Create a user for the StarSuite Portal and verify proper operation (see“Creating a StarSuite Portal User
and Verifying Proper Configuration” on page 15).
StarSuite Portal User Manual
2
Chapter 1 - Before You Start
1.2
Prerequisites
Prerequisites
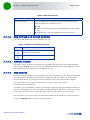
Verify that your system meets the following requirements:
Table 1-1: Prerequisites
Subject
Requirement’s Details
Browser
The following browsers were tested with the StarSuite Portal:
Microsoft Internet Explorer 8
Mozilla Firefox 3.6 or higher
Java
Java (available from http://www.java.com) must be installed to enable
cut-through to AlvariSTAR (AlvariSTAR client uses Java Web Start technology)
Flash
Adobe Flash Player 10 or higher (available from http://www.adobe.com)
Browser Security
In Internet Explorer 8, go to Tools->Internet Options, select the Security tab,
and in Trusted sites set the Security level to Medium-low and add to the
trusted sites the following addresses:
a. http://<AlvariSTAR_Server_IP>
b. http://ecn.dev.virtualearth.net (for maps functionality)
Internet Connection
To use functionality related to geographical maps the browser must be
connected to the Internet.
Screen Resolution
The minimum recommended screen resolution for a 4:3 format desktop or
laptop is 1024x768. For a wide screen, the minimum recommended screen
resolution is 1280x800 (laptop) or 1366x768 (HD Ready TV).
StarSuite Portal User Manual
3
Chapter 1 - Before You Start
1.3
Configuring the StarSuite Portal
Configuring the StarSuite Portal
Configuration steps include:
Preparing Required Configuration Details
The Portal Configuration Utility
Configuring the StarQuality Application Parameters
Configuring the StarACS Application Parameters
Configuring the CSR Application Parameters
Configuring the StarReport Application Parameters
Configuring the Database Connections Parameters
Configuring Miscellaneous Settings (optional)
Completing the Portal Configuration
1.3.1
Preparing Required Configuration Details
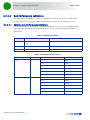
Before you start, verify that you have all necessary configuration details, according to the available
Alvarion’s Star Suite applications:
Table 1-2: Required Configuration Details
Application
Required Configuration Details
StarQuality
Application:
IP Address
HTTP Port
Username
Password
Database:
Host Address
Port
Database Name (Oracle SID)
Username
Password
StarSuite Portal User Manual
4
Chapter 1 - Before You Start
Configuring the StarSuite Portal
Table 1-2: Required Configuration Details
Application
Required Configuration Details
StarACS
Application:
IP Address
HTTP Port
JNP Port
Database:
Database Type (MySQL or Oracle)
Host Address
Port
Database Name
Username
Password
CSR
IP Address (same as IP Address of StarACS)
HTTP Port (same as HTTP Port of StarACS)
Username
Password
StarReport (not
applicable for
Extreme)
IP Address of StarReport’s InfoView
HTTP Port of StarReport’s InfoView
Username
Password
1.3.2
The Portal Configuration Utility
To connect to the Portal Configuration utility:
1 To configure the Portal, connect to: http://<AlvariSTAR_Server_IP_Address>:<AlvariSTAR
Port*>/portal/config
* The default AlvariSTAR port is 8080.
The Sign In window opens.
StarSuite Portal User Manual
5
Chapter 1 - Before You Start
Configuring the StarSuite Portal
Figure 1-1: Portal Configuration-Sign In Window
2 Enter the User Name and Password and click on the Sign In button. The relevant user must have
Administrator privileges in AlvariSTAR.
The Portal Configuration window opens.
Figure 1-2: Portal Configuration-Main Window
Each configuration screen includes the following buttons:
Table 1-3: Portal Configuration Buttons
Button
Functionality
Undo Changes
Click to cancel configuration changes made in the screen during the current
session
Save Configuration
Click to save the entire configuration
StarSuite Portal User Manual
6
Chapter 1 - Before You Start
Configuring the StarSuite Portal
CAUTION
The Application Configuration>AlvariSTAR screen is informational. Do not perform any changes in this
screens.
Execute the configuration steps described in the following sections.
1.3.3
CAUTION
Configuring the StarQuality Application Parameters
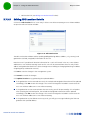
For properly supporting operation with the Portal, the StarQuality must have a license for support of
SOAP (Simple Object Access Protocol).
All sites discovered and managed by AlvariSTAR should also be monitored by StarQuality.
To configure the StarQuality application parameters:
1 Select Application Configuration>StarQuality:
Figure 1-3: Portal Configuration-Application Configuration-StarQuality
2 Set Configured to Yes.
3 In the IP Address field, enter the StarQuality’s IP Address
4 In the HTTP Port field, enter the StarQuality’s HTTP port number (the default is 80).
5 In the Username field, enter the Username to be used for login to the StarQuality (the default is
portal, with Read-Only privileges).
StarSuite Portal User Manual
7
Chapter 1 - Before You Start
Configuring the StarSuite Portal
6 In the Password field, enter the Password to be used with the specified Username for login to the
StarQuality (the default is portal123).
NOTE!
1.3.4
If StarQuality’s Configured state is set to Yes, Database Connection for StarQuality (see Section 1.3.7.2)
must be configured.
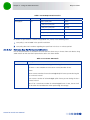
Configuring the StarACS Application Parameters
To configure the StarACS application parameters:
1 Select Application Configuration>StarACS:
Figure 1-4: Portal Configuration-Application Configuration-StarACS
2 Set Configured to Yes.
3 In the IP field, enter the StarACS’s IP Address.
4
In the HTTP Port field, enter the StarACS’s HTTP port number (the default is 80).
5
In the JNP Port field, enter the StarACS’s JNP port number (the default is 1099).
6 In the Endpoint URL field, change the string @@@ACS_SERVER_IP@@@ to the StarACS’s IP Address.
NOTE!
If StarACS’s Configured state is set to Yes, Database Connection for StarACS (see Section 1.3.7.3) must
be configured.
StarSuite Portal User Manual
8
Chapter 1 - Before You Start
1.3.5
Configuring the StarSuite Portal
Configuring the CSR Application Parameters
To configure the CSR application parameters:
1 CSR application should be installed on the ACS server
2 Select Application Configuration>CSR:
Figure 1-5: Portal Configuration-Application Configuration-CSR
3 Set Configured to Yes.
4 In the IP Address field, enter the StarACS’s IP Address
5 In the HTTP Port field, enter the StarACS’s HTTP port number (the default is 80).
6 In the Username field, enter the Username to be used for login to the CSR application (the default is
admin).
7 In the Password field, enter the Password to be used with the specified Username for login to the CSR
application (the default is admin).
1.3.6
Configuring the StarReport Application Parameters
To configure the StarReport application parameters:
1 Select Application Configuration>StarReport:
StarSuite Portal User Manual
9
Chapter 1 - Before You Start
Configuring the StarSuite Portal
Figure 1-6: Portal Configuration-Application Configuration-StarReport
2 Set Configured to Yes.
3 In the IP Address field, enter the StarReport’s IP Address
4 In the HTTP Port field, enter the StarReport’s HTTP port number (the default is 8080).
5 In the Username field, enter the Username to be used for login to the StarReport (the default is
Administrator).
6 In the Password field, enter the Password to be used with the specified Username for login to the
StarReport (the default is report).
1.3.7
Configuring the Database Connections Parameters
This section includes:
Opening the Database Connections General View
Configuring Database Connection Parameters for StarQuality
Configuring Database Connection Parameters for StarACS
1.3.7.1
Opening the Database Connections General View
To configure the Database Connections parameter:
Select Database Connections:
StarSuite Portal User Manual
10
Chapter 1 - Before You Start
Configuring the StarSuite Portal
Figure 1-7: Portal Configuration-Database Connections-General View
By default, both database connections are Not Configured.
1.3.7.2
Configuring Database Connection Parameters for StarQuality
To configure the Database Connections parameter for StarQuality:
1 In the Database Connection General View, select Add for StarQuality Connection.
NOTE!
Add operation for StarQuality Connection is available only If in StarQuality Application Configuration
the Configured state is set to Yes.
Figure 1-8: Portal Configuration-Database Connections-Add StarQuality Database Connection
StarSuite Portal User Manual
11
Chapter 1 - Before You Start
Configuring the StarSuite Portal
2 In the Host Address field, enter the IP address of the database.
3 In the Port field, enter the HTTP port number (the default is 1521).
4 In the Username field, enter the Username to be used for login to the database (the default is sq).
5 In the Password field, enter the Password to be used with the specified Username for login to the
database (the default is sq).
6 In the Database Name field, enter the configured name of the database (the default is sq).
7 Click on the Test Connection button to check the connection to the database. If there is an error
message, try to correct parameters or check the route to the database.
8 Click on the OK button to apply the configuration and return to the General View screen. The status
for the Connection is changed to Configured.
* StarQuality’s Database Type is always Oracle.
1.3.7.3
Configuring Database Connection Parameters for StarACS
To configure the Database Connections parameter for StarACS:
1 In the Database Connection General View, select Add for StarACS Connection.
NOTE!
Add operation for StarACS Connection is available only If in StarACS Application Configuration the
Configured state is set to Yes.
Figure 1-9: Portal Configuration-Database Connections-Add StarACS Database Connection
2 Select the database Type (Oracle or MySQL).
3 In the Host Address field, enter the IP address of the database.
4 In the Port field, enter the HTTP port number (the default is 1521 for Oracle, 3306 for MySQL).
StarSuite Portal User Manual
12
Chapter 1 - Before You Start
Configuring the StarSuite Portal
5 In the Username field, enter the Username to be used for login to the database (the default is dps).
6 In the Password field, enter the Password to be used with the specified Username for login to the
database (the default is dps).
7 In the Database Name field, enter the configured name of the database (the default is dps).
8 Click on the Test Connection button to check the connection to the database. If there is an error
message, try to correct parameters or check the route to the database.
9 Click on the OK button to apply the configuration and return to the General View screen. The status
for the Connection is changed to Configured.
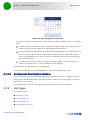
1.3.8
Configuring Miscellaneous Settings
In List view, each page includes up to a certain number of entries.
To change the default maximum number of displayed search results on page:
1 Select Miscellaneous>Settings:
Figure 1-10: Portal Configuration-Miscellaneous-Settings
2 Use the Up/Down keys to change the Number of Displayed Search Results. The range is from 1 to
100. The default is 20.
You can define a link to a third party web location. If defined, a cut-through button to the specified Web
Address will be added to the Portal’s screen, with a name as defined in the Display Name parameter
(refer also to “Using the Cut-through Buttons” on page 21).
StarSuite Portal User Manual
13
Chapter 1 - Before You Start
Configuring the StarSuite Portal
To configure a link to a third party web location:
1 Enter the desired Web Address. The range is up to 256 characters. The default is null.
2 Enter the Display Name for the link. The range is up to 12 characters. The default is null.
1.3.9
Completing the Portal Configuration
To complete the Portal Configuration:
1 Click on the Save Configuration button.
2 Logout from the Portal Configuration utility (Logout> link is located on the top right corner of the
screen.
3 Restart the AlvariSTAR server to apply the saved configuration.
StarSuite Portal User Manual
14
Chapter 1 - Before You Start
1.4
Creating a StarSuite Portal User and Verifying Proper Configuration
Creating a StarSuite Portal User and Verifying
Proper Configuration
To create a StarSuite Portal user with geographical maps functionality:
1 Login to AlvariSTAR as a user with Administrators privileges
2 Create a new user. The User Profile Membership must include:
a PortalMapUsers (By default, a maximum of two named users can use the PortalMapUsers User
Profile. An appropriate license for N additional users (NMS Web Portal Map Users license) is
required for supporting more than two users).
b A User Profile with at least View permission for Equipment Manager. Supported functionality of
cut-through to AlvariSTAR will be according to functional permissions of this User Profile.
NOTE!
For more details on functional permissions related to the StarSuite Portal application, including creation
of users without maps functionality, refer to “AlvariSTAR Functional Permissions for StarSuite Portal” on
page 16.
3 Exit AlvariSTAR.
4 Login to AlvariSTAR as the new StarSuite Portal user. You will be prompted to change the password
after first login.
5 Connect to http://<AlvariSTAR server IP Address>:<AlvariSTAR Port*>/portal (* the default AlvariSTAR
port is 8080). The StarSuite Portal should open.
6 The top section of the StarSuite Portal window includes cut-through buttons for Star Suite
applications. Verify that all relevant applications are connected (green rectangle indication on the
right side of the button).
7 If necessary, you can click on the Settings link (in the top right corner of the StarSuite Portal window)
to open the Portal Configuration utility for viewing or modifying configuration parameters.
StarSuite Portal User Manual
15
Chapter 1 - Before You Start
1.5
AlvariSTAR Functional Permissions for StarSuite Portal
AlvariSTAR Functional Permissions for StarSuite
Portal
The StarSuite Portal application is automatically installed on the same station as the AlvariSTAR server,
using the same security assignment mechanism for functional permissions.
All users using Administrators User Profile have by default functional permission for Web Portal, with
View operation only. They may use the StarSuite Portal application, but geographical maps will not be
available to them (unless the user is defined also as a member of the PortalMapUsers User Profile as
described below).
New User Profiles with similar security assignment related to Web Portal (only View operation) may also
be created. Users using these User Profiles may use the StarSuite Portal, without the benefit of
geographical maps. The functional permissions of these users must include also View operation for
Equipment Manager.
Managers and Observers do not have any functional permission for Web Portal.
Geographical maps are available only for users using the default PortalMapUsers User Profile having
functional permission for Web Portal, with both View and ViewMap operations. This User Profile cannot
be modified, and it cannot support any other functional permissions. By default, a maximum of two
named users can use the PortalMapUsers User Profile. An appropriate license for N additional users
(NMS Web Portal Map Users license) is required for supporting more than two users.
To have full functionality of the StarSuite Portal including geographical maps, you must be defined as a
member of the PortalMapUsers User Profile. You must be a member of an additional User Profile, having
at least functional permission for View operation for Equipment Manager.
Table 1-4: Summary of Functionality per User Profile Membership
User Profile Membership
Support StarSuite Portal Functionality
Administrators only
Partial (without maps)
Managers only
None
Observers only
None
Other (with Web Portal View
permission)
Partial (without maps)
PortalMapUsers only
None
PortalMapUsers plus another User
Profile
Full (including maps), provided the other User Profile includes
permission for at least View operation for Equipment
Manager
StarSuite Portal User Manual
16
Chapter 2 - Using the
StarSuite Portal
In This Chapter:
Accessing the Portal
The Portal Screen
Using the Cut-through Buttons
Re-sizing the Search and Network sections
Entities Search
Map/List Views
Managing Graphs, Charts and Reports
Chapter 2 - Using the StarSuite Portal
2.1
Accessing the Portal
Accessing the Portal
To access the Portal:
Connect to http://<AlvariSTAR server IP Address>:<AlvariSTAR Port*>/portal
* The default AlvariSTAR port is 8080.
You can also use an HTTPS connection via port 8443 for increased security:
https://<AlvariSTAR server IP Address>:8443/portal
The system is supplied with a self signed certificate providing authentication and encrypted connection
between client and server. If a certificate signed by a recognized certificate authority is not used, most
browsers will display a warning message.
NOTE!
Use one of the browsers specified in Section 1.2.
The Sign In window opens:
Figure 2-1: Portal Sign In Window
Enter the User Name and Password and click on the Sign In button.
NOTE!
For full functionality including availability of geographical maps you must be connected to the Internet
and have the appropriate functional permissions. For more details refer to Section 1.5.
StarSuite Portal User Manual
18
Chapter 2 - Using the StarSuite Portal
2.2
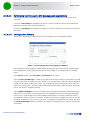
The Portal Screen
The Portal Screen
Figure 2-2: The Portal Screen (Map View)
Figure 2-3: The Portal Screen (List View)
The Portal screen includes the following components:
Top section that includes the following:
»
Cut-through buttons to Alvarion Star Suite applications, including status indications of each
application’s server. Optionally it may include also a cut-through button to a third party web
StarSuite Portal User Manual
19
Chapter 2 - Using the StarSuite Portal
The Portal Screen
address (if defined in Portal Configuration utility-see “Configuring Miscellaneous Settings” on
page 13).
»
Equipment selection combo box. Click to open a drop-down list with the following options:
◊
All Equipments (the default): The Portal will displays search results, pre-defined search
options, equipment and sector coloring options on maps and graphs for all equipment types
supported by the application.
◊
4Motion: The Portal will displays search results, pre-defined search options, equipment and
sector coloring options on maps and graphs only for 4Motion devices.
◊
Extreme: The Portal will displays search results, pre-defined search options, equipment and
sector coloring options on maps and graphs only for Extreme devices.
»
“Login User Name” display indicating the name of the user, with a drop-down list offering the
following options:
◊
CPEs Import cut-through link: Click to open the CPEs Import utility (see “Importing CPE
Files” on page 22). Applicable only for users with administrator privileges.
◊
Settings cut-through link: Click to open a new browser window/tab and connect to the
Portal Configuration utility. Applicable only for users with administrator privileges.
»
Logout action link: Click to logout
Search section that includes the following:
»
Entities search functionality (see “Entities Search” on page 27).
»
Information display area: A geographic map with overlay data or a list of entities (see “Map/List
Views” on page 35).
Network section that includes a customizable set of graphs, charts and reports (see “Managing
Graphs, Charts and Reports” on page 61).
StarSuite Portal User Manual
20
Chapter 2 - Using the StarSuite Portal
2.3
Using the Cut-through Buttons
Using the Cut-through Buttons
The top section of the portal contains cut-through buttons to other applications:
AlvariSTAR
StarQuality
StarACS
StarReport
Display Name for a third party web address (if defined)
The actual repertoire of active cut-through buttons is set per installation according to the actually
available components linked to the portal:
If the application server is not configured in the Configuration Utility (see Section 1.3), the system
shall display the corresponding cut-through button as non-active (greyed out).
If the application server is configured in the Configuration Utility (see Section 1.3) but the application
is not running, the system shall display the corresponding cut-through button as active, with a small
red rectangle on the right side of the button.
If the application server is configured in the Configuration Utility (see Section 1.3) and the application
is running, the system shall display the corresponding cut-through button as active, with a small
green rectangle on the right side of the button.
Position the mouse on an active button to view a tool-tip with more details on the application server’s
status.
Click on an active cut-through button of a running application (with a green rectangle on the right side)
to open the default entry screen of the relevant management application in a new window. Refer to
Section 2.7.3.2.3 and Section 2.7.3.3.3 for details on more cut-through options.
A cut-through button to a third party web address will be available on the right side of the StarReport
button if defined in the Portal Configuration utility (see “Configuring Miscellaneous Settings” on
page 13). If available, this button is always active. Click on the button to open the specified web link in a
separate tab (or window) of the browser).
StarSuite Portal User Manual
21
Chapter 2 - Using the StarSuite Portal
2.4
Using the CPEs Import Utility
Using the CPEs Import Utility
The CPEs Import utility enables loading to the system files with CPE(s) location details. These location
details may be used to display the a CPE in its geolocation, and are included in the displayed CPE
Information for CPE(s) shown on the map.
CPE location details may specify either its geolocation (latitude/longitude) or its full address.
The system accepts files with CPE(s) location details that meet the following rules:
1 The file is a text file, parameters are comma separated.
2 Each line describes one CPE, and can have a variable length.
3 A line always starts with a CPE Serial Number. The Serial Number must be a valid one (exists in the
ACS database).
4 The second parameter in each line is either "ADDR" or "LATLONG" (case-insensitive), defining the
type of location information to be provided by the following parameters.
5 If the second parameter is "LATLONG", the rest of the line should contain two floating point numbers
or degrees:minutes:seconds, defining latitude and longitude. If no latitude and longitude details
follow "LATLONG", the system will assume the user wanted to delete the latitude and longitude
information in the system (if exist) for the specific CPE.
6 If the second parameter is "ADDR", the line should contain the following parameters:
a Country
b State (required only if the country is US)
c
City
d Rest of the address
If no address details follow "ADDR", the system will assume the user wanted to delete the address
information in the system (if exist) for the specific CPE.
The utility offers the option of using Bing Spatial Data Services to try resolving the latitude/longitude
coordinates of “ADDR” CPEs (see “Using Bing Spatial Data Services” on page 24).
2.4.1
Importing CPE Files
To load CPE file(s):
1 In the <User> drop-down list, select CPEs Import. The CPEs Import window opens:
StarSuite Portal User Manual
22
Chapter 2 - Using the StarSuite Portal
Using the CPEs Import Utility
Figure 2-4: The CPEs Import Window
NOTE!
You may skip the Import CPEs file process (steps 2 to 3 below) and start a Bing Spatial Data Services job
(see “Using Bing Spatial Data Services” on page 24) for geolocating previously loaded “ADDR” CPEs
that are stored in the management system server without latitude/longitude details.
2 Click on Select file.... The Select file(s) to upload by <AlvariSTAR IP Address> dialog box opens.
Select CPE file(s) and click Open.
3 Click on Upload file to upload the selected files to the AlvariSTAR server.
»
Lines will be validated.
»
If applicable, lines with invalid parameters will be indicated.
»
Details of validated lines will be uploaded to the management system.
»
The number of CPEs without latitude/longitude on the management system server will also be
displayed (if there are such CPEs). This includes new uploaded “ADDR” CPE(s) and previously
uploaded “ADDR” CPEs that were not geolocated.
If the file is not in a textual format, or if there is any other general problem with the input file, the
system will inform the user via an error message and abort the operation.
If there are no CPEs without latitude/longitude on the management system server, the CPEs Import
operation is completed and the window should be closed.
If there are CPEs without latitude/longitude on the management system, the user may still decide to
discontinue the operation and close the window. The geolocation for these CPEs may be resolved
later using Bing Maps Geolocation Services. Otherwise, the user may continue, trying to geolocate
the CPE(s) using Bing Spatial Data Services.
StarSuite Portal User Manual
23
Chapter 2 - Using the StarSuite Portal
2.4.2
NOTE!
Using the CPEs Import Utility
Using Bing Spatial Data Services
Bing Spatial Data Services is intended for resolving the geolocation for a large number of “ADDR” CPEs.
If there are few CPE with address details that are not geolocated it is recommended to resolve their
geolocation using the Bing Maps Geolocation Services (see “Switching to Map View for a selected CPE”
on page 45 and “Editing CPE Location Details” on page 49).
Bing Spatial Data Services may not be available due to one of the following reasons:
Another user of the Portal is running a Bing Spatial Data Services job. There can be only one running
job at a time per Portal server.
The maximum number of jobs has been reached. The maximum number of jobs is limited to 50 jobs
per 24 hours per a Bing Maps Key (account). The Portal server has a single Bing Maps Key.
To run a Bing Spatial Data Services job:
1 Start Step 1 by clicking on Download.... The Select location for download by <AlvariSTAR IP
Address> dialog box opens allowing you to specify a location and name. Click Save to save on the
drive a file containing addresses of all previously imported CPEs (by all users / sessions ) that don't
have a geolocation (Latitude/Longitude).
2 Start Step 2 by clicking on Select file.... The Select file(s) to upload by <AlvariSTAR IP Address>
dialog box opens. Select the previously saved file (file type is cpe.xml) and click Open.
3 Click Upload to upload the selected file to Bing Spatial Data Services and start Step 3 of the process.
A Bing job trying to geolocate the CPEs in the uploaded file will start. As long as the job is not
completed (pending), you may abort it by clicking on Cancel Job.
NOTE!
As long as the job is pending, another Bing Spatial Data Services job cannot take place.
To properly cancel a job you must click on Cancel Job. If you just close the window before the job is
completed and the results are uploaded to the management system server, the job is considered as open
and another job cannot be started.
4 After completion of the job, start Step 4 by clicking on Download.... The Select location for
download by <AlvariSTAR IP Address> dialog box opens allowing you to specify a location and
name. Click Save to save on the drive an xml file containing job results.
5 Start Step 5 by clicking on Select file.... The Select file(s) to upload by <AlvariSTAR IP Address>
dialog box opens. Select the previously saved file (file type is job_results.xml) and click Open.
6 Click on Upload File to complete the process by uploading the job results file to the management
system server. You will be informed of the results (number of geolocated addresses, number of
updated addresses and number of addresses that were not geolocated and are without
latitude/longitude).
StarSuite Portal User Manual
24
Chapter 2 - Using the StarSuite Portal
NOTE!
Using the CPEs Import Utility
If the geolocation service returned zero results or more than one result, only the address information will
be stored on the management system. You may try later to resolve the geolocation of such CPEs using
the Bing Maps Geolocation Services (see“Switching to Map View for a selected CPE” on page 45 and
“Editing CPE Location Details” on page 49).
StarSuite Portal User Manual
25
Chapter 2 - Using the StarSuite Portal
2.5
Re-sizing the Search and Network sections
Re-sizing the Search and Network sections
By default, both the Search and Network sections are displayed. When hovering the mouse over the
separation bar between the two sections, the mouse pointer becomes a double-headed arrow (
)
You can change the relative sizes of the sections by dragging this arrow left/right.
You can hide the Search section to increase the size of the Network section so it will occupy the entire
width of the screen by clicking on the Hide Search Section button (
) located on the top right corner of
the Search section. To return to the previous state, click on the Show Search Section button (
)
located on the left side of the expanded Network section.
StarSuite Portal User Manual
26
Chapter 2 - Using the StarSuite Portal
2.6
Entities Search
Entities Search
This section includes:
Introduction to Entities Search Functionality
Simple Search
Advanced Search
2.6.1
Introduction to Entities Search Functionality
The entities search functionality enables the user to focus on entities that meet certain criteria. Search
results reflect data retrieved from relevant management components (if available):
AlvariSTAR: Current information in the configuration database
StarQuality: Information for the relevant equipment recorded during the relevant period.
StarACS: Current information in the database.
Figure 2-5: The Search Bar (Advanced Search Hidden)
Search functionality is entity-type sensitive. Use the Search In drop-down menu to select between BTS
and CPE search. The default selection is BTS.
Search results are displayed in List view.
2.6.2
Simple Search
The simple search functionality enables searching for BTS(s) based on either BTS Name or Management
IP Address, or searching for CPE(s) based on the MAC Address.
In a CPE search, specify in the Enter equipment name or address text box a complete MAC address to
search for a specific CPE, or a partial address string to search for CPEs that the specified string is included
anywhere in their MAC address (for example-type E7-30 to search for all CPEs whose MAC address
includes the string E7-30). Leave the text box empty to search for all CPEs in the database.
In a BTS search, the search can be based on either BTS Site Name or BTS Management IP Address:
In a Site Name based search, specify in the Enter equipment name or address text box a complete
Site Name to search for a specific BTS, or a partial string to search for BTSs that the specified string is
included anywhere in their Site Name (for example-type ab to search for all BTSs whose Site Name
includes the string ab).
In a Management IP Address based search, specify in the Enter equipment name or address text
box a complete Management IP Address to search for a specific BTS, or a partial string to search for
StarSuite Portal User Manual
27
Chapter 2 - Using the StarSuite Portal
Entities Search
BTSs that the specified string is included anywhere in their Management IP Address (for example-type
130.131 to search for all BTSs whose Management IP Address includes the string 130.131).
Leave the text box empty to search for all BTSs in the database.
Enter the search string in the Enter equipment name or address text box and click on the
button
to initiate the search. For either BTS or CPE, do not type anything (or enter only the wild card character
*) to search for all BTSs or CPEs in the relevant database.
The search string is not case-sensitive.
2.6.3
Advanced Search
This section includes:
Introduction to Advanced Search Functionality
Performing a Custom Search
Performing a Previously Saved Search
Deleting a Previously Saved Search
Performing a Pre-Defined Search
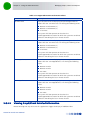
2.6.3.1
Introduction to Advanced Search Functionality
To open the advanced search definition section, click on the Advanced Search link.
Figure 2-6: Advanced BTS Search
StarSuite Portal User Manual
28
Chapter 2 - Using the StarSuite Portal
Entities Search
Figure 2-7: Advanced CPE Search
The advanced search enables defining any of the following:
A custom search, allowing definition of various search criteria.
A pre-defined search from a factory-set list.
A previously saved custom search.
2.6.3.2
Performing a Custom Search
To define/run a custom search:
1 Select BTS (the default) or CPE in the Search In drop-down menu.
2 Select Custom BTS Search/Custom CPE Search (the default) in the Configuration drop-down menu.
3 Select the required search criteria. You can select one or several of the following criteria:
»
For a Custom BTS Search:
◊
IP Address
◊
Site Name (with support for wildcard search functionality)
◊
Serial Number
◊
Alarm State (select from the drop-down menu):
{
Cleared
{
Indeterminate and above
{
Warning and above
{
Minor and above
{
Major and above
{
Critical
{
All (the default)
StarSuite Portal User Manual
29
Chapter 2 - Using the StarSuite Portal
»
Entities Search
For a Custom CPE Search:
◊
MAC Address: specify a complete MAC address to search for a specific CPE, or a partial
address string to search for CPEs that the specified string is included anywhere in their MAC
address (for example-type E7-30 to search for all CPEs whose MAC address includes the
string E7-30). Leave the text box empty to search for all CPEs in the database.
◊
Serial Number: Specify a complete Serial Number or a partial prefix string (for example-type
7053 to search for all CPEs whose serial number starts with 7053).
◊
◊
Model Name (select from the drop-down menu):
{
BMAX 1000
{
BMAX 2000
{
CPE 5000
{
BMAX 4000
{
BMAX 3000
{
BMAX 6000
{
NGVG
{
All (the default)
Serving BS ID: Specify a complete BS ID or a partial prefix string (for example-type
130.131.30.14 to search for all CPEs served by any BS whose BS ID starts with
130.131.30.14).
4 The search strings are not case-sensitive.
5 To clear selected parameters, click on the Clear Fields button.
6 To run the search based on the defined criteria, click on the Search button. The search result will be
displayed below. For details refer to “BTS Equipments List” on page 42 or “CPE Equipments List” on
page 45.
7 The results for a Custom CPE search include only “connected” CPEs:
»
4Motion: CPEs available in the database of StarQuality that had at least one collection in the last
24 hours (including CPEs not available in the database of StarACS).
»
Extreme: CPEs available in the database of AlvariSTAR (including CPEs not available in the
database of StarACS).
8 To save the search criteria, click on Save Search. The Save Search dialog box opens, enabling you to
define the Filter Information:
StarSuite Portal User Manual
30
Chapter 2 - Using the StarSuite Portal
Entities Search
Figure 2-8: Save Search
»
Name: A mandatory parameter. The name of the saved custom search for future use (refer to
“Performing a Previously Saved Search” on page 31)
»
Description: An optional description of the Filter.
»
Visibility: Select whether you want the Filter to be available for all users (Public) or only to you
(Private). The default is Private.
2.6.3.3
Performing a Previously Saved Search
To run a previously saved search:
1 Select BTS (the default) or CPE in the Search In drop-down menu.
2 Select the desired Filter in the Saved Filter drop-down menu (The default is No filter). When you
place the mouse over any saved search, you will get a tool-tip with the saved search parameters.
3 Click on the Search button. The search result will be displayed below in a List view.
2.6.3.4
Deleting a Previously Saved Search
To delete a previously saved search:
1 Select BTS (the default) or CPE in the Search In drop-down menu.
2 Select the desired Filter in the Saved Filters drop-down menu.
3 Click on the X button. You will be requested to confirm the action.
StarSuite Portal User Manual
31
Chapter 2 - Using the StarSuite Portal
2.6.3.5
Entities Search
Performing a Pre-Defined Search
To define/run a pre-defined search:
1 Select BTS (the default) or CPE in the Search In drop-down menu.
2 Select one of the pre-defined searches in the Configuration drop-down menu:
»
For a BTS pre-defined search for 4Motion devices (based on StarQuality reports) the available
options are:
Table 2-1: 4Motion BTS Pre-Defined Searches
Name
Description
Equivalent StarQuality
Report
Top 20 UL
throughput
Top 20 BTSs regarding single-AU uplink
throughput, over the last week
4Motion top N average sector
throughput UL
Top 20 DL
throughput
Top 20 BTSs regarding single-AU downlink
throughput, over the last week
4Motion top N average sector
throughput DL
Bottom 20 UL
throughput
Bottom 20 BTSs regarding single-AU uplink
throughput, over the last week
4Motion bottom N average
sector throughput UL
Bottom 20 DL
throughput
Bottom 20 BTSs regarding single-AU downlink
throughput, over the last week
4Motion bottom N average
sector throughput DL
Top 20 CPEs no.
Top 20 BTSs regarding the number of
currently-connected CPEs
4Motion top no. of SUs
Bottom 20 CPEs no.
Bottom 20 BTSs regarding the number of
currently-connected CPEs
4Motion bottom no. of SUs
Top 20 UL
utilization
Top 20 BTSs regarding single-AU uplink
utilization, over the last week
4Motion top N average sector
air-link utilization UL
Top 20 DL
utilization
Top 20 BTSs regarding single-AU downlink
utilization, over the last week
4Motion top N average sector
air-link utilization DL
Bottom 20 UL
utilization
Bottom 20 BTSs regarding single-AU uplink
utilization, over the last week
4Motion bottom N average
sector air-link utilization UL
Bottom 20 DL
utilization
Bottom 20 BTSs regarding single-AU downlink
utilization, over the last week
4Motion bottom N average
sector air-link utilization DL
Bottom 10 Uptime
Bottom 10 BTSs regarding current uptime
4Motion bottom N uptime
»
For a BTS pre-defined search for Extreme devices (based on relevant events received by
AlvariSTAR) the available options are:
StarSuite Portal User Manual
32
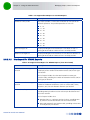
Chapter 2 - Using the StarSuite Portal
Entities Search
Table 2-2: Extreme BTS Pre-Defined Searches
Name
Description
Applicable Event
Top 10 Airlink
Problems
Top 10 BTSs regarding number of MS
connection failures (user disconnection)
during the last hour or day.
User Airlink Connection Failure
(userAirlinkConnectionFailure,
extremeEvents 57)
Top 10 Satellite
Sync Problems
Top 10 BTSs using a Trimble GPS regarding
number of events during the last hour or
day indicating that the GPS is synchronized
to less than 4 (the minimum required
number of satellites) at the time of
initialization.
Min 4 Satellite Sync Failure
(min4SatelliteSyncFailure,
extremeEvents 116)
Top 10 Hold Over
Entered
Top 10 BTSs using a GPS regarding number
of events during the last hour or day
indicating that the BTS entered holdover
state.
Hold Over Entered
(holdOverEntered, extremeEvents
110).
Top 10 BTSs using an external
Authentication server regarding number of
events during the last hour or day indicating
that the Authentication server is not
responding to keep-alive messages.
Authentication Server Keepalive
Timeout
(authenticationServerKeepaliveTO
, extremeEvents 103)
Top 10 KeepAlive
Note that the event is sent by
each affected BS.
In the Criteria section, use the Unit drop-down menu to select between one HOUR or one DAY. The
default is one HOUR.
»
For a CPE pre-defined search (based on information gathered from StarACS) the available options
are:
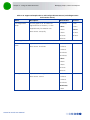
Table 2-3: CPE Pre-Defined Search
Name
Description
Searches based on information gathered from StarACS
CPEs Registered Since
CPEs registered since a certain date (see below instructions for date
definition)
CPEs Rebooted Since
CPEs rebooted since a certain date (see below instructions for date
definition)
CPEs Not Updated Since
CPEs not updated since a certain date (see below instructions for
date definition)
Searches based on information gathered from StarACS plus information received from the
Portal server (uploaded using CPEs Import utility)
StarSuite Portal User Manual
33
Chapter 2 - Using the StarSuite Portal
Entities Search
Table 2-3: CPE Pre-Defined Search
Name
Description
ACS CPEs without Lat/Long
CPEs with address information and without latitude/longitude
information
ACS CPEs without Address
CPEs with latitude/longitude information and without address
information
To select a date: In the Date field enter a date in the format YYYY-MM-DD, or click on the
to open the calendar window for date selection.
button
For ACS CPEs without Lat/Long or ACS CPEs without Address, you can select in the W/O Location
drop-down menu wheter to view all CPEs or only “connected” CPEs: “Connected” 4Motion CPEs
include all CPEs available in the database of StarQuality that had at least one collection in the last 24
hours (including CPEs not available in the database of StarACS). “Connected” Extreme CPEs include
all CPEs available in the database of AlvariSTAR (including CPEs not available in the database of
StarACS).
3 To run the pre-defined search, click on the Search button. The search result will be displayed below in
a List view. The table’s content for each of the pre-defined searches is described in “Pre-Defined
Searches Lists” on page 46.
StarSuite Portal User Manual
34
Chapter 2 - Using the StarSuite Portal
2.7
Map/List Views
Map/List Views
This section includes:
Switching between Map and List Views
Managing List Views
List Types
Map View
2.7.1
Switching between Map and List Views
The Map and List buttons enables selecting the information view mode.
The default view is List. Map view is available only for users with full ViewMap privileges (using the
PortalMapUsers User Profile).
2.7.2
Managing List Views
This section includes:
Introduction to List Views
Page and List Control Bar
Modifying the List Content
Resizing and Rearranging Columns
List Types
List Types
2.7.2.1
Introduction to List Views
List view displays a table with contents according to the relevant search and its results. The default list is
BTS Equipment (see “BTS Equipments List” on page 42), displaying information for all sites in the
database of AlvariSTAR.
StarSuite Portal User Manual
35
Chapter 2 - Using the StarSuite Portal
Map/List Views
Figure 2-9: List View
2.7.2.2
Page and List Control Bar
The Page and List Control Bar is displayed below the results table. It contains quick access icons and
controls for some common operations. It also provides details on the results displayed in current page
and total number of results.
Figure 2-10: Page and List Control Bar
2.7.2.2.1
Using the Page Controls
When the number of results exceeds the number defined in the Page Size box, the results are divided
into several pages. Use the following controls to browse the various pages and manage page size:
Table 2-4: Page Controls
Icon/Control
Description
First/Previous - Cycles back to the first or previous page.
Next/Last - Cycles forward to the next or last page.
Page # of - The current page number out of total number of pages.
StarSuite Portal User Manual
36
Chapter 2 - Using the StarSuite Portal
Map/List Views
Table 2-4: Page Controls
Icon/Control
Description
Page Size - Defines the number of results to display in each page. The default is
20. See also Section 1.3.8 for details on changing the default number of results per
page. You have to refresh the list in order for the change of the page size to take
effect.
2.7.2.3
Using the List Controls
The List Control buttons are.
Table 2-5: List Controls
Icon
Description
Refresh - Refreshes the displayed information.
Save Grid Configuration - Saves the current columns’ order. The saved configuration
will be the default for the specific user. Refer to sections Section 2.7.2.4.3 and
Section 2.7.2.5 for details on changing displayed columns and their order.
Detach List - opens the list in a new window. Click Esc to return.
Export CSV - Exports the List’s content to an Excel Comma Separated Value file. The
default file name includes search type, filter, date and user name.
Export Excel - Exports the List’s content to an Excel Worksheet file.
Export PDF - Exports the List’s content to an Adobe Acrobat PDF document.
2.7.2.4
Modifying the List Content
This section includes:
Introduction to List Modification Functionality
Sorting Lists
Dynamic Columns Selection
Filtering the Displayed Information
2.7.2.4.1
Introduction to List Modification Functionality
Position the cursor on a table header. A small drop-down arrow will appear on the right side of the
header. Left-click on the arrow to open the column modification menu.
StarSuite Portal User Manual
37
Chapter 2 - Using the StarSuite Portal
Map/List Views
Figure 2-11: Column Modification Menu
The available options in the column modification menu are:
Sort Ascending (see Section 2.7.2.4.2)
Sort Descending (see Section 2.7.2.4.2)
Columns (see Section 2.7.2.4.3)
Filters (see Section 2.7.2.4.4)
2.7.2.4.2
Sorting Lists
In the column modification menu, select the Sort Ascending option to sort the table by the selected
column in ascending order. Select the Sort Descending option to sort the table by the selected column
in descending order.
Alternatively, click on any of the column headings to sort the table by the selected column. Click again
on a column heading to toggle between ascending and descending sorting order.
2.7.2.4.3
Dynamic Columns Selection
In the column modification menu, position the cursor on the Column option to displays a list of all the
columns that are available in the table. Check the columns that you wish to display and uncheck the
columns that you want to hide.
2.7.2.4.4
Filtering the Displayed Information
In the column modification menu, position the cursor on the Filters option (not available in some
columns) to display the filter definition menu. There are different types of filters, according to syntax of
the selected header:
Filter by Option(s): A list of options with a check-box next to each one allowing you to filter the results
so that only entities that match any of the selected options will be displayed.
Figure 2-12: Filter by Option(s)
StarSuite Portal User Manual
38
Chapter 2 - Using the StarSuite Portal
Map/List Views
Text String Filter: A single text box allowing you to filter the results by a specific string in the value in
the selected column. A single text field opens, allowing you to enter the filtering string.
Figure 2-13: Text String Filter
The table is updated on the fly (the content is automatically updated after entering each character).
For example, if you want to filter the displayed results for BTS Equipments list by Site Name so that
only sites that include the string “ab” in their name will be displayed: After entering “a” in the filter
definition text field, only sites that include the character “a” anywhere in the Site Name will be
displayed. Enter “b”, and only sites that include the string “ab” anywhere in the Site Name will be
displayed. Note that the filter string is not case-sensitive.
Value Range/Specific Value Filter: Three text boxes marked <, > and =, allowing you to define a range
of values or a single value so that only entries that match the definition will be displayed.
Figure 2-14: Value Range/Specific Value Filter
The table is updated on the fly (the content is automatically updated after entering each number).
Examples for filtering the displayed results of BTS Equipments list by a range/value of Site ID:
a Enter 200 in the < text box. Only sites whose site ID is smaller than 200 will be displayed.
b Enter 200 in the < text box and 100 in the > text box. Only sites whose site ID is between 101 and
199 will be displayed.
c
Enter 200 in the = text box. Only the site with Site ID=200 (if exists in the relevant database) will
be displayed.
Date Range/Specific Date Filter: Three date options allowing you to define a range of dates or a single
value so that only entries that match the definition will be displayed.
StarSuite Portal User Manual
39
Chapter 2 - Using the StarSuite Portal
Map/List Views
Figure 2-15: Date Range/Specific Date Filter
Examples for filtering the displayed results of CPE Equipments list by a range/value of Last Connection
Date:
a Position the mouse on the Before option to open the calendar window. Select a date. Only CPEs
whose last connection date is before the specified date will be displayed.
b Position the mouse on the Before option to open the calendar window. Select a date. Position the
mouse on the After option to open a new calendar window and select another date (must be
after the selected Before date). Only CPEs whose last connection date is between the specified
dates will be displayed.
c
Position the mouse on the On option to open the calendar window. Select a date. Only CPEs
whose last connection date is at the specified date will be displayed.
The header color of a filtered column is changed to red.
To cancel column filtering, uncheck the Filters option in the column modification menu.
2.7.2.5
Resizing and Rearranging Columns
To resize a column, position the cursor on the border line between two columns headings. The cursor
changes into a double-headed arrow. Click and drag the cursor to the left or to the right to increase or
decrease the size of a column.
To rearrange column sequence, click and drag a column header to the new desired position.
2.7.3
List Types
This section includes:
Available List Types
BTS Equipments List
CPE Equipments List
Pre-Defined Searches Lists
StarSuite Portal User Manual
40
Chapter 2 - Using the StarSuite Portal
2.7.3.1
Map/List Views
Available List Types
The available list types as displayed on the title bar of search results are:
Table 2-6: List Types
Search Type
List Type
Simple and Custom Searches
Simple BTS Search
BTS Equipments
Simple CPE Search
CPE Equipments
Custom BTS Search
BTS Equipments
Custom CPE Search
CPE Equipments
4Motion BTS Searches
Top 20 UL throughput
BTS by Throughput
Top 20 DL throughput
Bottom 20 UL throughput
Bottom 20 DL throughput
Top 20 CPEs no.
BTS by CPE Number
Bottom 20 CPEs no.
Top 20 UL utilization
BTS by Air Link Utilization (ALU)
Top 20 DL utilization
Bottom 20 UL utilization
Bottom 20 DL utilization
Bottom 10 Uptime
BTS regarding current uptime
Extreme BTS Searches
Top 10 Airlink Problems
Top 10 BTS with User Airlink Connection
Failure
Top 10 Satellite Sync Problem
Top 10 BTS with Minimum 4 Satellite Sync
Failure
Top 10 Hold Over Entered
Top 10 BTS Hold Over Entered
Top 10 KeepAlive
Top 10 BTS with Authentication Server Keep
Alive TO
CPE Searches
CPEs Registered Since
CPEs Registered since
CPEs Rebooted Since
CPEs Rebooted since
StarSuite Portal User Manual
41
Chapter 2 - Using the StarSuite Portal
Map/List Views
Table 2-6: List Types
2.7.3.2
Search Type
List Type
CPEs Not Updated Since
CPEs not Updated since
ACS CPEs without Lat/Long
CPEs without Lat/Long
ACS CPEs without Address
CPEs without Lat/Long
BTS Equipments List
This section includes:
BTS Equipments List Parameters
Switching to Map View for a selected BTS
Performing Cut-through to BTS Management Applications
2.7.3.2.1
BTS Equipments List Parameters
The default BTS Equipment list includes the following parameters for each BTS:
Site ID
Site Name
NE Type
Management IP Address
Management Status
Operational State
Alarm State
Software Version
Site Coordinates (Lat(deg)/Long(deg)/alt(m) with a Show On Map link for sites with known
coordinates. For details refer to Section 2.7.3.2.2 below.
Serial Number
Management/Performance Application with cut-through links to relevant management applications.
For details refer to Section 2.7.3.2.3 below.
Configuration History link (applicable only for 4Motion devices) for viewing configuration changes
history of the site. For details refer to “Configuration History” on page 43.
2.7.3.2.2
Switching to Map View for a selected BTS
Next to the Site Coordinates details of each site with known coordinates, there is a Show On Map link.
Click on the link to switch to Map view, with the selected BTS icon in the center of the displayed map.
StarSuite Portal User Manual
42
Chapter 2 - Using the StarSuite Portal
2.7.3.2.3
Map/List Views
Performing Cut-through to BTS Management Applications
The Management/Performance Application column includes cut-through links to AlvariSTAR and
StarQuality.
Click on the AlvariSTAR cut-through link to open in a separate window the entry AlvariSTAR Device
Manager screen (BTS View) for the selected site.
Click on the StarQuality cut-through link to open in a separate window the StarQuality in the specific
BTS context.
2.7.3.2.4
Configuration History
Click on the Configuration History link to open the Configuration History Request window.
Figure 2-16: The Configuration History Request Window
The Configuration History Request window enables defining the time interval and filtering parameters
for a Configuration History Report detailing the relevant changes in the configuration of a selected
device.
In the Interval section, select Start Date and End Date for the report.
Select the Filter SYSTEM Logs to include in the report only changes made by an AlvariSTAR user using
the AlvariSTAR server installed on the same station as the StarSuite Portal server. De-select this option to
include also all changes made by the system. These includes changes initiated by the device itself (as a
response to various events), changes made via Telnet/SNMP and changes made using other AlvariSTAR
servers. The default is selected (checked).
Select Summarized Report to show in the report only the changes between the requested Start Date
and End Date. For example, if a certain parameter was modified more than once during the specified
interval, only a single change entry will be provided, indicating the last relevant change (the value in
Changed From will be the value at Start Date). If following any series of changes the status of a certain
parameter at End Date is the same as in Start Date, no change will be indicated in the report. De-select
the Summarized Report option to include in the report all changes history. The default is de-selected
(unchecked).
StarSuite Portal User Manual
43
Chapter 2 - Using the StarSuite Portal
Map/List Views
Click on the OK button to generate the requested report.
Figure 2-17: The Configuration History Report
The Configuration History Report title includes identification details:
BTS Name
BTS Number
Address (IP address used for management)
Interval of the report (From-To)
For each change included in the report the following details are provided:
Parameter
Description
Group
The type of entity that was changed.
Instance
Identification of the specific entity that was changed.
Parameter
The specific parameter that was changed (applicable only for MOD
operation).
Operation
Type of change: ADD, DEL (Delete), MOD (Modify).
Changed From
The value of the parameter before the change (applicable only for MOD
operation). In a Summarized Report this is the value at the Start Date of
the report.
Changed To
The value of the parameter after the change (applicable only for MOD
operation). In a Summarized Report this is the value after the last change
to the parameter during the report’s interval.
Changed By
The user that made the change. In a Summarized Report this is the user
that made the last change to the relevant parameter.
StarSuite Portal User Manual
44
Chapter 2 - Using the StarSuite Portal
2.7.3.3
Map/List Views
Parameter
Description
Changed At
Time and date of the change. In a Summarized Report this is the time
and date of the last change to the relevant parameter.
Record Data
Click on the Record Data link to open a Configuration History Record
Data window providing all configuration details of the relevant Group’s
Instance.
Link To
A Go To section cut-through link to the relevant configuration page in
the Device Manager (or to the general Site page if there is no
configuration page for the Group).
CPE Equipments List
This section includes:
CPE Equipments List Parameters
Performing Cut-through to CPE Management Applications
2.7.3.3.1
CPE Equipments List Parameters
The default CPE Equipments list includes the following parameters for each CPE:
MAC Address
Serial Number
Product Model
Last Connection Date
Serving BS ID
Map Location with a Show On Map cut-through link. For details refer to Section 2.7.3.3.2 below.
Software Version
Management/Performance Application with cut-through links to relevant management applications.
For details refer to Section 2.7.3.3.3 below.
2.7.3.3.2
Switching to Map View for a selected CPE
Click on the Show On Map cut-through link to view the CPE’s location on a map. This is applicable only
if at least one of the following conditions is fulfilled:
The CPE is served by a BTS with known coordinates.
The geolocation information (Latitude/Longitude) of the CPE is stored in the system (see “Using the
CPEs Import Utility” on page 22).
The Latitude/Longitude information is not available, but the address information of the CPE is stored
in the system (see “Using the CPEs Import Utility” on page 22) and the system can find the
geolocation based on this address using Bing Maps Geolocation Services (see more details below).
StarSuite Portal User Manual
45
Chapter 2 - Using the StarSuite Portal
Map/List Views
The system will display messages indicating missing information.
If only the address of the CPE is known, the system will try finding its coordinates using Bing Maps
Geolocation Services:
If the geolocation service fails, the system will notify the user about the existence of an address which
cannot be mapped to latitude/longitude coordinates, and will display the CPE in the center of the
serving sector.
If the geolocation services returned one result, the latitude/longitude coordinates will be stored and
the CPE will be displayed in its geolocation. This CPE will no longer be available in the ACS CPEs
without Lat/Long search results.
If the geolocation services returned more than one result, a list of options will be presented to the
user. The latitude/longitude coordinates of the selected location will be stored and the CPE will be
displayed in the selected geolocation. This CPE will no longer be available in the ACS CPEs without
Lat/Long search results.
The system will display for several seconds a blinking CPE icon at its geolocation (if available). Otherwise,
the icon will be displayed at the center of the serving sector. The contour of the serving sector also will
also blink together with the CPE’s icon.
2.7.3.3.3
Performing Cut-through to CPE Management Applications
The Management/Performance Application column includes cut-through links to StarACS and
StarQuality.
Click on the StarACS cut-through link to open in a separate window the StarACS in the specific CPE
context.
Click on the StarQuality cut-through link to open the StarQuality in the specific CPE context.
2.7.3.4
Pre-Defined Searches Lists
The lists for pre-defined searches are:
4Motion BTS searches: A list with up to 20 entries (up to 10 entries for Bottom 10 Uptime search),
providing for each BTS the following details:
»
Site Name
»
Management IP Address
»
Management/Performance Application cut-through links
»
Site Coordinates with Show On Map link (if applicable)
»
The value of the relevant search parameter (Throughput, Air Link Utilization, CPE Count, Uptime)
that is used also as sorting parameter.
Top searches are sorted in descending order, bottom searches are sorting in ascending order.
StarSuite Portal User Manual
46
Chapter 2 - Using the StarSuite Portal
Map/List Views
Extreme BTS searches: A list with up to 10 entries, providing for each BTS the same details as for a
simple BTS search (see “BTS Equipments List Parameters” on page 42), plus the number of relevant
events (Number of Events) that is used also as sorting parameter. Top searches are sorted in
descending order.
CPE
»
CPEs Registered Since: CPE Registered since list containing all CPEs registered since the specified
date, providing for each CPE the following details:
◊
Serial Number
◊
MAC Address
◊
Creation Date (the date when the CPE was added to the ACS database)
◊
Serving BS ID
◊
Map Location with a Show On Map cut-through link. For details refer to Section 2.7.3.3.2.
◊
Management/Performance Application with cut-through links to relevant management
applications. For details refer to Section 2.7.3.3.3.
»
◊
Product Model
◊
Last Connection Date
◊
Software Version
CPEs Rebooted Since: CPE Registered since list containing all CPEs rebooted since the specified
date, providing for each CPE the following details:
◊
MAC Address
◊
Serial Number
◊
Product Model
◊
Last Connection Date
◊
Serving BS ID
◊
Map Location with a Show On Map cut-through link. For details refer to Section 2.7.3.3.2.
◊
Software Version
◊
Management/Performance Application with cut-through links to relevant management
applications. For details refer to Section 2.7.3.3.3.
◊
»
Reboot Count
CPEs Not Updated Since: CPE not Updated since list containing all CPEs not updated since the
specified date, providing for each CPE the following details:
◊
Serial Number
StarSuite Portal User Manual
47
Chapter 2 - Using the StarSuite Portal
Map/List Views
◊
MAC Address
◊
Last Connection Date
◊
Serving BS ID
◊
Map Location with a Show On Map cut-through link. For details refer to Section 2.7.3.3.2.
◊
Management/Performance Application with cut-through links to relevant management
applications. For details refer to Section 2.7.3.3.3.
»
◊
Product Model
◊
Software Version
ACS CPEs without Lat/Long: A list containing CPEs that were loaded using the CPEs Import utility
that have address information and do not have complete latitude and longitude information. The
list includes also CPEs that were loaded with address information and later the address
information was deleted (either by loading an “ADDR” CPEs file with null information for the CPE
or through the location edit feature). The list provides for each CPE the following details:
»
◊
Serial Number
◊
Address
◊
City
◊
Country
◊
Latitude
◊
Longitude
◊
Edit location link (see Editing CPE Location Details below)
ACS CPEs without Address: A list containing CPEs that were loaded using the CPEs Import utility
that have latitude and longitude information and do not have complete address information. The
list includes also CPEs that were loaded with latitude/longitude information and later the
latitude/longitude information was deleted (either by loading a “LATLONG” CPEs file with null
information for the CPE or through the location edit feature). The list provides for each CPE the
following details:
◊
Serial Number
◊
Address
◊
City
◊
Country
◊
Latitude
◊
Longitude
StarSuite Portal User Manual
48
Chapter 2 - Using the StarSuite Portal
◊
2.7.3.5
Map/List Views
Edit location link (see Editing CPE Location Details below)
Editing CPE Location Details
Click on the Edit location link of a CPE entry in either CPEs without Lat/Long or CPEs without Address
to open the Edit CPE location window.
Figure 2-18: Edit CPE location
The Edit CPE location window enables updating/adding/deleting address (Address, City, Country) and
geolocation (Latitude, Longitude) information for the CPE.
Note that even if you delete all location information for a CPE it will remain in the ACS CPEs without
Address/ACS CPEs without Lat/Long search results. CPEs will be removed from these lists only if both
address and geolocation details exist (either through manual editing or through geolocating an address
using Bing Maps Geolocation Services).
Click OK to store the changes in the management system.
Click Cancel to cancel the changes.
Click Update location to try geolocating the updated address:
If the geolocation service returned one result, the Latitude and Longitude information will be updated
accordingly. Click OK to store the changes. The CPE will no longer be included in search results for
ACS CPEs without Address/ACS CPEs without Lat/Long.
If the geolocation service returned more than one results, you will be presented by a list of options.
After selecting the preferred option, the Latitude and Longitude information will be updated
accordingly. Click OK to store the changes. The CPE will no longer be included in search results for
ACS CPEs without Address/ACS CPEs without Lat/Long.
If the geolocation service did not return any result, you will get a message indicating the failure to
geolocate the specified address.
StarSuite Portal User Manual
49
Chapter 2 - Using the StarSuite Portal
2.7.4
Map/List Views
Map View
This section includes:
Map View Controls
Map Refresh and Detach Controls
Address Search
Map Overlay
Viewing Site Details
2.7.4.1
Map View Controls
Figure 2-19: Map View
The standard map view controls are located on the top left corner of the map:
Table 2-7: Map View Controls
Control
Description
Pan
Click once to pan the map in the selected direction. To pan
continuously, click and hold in the required direction. Alternatively, click
and hold anywhere in the map area and drag in the required direction.
Zoom In (-)/Zoom Out (+)
Click once to zoom in/zoom out. You can also place the mouse over the
Zoom In/Zoom Out controls to open the zoom slider.
StarSuite Portal User Manual
50
Chapter 2 - Using the StarSuite Portal
Map/List Views
Table 2-7: Map View Controls
Control
Description
View Type selection
Place the mouse over the selected view type to open the view type
selection window. The available views are:
Road
Bird’s eye (enabling control of showing/hiding labels and of angled
views)
Automatic (best view type according to zoom in/out status)
2.7.4.2
Map Refresh and Detach Controls
The Refresh and Detach icons are located above the map:
Table 2-8: Map Refresh and Detach Controls
Icon
Description
Detach Mode - opens the map in a new
window. Click Esc to return.
Refresh - refreshes the overlay information.
2.7.4.3
Address Search
The address search text boxes are located on the top right corner of the map. Enter required address
details and click Search. The relevant map will be displayed, centered on the entered address, having
the standard location icon pointing to exact address on map.
2.7.4.4
Map Overlay
Devices with known coordinates are presented on the map by suitable icons. Icon’s color shall represent
summarized alarm severity of the specific device, using AlvariSTAR set of colors. For co-located (or
nearly-located) devices, the number of devices is displayed, with a color representing the highest
summarized alarm severity. You can click on the icon to open separate icons for the
co-located/nearly-located devices.
For each BTS, the associated BSs (sectors) are presented as equilateral triangles pointing outward of the
BTS icon, at the approximate sector’s heading and width as defined in the device. In the current release,
sector’s icon size will represent a fixed radio range: 500 meters for 4Motion, 2 km for Extreme.
Place the mouse over a sector to open an information bubble with BS details (BS ID and Sector Name).
Click on the Refresh button to refresh overlay information.
StarSuite Portal User Manual
51
Chapter 2 - Using the StarSuite Portal
2.7.4.5
Map/List Views
Key Performance Indicators
BS’s sector color is according to its current Key Performance Indicator (KPI) value. The Color Sectors
based on controls above the map enables selection of the KPI to be used for each device family.
2.7.4.5.1
4Motion Key Performance Indicators
KPIs for 4Motion devices are based on information recorded for the last 15-minutes period for which
there is available data regarding the relevant BS. Details on KPIs and their representative colors are
shown below.
Table 2-9: 4Motion KPI Details
KPI
Full Name
Name in StarQuality
SINR
SINR distribution Downlink less than
5dB
SINR Distribution Downlink - SINR <= 4dB
ALU
DL Data Zone utilization
DL Air Link Utilization, Data Zone
Throughput
Average BS Throughput
DL Throughput Total
Table 2-10: KPI Representative Colors
KPI
Units
Value
Color
SINR
%
0-10
Green
10-20
Yellow
20-30
Orange
30-40
Red
40-50
Purple
50 and above
Blue
0-30
Green
30-50
Yellow
50-70
Orange
70-80
Red
80-90
Purple
90-100
Blue
ALU
StarSuite Portal User Manual
%
52
Chapter 2 - Using the StarSuite Portal
Map/List Views
Table 2-10: KPI Representative Colors
KPI
Units
Value
Color
Throughput
bps
Above 8,000,000
Green
3,000,001-8,000,000
Yellow
2,000,001-3,000,000
Orange
1,000,001-2,000,000
Red
500,000-1,000,000
Purple
0-500,000
Blue
BS sectors are presented as a hollow triangle (Black line, no fill) in the following cases:
1 StarQuality is not included in the specific installation.
2 StarQuality does not have data regarding the specific BS in the last 15-minutes period.
2.7.4.5.2
Extreme Key Performance Indicators
KPIs for Extreme devices are based on real-time counters taken every 5 minutes from each device using
SNMP. Details on KPIs and their representative colors are shown below.
Table 2-11: Extreme KPI Details
KPI
Description
UL NACK
Uplink NACK rate. Computed using the following formula:
UL NACK = 100*SUM(NACK Frames/ACK Frames)/Number of MSs.
where:
NACK Frames=number of non-acknowledged uplink frames per MS during the
last 5 minutes interval.
ACK Frames= number of acknowledged uplink frames per MS during the last 5
minutes interval.
Note: if for a certain MS number of acknowledged frames is zero, the MS shall
not be taken into consideration when performing the average.
StarSuite Portal User Manual
53
Chapter 2 - Using the StarSuite Portal
Map/List Views
Table 2-11: Extreme KPI Details
KPI
Description
DL NACK
Downlink NACK rate. Computed using the following formula:
DL NACK = 100*SUM(NACK Frames/ACK Frames)/Number of MSs.
where:
NACK Frames=number of non-acknowledged downlink frames per MS during
the last 5 minutes interval.
ACK Frames= number of acknowledged downlink frames per MS during the last
5 minutes interval.
Note: if for a certain MS number of acknowledged frames is zero, the MS shall
not be taken into consideration when performing the average.
max(UL,DL NACK)
The maximum value of UL NACK and DL NACK (described above)
Table 2-12: KPI Representative Colors
KPI
Units
Value
Color
UL NACK
%
0-2.9999
Green
3-9.9999
Yellow
10 and above
Red
0-2.9999
Green
3-9.9999
Yellow
10 and above
Red
0-2.9999
Green
3-9.9999
Yellow
10 and above
Red
DL NACK
max (UL,DL NACK
%
%
BS sectors are presented as a hollow triangle (black line, no fill) if the KPI value, or one of the KPI values
for max(UL,DL NACK), is not available for the last 5 minutes interval:
2.7.4.6
Viewing Site Details
Click on a device’s icon to open the Site Details bubble.
The Site Details bubble comprises the following tabs:
Site Tab
Sectors Tab
KPIs Tab
StarSuite Portal User Manual
54
Chapter 2 - Using the StarSuite Portal
2.7.4.6.1
Map/List Views
Site Tab
Figure 2-20: Site Tab (4Motion)
Click on the AlvariSTAR cut-through link to open in a separate window the AlvariSTAR application in
the specific device’s context.
Click on the StarQuality cut-through link to open in a separate window the StarQuality application (if
applicable) in the specific device’s context.
2.7.4.6.2
Sectors Tab
Figure 2-21: Sectors Tab (4Motion)
If needed, use the scroll bar to view the details of available sectors (BSs).
Click on the StarQuality cut-through link to open in a separate window the StarQuality application (if
applicable) in the specific sector (BS) context.
Click on the Show Neighbor(s) link (applicable only for 4Motion devices) to visualize the sectors (BSs)
associated as neighbors to the sector (B)S. If there are any neighbor(s) defined for the sector, the system
will zoom and move the map to an appropriate resolution and location so that each involved sector is
clearly visible, and display a highlighting animation of the sector together with its neighbors for several
seconds by drawing the contour of the involved sectors.
StarSuite Portal User Manual
55
Chapter 2 - Using the StarSuite Portal
Map/List Views
Check the Show CPEs check-box to display the CPEs served by the sector (BS). The default is
de-selected (CPEs not shown). If Show CPEs option is selected, a CPE icon will appear on the right side
of the option. Click on the CPE icon to enable selection of icon color for CPEs served by this sector. Only
“connected” CPEs will be displayed: “Connected” 4Motion CPEs include all CPEs available in the
database of StarQuality that had at least one collection in the last 24 hours (including CPEs not available
in the database of StarACS). “Connected” Extreme CPEs include all CPEs available in the database of
AlvariSTAR (including CPEs not available in the database of StarACS). Icons for CPEs with a known
geolocation served by the sector will be displayed in their defined geolocations. For CPEs without a
known geolocation, a CPE icon will be displayed at the center of the serving sector’s area. A single icon
will be shown for two or more CPEs without a known geolocation or in the same geolocation, with the
number of CPEs indicated on the icon. Click on the icon to view CPE(s) details:
If the number indicating the quantity of CPEs is higher than 10, a bubble with CPEs Information table
will open displaying main details for each CPEs. By default the table is sorted by ascending order of
CPEs Serial Number.
If the number is 10 or lower, the CPEs display will be “expanded” with an icon for each CPE. Click on
a CPE icon to open a bubble with its details.
For a single CPE, click on the CPE icon to open a bubble with its details.
2.7.4.6.3
KPIs Tab
This section includes:
4Motion KPIs Tab
Extreme KPIs Tab
2.7.4.6.3.1
4Motion KPIs Tab
Figure 2-22: KPIs Tab (4Motion)
The 4Motion KPIs tab includes the following KPIs for each sector (based on StarQuality measurements):
SINR(%): SINR Distribution Downlink less than 5dB
Air Link Utilization(%): DL Data Zone Air Link Utilization
StarSuite Portal User Manual
56
Chapter 2 - Using the StarSuite Portal
Map/List Views
Throughput(kbps): Average BS DL Total Throughput
2.7.4.6.3.2
Extreme KPIs Tab
Figure 2-23: KPIs Tab (Extreme)
Extreme KPIs (based on last received values of SNMP parameters/real-time counters) include:
BTS KPI includes: Current number of satellites in use.
Sector KPIs include (per sector/BS)
»
Average sector CINR of UL for all served MSs(dB): Sum over all MSs of last Uplink CINR
measurement divided by the number of served MSs.
»
Average sector CINR of DL for all served MSs(dB): Sum over all MSs of last Downlink CINR
measurement divided by the number of served MSs.
»
UL modulation rate number in use per sector: Rounded sum over all MSs of last Uplink
Modulation Number divided by the number of served MSs.
Table 2-13: Uplink Modulation Number
Rate
Modulation Number
QPSK-CTC-1/2 REP4
1
QPSK-CTC-1/2 REP2
2
QPSK-CTC-1/2
3
QPSK-CTC-3/4
4
QAM16-CTC-1/2
5
QAM16-CTC-3/4
6
QAM64-CTC-2/3
8
QAM64-CTC-3/4
9
StarSuite Portal User Manual
57
Chapter 2 - Using the StarSuite Portal
Map/List Views
Table 2-13: Uplink Modulation Number
Rate
Modulation Number
QAM64-CTC-5/6
10
»
DL modulation rate number in use per sector: Rounded sum over all MSs of last Uplink
Modulation Number divided by the number of served MSs.
Table 2-14: Downlink Modulation Number
Rate
Modulation Number
QPSK-CTC-1/2 REP4, MIMO A
1
QPSK-CTC-1/2 REP2, MIMO A
2
QPSK-CTC-1/2, MIMO A
3
QPSK-CTC-3/4, MIMO A
4
QAM16-CTC-1/2, MIMO A
5
QAM16-CTC-3/4, MIMO A
6
QAM64-CTC-2/3, MIMO A
8
QAM64-CTC-3/4, MIMO A
9
QAM64-CTC-5/6, MIMO A
10
QPSK-CTC-1/2 REP4, MIMO B
11
QPSK-CTC-1/2 REP2, MIMO B
12
QPSK-CTC-1/2, MIMO AB
13
QPSK-CTC-3/4, MIMO B
14
QAM16-CTC-1/2, MIMO B
15
QAM16-CTC-3/4, MIMO B
16
QAM64-CTC-2/3, MIMO B
18
QAM64-CTC-3/4, MIMO B
19
QAM64-CTC-5/6, MIMO B
20
»
UL NACK rate: 100*SUM(NACK Frames/ACK Frames)/Number of MSs.
where:
NACK Frames=number of non-acknowledged uplink frames per MS during the last 5 minutes
interval.
ACK Frames= number of acknowledged uplink frames per MS during the last 5 minutes interval.
StarSuite Portal User Manual
58
Chapter 2 - Using the StarSuite Portal
Map/List Views
Note: if for a certain MS number of acknowledged frames is zero, the MS shall not be taken into
consideration when performing the average.
»
DL NACK rate: 100*SUM(NACK Frames/ACK Frames)/Number of MSs.
where:
NACK Frames=number of non-acknowledged downlink frames per MS during the last 5 minutes
interval.
ACK Frames= number of acknowledged downlink frames per MS during the last 5 minutes
interval.
Note: if for a certain MS number of acknowledged frames is zero, the MS shall not be taken into
consideration when performing the average.
»
UL Dropped bursts: 100*SUM(Dropped Frames/ACK Frames)/Number of MSs.
where:
Dropped Frames=number of dropped uplink frames per MS during the last 5 minutes interval.
ACK Frames= number of acknowledged uplink frames per MS during the last 5 minutes interval.
Note: if for a certain MS number of acknowledged frames is zero, the MS shall not be taken into
consideration when performing the average.
»
DL Dropped bursts: 100*SUM(Dropped Frames/ACK Frames)/Number of MSs.
where:
Dropped Frames=number of non-acknowledged downlink frames per MS during the last 5
minutes interval.
ACK Frames= number of acknowledged downlink frames per MS during the last 5 minutes
interval.
Note: if for a certain MS number of acknowledged frames is zero, the MS shall not be taken into
consideration when performing the average.
BS KPIs include (per BS):
»
UL Frame Utilization: 100*(UL Used Slots/UL Total Slots).
StarSuite Portal User Manual
59
Chapter 2 - Using the StarSuite Portal
Map/List Views
where:
UL Used Slots=number of slots used in the uplink during the last 5 minutes interval.
UL Total Slots=total number of slots available in the uplink during the last 5 minutes interval.
»
DL Frame Utilization: 100*(DL Used Slots/DL Total Slots).
where:
DL Used Slots=number of slots used in the downlink during the last 5 minutes interval.
DL Total Slots=total number of slots available in the downlink during the last 5 minutes interval.
StarSuite Portal User Manual
60
Chapter 2 - Using the StarSuite Portal
2.8
Managing Graphs, Charts and Reports
Managing Graphs, Charts and Reports
The Network section includes a customizabe set of operational, inventory and performance graphs,
charts, and reports for all managed entities.
This section includes:
The Settings Section
The Graphs/Charts/Reports Section
2.8.1
The Settings Section
This section includes:
Accessing the Settings Section
Setting the Columns Layout
Selecting Graphs/Charts/Reports to be Displayed
2.8.1.1
Accessing the Settings Section
By default the Settings section is hidden. To open the Settings section, click on the Show Settings button
(
) on the top right corner of the Network section. If needed, you may change the size of the
displayed Settings section by placing the mouse on the separation line between the Settings and graphs
sections and dragging it to the desired location.
Figure 2-24: The Settings Section
StarSuite Portal User Manual
61
Chapter 2 - Using the StarSuite Portal
2.8.1.2
Managing Graphs, Charts and Reports
Setting the Columns Layout
Use the Columns Layout slider to set the number of columns (1, 2, or 3) to be used for displaying
selected graphs/charts/reports. The default is 1 column. Note that the usability of this feature depends
on the relative width dedicated for the Network section (see “Re-sizing the Search and Network
sections” on page 26).
2.8.1.3
Selecting Graphs/Charts/Reports to be Displayed
By default, all supported graphs and charts are displayed, and all reports are not displayed (pending on
availability of the relevant management application).
The Graph Selector enables selecting/de-selecting graphs/charts/reports to be displayed.
To Select/De-Select Graphs:
1 Click on the Expand symbol to the left of the Graphs and Reports icon to view the available groups
(Operational, Performance (4Motion and Extreme), and Inventory, depending on availability of the
relevant management application). In addition to specific graphs/charts, the Inventory group includes
also the Reports from StarReport group, with 2 sub-groups: StarReport For StarACS and StarReport
for WiMAX.
2 Click on the Expand symbol to the left of a selected group icon to view the available
graphs/charts/reports belonging to the group. For each graph/chart/report the following parameters
are available:
»
Select/de-select check box (available also for each group)
»
Name
»
Description
3 Select/de-select specific groups or specific graphs/charts/reports according to your current
preferences.
4 To cancel all changes-click on the Cancel button.
5 To apply all changes-click on the Apply button.
To hide the Settings section, click on the Hide Settings button (
) on the top right corner of the
Network section.
2.8.2
The Graphs/Charts/Reports Section
This section includes:
Rearranging Order of Graphs/Charts
StarSuite Portal User Manual
62
Chapter 2 - Using the StarSuite Portal
Managing Graphs, Charts and Reports
Managing a Graph/Chart
Viewing Graph/Chart Detailed Information
2.8.2.1
Rearranging Order of Graphs/Charts
To rearrange order of graphs/charts, click and drag the title bar of a graph/chart to the new desired
position.
INFORMATION
2.8.2.2
It is easier to rearrange order of graphs/charts if you first hide them (see Section 2.8.2.2 below) so that
only the title bar is visible, and hide also the Search section (increase Network section to its maximum
size) to view all columns.
Managing a Graph/Chart
Each graph/chart includes the following controls:
Table 2-15: Graph/Chart Controls
Control
Description
Configure
Click to switch to configuration mode, allowing you to configure the following:
Refresh Rate (where applicable)
Duration: Applicable only for graphs. Each graph presents the relevant data using
a time axis, ascending to the right. The right-most point is the last refreshed one.
The left-most point is defined by the duration parameter.
Hide Legends check box. For all graphs and bar-charts the default is unchecked
(show legends). For all pie-charts the default is checked (hide legends).
Full Screen
Click to use full screen for displaying the graph/chart. Click Esc to exit full screen
mode.
Save Graph Configuration - Click the button (on the top right corner) to save the
current graph/chart configuration. The saved configuration will be the default for the
specific user.
Hide Graph - Click the button (on the top right corner) to hide the graph/chart. Only
the title bar with the control buttons is displayed. The Hide Graph - sign is replaced by
a Show Graph + sign, enabling to display again the graph/chart.
The following table provides details on supported graphs/charts and available values for configurable
parameter. Default values are emphasized (bold).
Table 2-16: Supported Graphs/Charts and Configurable Parameters (excluding Extreme
Performance Charts)
Name
Description
Refresh Rate
Duration
Operational Graphs and Charts
StarSuite Portal User Manual
63
Chapter 2 - Using the StarSuite Portal
Managing Graphs, Charts and Reports
Table 2-16: Supported Graphs/Charts and Configurable Parameters (excluding Extreme
Performance Charts)
Name
Description
Refresh Rate
Duration
Alarms Graph
Linear graphs of no. of open BTS
summarized alarms, classified per severity
vs. time.
10 seconds
1 minute
20 seconds
2 minutes
1 minute
5 minutes
2 minutes
10 minutes
5 minutes
20 minutes
10 minutes
1 hour
Data Source: AlvariSTAR
2 hours
5 hours
12 hours
24 hours
Alarms Distribution
Chart
A bar-chart of no. of currently-open BTS
summarized alarms, classified per severity.
Data Source: AlvariSTAR
10 seconds
N/A
20 seconds
1 minute
2 minutes
5 minutes
10 minutes
BTSs Management
Chart
A pie-chart of BTS management status
distribution.
Data Source: AlvariSTAR
1 minute
N/A
2 minutes
5 minutes
10 minutes
20 minutes
1 hour
StarSuite Portal User Manual
64
Chapter 2 - Using the StarSuite Portal
Managing Graphs, Charts and Reports
Table 2-16: Supported Graphs/Charts and Configurable Parameters (excluding Extreme
Performance Charts)
Name
Description
Refresh Rate
Duration
BTSs Management
Graph
Linear graphs of BTS management status
vs. time.
1 minute
1 minute
2 minutes
2 minutes
5 minutes
5 minutes
10 minutes
10 minutes
20 minutes
20 minutes
1 hour
1 hour
Data Source: AlvariSTAR
2 hours
5 hours
12 hours
24 hours
BTSs Operability
Chart
A pie-chart of BTS operational state
distribution.
Data Source: AlvariSTAR
1 minute
N/A
2 minutes
5 minutes
10 minutes
20 minutes
1 hour
BTSs Operability
Graph
Linear graphs of BTS operational state vs.
time.
Data Source: AlvariSTAR
1 minute
1 minute
2 minutes
2 minutes
5 minutes
5 minutes
10 minutes
10 minutes
20 minutes
20 minutes
1 hour
1 hour
2 hours
5 hours
12 hours
24 hours
StarSuite Portal User Manual
65
Chapter 2 - Using the StarSuite Portal
Managing Graphs, Charts and Reports
Table 2-16: Supported Graphs/Charts and Configurable Parameters (excluding Extreme
Performance Charts)
Name
Description
Refresh Rate
Duration
CPEs Registration
Graph
A linear graph of no. of number of
registered CPEs of the BTSs, vs. time.
15 minutes
1 hour
1 hour
2 hours
2 hours
5 hours
5 hours
12 hours
12 hours
24 hours
Applicable only for 4Motion CPEs
Data Source: StarQuality
24 hours
Inventory Charts
BTSs SW Versions
Chart
A pie chart of BTS SW versions distribution.
1 minute
Data Source: AlvariSTAR
2 minutes
N/A
5 minutes
10 minutes
20 minutes
1 hour
2 hours
5 hours
12 hours
24 hours
CPEs Types Chart
A pie-chart of CPEs type distribution.
1 minute
Data Source: StarACS
2 minutes
N/A
5 minutes
10 minutes
20 minutes
1 hour
StarSuite Portal User Manual
66
Chapter 2 - Using the StarSuite Portal
Managing Graphs, Charts and Reports
Table 2-16: Supported Graphs/Charts and Configurable Parameters (excluding Extreme
Performance Charts)
Name
Description
Refresh Rate
Duration
CPEs Profiles Chart
A pie-chart of CPEs service profiles
distribution.
1 minute
N/A
Data Source: StarACS
2 minutes
5 minutes
10 minutes
20 minutes
1 hour
Performance Graph - 4Motion
Total UL/ DL
Throughput Graph
A linear graph of BTSs total throughput
(sum of all relevant AUs throughput in the
network), separately for uplink and
downlink, vs. time.
15 minutes
(fixed)
Data Source: StarQuality
2 hours
5 hours
12 hours
24 hours
In Extreme Performance charts, the Refresh Rate is fixed at 5 minutes and the Duration parameter is not
applicable.
For each KPI, both a pie chart and a 3D bar chart are available.
Refer to “KPIs Tab” on page 56 for details on how relevant KPIs are computed.
StarSuite Portal User Manual
67
Chapter 2 - Using the StarSuite Portal
Managing Graphs, Charts and Reports
Table 2-17: Supported Extreme Performance Charts
Name
Description
Number of Satellites in Use
A pie-chart/3D bar-chart displaying the percentage/number of
devices with the "Current number of satellites in use" KPI having
the following values:
Between 0 and 3
4
5
6
7
8
9
10
11 or more
The system shall also represent on the chart the
percentage/number of devices for which the system was unable to
collect this KPI during the last 5 minutes interval.
Average sector CINR of UL for All
MSs
A pie-chart/3D bar-chart displaying the percentage/number of
sectors with the "Average sector CINR of UL for all served MSs"
KPI having the following values:
Between 0 and 4
Between 5 and 10
Between 11 and 14
Between 15 and 20
21 or more
The system shall also represent on the chart the
percentage/number of sectors for which the system was unable to
collect this KPI during the last 5 minutes interval.
StarSuite Portal User Manual
68
Chapter 2 - Using the StarSuite Portal
Managing Graphs, Charts and Reports
Table 2-17: Supported Extreme Performance Charts
Name
Description
Average Sector CINR of DL for All
MSs
A pie-chart/3D bar-chart displaying the percentage/number of
sectors with the "Average sector CINR of UL for all served MSs"
KPI having the following values:
Between 0 and 4
Between 5 and 10
Between 11 and 14
Between 15 and 20
21 or more
The system shall also represent on the chart the
percentage/number of sectors for which the system was unable to
collect this KPI during the last 5 minutes interval.
UL Modulation Number in Use
A pie-chart/3D bar-chart displaying the percentage/number of
sectors with the "UL modulation rate number in use per sector"
KPI for each UL Rate.
Note: There is no rate with modulation number 7. If the calculated
KPI is between 6.5 and 7 inclusive, it is considered as 6
(QAM16-CTC-3/4). If the calculated KPI is between 7 and 7.5, it is
considered as 8 (QAM64-CTC-2/3).
The system shall also represent on the chart the
percentage/number of sectors for which the system was unable to
collect this KPI during the last 5 minutes interval.
DL Modulation Number in Use
A pie-chart/3D bar-chart displaying the percentage/number of
sectors with the "DL modulation rate number in use per sector"
KPI for each DL Rate.
Note: There is no rate with modulation number 7. If the calculated
KPI is between 6.5 and 7 inclusive, it is considered as 6
(QAM16-CTC-3/4, MIMO A). If the calculated KPI is between 7
and 7.5, it is considered as 8 (QAM64-CTC-2/3, MIMO A).
There is also no rate with modulation number 17. If the calculated
KPI is between 16.5 and 17 inclusive, it is considered as 16
(QAM16-CTC-3/4, MIMO B). If the calculated KPI is between 17
and 17.5, it is considered as 18 (QAM64-CTC-2/3, MIMO B).
The system shall also represent on the chart the
percentage/number of sectors for which the system was unable to
collect this KPI during the last 5 minutes interval.
StarSuite Portal User Manual
69
Chapter 2 - Using the StarSuite Portal
Managing Graphs, Charts and Reports
Table 2-17: Supported Extreme Performance Charts
Name
Description
UL NACK Rate
A pie-chart/3D bar-chart displaying the percentage/number of
sectors with the "UL NACK rate" KPI having the following values:
Between 0 and 2.9999 (%)
Between 3 and 9.9999 (%)
10 or more
The system shall also represent on the chart the
percentage/number of sectors for which the system was unable to
collect this KPI during the last 5 minutes interval.
DL NACK Rate
A pie-chart/3D bar-chart displaying the percentage/number of
sectors with the "DL NACK rate" KPI having the following values:
Between 0 and 2.9999 (%)
Between 3 and 9.9999 (%)
10 or more
The system shall also represent on the chart the
percentage/number of sectors for which the system was unable to
collect this KPI during the last 5 minutes interval.
UL Dropped Bursts
A pie-chart/3D bar-chart displaying the percentage/number of
sectors with the "UL Dropped bursts" KPI having the following
values:
Between 0 and 3
Between 4 and 5
6 or more
The system shall also represent on the chart the
percentage/number of sectors for which the system was unable to
collect this KPI during the last 5 minutes interval.
DL Dropped Bursts
A pie-chart/3D bar-chart displaying the percentage/number of
sectors with the "DL Dropped bursts" KPI having the following
values:
Between 0 and 3
Between 4 and 5
6 or more
The system shall also represent on the chart the
percentage/number of sectors for which the system was unable to
collect this KPI during the last 5 minutes interval.
2.8.2.3
Viewing Graph/Chart Detailed Information
Mouse hovering over any active area of a graph/chart triggers the display of additional data:
StarSuite Portal User Manual
70
Chapter 2 - Using the StarSuite Portal
Managing Graphs, Charts and Reports
Chart: Legend and actual value of the area under mouse hovering.
Graph: Actual time and Y-axis values for the time-axis value that matches the point of mouse
hovering.
2.8.2.4
Managing Reports
Each Report includes the following controls:
Table 2-18: Report Controls
Control
Description
Hide Report - Click the button (on the top right corner) to hide the displayed report.
Only the title bar with the control button is displayed. The Hide Report - sign is
replaced by a Show Report + sign, enabling to display again the report.
Show Entire Report - Click the button (on the bottom right corner) to view the full
report in a separate browser window. According to specific report type, the entire
report may include additional (detailed) information (see details in descriptions of
reports below).
Detach - Click to view the displayed report in a separate window.
Schedule - Click to open the Scheduler window, allowing you to change the refresh
rate for the report. The available options are:
15 minutes
30 minutes
1 hour
2 hours
3 hours
6 hours
12 hours
Daily
The default for all reports is 1 hour. The system will remember modified refresh
intervals for each user.
Refresh - Click to refresh the displayed report. A “Generating the report. Please
wait...” message will be displayed together with a ? icon. Click on the ? icon to cancel
the refresh task.
2.8.2.5
Supported Reports
Reports are applicable only for 4Motion devices.
StarSuite Portal User Manual
71
Chapter 2 - Using the StarSuite Portal
2.8.2.5.1
Managing Graphs, Charts and Reports
StarReport For StarACS Reports
Table 2-19: Supported StarReport For StarACS Reports
Name
Description
General CPE Inventory Report
A CPE Inventory Last Updated chart providing a vertical bar display
of the quantity of CPEs vs. Update Date, over the whole network.
Possible interval values for Update Date are:
Less than 1 day
Between 1 and 2 days
Between 2 and 5 days
More than 5 days
The full report includes also the General CPE Inventory Report, a
table providing extensive inventory details per CPE.
CPE Inventory by Type & SW
Version
A pie-chart display of the quantity of CPEs by Type and SW
Version, over the whole network.
The full report includes also the CPE Inventory by software version
table, providing per CPE details of Serial Number, MAC Address
and Running SW Version.
CPE Inventory Last Updated
A CPE Inventory Last Updated chart providing a vertical bar display
of the quantity of CPEs vs. Update Date, over the whole network.
Possible interval values for Update Date are:
Less than 1 day
Between 1 and 2 days
Between 2 and 5 days
More than 5 days
The full report includes also the CPE Inventory Last Updated table,
providing per CPE details such as Running SW Version, Uptime and
Updated Date.
Duplicate CPEs
A Duplicate CPEs by Serial Number table providing details for
duplicate Serial Numbers, providing the first 10 duplicates (if they
exist).
The full report includes also the Duplicate CPEs by MAC Address
table providing similar details for duplicate MAC Addresses
StarSuite Portal User Manual
72
Chapter 2 - Using the StarSuite Portal
Managing Graphs, Charts and Reports
Table 2-19: Supported StarReport For StarACS Reports
Name
Description
Number of CPEs per BS
This report provides a vertical bar of Number of CPEs per BS for
different quantities. The possible quantities of CPEs are:
0 - 10
11 - 20
21 - 30
31 - 40
41 - 50
51 - 60
61 - 70
71 - 80
81 - 90
2.8.2.5.2
Top N Serving BS ID
A table providing BS ID and number of CPEs details of top 10
Serving BS IDs based on number of CPEs served by each BS.
Bottom N Serving BS ID
A table providing BS ID and number of CPEs details of bottom 10
Serving BS IDs based on number of CPEs served by each BS.
StarReport for WiMAX Reports
Table 2-20: Supported StarReport for WiMAX Reports (from AlvariSTAR)
Name
Description
Total Network Inventory per
Location
A Total Network Inventory per Location Chart, providing a vertical
bar display of the number of Network Elements (NE) of each type
per location.
The full report includes also the Total Network Inventory per
Location table, providing the number of Network Elements (NE) of
each type per location.
Detailed Network Inventory per
Location
Detailed Network Inventory per Location table, providing the
number of hardware components (such as various cards, ODUs,
Antennas, GPS) for each Network Elements per location.
NPU Card Details per Location
A Number of BTS vs. Hardware Version/Revision Number pie-chart,
providing NPU by hardware version-revision pair distribution over
the entire network.
The full report includes also:
Number of BTS vs. Software Version pie-chart, providing NPU
by software version distribution over the entire network.
NPU Card HW Details per Location table, providing various NPU
inventory details per location.
StarSuite Portal User Manual
73
Chapter 2 - Using the StarSuite Portal
Managing Graphs, Charts and Reports
Table 2-20: Supported StarReport for WiMAX Reports (from AlvariSTAR)
Name
Description
AU Card Details per Location
AU HW Distribution pie-chart, providing AU by Hardware
Version/Revision Number pair distribution over the entire network.
The full report includes also:
AU Card Details per Location table, providing various AU
inventory details for each AU per location.
AU Type Distribution pie-chart, providing AU by type
distribution over the entire network.
AU SW Distribution pie-chart, providing AU by Boot
Version/Operating Version pair distribution over the entire
network.
ODU Details per Location
ODU Type Distribution pie-chart, providing ODU by type
distribution over the entire network.
The full report includes also ODU Details per Location table,
providing inventory details for each ODU per location.
Antenna Type per Location
A Antenna Types Distribution pie-chart, providing Antenna by
product type distribution over the entire network.
The full report includes also Antenna Types per Location table,
providing the number of antennas for each product type defined
per location.
Quick View Configuration
A Quick View Configuration table providing for each BS selected
configuration details for some General, Permutation, Map, Power
Control and Basic Rate parameters.
Detailed View Configuration
A Detailed View Configuration table providing for each BS
comprehensive configuration details for Frame Structure,
Permutation, Basic Rate, Power Control, Mobility and Beam
Forming parameters.
Neighboring Relation
Configuration
A Neighboring Relation Configuration table providing for each BS
the defined triggers (type and value) for each defined neighbor.
Consistency Check
Configuration
Consistency Check Configuration tables providing actual and
desired values per BS for each parameter from Frame Structure,
Basic Rate, Power Control, Mobility, Beam Forming
Upon clicking the Refresh button in a per location report, you will be prompted to specify a filter for a
specific NE Type (in Network Inventory reports) or a specific BTS (by its IP Address). Do not specify any
value to generate a report for the entire managed network.
StarSuite Portal User Manual
74