1
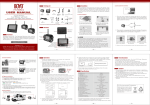
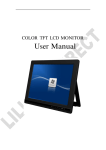
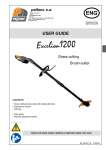
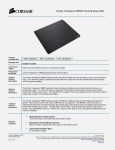
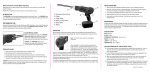
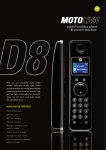
TFT LCD COLOR
MONITOR
OPERATION MANUAL
Mode 1
Mode 2
Mode 3
DEAR CUSTOMERS
Thanks you for purchasing 8”TFT COLOR MONITOR,We hope that you will have
the enjoyment of your new mini color TFT LCD.
SAFEGUARDS AND PRECAUTIONS
1、Please adopt the matched home AC power adapter.
2、Do not remove the rear panel of this product. If in need of service, please call a
qualified technician.
3、Keep away form strong light while using this product so as to obtain the
clearest and the most colorful picture.
4、Do not seriously impact or drop the product onto the ground.
5、Don’t use chemical solutions to clean this TFT LCD set.Please simply wipe with
a clean soft cloth to keep the brightness of the surface.
CONTENTS
1
FEATURE-----------------------------------------------
2
CONNECTION-----------------------------------------
3
REMOTE CONTROLLER----------------------------
4
MENU OPERATION-----------------------------------
5
PARAMETER-------------------------------------------
6
ACCESSORIES-----------------------------------------
7
TROUBLE SHOOTING-------------------------------
1、 FEATURE
Mode 1
13
1.
POWER.:ON/OFF
2. Indication Light for power supply: Red light means stand by ,Green light
means to work.
3.
PC/AV:VGA , AV switch.
4.
:Program selection key or using to select function in OSD.
5.
:Program selection key or using to select function in OSD.
6.
IR Sensor
7.
MENU:Display MENU key;
8. VOL+: Volume up or using to adjust the number of selected function in OSD.
9. VOL-: Volume down or using to adjust the number of selected function in
OSD.
10. 14P SKS cable input jack
11. 12V power input jack
12. Folding Bracket
13. Touch pen
Mode 2
10
1. -:Volume down key or used to move cursor down in OSD mode
2. +:Volume up key or used to move the cursor up in OSD mode
3. <:Program selection key or used to select function in OSD mode
4. M/E:Display MENU key
5. >:Program selection key or used to select function in OSD mode
6. A/V:VGA, AV switch
7. POWER:ON/OFF
8. 14P SKS input jack
9. DC 12V input jack
10. Touch pen
Mode 3
10
11
12
9
1.
2.
3.
4.
8 7
654321
Indication Light for power supply: Red light means stand by ,Green light means
to work.
VOL+: Volume up key or used to move cursor down in OSD mode
VOL-: Volume down key or used to move the cursor up in OSD mode
>: Program selection key or used to select function in OSD mode
5. MENU:Display MENU key
6. < : Program selection key or used to select function in OSD mode
7. A/V: VGA, AV switch
8. POWER:ON/OFF
9. IR Sensor
10. DC 12V input jack
11. 14P SKS input jack
12. Touch pen
2. CONNECTION
Mode 1
Connect USB port of PC
only use for touch screen
date transmission.
VGA signal input
White Audio input
Yellow Video2 input
Yellow Video1 input
Connect to DC
12V power supply
Mode 2& Mode 3
DC 12V input
3、REMOTE
CONTROLLER
3、
: POWER ON/OFF
: MUTE
: Display inputted mode
: To activate OSD menu
: Volume down or to adjust the value of setting function
: Volume up or to adjust the value of setting function
: To select function on OSD
: To select function on OSD
: AV1, AV2, PC switch
~
: Number key, no use
: Unit, double-digit, three-Picture, no use.
: NO USE
: NO USE
:
NO USE
4、MENU
OPERATION
4、
After connected correctly and then Power on, Press “MENU” on the unit or by remote
control to show MENU
IN AV MODE
Press “</>”on the unit or “
/
” on the remote control to select item, eg.
and it will be highlighted; and then press +/ - of the unit or
/
,
to adjust the
favorite values. It shows current picture format (NTSC&PAL) below the dialog box.
BRIGHTNESS:
to adjust the luminance of brightness
CONTRAST:to adjust the level of contrast
SATURATION: to adjust the level of saturation
TINT: to adjust the hue of image
SHARPNESS: to adjust the level of sharpness
LANGUAGE:There are 2 languages provided for choice, English and Chinese
RESET: you can reset adjustment of the unit when click “YES”
OSD H-POSITION ADJUSTMENT: to adjust the OSD move in horizontal
direction
OSD V-POSITION ADJUSTMENT: to adjust the OSD move in vertical
direction
OSD DURATION: to adjust the duration of OSD from5-100seconds.
picture over-turn to left or right
picture over-turn to up or down
EXIT OSD: select “YES” to exit
IN PC MODE:
Press “</>”on the unit or “
/
” on the remote control to select item, eg.
and it will be highlighted with yellow; and then press +/ - of the unit or
/
,
to
adjust the favorite values. It shows picture mode specifications below the dialog box.
BRIGHTNESS:
to adjust the luminance of brightness
CONTRAST:to adjust the level of contrast
PHASE:to adjust the beginning point and terminal point of image
FREQUENCY: to adjust the frequency range of image
OSD H-POSITION:to adjust the picture position in horizontal direction
OSD H-POSITION:to adjust the picture position in vertical direction
RESET: you can reset adjustment of the unit when click “YES”
COLOR TEMPERATURE:choose color and temperature at first, such as: 65000
K, 75000 K or 93000 K.
Only if under “USER” mode, can adjust
BLUE to meet the color value you need.
RED,
GREEN and
LANGUAGE:There are 2 languages provided for choice, English and Chinese
MISCELLANEOUS:to select
to enter next page
As follows:
EXIT OSD: select “YES” to exit
OSD H-POSITION ADJUSTMENT: to adjust the OSD move in horizontal
direction
OSD V-POSITION ADJUSTMENT: to adjust the OSD move in vertical
direction
OSD DURATION: to adjust the duration of OSD from5-100seconds.
OSD AUTO COLOR:If select “YES” it will adjust automatic color system to
the best
picture over-turn to left or right
picture over-turn to up or down
5、 PARAMETER
TFT LCD SCREEN
High Resolutions
Average Brightness
Contrast Ratio
Aspect Ratio
Viewing Angle
Color System
Power consumption
Audio Output
Input Voltage
TFT LCD (8 inch)
800 * 600
250 cd/㎡
500: 1
Mode 1 & Mode 2
4:3
Mode 3
16:9
Mode 1& Mode 2
140°/120° (H/V)
Mode 3
130°/110° (H/V)
PAL-4.43 NTSC-3.58
≤8.5W
≤1.2W
DC11-13V
Mode1
Dimension
205 L×150 W×210 H mm(Unfolding)
Mode 2
Mode 3
Mode 1
Weight
205L×178W×67H mm(Folding)
Mode2
Mode 3
220 x166 x37.5 mm
196×116×32.5(mm)
WITH TOUCH
WITHOUT TOUCH
WITH TOUCH
WITHOUT TOUCH
WITH TOUCH
WITHOUT TOUCH
1024g
945g
526g
588g
610g
518g
6、 ACCESSORIES
1
2
3
4
1
2
3
VGA signal cable with 9 holes
14P SKS patch cord of A/V cable
DC adapter
Remote controller
4
5
1piece
1piece
1piece
1piece
5
Driver disk(Matched with touch function)
1piece
6
Operation manual
1copy
6
7、TROUBLE
SHOOTING
7、
7.1、
、AV MODE
Case(condition)
Only black
white picture
Possible causes
and 1. The number of “color” function on Video menu is zero.
2. The present program have only black and white image.
1. Check power connectin(check the working indicator
No picture
light).
2. Check if the AV cable is connected well.
The
remote 1. Check battery install method.
controller can not 2. The battery is used out.
work or insensitive 3.The signal are influenced
7.2、
、PC MODE
① Image excursion
According to the operation of image station adjustments to adjust:
A. Press“<”key, select automatic function
B. Manual adjust as per the operation manual in the menu.
C. Select correct refurbish and resolution rate
Lose color
Please check the VGA cable if connect correctly, or what is matter with the
VGA cable, if any bend or break in cable, please adopt new VGA cable.
No picture
A、 After connecting the power, the indicator light will turn red, then
press“POWER” button, the unit will work, if the screen display “NO
SIGNAL”, that is to say no signal input, at this time, you should open
your computer; if the screen display “OVERRANGE”, that is to say
signal mode input exceed the range of display, please adjust the refurbish
rate of unit.
B、If the green light on the monitor is turned on, the management mode of the
power is activated. You may press any key on the computer to activate it.
The power of the monitor also has the management mode. If no effect after
pressing the keyboard of the PC ,please press “POWER” key on the
monitor.
C、If the indicator light is turned off, please check the power connection.
No clear or really image, shaky picture
Please select correct resolution rate, renew the refurbish rate.
If any questions, you may be contact with the related dealers.
If the whole screen turn light, please check computer refurbish rate is less
than 72Hz.
Remark:
* If happen image interruptive, it is possible that the VGA signal frequency is not
matched with normal standard.
* It is a normal condition that some bright lines appear on the screen when you
are closed the unit.
*To ensure a longer use, please make power management function of PC active.