1
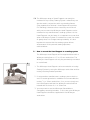
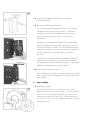
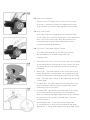
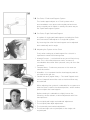
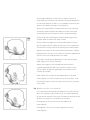
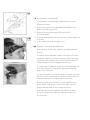
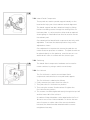
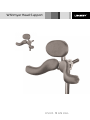
Whitmyer Head Support
USER MANUAL
Getting Started
Congratulations on the purchase of your Whitmyer Head
Support System from James Leckey Design. It is likely
that you will require a Leckey representative to set up the
Whitmyer Head Support System. Please contact our
customer service department to arrange an appointment.
1.0 Before you start
Whitmyer manufacture a range of both single 2 and 3 pad
head support systems to suit a wide range of clients’
needs. The following are guidelines in getting started with
the Whitmyer head support.
Experience has shown that head control difficulties can
only be overcome once clients are seated correctly. Before
using the Whitmyer Head Support System it is important
that the following postural seating objectives are met.
Obviously the level of support will vary depending on the
individual client’s needs. For instance if you have a client
using a one pad Whitmyer head support it is likely that
they will not require as great a level of support as a client
requiring a 3 pad system with forehead strap.
1.1 Postural Seating Objectives
1 A good Mid Line Symmetrical position should be
achieved. It may be necessary to use thoracic lateral
supports, side pads, a knee block system and foot supports
to ensure a mid line symmetrical position at all times.
2 Pelvic Stability is critical. A hip belt angled at 45 degrees
will secure the client in a good position.
3 Shoulder Girdle Stability is also very important. It may be
necessary to use additional strapping or harnessing such
as a waistcoat.
Functional Positioning of the Hands and Arms by using
4 a height adjustable and tiltable tray can also assist in
maintaining good shoulder girdle stability.
The Whitmyer Head Support system is mounted in a fixed
position to a chair. Therefore if your client can move their
body in their chair they will be moving their shoulder girdle,
neck and head relative to their Head Support System. For
instance if the client does not have good thoracic lateral
support in their seating system and is using the Whitmyer
head support their head may be held in position at the
expense of a scoliotic trunk.
It is also very important to ensure consistency in
positioning. For instance if a client is being transferred
into their seating system, it is important to ensure that
they are positioned well back into their chair and in a
mid line position.
1.2 Tilt in space
When using the Whitmyer Head Support with a tilt in space
seating system it is important to assess the tilt angle that
the head support will be used at most often. For instance it
is very likely that clients using the Whitmyer 3 pad head
support system with forehead strap will be using their head
support mostly, in a fairly upright position. The head
support should therefore be set to accommodate this
client with the seating system in a fairly upright position.
If the client also uses their seating system for periods of
relaxation when their chair is tilted back, an assessment
should be carried out to review the position of the head
support system in relation to the client when a lot of tilt in
space is employed. It may simply be the case that the
head support is no longer comfortable. In some situations
it may be necessary to have a second single pad head
support system for clients during periods of relaxation.
It is also very important to ensure that the tilt in space
facility on a seating system will remain secure and not
shift position "accidentally". If the chair moves position
accidentally without a full assessment of the implications
for the client having been carried out, this may cause
discomfort, distress or even in extreme cases danger.
1.3 The Whitmyer range of Head Supports can easily be
mounted to any Leckey Seating System. Indeed they can
also be used in conjunction with our standing frames.
(See separate User Manual - Head Support Accessories
For Standing). However when necessary we will work
with you to ensure the Whitmyer Head Supports can be
mounted to any manufacturer’s seating systems. As the
Head Supports can be heavy, it is important to ensure that
when a Whitmyer System is mounted to a seat, the centre
of gravity does not change causing instability. It is also
important to ensure that the seating system allows
achievement of the postural seating objectives
outlined below.
2.0 How to mount the Head Support to a seating system
The Whitmyer Head Support will be supplied either with a
Whitmyer vertical bar or a 1/2" or 15 mm vertical bar. The
Whitmyer Head Support can only be permanently mounted
to a solid back.
2.0
1 The Whitmyer Head Support can be mounted to a Leckey
Seating System by using the Whitmyer vertical bar and the
Leckey receiving bracket provided.
2 If using another manufacturer’s seating system check to
see if a receiving bracket is available to accommodate the
Leckey 1/2" or 15mm vertical bar. If so you can simply use
the Head Support without the Whitmyer vertical bar but
instead with a choice of 1/2" or 15mm bar.
3 You may want to use the Whitmyer Detachable or
Swingaway mounting brackets. In this case your Whitmyer
Head Support should be supplied with the Whitmyer
vertical bar.
2.2
2.1 If using the Whitmyer Detachable or Swingaway
mounting brackets.
2.2 Wooden Backed Seating Systems
For all wooden backed seating systems, T nuts must be
installed prior to the upholstery process. If ordering a
custom solid back from a seating company, be sure to
specify the hole placement for the T nuts prior to
manufacture.
To attach the detachable mounting bracket simply attach
placing the additional back plate between the mounting
block and seat back’s surface. This back plate protects the
seat back’s surface. The screws can be then be tightened
securely into the T nuts already fitted in the back of
the seat.
To attach the swingaway mounting bracket an additional
back plate is not necessary. In this case the swingaway
mounting bracket can be attached using the T nuts already
fitted and by tightening the screws securely.
2.3 Plastic Backed Seating Systems
When mounting to a plastic shell back an optional interface
plate must be used to redistribute forces evenly across the
back support.
3.0 How to adjust
3.1 Attaching the Pads
3.1
a
Using a 3/16" Allen wrench, loosen the collar screws
allowing the collar to slip onto the ball. It is very important
that the 2 screws are tightened evenly as shown in A as
opposed to unevenly as shown in B. Uneven tightening
will allow the collar to slip out of adjustment and may even
damage the collar.
b
3.2
3.2 Pivot Cover Removal
Simply use the T handle wrench to prise off the covers
as shown. Fold away to expose the adjustment screws.
Snap cap back into position after adjustments are made.
3.3 Vinyl Collar Covers
Vinyl collar covers are supplied over all clamping collars.
These collars slip on and off exposing the collar adjustment
bolts. Use of the collars helps keep dust and dirt from
contaminating the bolt threads and provides a more
cosmetically pleasing appearance.
3.4 Pro Series 3 Pad Head Support System
This head support adjusts on a 3 ball system which
accommodates one occipital pad and two sub
occipitals pads.
1 Horizontal Pivot Cover – Once the pivot covers are removed
3.3
as described above, loosening all 4 of the screws will allow
the head support to be angled and positioned forward or
backwards.
2 Base Plate – This plate attaches to the horizontal bar and
allows fitting of the occipital plate, sub occipital screw ball
and when required the lateral facial components mounting
plate. The screw balls G allow width adjustment of the sub
occipital pads.
3 Occipital Pad – This pad supports the occipital area of the
head and adjusts vertically on the occipital plate, D and
d
b
rotationally on the screw ball F.
3.4
c
4 Occipital Plate – Mounted to the base plate, B this allows
the occipital pad to be mounted on the screw ball for
e
vertical, horizontal and angular adjustment. It also functions
a
as a mount for the Dynamic Forehead Strap, T-Bar and
Uni-Bar Systems.
5 Sub-Occipital Pads – These mount to the base plate
f
g
on screwballs which allow for both rotational and width
g
adjustment, G. These pads support the sub-occipital region.
3.6
3.5 Pro Series 2 Pad Head Support System
This head support adjusts on a 2 ball system which
accommodates a one piece sub-occipital pad and a one
piece occipital pad. It adjusts in exactly the same way as
the 3 pad head support system.
3.6 Pro Series Single Pad Head Support
A number of single pad head supports including the Plush
3.7
and Contoured Cradle adjust on a single ball system.
By loosening the collar the head support can be adjusted
both rotationally and in angle.
3.7 Adjusting the System to the Client
Firstly when setting up a head support for a client it is
important to avoid the following areas.
1 Mastoid Process – Just behind the ear you will feel a bony
area. This is the mastoid process and is a source of
considerable discomfort when pressed, even just for a few
moments.
2 Temporal Area – Continuous pressure on this area can
cause discomfort.
3 Mandible – It is important that the head support pads do
not obstruct the jaw line.
4 Carotid Vein and Jugular Artery – The Head Support must
not be "clamped" around the neck as the blood flow may
be restricted.
When adjusting the system it is advisable for one person to
hold the client’s head in the desired position, whilst another
person adjusts the head support.
Before starting it is advisable to slightly loosen the
following, where relevant, to allow adjustment with firm
hand pressure.
1 The occipital pad height and rotational adjustment.
2 The occipital plate depth adjustment.
3 The horizontal pivot bracket adjustment.
4 The left and right sub occipital pads or the single sub
occipital pad.
A thorough evaluation of the client’s needs in terms of
Head Support should also be carried out before adjustment
of the Head Support System. It is important to observe the
amount of balance and types of movement.
When the Head Support is attached to the chair the pads
should be moved slightly back away from the client and
should be just loose enough to move, rotate and adjust.
Gently slide the Head Support forward allowing the sub3.8
occipital pads to make soft initial contact.
Gently rotate and adjust the sub-occipital pads to ensure
good contact with the head. At this point the occipital pad
should still be loose and not be pushing the head forward.
Tighten the screws on the horizontal pivot bracket. Slightly
tightening two screws on one side will hold this adjustment
a
until the rest of the adjustments are made.
Then after checking the adjustment on the sub-occipital
pads, tighten the screws securely.
Adjust the height of the occipital pad and move the
occipital pad forward until it just meets the back of the
client’s head. Adjust the pad angle to provide as much
contact as possible.
Now review the contact, fit and adjustment of all pads.
Finally tighten all of the screws evenly and securely, snap
b
the horizontal pivot cover into place and fit the vinyl covers
over collars.
3.8 What to Look For In A Correct Fit
It is important that the pads are balanced, so that the user
does not experience discomfort from one pad supporting
an excessive amount of the load. Clearances around the ear
and bony prominence should also be checked.
Photographs A & B show how not to adjust the
head support.
c
Photograph C shows the correct adjustment of the
Head Support.
1
3.9
3.9 The Dynamic Forehead Strap
The Dynamic Forehead Strap is attached to the Head
2
Support as follows.
1 Firstly loosen the rear occipital pad (1) and adjust up or
down to provide slot access.
2 Remove the bolt and washer (2) from the DFS
mounting bracket.
3 Fit the mounting plate to the front of the occipital plate slot
3.10
as shown.
4 Finally replace the bolt and washer (2).
3.10 Dynamic Forehead Strap Adjustment
With the client in the chair, slide the forehead strap into
position.
Using the tension adjusters tighten the strap to the point
required to maintain constant forehead contact. The strap
should not cause redness from excessive pressure or fit
loosely enough to allow slippage over the eyes.
It is important to adjust the angle of the forehead strap pull
to ensure a direction of pull that is perpendicular to the
slope of the forehead.
It is also important to ensure the strap cord does not touch
the client’s ears and that there is about a finger’s width of
clearance between the strap and the client’s ears.
A check should also be made to ensure that when the
client makes a full turn to the left or the right that the
tension adjuster balls do not contact the pulley.
It may be necessary to readjust and change the angle
of pull to prevent the strap from riding up or down on
the forehead.
3.11
3.11 Lateral Facial Components
These pads are used to provide support laterally on the
head and to help your client maintain vertical alignment.
The lateral support bracket is attached simply by fitting
the two mounting screws through the existing holes on
the base plate. It can be used on either side as required.
A swingaway or fixed ballrod can then be used to mount
the relevant pad
Once attached the lateral facial components are truly multiadjustable. To achieve the desired position they can be
adjusted as shown.
Once adjusted it is important to ensure the pads do not
cause excessive pressure or irritation. The pads should not
be placed directly on the jawbone, over the ears or in an
area that will come in contact with the client’s eyes.
3.12 Switching
3.13
The lateral facial components hardware can be used to
mount switches by using a switch mount clamp.
3.13 Pro X Mount
The Pro X Mount is used to mount lateral facial
components and switches to one pad head supports.
The Pro X Mount is attached as follows.
1 Firstly remove the screws from the collar, A.
2 Then place the Pro X Mount into position.
3 Then using the screws B and washers D tighten the
Pro X Mount into position.
4 The screws should be tightened evenly through the top half
and the lower half of the collar, A.
A number of lateral brackets can be attached to the Pro X
Mount in one of the 4 holes available. To do this the two
sets of screws on either side of the mount should be
loosened, the lateral bracket attached and the screws
re-tightened securely.
3.14
3.14 T Bar and Uni Bar
a
b
The T-Bar support is compatible with all 2 and 3 pad Pro
Series Head Supports and can be used with the Dynamic
Forehead Strap.
1 Remove the occipital pad and screwball A from the
occipital plate B.
2 Attach the T Bar C, using the fasteners and washers
provided.
3 Attach the previously removed screwball and the screwball
supplied with your T bar to the T bar slots.
4 Attach the appropriate pads to the screwballs and adjust
c
the position around the client’s head.
safety
pad
5 When the desired position is achieved, tighten all fasteners
and Velcro the safety pad as shown.
The uni bar is attached in exactly the same way as the
T bar.
4.0 Washing
The pad covers and forehead strap should be washed
at regular intervals. They can be hand washed in a
mild detergent.
Important Safety Points
1
2
It is important that a competent person such
as a wheelchair technician, trained therapist
or Leckey representative carries out all
adjustments and set ups of the head
support system.
It is important that the postural seating
objectives highlighted in this user manual are
followed. Failure to do so, could in extreme
circumstances allow a client to become
trapped at the back or to the side of the head
support. This could result in occlusion of
the airway.
3
A weekly check of the client’s seating
system for growth, stable seating position
and comfort should be carried out paying
particular attention to the postural seating
objectives.
4
The dynamic forehead assembly should be
used as a forehead strap only. Serious injury
or death could result from misuse of the
strap. Do not use if the strap is loose
enough to slip, below eyes, nose or chin.
5
Please ensure that you check your head
support for wear and tear on a monthly basis.
It may be necessary to replace pads or
forehead straps as they can wear out
through use.
6
The Whitmyer Head Support has never been
crash tested for use in vehicles. It follows
therefore that James Leckey Design Ltd
cannot recommend the use of the Head
Support on seating systems whilst they are
being transported in a vehicle, as it’s use in
vehicular transport has never been proven safe.
7
We recommend that a client should not be
left unattended while using the Whitmyer
Head Support.
8
Please ensure that when a client is using the
Whitmyer Head Support that there is not
excessive pressure around the neck area.
This could result in restricted blood flow.
9
If a client using the Whitmyer Head Support
also has a "shunt" fitted, please ensure that
the head support does not come into contact
with the "shunt" and that there is adequate
clearance between the pads and the "shunt"
10 If you notice any sign of persistent redness
that is not simply from contact, please cease
from using the head support immediately.
11 If you are using a seating system with tilt in
space facility it is very important that the tilt
in space will not shift position accidentally. If
the chair moves position accidentally without
a full assessment of the implications for the
client having been carried out, this may cause
discomfort, distress or even in extreme cases
danger.
12 If you require any further assistance please
do not hesitate to contact our customer
service department.
James Leckey Design Ltd
WARRANTY:
We warrant that the goods
shall be free from defects in materials and
workmanship for a period of 24 months
from delivery if the instructions governing
use of the goods have been followed.
19 Ballinderry Road
Lisburn
BT28 2SA
Northern Ireland
United Kingdom
T: +44 (0) 28 9260 0750
F: +44 (0) 28 9260 0799
E: [email protected]
W: www.leckey.com
LS81-03