1
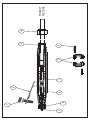
97249
Vari-Drop™ Applicator Repair Instructions
IMPORTANT: Read Instructions Carefully Before Attempting to Repair the
Vari-Drop™ Applicator.
To repair the Applicator, use the following procedure: numbers in parentheses ( )
refer to items on drawing which appears on reverse side.
Turn the Product Reservoir “off” and release all of the pressure within the tank by
depressing the toggle valve on the reservoir cover. Raise the Vari-Drop™ Applicator
above the reservoir with the needle in the vertical up position.
Loosen the nut on the back of the applicator and allow the product to drain out of the
applicator and feedline.
Unscrew the nut from the applicator and remove the feedline.
To disassemble applicator, remove six screws (8) holding the housings (2) together.
CAUTION: A spring under tension inside the Applicator will spread the
housings apart.
Tie the applicator together with elastic bands, one on front and another on the back
end. Remove the two front screws, the middle two screws, and last, the back two
screws using a Phillips Head screwdriver.
Remove elastic bands and separate housings. Remove pinch tube assembly and
lever (5) from housing.
Remove plastic fittings (3 and 4) and spring (1) from the pinch tube (6) and discard
the pinch tube.
Wash all parts in methylene chloride solvent or Loctite® Equipment Flushing Solvent
#12121. If plastic fittings are to be reused, make sure the 1/16 inch (1.6 mm)
diameter holes in the fittings are not plugged with adhesive.
To reassemble applicator, install a new pinch tube (6) on feedline adapter fitting (4)
making sure the Teflon® inner pinch tube is pushed over the two rings on the
adapter. Note: It will be easier to install the fittings if the ends of the Teflon® inner
tube are enlarged slightly with a pencil or other tapered device.
Install spring (1) over pinch tube (6) with the closed end facing the feedline
connector (4). The pinch tube must pass through the hole in the spring.
Install needle adapter fitting (3) on pinch tube (6) and install luer-lok sleeve (9).
Make sure the Teflon® inner tube is pushed over the two rings on the adapter.
Place pinch tube/spring/fitting assembly into lower housing and align the spring
and fittings on the pinch tube. Note, the pinch tube should be centered on the width
of the spring at the pinch point.
Install upper housing and slide lever over the front end of this housing.
Position the tabs on the lever between the pinch points of the spring and the pivot
holes in housing.
Tie the applicator together with elastic bands and check free motion of the lever.
Install the two front screws, the middle two screws, and back two screws and
remove elastic bands.
Apply a liberal amount of silicone grease to the threads on the applicator and secure
the feedline with the nut.
The applicator is now ready for use. Turn on the reservoir pressure and check to make
sure that there is no product leakage at the feedline connection or in the applicator.
Loctite North & Central America
Loctite Corporation
Rocky Hill, CT 06067
Loctite and Vari-Drop are trademarks of Loctite Corporation,
U.S.A. Teflon is a registered trademark of E.I. DuPont de Nemours
Co., Inc. © Copyright 1999. Loctite Corporation. All rights reserved.
999516 Rev C 06/99
3
7
9
6
5
1
2
8
4
10
PRODUCT
FEEDLINE