1
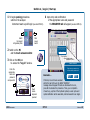
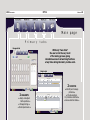
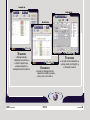
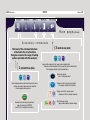
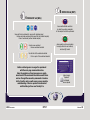
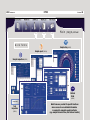
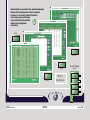
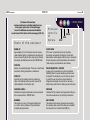
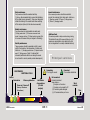
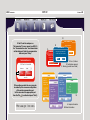
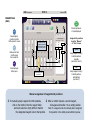
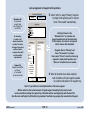
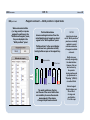
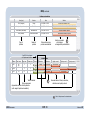
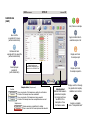
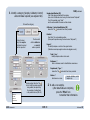
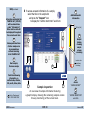
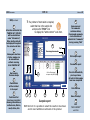
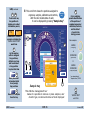
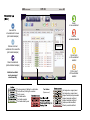
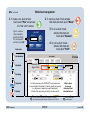
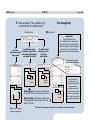
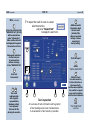
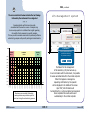
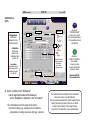
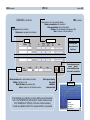
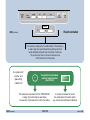
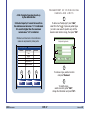
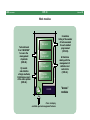
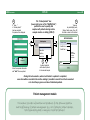
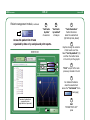
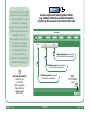
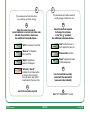
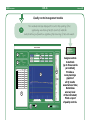
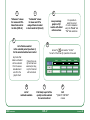
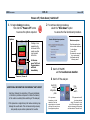
Operation (OPE)
● Main page ● Primary tabs ● Secondary commands ●
● State of the analyzer ● Controls ● Services ●
● REAGENTS ● MONITOR ● SAMPLES ●
● W O R K L I S T ● M E T H O D S ● Work modules ●
Human Interface manual - xii.2010
Complete descriptions
of the working parameters
required for a routine
testing session.
prepared by
This manual has been the collaborative
action of all the Edif Instruments staff.
Software version: 0.37b
First printed – iii.2007
Revisions made – vi.2007 / iii.2009 / ii.2010 / xii.2010
© EDIF INSTRUMENTS 2010
Contents − Operation (OPE)
Switch-on / Log-in / Start-up ................................ OPE.3
Main page, Primary tabs, Secondary commands, Work forms and modules ... OPE.4
10
State of the analyzer, Controls, Services, Message boxes, Rapid access ........
REAGENTS tab (REA) ......................... OPE.14
Manual assignment .........................
14
Auto assignment .............................
15
Reagents on board ..........................
16
Monitoring / Checking liquid levels ...
17
WORKLIST tab (WOL) ....................... OPE.26
Worksheet management ..................
27
Test management ............................
28
Test inspection ................................
30
MONITOR tab (MON) ......................... OPE.18
Overview ........................................
18
Problems and solutions ....................
19
Method status .................................
19
METHODS tab (MET) ......................... OPE.32
Calibration ......................................
33
Result correlation ............................
35
A special note on quality control .......
35
Method fields ..................................
36
SAMPLES tab (SAM) ........................... OPE.20
Sample list management .................
22
Sample inspection ...........................
23
Sample report .................................
24
Sample tray ....................................
25
Work modules ................................... OPE.38
Test count ......................................
39
Patient management .......................
40
Lot management .............................
44
Quality control management .............
46
Power-off / Shut-down / Switch-off ....................... OPE.48
EDIF Instruments
OPE.2
The Edif line of analyzers features an
innovative software based on the minimal number
of operational commands needed to accommodate in-depth
and comprehensive testing with maximum efficiency.
It can be employed immediately by laboratory technicians
at all levels of proficiency ... from the beginner on.
The manual begins with a brief but complete overview
of the entire work process (OPE.4 to 13) followed by
descriptions of the five “Primary tabs” (OPE.14 to 37)
which include a complete step-by-step explanation
of the entire hierarchy of testing actions and, finally,
a discussion of the “Work modules” covering the use
of special management features (OPE.38 to 47).
Readers are urged to “Switch-on” (OPE.3) and experiment
while following these instructions page by page.
Software
HI
Switch-on / Log-in / Start-up
1 To begin opening procedures
switch on the analyzer.
Instrument warm-up will begin (see also OPE.10).
Switch
for reagent
refrigeration plate
4 Upon entry and confirmation
of the appropriate name and password
the REAGENTS tab will appear (see also OPE.14).
Main
power
switch
DAILY START-UP
2 Switch on the PC
Daily start-up procedure has
not been done, execute now?
and the touch screen monitor.
OK
For an outline
of the message boxes
available see OPE.12.
3 Click on the HI icon
to access the “Log-in” window.
DAILY START-UP
Daily start-up procedure has
not been done, execute now?
Enter the
appropriate
name and
password
and press OK
Reminder ...
Log-in
Name:
Password:
OK
EDIF Instruments
Cancel
Cancel
Touch
screen
keyboard
provided
OK
Cancel
If start-up has not been executed
within the last 24 hours, the DAILY START-UP
message box will appear. If tests are scheduled to be run,
press OK to activate this procedure. Then, upon completion
of warm-up, a prime of the hydraulic system, a wash cycle and
optical calibration will be executed, and test execution can begin.
OPE.3
Software
HI
OPE.4
EDIF Instruments
1
1
2
2
3
3
Software
44
P r i m a r y
5
5
Main page
t a b s
Reagents tab
With only “two clicks”
the user is into the very heart
of the testing process giving
immediate access to all working functions
at any time during laboratory routine work.
2
Monitor tab
2
Problems
and solutions
Problems
1
REAGENTS
● Assign and adjust
bottle positions ●
● Manage listings ●
● Check liquid levels ●
Item (type)
Problem
GLU-1 (reagent)
Empty
3/16/2009 4:21:26
Waste (weekly maintenance)
Tank full
3/16/2009 4:21:26
Wash station (instrument)
Mechanical error
3/16/2009 4:21:26
Technical assistance required
GLUP (method)
Incorrect field value
3/16/2009 4:21:26
Administrator assistance required
Solution
Date
Provide a new bottle of GLU-1
Empty the waste tank and access the panel for confirmation
Method status
status
Method
Method
Avail. tests
GLU
Prog. tests
Sched. tests
Calibration
Calibrators
2
0
Blank
Valid
Missing
Quality control 1
Quality control 2
Not on board
Not on board
BUN
103
3
0
Valid
Expired
Not on board
Not on board
Not on board
GOT
54
51
7
Valid
Valid
Not on board
Not on board
Not on board
*
Quality control 3
Not on board
Click for “Rapid access” to related sections
2 MONITOR
● Identify and manage
problems ●
● Provide solutions
for problems identified ●
● Review method status ●
HI
Samples tab
Methods tab
Worklist tab
Worksheets
3
SAMPLES
● Manage samples,
calibrators and controls ●
● Monitor sample tray ●
● Sample inspection ●
● Request and print reports ●
EDIF Instruments
4
WORKLIST
● Create and manage test lists
organized in sheets by groups ●
● Run, zoom, rerun tests ●
OPE.5
5 METHODS
● Set and monitor calibrations ●
● Assign quality controls (QC) ●
● Access QC results ●
Software
HI
OPE.6
EDIF Instruments
1
3
4
Software
5
M a i n p a g e, continued
Secondary commands
3
This level of the command structure
is the link to the core functions
that give access to the range of testing
options provided with this analyzer.
1
REAGENTS tab (REA)
Save
Load
Clear
Save assigned positions and file bottle panel for reuse
Retrieve and load a bottle panel from saved file
Clear displayed bottle positions
Save
Load
Clear
Save and file a sample list for reuse (without related tests)
Retrieve and load a sample list from saved file (without related tests)
Clear displayed sample list (with related tests)
Barcode
scan
Sample
tray
Execute a complete
scan of “sample barcodes”
Display work form showing tray positions
for samples, calibrators and controls
Display work form for sample report
Display work form for sample inspection
Check
levels
Employed to check reagent liquid levels
when the analyzer is STOPPED
(see OPE.17 for complete information).
SAMPLES tab (SAM)
Apply
Add / Remove a sample
Apply modified data to selected sample
HI
5
4
METHODS tab (MET)
WORKLIST tab (WOL)
Fields
Save
Load
Clear
Save and file all worksheets for reuse (with related samples)
Retrieve and load worksheets from saved file (with related samples)
Clear all worksheets (without related samples)
Create a new worksheet
Remove worksheet selected
Access method fields work form
to check the working parameters
of the analysis that can be performed
QC
Access quality control work module
to assign controls to each method,
and check QC results
Run all tests of the worksheet selected
Print a report of the worksheet selected
Before continuing users are urged to experiment
with the main page command structure.
Using the graphics on these two pages as a guide,
access each of the numbered tabs above several times
and run through the secondary commands at random.
A bit of practice early on will ensure a more complete
understanding of how to operate this instrument
and illustrate just how user friendly it is.
EDIF Instruments
OPE.7
A touch-screen
“Keyboard”
is displayed
where required
Software
HI
OPE.8
EDIF Instruments
3
3
4
4
Software
5
M a i n p a g e, continued
Sample
tray
Work forms
Sample tray (OPE.25)
SAMPLE TRAY
Sample report (OPE.24)
SAMPLE REPORT
Sample inspection (OPE.23)
SAMPLE INSPECTION
METHOD FIELDS
TEST
INSPECTION
TEST
INSPECTION
Fields
Method
fields
(OPE.36)
Inspect test
Test
inspection
(OPE.30)
Work forms are provided for specific functions
where access to more detailed information
is required to complete operational tasks
(e.g. sample lists and status, test lists and results).
HI
QUALITY CONTROL
Work modules are provided for the special management
features that are independent and more complex
in nature (i.e. test count; patient information,
test sorting, review and storage;
new lots and links with methods;
quality control assignment
and results).
(OPE.39)
QUALITY CONTROL
LOT MANAGEMENT
PATIENT MANAGEMENT
Test count
TEST COUNT
System
quality control
(OPE.46)
Lot
management
(OPE.44)
Patient
management
(OPE.40)
Work
modules
“Access” modules
(OPE.38)
Test count
Patient
management
Lot
management
System
quality control
EDIF Instruments
OPE.9
Software
HI
EDIF Instruments
OPE.10
The state of the analyzer
can be monitored or controlled using the icons
in the upper right corner of the main page.
Icons for additional services and information
can be found at the bottom of the main page (OPE.11).
State of the analyzer
WARM-UP
Approximately 20 to 30 minutes of warm-up time are
required before testing is possible (warm-up status bar
shown in lower left panel). When warm-up has finished
the analyzer automatically reaches the STOPPED state.
STOPPED
Analyzer is completely stopped. There are no mechanical
movements. Testing temperature is maintained.
Software
HI
COVER OPEN
Principal
controls
of
Sphera
PAUSE
STOP
RUN
COVER OPEN
If the cover is opened during the running state,
the analyzer will suspend the sampling of new tests.
Dispensations will be skipped until the cover is closed and
all tests requiring a second dispensation will be aborted.
(Tests requiring no dispensations will continue.)
START-UP
Upon start-up the analyzer begins by executing a
prime of the hydraulic system, a wash cycle and the
optical calibration of the reaction cells.
PAUSE REQUESTED / PAUSED
A pause may be requested at any time and reached
(PAUSED) when the current sampling runs have been
completed. The instrument cover can then be opened
to permit the user to perform on-board functions.
(Reagents and samples on board can be removed or
added during which time the reading process continues.)
CHECKING LEVELS
Indicates that reagent liquid levels are being monitored
after a request while in STOPPED state.
PROBLEM
Indicates that the analyzer has stopped and testing can
not continue without user (or technical) intervention.
RUNNING
The analyzer is running. The reagent-sampling arm
is in motion. Tests, problems and liquid levels are
constantly being monitored.
SHUT-DOWN
The analyzer begins closing procedures by executing
the necessary wash cycles. When these are completed
the instrument can be switched off (OPE.48).
Daily maintenance
Two procedures should be executed each day.
1) Start-up. Recommended daily to ensure that calibration
of the optical group is renewed. 2) Shut-down. Required to
initiate the cleaning of the reaction cells before switching
off the analyzer (but only if tests have been executed).
Special maintenance
An occasional procedure should be executed to
monitor the remaining life of certain parts. Listed are ...
1) Reaction cuvettes. 2) Pumps. 3) Halogen lamp.
4) Filters. 5) Sampling needle.
Weekly maintenance
Four procedures are recommended once each week.
1) Empty waste tank. 2) Fill common resource tanks
(water / cleaning solution). 3) Prime hydraulic system (this
is to ensure the removal of any air trapped in the tubing).
Additional tools
Procedures possible to help save time during testing.
This includes the use of the manual dilution tool (for
preparing a sample dilution to be added to the test
mix as a supplement to normally scheduled dilutions).
Monthly maintenance
Three procedures should be executed monthly to avoid
a shift of test results or the deterioration of critical parts.
Listed are ... 1) Sampling needle rinse. 2) Special cuvette
wash. 3) Testing pumps. (Note: It is advised that
instrument performance tests be run during the course
of each month to monitor possible problem development.)
Principal services
Connecting
PC is trying to connect
MAINTENANCE
ADDITIONAL TOOLS
Service
Information
Warm-up status bar
Power-on / Power-off
(Start-up / Shut-down
Exit software)
Verification
of connections
(PC with
analyzer)
Not connected
Problem(s) detected
Some reasons ...
(i) Analyzer not turned on
(ii) Analyzer not connected to PC
(iii) Connecting cable damaged
(iv) PC communication port in use
Work
modules
Time
09.35.04
-3 °C
EDIF Instruments
Connected
PC connection established
OPE.11
Software
HI
OPE.12
EDIF Instruments
Software
3
If the PC and the analyzer are
“Not connected” for any reason (see OPE.11)
the “Communication error” box shown below
will be displayed. Check the communcation
cable and press “Retry”.
Communication error
CLEAR SAMPLE LIST
2
DAILY START-UP
1
Sample list will be
deleted, proceed?
COMMUNICATION ERROR
Daily start-up procedure hasOK
not been done, execute now?
The instrument is not responding.
Check the cable connection.
If problem persist contact OK
Cancel
technical assistance.
1 Error / Problem
2 Confirmation required
3 Warning (possible lose of data)
OK
SAMPLE
Cancel
4
CONTROL
PATIENT
CALIBRATOR
If the problem persists the error may also
be caused by the erroneous configuration
of the serial communcation port.
In this case select the appropriate port
from the “list ” provided and press “Retry”.
Message boxes
5
4 Sample information
5 Patient information
HI
To “Rapid access” relevant current data and information,
and working functions available in the system
select any color coded item under “solution” or “status”.
Rapid access
Worksheet panel
Method status
Blank
Calibration
Missing
Expired
Missing
Valid
Expired
Expired
Invalid
Valid
ADD CALIBRATION TESTS
Do you want to automatically
add all needed test(s) to
proceed with a calibration?
Cancel
OK
1Invalid
2
3
The three-part diagram above
(see also OPE.19)
shows one example of how “Rapid access” can simplify required operational tasks.
When either “Missing” or “Expired” is selected (”Calibration” column in “Method status”) the message box “ADD CALIBRATION TESTS”
is displayed and following an “OK-click” the entire list of tests required for calibration is automatically added to the “Worksheet panel”.
The color coded buttons below show typical examples of additional “Rapid access” functions.
Solutions to problems
Provide a new bottle of GLU-1
Empty the waste tank and access the panel for confirmation
Technical assistance required
EDIF Instruments
Additional information
Error detection
Resources missing
Valid
Expired
Not on board
Completed
Test aborted
Reag.1 empty
Executing
Predilution error
Sample empty
Reag. blank error
Diluent empty
Result unusable
OPE.13
Software
HI
OPE.14
EDIF Instruments
Software
HI
REAGENTS tab
(REA)
Check
levels
1
3
Check liquid levels
of panel displayed
Save
Save assigned
positions and file
bottle panel for reuse
In case of an error
in reagent placement,
double-click to clear
that bottle position
Load
Retrieve and load
a bottle panel
from saved file
2
2
2
1
1
Clear
Clear displayed
bottle panel
2
Assign bottle positions
by either “Manual”
or “Auto” means
Manual
Assign reagent code(s)
to bottle positions
manually
(see Items 1 and 2)
Auto
Assign reagent code(s)
to bottle positions
automatically
(see Item 3)
Bottle blinking yellow
(see Item 2)
Manual assignment of reagent bottle positions
1 To manually assign reagents to bottle positions,
click on the method, then the reagent listed
and touch-select an empty bottle to transfer
the designated reagent code to that position.
2 When a method requires a second reagent,
click again and transfer it to an empty position.
Note: If a reagent code has already been assigned,
that position in the bottle panel will blink yellow.
Auto assignment of reagent bottle positions
3 Select “Auto” to assign “Missing” reagents
Worksheet list
Manual
Worksheet list
All worksheets
currently listed
in the “Worklist tab”
(see OPE.26)
An inventory
is made of all
sheets checked to
monitor the status
of reagent resources
on-board and to
compare them with
current worklist
requirements.
Reagent list
Reagents are identified
as “Missing”
or “Not needed”
of those inventoried
Auto
to empty bottle positions and to remove
those “Not needed” automatically .
Initially all sheets in the
“Worksheet list” are checked and
reagent requirements will be inventoried.
If the inventory of a sheet is not required
click to remove that checkmark.
Reagent list
Reagents that are “Missing” and
those “Not needed” are shown.
Touch-select “Place” to transfer all missing
reagents to empty bottle positions and
“Remove” to delete those not needed.
GLU-1
GPT-2
Click
to transfer
an individual
missing code
to a bottle
position
Place
4 When all positions have been assigned,
Remove
load the bottles of liquid reagents needed
to positions indicated on the reagent tray.
Note: It is possible to load multiple bottles of the same reagent.
Bottles which contain small amounts of liquid reagent remaining from previous tests
can be used when loading the reagent tray. All bottles will be used beginning with the least full,
then the next and finally the full bottles. Any number of methods may employ the same bottle of reagent.
EDIF Instruments
OPE.15
Software
HI
OPE.16
EDIF Instruments
REA, continued
Software
Reagents on board — Bottle positions / Liquid levels
When various size bottles
(i.e. large, small) or cups are
assigned to positions on the
“Methods and reagents” panel,
they are displayed in the
“Bottle positions” panel.
The illustration below
shows an enlarged version of how the
actual liquid levels of reagents on-board
appear in the “Bottle positions” panel.
“Bottle positions” in the current display
can be used as a guide when actually
loading bottles or cups on the reagent tray.
Full
Approximate
2.5 ml
FE-1
ASP-1
16.2 ml
GOT-2
GOT-1
17.6 ml
CRE-1
GLU-1
44.1 ml
10% or less
33.5 ml
4.2 ml
The exact positions on the tray
and the use of the correct bottle sizes
are manditory to ensure the accurate
measurement of the volume
of reagent liquid levels on-board.
NOTES
Liquid levels shown
on the “Bottle positions”
panel are constantly
updated to permit
real-time evaluation
of reagents available
on-board.
Bottle sizes are
normally assigned by
the administrator.
However, this can
also be done by
the operator
during routine work
by adjustments to
“Pipetting” (OPE.36).
in method fields.
Normal reagent
liquid volumes are:
50 and 24 ml
for large and
small bottles;
1-3 ml for cups.
HI
5 “Monitoring / Checking liquid levels” of reagents currently on-board.
REA, continued
STOPPED
RUNNING
While the analyzer is “RUNNING”
reagent liquid levels of tests being
executed are constantly monitored.
The user can touch-select any
“Bottle position” in the panel at
any time to request a liquid
level check of that bottle.
When the analyzer is “STOPPED”
choose any reagent bottle in
the “Bottle positions” panel that
you would like to verify,
then touch-select “Check levels”
to measure that liquid level.
Check
levels
If no bottle selection is made,
and “Check levels” is requested,
the liquid levels of all reagents
currently on-board will be measured.
NOTE
When the instrument detects a bottle
or cup of reagent that has been
newly replaced on the reagent tray
(one found previously insufficient),
all of the tests that were stopped
for the lack of that specific reagent
will be automatically rescheduled.
REAGENT BARCODES
Reagent bottles with barcodes
can be scanned using an external reader,
recognized by the software HI and displayed in
a special window provided in the “REAGENT tab”.
Users have only to click on an empty bottle
position to trasfer that “reagent barcode”.
During the course of these procedures
the liquid level of the diluent bottle
is also measured.
EDIF Instruments
OPE.17
Software
HI
OPE.18
EDIF Instruments
Software
HI
MONITOR tab
(MON)
OVERVIEW
Problems
and solutions
Problems
Constant monitoring
of the status of all
critical items that may
interrupt the normal
testing process.
Once an anomaly is
identified, a solution may
be provided by using the
“Rapid access” function
(see also OPE.11).
Item (type)
Problem
GLU-1 (reagent)
Empty
3/16/2009 4:21:26
Waste (weekly maintenance)
Tank full
3/16/2009 4:21:26
Wash station (instrument)
Mechanical error
3/16/2009 4:21:26
Technical assistance required
GLUP (method)
Incorrect field value
3/16/2009 4:21:26
Administrator assistance required
Solution
Date
Provide a new bottle of GLU-1
Empty the waste tank and access the panel for confirmation
Method status
status
Method
Method
Avail. tests
GLU
Prog. tests
Sched. tests
2
0
Blank
Calibration
Calibrators
Valid
Missing
Not on board
Quality control 1
Not on board
Quality control 2
BUN
103
3
0
Valid
Expired
Not on board
Not on board
Not on board
GOT
54
51
7
Valid
Valid
Not on board
Not on board
Not on board
Method status
(”Rapid access”)
Blank / Calibration
Missing
Has not been executed
Expired
No longer valid *
Valid
Has been executed and is still valid
Invalid
Unusable (Reagent BLANK / Calibration)
* Possible drift in chemical characteristics of reagent
Quality control 3
Not on board
Problems
and solutions
Identifies problems
concerning the instrument
and indicates possible
solutions for the user.
Method status
Provides information for
each method programmed;
Indicates scheduled and
available tests, and the
status of reagent blank,
calibration, calibrators
and quality control.
Calibrators / Quality control **
On board
Specified and present
Expired
Specified but no longer valid
Specified but not present
Not on board
Not specified in method
Method error
** User’s may elect to apply quality controls at any time
to monitor the accuracy of ongoing analyses
MON, continued
Problems and solutions
Item (type)
Problem
GLU-1 (reagent)
Empty
3/16/2009 4:21:26
Waste (weekly maintenance)
Tank full
3/16/2009 4:21:26
Empty the waste tank and access the panel for confirmation
Wash station (instrument)
Mechanical error
3/16/2009 4:21:26
Technical assistance required
GLUP (method)
Incorrect field value
3/16/2009 4:21:26
Administrator assistance required
Type of
problem
Nature of
problem
See OPE.11 for a diagram
of a “Rapid access” function
Method
Avail. tests
GLU
Prog. tests
Sched. tests
2
0
Solution
Date
Provide a new bottle of GLU-1
Solutions provided
with analyzer
or designated by administrator
*
Date and time since
problem was detected
Method status
Blank
Calibration
Calibrators
Quality control 1
Valid
Missing
Not on board
Not on board
Quality control 2
BUN
103
3
0
Valid
Expired
Not on board
Not on board
Not on board
GOT
54
51
7
Valid
Valid
Not on board
Not on board
Not on board
Tests scheduled
Tests programmed
Approximate number of tests possible
(with reagent liquid levels available)
*
OPE.19
Not on board
Recorded status of blank, calibration,
calibrators and quality controls
*
EDIF Instruments
Quality control 3
Click for “Rapid access” to related sections
Software
HI
OPE.20
EDIF Instruments
Software
HI
SAMPLES tab
(SAM)
Add / Remove a sample
Barcode
scan
Save
Apply
Save and file
a sample list for reuse
(without related tests)
Apply modified data to
selected sample in list
Load
Retrieve and load
a sample list from saved file
(without related tests)
Display work form
for sample report
Clear
Samples listed here are
automatically transferred to the
sample list in the “WORKLIST tab”
Clear displayed
sample list
(with related tests)
Display work form
for sample inspection
Sample
tray
Sample status (”Rapid access”)
Routine
Not Scheduled
Scheduled
Executing
Completed
One or more tests of that sample are waiting for confirmation
All tests of that sample have been scheduled
One or more tests of that sample are being executed
All tests of that sample have been completed and are correct
Sample errors
Sample empty
Test aborted
Sample remaining is insufficient for testing
One or more tests of the sample have been aborted
Linked patient
Establish links between
patients and samples
for analyzer archives.
See OPE.40 for a
description of how
this feature works.
Display work form showing
tray positions for samples,
calibrators and controls
Barcode
scan
Execute a complete
scan of “sample barcodes”
SAM, continued
Sample identification (ID)
If an ID has been provided with the sample,
click on the ID field and enter it using the touch-screen “Keyboard”.
If no ID is provided, press “Auto”
and the next available ID number will be entered.
1 Identify a category (Sample, Calibrator, Control)
and enter data required (see adjacent list).
Choose the category
Calibrator / Control identification (ID)
Access the “list ” and select from those provided.
In most cases
only the sample
information panel
will be required.
Position *
Press “Auto” for next available position.
(Enter specific positions using the touch-screen “Keyboard”.)
Touch-select
either calibrator
or control
when required.
Urgent *
To identify samples or controls of an urgent nature.
(Calibrators are always urgent and are auto-tagged as such.)
Tube / Cup *
Identify sample container to be used.
Reference **
Enter a reference name for identification convenience.
.
New ...
Select a patient from the “list ”
to link it with the sample currently
being added, thus permitting
the recording of related tests
in the patient archive (OPE.40).
Department / Type **
Access the “list ” and select from those provided.
Nature **
Select serum or urine.
* sample, calibrator, control
** sample only
2 To add a new sample,
(after data fields are complete),
press the “Plus” icon
to transfer that information.
Gates Paul
Mart Bob
Smith John
Thomson Henry
EDIF Instruments
OPE.21
Software
HI
OPE.22
EDIF Instruments
Software
Sample list management
3 Continue until all sample data required
Initially all categories are checked
(samples, calibrators, controls).
If not required click to remove that checkmark.
for the current work schedule has been
entered and transferred to the sample list.
... first touch select
the line in question
and then perform
the operation
NORM 1:2
Control
4
Calibrator
Yes
0002
Male
Yes
0001
Female
CRPCAL-R70891
Surgery
0003
PATO-1
When no designation is
indicated in the “Type” column
the sample type
has not been specified
Control
There are no reserved positions.
Urgencies, Samples, Calibrators and Controls are positioned
together in normal tube configuration and in any sequence
assigned by the operator in the course of programming work.
4 To delete an entire line from the sample list,
touch select that line
and press the “Remove” icon.
Pediatry
*
To delete a line (Item 4),
change an entry (Item 5),
inspect a sample (Item 6)
or print test results (Item 7)
SAM, continued
*
Click for “Rapid access” to related sections
5 To change an incorrect entry in the sample list,
touch select that line,
make the necessary adjustment
and press “Apply” to add it.
Apply
HI
SAM, continued
1
A line item selected in the
“SAMPLE tab” (OPE.20)
will be entered here
under “Information”;
Other relative data will
be displayed throughout
the current work form
2
6 To access accurate information of a sample,
Additional useful
information
3500 µl (full)
2
5
1
6
6
Subsequent selections
of other samples can
be accessed here
without returning
to the “SAMPLE tab”
3
5
select that line in the sample list
and press the “Inspect” icon
to display the “SAMPLE INSPECTION” work form.
Graphic
display
showing
sample
volume
remaining
-
3
4
Next sample;
Previous sample
Level too low
(insufficient
for testing)
*
4
Tests listed showing
information on
method code, dilution,
OD, result, status, date
*
click for “Rapid access”
to “TEST INSPECTION”
EDIF Instruments
OK
7
7
Sample inspection
8
An overview of sample information featuring
a graphic display showing the remaining sample volume
for easy monitoring of the current level.
OPE.23
Access
“SAMPLE REPORT”
8
Exit
“SAMPLE INSPECTION”
work form
Software
HI
OPE.24
EDIF Instruments
SAM, continued
Software
7 If a printout of test results is required,
6
select that line in the sample list
and press the “Print” icon
to display the “SAMPLE REPORT” work form.
1
A line item selected in the
“SAMPLE tab” (OPE.20)
will be entered here
under “Information”;
Other relative data will
be displayed throughout
the current work form
Comments
6
2
2
1
7
Print sample report
8
Preview the report
5
3
3
9
Next sample;
Previous sample
Check to automatically
print report when
all tests for that sample
have been completed
Click for “Rapid access”
to inspect a test (OPE.30) *
4
4
Checked tests
will be included
in the report
5
Tests listed that
have been completed
showing information on
method code, dilution,
result, status, date
Space reserved
for comments
and observations;
Prearranged comments
can be selected and
added to the “Comments”
box by pressing “Add”
“Add”
Prearranged comments
Subsequent selections
of other samples can
be accessed here
without returning
to the “SAMPLE tab”
HI
OK
10
Date and time
7
8
9
10
11
12
Sample report
With this form it is possible to select the results to be shown
and to insert additional comments in the printout.
11
Name of analyst
12
Exit
“SAMPLE REPORT”
work form
SAM, continued
1
1a
8 This work form shows the positions assigned to
urgencies, samples, calibrators and controls,
with the color coded status of each.
It can be displayed by pressing “Sample tray”.
Touch select any
tray position to
display color coded
information panels;
Remove
from tray
5
Sample
tray
Color coded key
permits identification
of the position of
samples/urgencies/
calibrators/controls,
and the status*
of each in the
testing process
Inspect
1
Commands to remove
a sample or display the
“SAMPLE INSPECTION”
work form
2
Code examples
5
2
List of samples
with no assigned
tray positions;
Activate any item
and touch-select
a tray position
to place that item
Place all
3
Auto placement
of samples listed
to any empty
tray positions
Remove all
4
Remove all samples
from the tray
EDIF Instruments
SAMPLE
(orange ring)
+
COMPLETED
(green center)
3
Place all
=
4
SAMPLE
COMPLETED
1a
Remove all
(orange and green)
OK
* see descriptions of
“Sample status”, OPE.20
6
Sample tray
This effective management tool
makes it is possible to remove or place samples, and
monitor type, location and status of tests displayed.
OPE.25
6
Exit
“SAMPLE TRAY”
work form
Software
HI
OPE.26
EDIF Instruments
Software
HI
Create
a new worksheet
Worksheets
Save and file
all worksheets for reuse
(with related samples)
Remove
worksheet selected
Transferred from
“SAMPLE tab”
Retrieve and load
worksheets from saved file
(with related samples)
Run all tests
on the worksheet
selected
Clear all worksheets
(without related samples)
Print a report
of the worksheet
selected
Unlimited worklists
can be managed
simultaneously.
Result edited
Test
Test
Test
Test
Test
Test
programmed / Waiting for confirmation
confirmed / Waiting for execution
in process
result usable
result unusable
result edited by user
Test status
(”Rapid access”)
Diluent empty
Not assigned on reagent panel
Not assigned on reagent panel
Reagent usability range exceeded
Reagent assigned insufficent
Reagent assigned insufficent
Sample provided insufficent
Diluent provided insufficent
Worksheet management
WOL, continued
2 To remove a sheet of tests activate
1 To create a new sheet of tests
that sheet and touch-select “Minus”.
touch-select “Plus” and activate
the “NEW SHEET” window.
Type in a name or
other designation
suitable to identify
the new page and
and then press “OK”
3 To run a sheet of tests
activate that sheet and
touch-select “Execute”.
NEW SHEET
Sheet name
Sheet 2
OK
4 To print a sheet of tests
Cancel
activate that sheet and
touch-select “Print”.
Sheet status
Worksheets
Not scheduled
Worksheets are
pages of tests
Scheduled
Remove test
Execute test
See OPE.29
Inspect test
Executing
i
Completed
Aborted
For testing convenience the “WORKLIST” can be broken down
to create individual “Worksheets” of tests for specifc user purposes
(e.g. all glucose; all samples of a specific department;
all tests of the same sample; all tests by the same analyst).
i
EDIF Instruments
*
Click any “Sample ID” to display the “Message boxes” showing
relevant sample and patient information (see Items 4 and 5, OPE.12)
OPE.27
When a sheet
is removed
the tests of that
sheet will be lost.
*
Click for “Rapid access”
to related sections
Software
HI
OPE.28
EDIF Instruments
Software
5 Choose a category (Test, Calibration, QC)
Test management
to add that item to a selected sheet.
WOL, continued
Identify the item
For calibration select
For a test
standard or reagent blank
select both a sample
and a method (this includes
and a method
a complete list of tests)
Departments
This panel appears above
the “Sample list” when departments
have been set-up by the administrator.
Only the samples in checked categories
will appear in the “Sample list” thus
reducing user search-and-find operations.
For quality control
select one or more
QC listings
and a method
Undefined
If a listing is not required
click to remove that checkmark
Calibrator / Control
Surgery
Undefined
Calibrator / Control
Surgery
Select a
method
Select a
method
Method groups. Touch-select a method code
to add that item to the selected page of tests.
Method profiles. Touch-select a profile to add
.
the page selected to the complete list of tests
linked to that item
Blue: test not programmed
Green: test programmed
Profile 1
Profile 2
Profile 5
Profile 6
Profile 3
Profile 4
Select a
profile
The administrator of
your laboratory has
managed method profiles
for this instrument
to simplify work routine.
Users can add a complete
list of tests to a worksheet
with a single click avoiding
long programming sessions.
Note that method groups and profiles are available in all panel variations
HI
WOL, continued
Worksheets
DILUTIONS
If more than one dilution
is available for the method selected,
a box will be shown for
the selection of the dilution rate.
6 Activate any test line(s) on a worksheet of tests to either
“Remove, Execute or Inspect” the line(s) indicated
and then touch-select the required option.
Delete selected test(s).
Note: when a test
is removed it
will be lost.
When “Execute test”
is activated ...
Access
“Test inspection”
work form
(see OPE.30).
Method
Sample
Nature
ALP
0001
Serum
Check dilutions
to apply.
Rates that are checked
will be inserted in the current worksheet.
NOTE
If the result of a test is unusable,
it may be possible that
the sample is too concentrated.
When this is the case
the test should be replicated
with an appropriate dilution rate
based on the previous result.
• Non-scheduled tests will be scheduled
and added to the work queue.
• Completed tests will be copied (replicated).
The copies will be inserted in the worksheet
(possibly diluted) and executed.
• Tests in error will be run again.
EDIF Instruments
Test proposed
OPE.29
Software
HI
OPE.30
EDIF Instruments
WOL, continued
1
2
5
Subsequent selections
of other tests can
be accessed here
without returning
to the “WORKLIST tab”
6
Print test report
7
3
3
Additional useful
information about
the test result
(includes ODs,
date and eventual
listings of issues
encountered
during testing)
select that test line
and press “Inspect test”
to display the work form.
A line item selected in the
“WORKLIST tab” (OPE.26)
will be entered here
under “Information”;
Other relative data will
be displayed throughout
the current work form
4
Access
“SAMPLE INSPECTION”
4a
8
Next test;
Previous test
OK
4
4a
Test result
readings in Abs
with a graphic
representation;
Readings plotted
here represent
the trend of ODs
during test execution
HI
5
7 To inspect the result of a test on a sheet
1
2
Software
6
7
8
9
Within 24 hours
from test execution,
if either calibration or
blank were faulty,
and thus were adjusted,
it is possible to request
a new result calculation
with the latest calibration
Test inspection
9
An overview of test information with a graphic
of test readings and result considerations.
A recalculation of test results is possible.
Exit
“TEST INSPECTION”
work form
WOL, continued
4a
The color coded chart below indicates the test timings
followed by the instrument for a single test
LIS management system
* * *
Operators familiar with the trends normally
associated with the reaction curves of analyses may
be in a unique position to contribute their insight regarding
the validity of tests executed on specific samples.
This can provide a valuable asset which is particularly effective
when testing samples with specific pathological characteristics.
LIS WORKSHEET
OD
Incubation
time 1
Incoming worksheet has been
received from the server.
Do you want to accept it?
Reading
time
Incubation
time 2
0,284
OK
0,253
Cancel
0,223
0,192
0,161
0,130
0,100
0,069
0,038
0,007
Time
609 s
580 s
551 s
522 s
493 s
464 s
435 s
406 s
377 s
348 s
319 s
290 s
261 s
232 s
203 s
174 s
145 s
87 s
58 s
116 s
0,000
Reactions are accurately followed by
readings taken every machine cycle for
each test during the entire testing process.
EDIF Instruments
OPE.31
If software for the management
of the laboratory (LIS) has been set-up
to work in tandem with the instrument, it is possible
to receive worksheet data from the central computer.
When this happens a message box
requesting confirmation by the operator
will be displayed in the middle of the screen.
Upon “OK”, LIS information will
be transferred to a normal worksheet and executed.
Once completed the results will be sent
automatically to the central computer.
Software
HI
OPE.32
EDIF Instruments
Software
HI
METHODS tab
(MET)
Fields
Method list
Designations
Designations
Information
pertaining to the
method selected
CHOL
Calibration
CHOL
Calibration
Information
used to build
calibration tests
QC
(see OPE.33)
Correlation
Information used to
adjust results with
correlation models
(see OPE.35)
1
Access the
“METHOD FIELDS”
work form to check
the working parameters
of the selected method
(see OPE.36)
Select any method
to apply available
information
to the three
adjacent panels
Correlation
1 Select a method in the “Method list”
and the appropriate data will be displayed
under “Desigations, Calibration” and “Correlation”.
This information forms the basis for functions
critical for testing (e.g. readings and calculations,
interpolations, testing processes, timings, volumes).
Access the
“QUALITY CONTROL”
work module
to assign controls
to each method and
check QC results
See also OPE.35
for a special note
The methods that are installed on this instrument
have been set by your administrator.
They have been developed for specific reagent types.
During the testing process if there is any doubt
concerning the quality of the reagent used,
bring this to the attention of your administrator.
Calibration
MET, continued
METHOD
ERRORS
Calibrations are the means by which the instrument transforms ODs
(optical density values) into interpretable results (concentrations).
It can be a linear function (factor) or it can be a
non-linear function described by multiple points (standards).
To ensure accurate results it is mandatory to execute
a calibration of the method each time it is requested by the system.
Invalid filter
A filter with the
wavelength inserted
is not mounted
on the instrument
Invalid
calibration
of method filters
The optical calibration
at “Start-up” has failed
Number of standards to be used for the calibration
Factor of multiplication for result concentration
Validity of the calibration expressed in hours
Interpolation type used for calculation
Error in calibration
curve standards
One or more standards
of the curve are invalid
Calibration
Method
error
General
Error in reagent
BLANK ranges
Blank calibration
values are out of range
Error in calibration
curve ODs
The OD values
of calibration are
out of range
1
2
Click “Single” and the calibrator in position 1 will be repeated in all other positions
EDIF Instruments
OPE.33
Software
HI
OPE.34
EDIF Instruments
Calibration, continued
Calibrator used for the standard
Dilution rate to be applied to the standard
Standard
Software
MET, continued
Lot currently in use for the selected calibrator
Primary concentration of the selected lot
Final concentration* used for the standard
OD value of the last calibration in absorbances (Abs)
Date of execution of the last calibration
*
Current calibration
Final concentration
=
Primary concentration
÷
Dilution rate
*
1
2
8
Touch-select curve chart,
access “ listings”,
select interpolation type
to be used for calculations
Reagent
blank
Blank correction used in result calculation if checked
Validity of the blank in hours
Blank OD values in absorbances (Abs)
Date of execution of the last blank correction
Print a report showing
the current
calibration
status and chart
If the calibration of a method is no longer valid the user will be alerted
both in the “MONITOR tab” (OPE.18) and in the test creation process
in the “WORKLISt tab” (OPE.26). In this case it will be necessary
to build new calibration tests for the required method to be executed.
CURVE
CHART
CURVE CHART
Interpolation type:
Average
Polylinear
Linear regression
Cubic spline
Four parameters
HI
Correlation
Result correlation
MET, continued
This operation, configured by the administrator of the laboratory,
is used to align the result obtained during testing with other
results statistically obtained from instruments of reference.
This process may help to improve the accuracy level
of the instrument in certain cases.
A special
note on
quality
control
QC
The quality control module
performs a dual function
(see OPE.46)
This module can be accessed from the “METHODS tab”
to assign the controls that are used during
the execution of QC tests and to monitor their status.
EDIF Instruments
OPE.35
System
quality control
It can also be accessed to monitor
the overall status of the entire system
(e.g. accuracy and performance indicators).
Software
HI
OPE.36
EDIF Instruments
MET, continued
Software
4 To inspect or adjust a method item, press “Fields”
Fields
to display the “METHOD FIELDS” work form.
Then, select the desired line from the method list
to automatically apply the relevant information
(which will define all testing procedures).
1
PIPETTING
Codes of reagents
and diluents to be used;
Bottle sizes;
Liquid volumes pipetted
2
TIME
The time scheduled
for the test reaction
(i.e. between sampling
and reading)
6
LIMITS
Working limits
for results validity
7
AUTODILUTION
Dilution rate used in
the event of automatic
test repetition
8
Sample types
Minimum
3
3
1
WAVELENGTHS
Each method requires
specific wavelength(s)
for the reading(s)
to be performed
4
2
Maximum
Man
Woman
Child
Dialysate man
Dialysate woman
4
5
6
See also OPE.37
7
10
5
11
Large
Large
Small
Cup
PATHOLOGICAL
RANGES
Min / Max values
for various sample types
10
OK
GLU-1
DILUTIONS
Serum and urine rates
9
9
8
WASHING
Programmed intensity
of washings
required for each
test sequence
INCOMPATIBILITY
Number of cycles
that are skipped
in the work queue
to avoid contamination
owing to incompatible
reagent proximity
HI
RESULT UNITS
Allows access to
appropriate
measurement units
for the analysis
being performed
11
Select
suitable
bottle size
or cup
12
Print report
of selected method
12
Method fields
Exit
“METHOD FIELDS”
work form
MANAGEMENT OF PATHOLOGICAL
RANGES AND LIMITS
A list of sample types may be set-up
by the administrator.
1
In the test reports, if a result is lower than
the minimum normal value “<L” is indicated.
If a result is higher than the maximum
normal value “>H” is indicated.
Minimum and maximum normal reference
values are expressed in primary units.
To add a new “Sample type” press “Add”,
select from the “list ” of previously added types
(or enter a new value for specific use) with the
maximum and minimum range, then press “OK”.
Add pathological value
9 - Pathological ranges
Minimum
Sample types
Maximum
Man
Woman
Child
Dialysate man
Dialysate woman
OK
Cancel
2
1
Add
2
Remove
To remove a type, select a line item
and press “Remove”.
3
3
Edit
To modify a type,
select a line item, press “Edit”,
change the information and press “OK”.
EDIF Instruments
OPE.37
Software
HI
OPE.38
EDIF Instruments
Software
Work modules
Test count
Tests retrieved
from “ARCHIVES”
for use in the
management
of patients
(OPE.40).
QC results
and statistics
of single methods;
Performance report
of the entire system
(OPE.46).
Patient
management
Lot
management
System
quality control
10.09.43
Press to display
available special management features
Cumulative
listing of the number
of tests executed
for each method
programmed
(OPE.39).
All functions
dealing with the
management of
calibrator and
control lots
(OPE.44).
“Access”
modules
HI
Test count module
This special management feature provides
a continually updated record of all testing activities executed
including liquid quantities of reagents that have been used.
Test count
1
Number
of tests counted
per method
Select this module
to review the
number of tests
recorded per method;
Print a report
of current listings.
1
2
Print a report
of tests counted
3
Exit
“TEST COUNT”
module
Print report
EDIF Instruments
2
3
OPE.39
OK
Software
HI
OPE.40
EDIF Instruments
2
If “New ...”
in “Linked patient”
has been selected
this panel will be displayed
The “Linked patient” box
(lower right corner of the “SAMPLE tab”)
permits the user to quickly link
samples with patients during routine
sample creation or editing (OPE.21).
Software
3
Type any
key indentifying word,
(Name, Family name, Type, ID)
to initiate a search in the archive
PATIENT SEARCH
Smith Annie
Smith John
New ...
Gates Paul
Smith Paul
Execute
word match
on items
in archive
Mart Bob
Smith John
Add
new patient
Enter the required information
and “Add” the new patient.
1
A patient selected
will be directly linked
to the selected sample
Smi
During the test execution, when a test linked to a patient is completed,
a new item will be recorded in the archive making it possible to search for old tests executed
or to track the progress over time of individual patients.
Patient management module
This module provides information and procedures for the optimum operation
and the efficiency of patient management (e.g. list of patients, patient searches,
tests organized by date or analysis, stored test features).
HI
Patient
management
List patients and
search for individual
patient records.
1
2
Enter “Key” indentifying words
(i.e. Name, Family name,Type, ID)
to search for patients in archive
Access “Detailed search”
to identify patients
by entering key words
3
Display “Complete list”
of patients in archive
1
4
2
3
In this panel a list
of patients is displayed.
The list may be complete
or partial (i.e. the result of a search).
This feature can be used to inspect
or edit patient information and to show tests
of a selected item recorded in the archive.
“Add” a new
patient to the list
5
4
“Edit” selected line item
5
6
Access
“Patient test list” panel
(OPE.42)
6
7
Select any line item in the list of patients to display
additional data in this panel (e.g. Date of birth, Email, Type ...).
EDIF Instruments
OPE.41
7
Exit
“PATIENT MANAGEMENT”
module
Software
HI
OPE.42
EDIF Instruments
Patient management module, continued
Software
1b
1a
“Sort tests
by date”
of execution
2
“Sort tests
by method”
of analysis
Access the patient list of tests
organized by date or by analysis and print reports.
1a
“Test information”
Partial information
about the selected test
(ID, Method, Date, Result)
3
Graphic showing the evolution
of test results over time.
Select “Sort by method” (1b)
and then the method name
in the list to plot the graphic
1b
2
Print
checked tests(s)
4
4
Test stored
5
“Print” a report of the tests
previously checked in the list
5
3
For detailed information
about the selected test
access the “Test stored” form...
(next page)
Test stored
Treeview of patient tests
organized by date
or by method as requested
6
6
Exit
“PATIENT TEST LIST”
panel
HI
The information provided
here will allow the operator
to retrieve data from past
situations to identify
previous testing anomalies
that may have occurred.
Equipped with this
knowledge the operator is
in a position to apply
the work practices that
are expected from a
modern laboratory
(national or international
standards may apply).
Test stored
Access a single test showing system status
(e.g. method, calibration, sample information)
precisely at the moment of execution of that test.
TEST STORED
1
METHOD
SAMPLE
CURVE
4
3
2
“Sample information” upon which
the archived test has been executed
“Calibration curve” used to calculate
the result of the archived test
1
“General information”
about the test
(i.e. Test ID,
Date of execution,
Result, Dilution,
Logged operator,
Patient ID)
EDIF Instruments
“Method parameters” employed
to execute the archived test
Exit
“TEST STORED”
panel
5
OPE.43
Software
HI
OPE.44
EDIF Instruments
Software
Lot management module
To simplify the information loading and monitoring process,
this module has been designed to manage
the calibrators and control lots in a single database.
Lot
management
LOT MANAGEMENT
1
Load new lots of
calibrators and controls;
Link methods to lots;
Inspect the
current listings.
With this module
users can add new lots and
specify multiple methods.
Each lot can be linked to
as many methods as required
and once a lot/method
linkage has been established
it need never be recorded again.
Unused lots can be deactivated.
2
R03000
AUSL
MULC1
R03000
MULC1
AUSL
1a
1b
2b
2a
Link
method
Add
Remove link
Remove
Apply
Apply
Active
(complete decriptions below)
3
HI
1
2
This panel deals with method selection
and the linkage of methods to lots
This panel deals with all lot functions
(e.g. entering, recording, storing)
1a
2a
Enter the name of a new lot,
(select calibrator or control) and enter code
and date of expiration in text boxes;
See additional commands below ...
Select the method required
for linkage from choices
in the “list ” provided;
See additional commands below ...
Remove
Apply
Active
Link
method
“Add” lot entered to record file
Add
Stored
“Remove” lot displayed
from record file
Remove link
“Apply” adjustments
made to lot displayed
Apply
“Link” method chosen to
the lot selected in panel 1a
“Remove link” selected
“Apply” adjustments made
to method displayed
2b
“Activate / Stored”
Indicates the lot status (active
or stored); Click to change
(lots with same name cannot
be activated at the same time)
List of all methods currently
linked with the selected lot
(name and code indicated)
1b
3
List of lots currently recorded
Exit “LOT MANAGEMENT” module
EDIF Instruments
OPE.45
Software
HI
OPE.46
EDIF Instruments
Software
Quality control management module
This module has been designed to control the quality of the
system by monitoring the QC results of methods
and extracting information regarding the accuracy of the instrument.
QC
System
quality control
1
5
2
2009/11/01 16:10
MTCL1-N
25,1 mg/dl
2009/11/01 16:20
MTCL1-N
24,1 mg/dl
2009/11/01 16:30
MTCL1-N
24,3 mg/dl
2009/11/01 16:50
MTCL1-N
25,4 mg/dl
2009/11/01 17:12
MTCL1-N
0,1 mg/dl
2009/11/01 17:24
MTCL1-N
25,8 mg/dl
2009/11/01 17:31
MTCL1-N
25,6 mg/dl
2009/11/01 17:43
MTCL1-N
26,4 mg/dl
2009/11/01 17:55
MTCL1-N
27,1 mg/dl
6
4
3
wednesday 5th august 2009
7
wednesday 2nd september 2009
8
Assigns controls
to methods
(up to three conrols
per method);
Provides a
Levey-Jennings
graphic of
all QC results
executed over time;
Determines
accuracy level
of the instrument;
Prints a report
of quality controls.
HI
2
1
“Reference” values
for mean and CV%
taken from control
lot data (OPE.44)
4
“Calculated” values
for mean and CV%
using all items checked
in test results list (Item 3)
Levey-Jennings
graphic of QC
results with dated
reference lines
It is possible to
select the period
of control evaluation
using the “From” and
“To” date selections
3
5
List of tests executed
in the selected period (see item 4)
for the selected method and control
Any items that
remain unchecked
will be excluded
from the values
calculated and
also from the
graphic chart
EDIF Instruments
Access “list
” and select a “Control”
for each of the three QC operations to be used
If more than one
QC test has been
executed per day,
only the final test
will be checked
6
7
8
List of
methods available
Print daily report of the
quality control selected
for current method
Exit
“QUALITY CONTROL”
module
OPE.47
Software
HI
OPE.48
EDIF Instruments
Software
HI
Power-off / Shut-down / Switch-off
1 To begin closing procedures,
first click the “Power-off” button
to access the options required.
Options
Start-up
Shut-down
Exit
(but not Shut-down)
If testing is to be
resumed shortly,
a final wash of the
reaction cuvettes
is not required
at this time.
In this case
press “Exit” and
the programme
will close
immediately.
Power-on / Power-off
ADDITIONAL INFORMATION CONCERNING “SHUT-DOWN”
Each day, following the completion of the work scheduled,
a Shut-down procedure is required to initiate the cleaning
of the reaction cuvettes (before switching off the analyzer).
If this procedure is neglected any test residue remaining may
damage the cuvette walls. This will reduce testing accuracy
and possibly require earlier replacement of cuvettes.
2 To continue closing procedures,
select the “Shut-down” option
to access the final shut-down procedure.
Execute final shut-down procedure.
Proceed?
Shut-down options
Check automatic actions
to be run after shut-down:
i) exit software
ii) turn off PC
iii) restart when required
(e.g. next morning)
iv) automatic start-up
following restart
Exit after shut-down
3 Switch off the PC
and the touch screen monitor.
4 Switch off the analyzer.
Switch for
reagent
refrigeration
plate
If for any reason
the analyzer is to be
switched off, but the
reagent trays are to remain
on-board, be sure to leave
the refrigeration plate on.
Main
power
switch
If "Programmed restart"
has been checked
during "Shut-down" do not
turn off the main power switch
and the instrument will hybernate
until the selected "Date and time".
Notes
Edif Instruments would welcome receiving
any comments or feedback
from the operator
so that over time
improvements
can be made.
EDIF Instruments
OPE.49
Software
HI
EDIF Instruments
OPE.50
Software
HI
SAMPLES
REAGENTS
WORKLIST
MONITOR
METHODS
The approach taken in the design
of Edif products and the Edif line
of analyzers is simplicity itself.
www.edif.it
Edif Instruments S.r.l.
via Ardeatina, 132 - 00179 - Rome, Italy
Phone: +39 06 5127161 - Fax: +39 06 5127550
Web: www.edif.it - Email: [email protected]