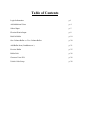
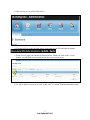
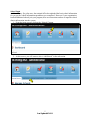
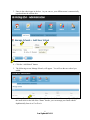
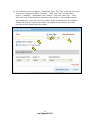
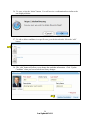
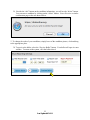
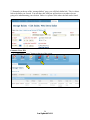
1
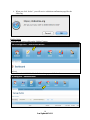
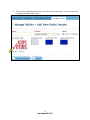
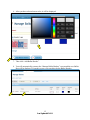
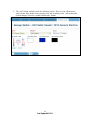
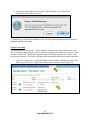
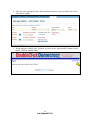
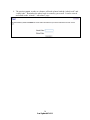
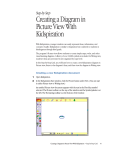
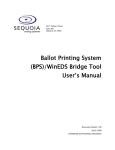
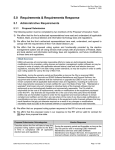
DoubleClick Democracy
User Manual
Table of Contents
Login Information
p.1
Add Additional Users
p. 4
School Input
p. 5
Election District Input
p. 8
Build A Ballot
p. 10
One Column Ballot vs. Two Column Ballot
p. 20
Add Ballot Item (Candidates etc.)
p. 21
Preview Ballot
p. 25
Ballot Link
p. 26
Generate Voter ID’s
p. 26
Unlock Code Setup
p. 28
DoubleClick Democracy
User Manual
Log Into the System:
1. Go to https://dcdonline.org/Admin/Users/SignIn
2. Enter in your email address and password
1
Last Updated 8/24/11
3. After you log in, you will see this screen.
4. You also will see in the far right corner, your name, my profile and sign out button.
5. In the “Users” page you can edit or delete profiles. When you click on the “Users”
button, you will then see a screen that lists all of your current users.
6. To edit or delete a current user, click on the “edit” or “delete” button besides their name.
2
Last Updated 8/24/11
7. After clicking on the “edit” button, you will see the following screen where you can
change any of the person’s basic demographic information including the password as well
as the status. When you have made the appropriate changes, click on the “update user”
button and you will return to the main “Users” screen.
8. On the “Users” page, you can delete a user simply by clicking the delete button. After
selecting the “Delete” button, you will be prompted with a confirmation box shown
below.
3
Last Updated 8/24/11
9. To add a user from the “Users” homepage, select the tab “Add User”.
10. On the add user page, you will be asked to provide basic demographic information for
the new user as well as create a password for the user. Additionally, you will be
required to give the user a role. You have two options. One is the affiliate administrator
role, which is the level of access that you have. This person will be able to do exactly
what you can do. The report user can only view results. The report user cannot create a
ballot, add a school, generate voter ids or add a voting district. Select the “add user’
button when you have completed the page.
4
Last Updated 8/24/11
School Input
A. School Entry: For pilot users, the national office has uploaded the basic school information
for you per the school information spreadsheet you completed. However if your organization
has had additional schools join your program, here are instructions on how to input the school
district information into the system.
1. From the home screen, click on the “Schools” button.
2. At this screen, you will want to select “Add School” in the tab section.
5
Last Updated 8/24/11
3. Enter in the school name in the box. As you can see, your affiliate name is automatically
populated into the affiliate box.
4. Click the “Add School” button.
5. The following screen, Manage Schools, will appear. You will see the new school you
added.
6. Additionally, you will be able to edit and delete schools from this screen. By clicking on
the small arrow to the left of the “Name” header, you can arrange your listed schools
alphabetically from A to Z or Z to A.
6
Last Updated 8/24/11
7. On the Edit screen, you can change the school “Name”, “Generic Voting Id”, “Voting
District(s)” and “Status”. When you are finished, click the “Update” button.
8. If you need to delete a school, simply click the “Delete” button. A confirmation screen
will appear asking if you are sure you wish to delete the school.
7
Last Updated 8/24/11
Election District Input
1. From the home screen, click on the “Schools” button.
2. Then select the “Add Voting District” tab.
8
Last Updated 8/24/11
3. On this screen, you will “name your voting district. Additionally, your affiliate will
automatically populate and the status will be set as “Active”.
4. After you have given your voting district a “name”, click on “Add Voting District”. The
following screen will appear displaying your new voting district. By clicking on the small
arrow to the left of the “Name” header, you can arrange your listed voting districts
alphabetically from A to Z or Z to A.
5. Furthermore, you can manage your voting districts after you have entered them. Click on
the “Manage Voting Districts” tab on the “Schools” page. You will see the “edit” and
“delete” buttons besides your voting districts. The “edit” button will take you to the
following screen where you can change the name of the district or the status.
9
Last Updated 8/24/11
6. When you click “delete”, you will receive a deletion confirmation page like the
following.
Build a Ballot
From the home screen, click on the “Ballots” button.
1. Select the “Add Ballot Header” tab to change your ballot header.
10
Last Updated 8/24/11
2. On this screen, you can name your ballot. An example of a name for a ballot is “2010
Mid-Term Elections”. Your affiliate name automatically populates in the affiliate box
and the “Active” button is selected.
11
Last Updated 8/24/11
3. The DoubleClick Democracy logo is the default logo for each ballot header. To change
the logo, select the “Change” button. After clicking on “Change”, your finder window
will appear allowing you to select a saved logo to insert onto the ballot. Once you have
found a logo, click “Choose”.
12
Last Updated 8/24/11
4. After you have uploaded a new logo, you will return to this screen. Your new logo will
be displayed under Header Logo.
13
Last Updated 8/24/11
5. To change the Header Color, Primary Color or Secondary Color, click on the color box.
A color box will pop up and you can select a different color.
14
Last Updated 8/24/11
6. After you have selected a new color, it will be displayed.
7. Then click “Add Ballot Header”.
8. You will automatically return to the “Manage Ballot Headers” screen and the new Ballot
Box will be displayed. From this screen, you can edit or delete Ballot Headers.
15
Last Updated 8/24/11
9. The “edit” button will take you to the following screen. Here you can edit the name,
status, header logo, header color, primary color and secondary color. After making the
needed changes, select the “update ballot header” button.
16
Last Updated 8/24/11
10. If you wish to delete a ballot header, on the manage ballot headers select the “delete”
button. You will receive a confirmation box similar to the one displayed below.
11. Now that you have individualized your ballot header, you are ready to begin creating
your ballot. Select “Add Ballot”.
17
Last Updated 8/24/11
12. On this page, add a name. Then choose your ballot box. Select the start date and time
and end date and time for your ballot to be available for voting. After selecting the dates
and times your ballot will be available, select the active days. For example if you set the
start date to Oct. 1st and the end date to Oct. 31st and you check Tuesday, the ballot will
only be available on the Tuesdays between Oct. 1st and Oct. 31st. If you want the ballot
to be available every day of the week, check the box by each day. Also notice the “Ballot
Header” is set to default. To use an individualized header, select one from the drop down
box under “Ballot Box Header”. Finally the question regarding generic voter id
automatically populates to no. After completing the form, click on “Add Ballot”.
13. Now you can begin adding items to the ballot. Select “Add New Ballot Item” at the
bottom of the page.
18
Last Updated 8/24/11
14. The following screen will appear. Complete the form. The “Title” will be the race in the
election. For example it could be “Governor”. With “Item Type”, you have three
choices, “Candidate”, “Amendment” and “General”. Select one “Item Type”. “Max
Selections” enter in the number of selections a voter can have. For example in student
government races, voters can select four senators in the election from the 20 candidates.
“Ballot Item Layout” requires you to select one column or two columns. See ballot
previews of one column versus two column.
19
Last Updated 8/24/11
One Column
Two Column
20
Last Updated 8/24/11
15. Then complete the “Voting Restrictions” portion of the form. Select a grade level from
the drop down box for “Allow Grade From” and “Grade To”. Choose a district for the
“Voting District” from drop down box as well. Please remember these restrictions need
to match the restrictions you enter when generating voter ids. For generic voter id use,
please select kindergarten through 12th grade. If the race doesn’t have a voting district
(governor or proposition), select none. Then this ballot item will appear on all ballots
within the grade category you have indicated.
16. After you have made your selections and given the ballot item a name, select “Add
Ballot Item”. Then you will see your Ballot Item displayed. You can continue adding
Ballot Items by selecting “Add New Ballot Item”.
17. To add information about each race, click on the “Add Candidate” button.
18. Enter the candidate’s first name, middle name and last name. If you would like, add a
description and party name.
19. You can also upload picture of the candidate by clicking on the “Change” button below
the picture box.
21
Last Updated 8/24/11
20. When you select “Change”, your finder window will appear allowing you to select a
picture file. Remember your picture must be in one of the following formats: JPEG, JPG,
GIF, or PNG. Then select “Choose”.
21. When the “Add New Candidate” box is completed, click on “Add Candidate”.
22
Last Updated 8/24/11
22. Then you will return to the Manage Ballot page and your new candidate will be
displayed at the bottom of the page.
23. Notice that you can edit or delete the candidate now. Additionally, the “Hide Details”
button on the left allows you to hide the candidate information. If you click on it, the
page will look like this.
24. The candidate information will reappear if you select “Expand Details”.
25. To edit or delete a ballot item, use the appropriate buttons on that line. The “edit” button
will let you change the ballot item information you previously entered. Click “update
ballot item” when you are finished.
23
Last Updated 8/24/11
26. To erase, select the “delete” button. You will receive a confirmation box similar to the
one displayed below.
27. To edit or delete candidates in a specific race go to the show details. Select the “edit”
button.
28. The “edit” button will allow you to change the candidate information. Click “Update
Candidate” when you have made the necessary changes.
24
Last Updated 8/24/11
29. Besides the “edit” button on the candidate information, you will see the “delete” button.
You can erase a candidate by clicking on the “delete” button. You will receive a similar
confirmation page as the one shown below.
** To change the order of your candidates, simply hover of the candidate picture, click and drag
to the appropriate place.
30. To preview the ballot, select the “Preview Ballot” button. Your ballot will open in a new
window. To return to the system, click the ballot closed.
25
Last Updated 8/24/11
** Remember at the top of the “manage ballots” page, you will find a ballot link. This is a direct
link to the ballot you created. You can share this with your poll workers or teachers who are
going to be administrating your election. Below is a picture of the where the link can be found.
Generate Voter ID’s
1. Click on the “voters” button at the top of the screen.
26
Last Updated 8/24/11
2. Click on the “generate voter ids” tab. Then you will see the following screen.
3. Next select your ballot, school, voting district and grade that you need to create voter ids
for. Remember you will want to click on the appropriate voting district to match the
restrictions you indicated on the ballot. The same goes for the grade. If you select none
on the ballot that is what you would want to pick here. If you have created a restriction
for K-3rd graders on your ballot and you need to generate ids for that group, select any
grade level in that range. If you want the reports to be broken down by grade level, you
will have to generate ids for each grade level. Enter in how many ids you want to create
in the number box. Then click “generate”.
4. You will be taken back to the “manage voters” page. You should see the ids you just
created listed first.
5. Simply click on the “export” button to get the ids. The voter ids will be exported into an
excel spreadsheet or pdf.
27
Last Updated 8/24/11
6. If you want to delete the ids, click on the “delete” button. You will receive a
confirmation box similar to this one.
** Remember you can generate additional voter ids at any point including during the election
without disturbing your results.
Unlock Code Setup
The system has an “unlock code”. This is an option for those users who wish not to use voter
id’s. Previously with the generic voter id, each voter (student) would have to enter the id. Now
with the “unlock code”, the precinct captain, teacher or volunteer will enter the “unlock code”
one time per computer. The ballot will remain unlocked until the ballot is not used for one hour.
1. To use the “unlock code”, create your ballot. After creating your ballot, go to the “Edit
Ballot” page. Select yes. Create your code and type it into the “unlock code” box.
28
Last Updated 8/24/11
2. Then select the appropriate dates, dates and times that you want your ballot to be active.
Next choose update.
3. When using the “unlock code” function, you will see the “unlock ballot” button on your
ballot. Click on “unlock ballot”.
29
Last Updated 8/24/11
4. The precinct captain, teacher or volunteer will need to know both the “unlock code” and
“school code”. Remember the school code is created by you as well. It can be viewed
and edited on the “schools”, “edit school” page.
30
Last Updated 8/24/11