1
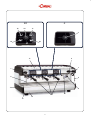
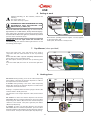
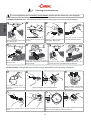
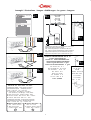
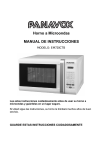
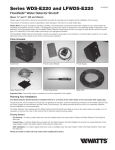
M24
USO E INSTALLAZIONE
USE AND INSTALLATION
USAGE ET INSTALLATION
GEBRAUCH UND INSTALLATION
USO Y INSTALACIÓN
USO E INSTALAÇÃO
Dichiarazione di conformità CE
Con la presente il GRUPPO CIMBALI S.P.A. dichiara sotto la propria responsabilità che:
EC Declaration of conformity
GRUPPO CIMBALI S.P.A., hereby declares, under its own responsibility, that:
Certificat de conformité CE
Par la présente le GRUPPO CIMBALI S.P.A. déclare sous sa propre responsabilité que:
EG-Konformitätserklärung
Die GRUPPO CIMBALI S.P.A. hiermit in eigener Verantwortlichkeit wie folgt:
Declaraciòn de conformidad CE
Con la presente el GRUPPO CIMBALI S.P.A. declara bajo su propia responsabilidad que:
Declaração de conformidade
Com a presente o GRUPPO CIMBALI S.P.A. declara, sob a própria responsabilidade que:
• Apparecchio - Appliance - Appareil
Gerätes - Aparato - Aparelho
• Marca - Brand - Marque - Marke - Marca - Tipo
• Fabbricante - Manufacturer - Fabricant
Hersteller - Fabricante - Fabricante
• Tipo di macchina - Type of machine - Type de la machine
Maschinentypen - Tipo de la màquina - Tipo de la màquina
• N° della macchina - Serial number - N° de la machine
Maschinen-Nummer - N° de la máquina - No de la máquina
è conforme alle seguenti direttive:
est conforme aux normatives suivantes:
es conforme a las siguientes directivas:
vedere targa dati
refer to machine data
voir étiquette données
siehe Angaben zum
Maschinentyp
• ver la placa de la
caracterìsticas
• ver la plaqueta das
características
•
•
•
•
is in compliance with the following directives:
entspricht den folgenden Gesetzesbestimmungen:
está conforme às seguintes directrizes:
2006/95/EC
Direttiva bassa tensione - EC Low Voltage Directive - Normes CE Basse-tension
EG-Niederspannungrichtlinie - Directiva de la maquinaria CE - Directiva sobre a baixa tensão CE
2004/108/EC EMC - EC Electromagnetic Compatibility directive - Normes CE Compatibilité électromagnétique
EG-Richtlinie Elektromagnetische Verträglichkeit - Directiva de la maquinaria CE
Directiva sobre a compatibilidade el.magn. CE
2006/42/EC Direttiva macchine - EC Machinery Directive - Normes CE Machines EG-Maschinenrichtlinie - Directiva de la maquinaria CE - Directiva sobre as máquinas CE
97/23/EC
Direttiva attrezzature a pressione (PED) (Vedere tabella nella pagina successiva)
Pressure Equipment Directive (PED) (See chart in the following page)
Directive Èquipements sous Pression (PED) (Voir tableau dans la page suivant)
Richtlinie-Druckgeräte (PED) (Siehe Tabelle auf der nächsten Seite)
Directiva equipos a presión (PED) (Véase cuadro en la página siguiente)
Directiva equipos sobre pressão (PED) (Veja quadro na página seguinte)
e successive modifiche ed integrazioni.
et modifications ultérieures et intégrations.
y siguientes modificaciones e integraciones.
and later modifications and integrations.
sowie den nachfolgenden Änderungen und Ergänzungen.
e alterações e integrações subsequentes.
La presente dichiarazione perde la sua validità nel caso in cui l’apparecchio venga modificato senza espressa autorizzazione del
costruttore oppure se installato o utilizzato in modo non conforme a quanto indicato nel manuale d’uso e nelle istruzioni.
This declaration is null and void if the machine is modified without the express authorization of the manufacturer or if improperly
installed and used in such a way that does not comply with indications in the users’ manual and the instructions.
La présente déclaration perd toute validité dans le cas où l’appareil est modifié sans l’autorisation du constructeur ou si l’appareil
est installé ou utilisé de façon non conforme à ce qui est indiqué dans le manuel et dans le mode d’emploi.
Die vorliegende Bescheinigung verliert ihre Gültigkeit, falls das Gerät ohne ausdrückliche Genehmigung des Hersteller modifiziert
werden sollte oder falls es nicht entsprechend der im Bedienungs- und Wartungshandbuch aufgeführten Anleitungen installiert
oder benutzt werden sollte.
La presente declaración pierde su validez en el caso de que el aparato sea modificado sin expresa autorización del constructor,
o bien si ha sido instalado o utilizado de forma no conforme a lo indicado en el manual de uso y en las instrucciones.
A presente declaração deixa de ter validade no caso em que o aparelho seja modificado sem autorização do construtor ou se
instalado ou utilizado de maneira não conforme ao indicado no manual de uso e nas instruções.
Sede legale - Registered office - Siège social
Rechtssitz - Sede legal - Sede legal:
Data - Date - Date
Datum - Fecha - Data
30.08.2010
Via A. Manzoni 17, Binasco (Mi), ITALY
........................................................
Product Development Manager
1
........................................................
Industrial Manager
Code 952-098-030 (rev. 1130)
Pmax
[ bar ]
Caldaia
Service boiler
Chaudiére
Heizkessel
Caldera
Caldeira
Tmax
2 gruppi
2 units
2 groupes
2 gruppen
2 grupos
2 grupos
tipo di macchina
Type of machine
type de la machine
Maschinentypen
modelo de la machina
tipo de la màquina
[ °C ] Fluido - Fluid - Fluide
Flüssig - Fluido - Fluido
2 bar 133° C
Scambiatore
Heat exchanger
Èchangeur
12 bar 133° C
Wrmeaustauscher
Intercambiador de calor
Trocador de calor
3 gruppi
3 units
3 groupes
3 gruppen
3 grupos
3 grupos
4 gruppi
4 units
4 groupes
4 gruppen
4 grupos
4 grupos
Capacità - Capacity - Capacitè
[L]
Kapazität - Capacidad - Capacidade
acqua/vapore
water/steam
eau/vapeur
wasser/dampf
agua/vapor
água/vapor
5 - 11
acqua
water
eau
wasser
agua
água
15
20
0.18 - 0.25 0.18 - 0.25 0.18 - 0.25
x2
x3
x4
2
DT
16
C
17
18
2
19
20
2
9
11
7
7
6
6
15
8
10
1
1a
12
3
14
Legenda - Legend - Legende - Legende - Leyenda - Legenda
LEGENDA
IT
1 Interruttore generale
1a Interruttore inserimento
resistenze caldaia
2 Pulsantiera / Interruttore
erogazione caffè
6 Lancia vapore orientabile
7 Manopola regolazione vapore
8 Lancia acqua calda
9 Manopola erogazione acqua calda
10 Portafiltro
11 Piano scaldatazze (*)
12 Interruttore scaldatazze (*)
14 Manometro caldaia / pompa
15 Bacinella
16 Pulsante erogazione 1 caffè corto
17 Pulsante erogazione 2 caffè corti
18 Pulsante STOP-CONTINUO / Prog
19 Pulsante erogazione 1 caffè lungo
20 Pulsante erogazione 2 caffè lunghi
I componenti - (*) - sono applicati solo in
alcune configurazioni di prodotti.
GB LEGEND
FR
1 Main ON/OFF switch
1a Boiler heat resistance switch
2 Pushbutton Panel / Coffee
dispensing switch
6 Swivel steam jet pipe
7 Steam adjustment knob
8 Hot water dispensing pipe
9 Hot water dispensing knob
10 Filter holder
11 Cups-warmer (*)
12 Cup heating switch (*)
14 Boiler / pump pressure gauge
15 Pan
16 Dispensing push button - 1 short
coffee
17 Dispensing push button - 2 short
coffees
18 STOP-CONTINUOUS / Prog - push
button
19 Dispensing push button - 1 long
coffee
20 Dispensing push button - 2 long
coffees
LEGENDE
1 Interrupteur général.
1a Interrupteur branchement
résistance chaudière
2 Clavier / Interrupteur de débit du café
6 Tuyau (lance) orientable de la
vapeur.
7 Poignée de réglage de la vapeur.
8 Tuyau (lance) d’eau chaude.
9 Poignée de débit de l’eau chaude.
10 Porte-filtres.
11 Chauffe-tasses (*)
12 Touche plateau chauffant (*).
14 Manomètre de la chaudière / pompe.
15 Cuvette.
16 Touche débit 1 café court
17 Touche débit 2 café court
18 Touche STOP-CONTINU / Prog
19 Touche débit 1 café long
20 Touche débit 2 café long
Les détails - (*) - ne sont appliqués qu'à
certaines configurations de produits.
Items marked - (*) - are fitted in
some product configurations only.
DE
LEGENDE
1 Hauptschalter
1a Schalter zur Aktivierung der
Wasserkesselbeheizung
2 Druckknopftafeln / Bedienung der
Kaffeegruppen
6 Dampfrohr (beweglich)
7 Dampfhahn
8 Teewasserrohr (beweglich)
9 Teewasserhahn
10 Filterhalter
11 Tassenerwärmer (*)
12 Einschalter Tassenwärmeplatte (*)
14 Manometer Kessel / Pumpe
15 Wanne
16 Taste Abgabe 1 Espressokaffee
17 Taste Abgabe 2 Espressokaffees
18 Taste STOP-KONTINUIERLICHE /
Prog
19 Taste Abgabe 1 normaler Kaffee
20 Taste Abgabe 2 normaler Kaffees
Die mit - (*) - gekennzeichneten
Komponenten sind nur in
bestimmten Modellen installiert.
ES
LEYENDA
PT
1 Interruptor general
1a Interruptor accionamiento
resistencias caldera
2 Botoneras / Interruptor erogación
café
6 Tubo (lanza) vapor orientable
7 Mando regulación vapor
8 Tubo (lanza) agua caliente
9 Mando erogación agua caliente
10 Portafiltro
11 Calientatazas (*)
12 Botón calienta-tazas (*)
14 Manómetro caldera / bomba
15 Bandeja
16 Botón erogación 1 café fuerte
17 Botón erogación 2 cafés fuertes
18 Botón STOP-CONTINUO / Prog
19 Botón erogación 1 café suave
20 Botón erogación 2 cafés suaves
Los detallos - (*) - se pueden aplicar
sólo en algunas configuraciones del
producto.
4
LEGENDA
1 Interruptor geral
1a I n t e r r u p t o r d e i n s e r i m e n t o d e
resistências da caldeira
2 Quadro de botões / Interruptor
erogação café
6 Tubo vapor orientável
7 Manípulo regulação do vapor
8 Tubo água quente
9 Manípulo distribuição água quente
10 Porta-filtro
11 Grelha para esquentar chávenas (*)
12 Interruptor para aquecer as chávenas (*)
14 Manómetro caldeira / bomba
15 Bandeja
16 Botão distribuição 1 café forte
17 Botão distribuição 2 cafés fortes
18 Botão STOP-CONTÍNUO / Prog
19 Botão distribuição 1 café ligeiro
20 Botão distribuição 2 cafés ligeiros
Os detalhes - (*) - são aplicados só em
algumas configurações de produtos
......................................................7
Translation of the original instructions
English
English
Istruzioni originali
Italiano
Italiano
......................................................21
Français ......................................................35
Deutsch ......................................................49
Español ......................................................63
Portugûes ......................................................77
5
Portugûes
Tradução das traduções originais
Español
Traducción de las instrucciones originales
Deutsch
Übersetzung der Originalanleitung
Français
Traduction des instructions d’origine
6
GRUPPO CIMBALI S.p.A.
Index
Page
1.
General Rules
22
2.
Installation Rules
23
3.
Electrical Installation Rules
24
4.
Water Installation Rules
24
5.
Installation Check-up
25
USE
6.
Setting at work
27
7.
Cup-Warmer (when provided)
27
8.
Heating phase
27
9.
Delivery of the coffee
28
10.
Other hot beverage
28
11.
Programming the coffee measures
(only DT version)
29
11.1 Programming the Drying time
(when provided)
29
12.
Cleaning and maintenance
30
13.
Rules for the worker operating
the machine
32
14.
Caution
33
15.
Maintenance and Repairs
33
16.
Dismantling the machine
34
17.
Defects - Malfunctions
34
ILLUSTRATIONS
91
Changing the electric power supply
92
Changing the Voltage of the Transformer 96
Service Line
21
98
English
Dear Madam, Dear Sir
Congratulations on your new Cimbali!
With this purchase, you have chosen an advanced espresso coffee machine built with the most modern technologies. This
machine not only offers you a perfect combination of efficiency and functionality, but also provides you with all the tools you
need to do your job in the best possible way.
We recommend that you take some time to read this Use and Maintenance Booklet. It will help you become more familiar with
your new espresso machine, which we’re sure you are looking forward to using.
Wishing you all the best.
1. General Rules
Please read the warnings and rules in this User’s Manual carefully before using or handling the machine
in any way because they provide important information regarding safety and hygiene when operating the
machine.
Keep this booklet handy for easy reference.
English
•
The machine was designed solely for preparing espresso coffee and hot beverages using hot water or steam, and for
warming cups.
•
The machine must only be used by suitably trained employees who are well aware of the possible risks that can occur when
operating the machine.
•
The machine is for professional use only.
•
The machine must not be used by children or by people with physical, sensorial, or mental impairments: if such people use
the machine, they must be supervised during operation.
•
The machine must not be left unattended.
•
The machine must not be used outdoors.
•
If the machine is stored in rooms where the temperature can drop below freezing, empty the boiler and water circuit tubes.
•
Do not expose the machine to atmospheric agents (rain, sun, and cold).
•
Noise: assessed acoustic pressure level 75,6db(A) (+/- 1db).
•
If the machine is used improperly or for purposes other than those described above, it can be a source of danger. The
manufacturer will not be held responsible for damages caused by improper use of the machine.
22
These chapters in the manual are to be used by qualified, authorized technical staff.
2. Installation Rules
WARNING
Installation, dismantling, and adjustments must only be performed by qualified and authorized
technicians.
Keep this booklet handy for easy reference.
•
Staff responsible for moving the machine must realize the risks in moving heavy loads.
Move the machine carefully, using the correct lifting equipment (fork lift, for example).
If moving the machine by hand, make sure:
- enough people are available for the task, depending on the machine weight and difficult handling;
- to always use the necessary safety gear (shoes/gloves).
•
After removing the machine from its packing materials, make sure that the machine and its safety devices are intact.
•
If the power supply cord is damaged, it can only be replaced by qualified and authorized technicians.
•
Packing materials (plastic bags, polystyrene foam, staples, etc.) must be kept out of the reach of children because they are
potentially hazardous.
•
Before plugging in the machine, make sure that the information on the nameplate (voltage, etc.) matches that of the electrical
and water systems.
•
Completely unwind the power supply cable.
•
The coffee machine should sit on a flat, stable surface at least 20 mm from walls and from the counter. Keep in mind that the
highest surface on the machine (the cup warmer tray) sits at a height of at least 1.2 meters. Make sure there is a shelf nearby
for accessories.
•
Room temperature must range between 10° and 32°C (50°F and 90°F).
•
An electrical outlet, water connections, and a drain with siphon must be in the immediate vicinity.
•
Do not install in rooms (kitchens) that are cleaned with jets of water.
•
Do not clean the machine with jets of water.
•
Do not obstruct openings or ventilation and heat vents.
•
Do not install the machine outdoors.
23
English
Carefully read the warnings and rules in this manual because they provide important information regarding
safe installation, use and maintenance of the machine.
These chapters in the manual are to be used by qualified, authorized technical staff.
3. Electrical Installation Rules
Prior to installation, make sure there is a circuit breaker installed with a distance between the contacts that allows for complete
disconnection when there is a category III overload and that provides protection against current leakage equal to 30 mA. The
circuit breaker must be installed on the power supply in compliance with installation rules.
If the power supply is not working properly, the machine can cause transitory voltage drops.
English
The electrical safety of this machine is only ensured when it is correctly connected to an efficient earthing system in compliance
with the electrical safety laws in force. This fundamental safety requirement must be verified. If in doubt, request that a qualified
electrician inspect the system. The manufacturer cannot be held responsible for any damage caused by the lack of an earthing
system on the electrical supply.
It is unadvisable to use adaptors, multiple plugs, and/or extension cords. If their use is indispensible, only use simple or multiple
adaptor plugs and extension cords that are in compliance with safety laws. Make sure these devices do not exceed the voltage
capacity marked on the simple adaptor and on extension cords, and the maximum voltage marked on the multiple adaptor.
Check that the type of connection and voltage correspond with the information on the nameplate: see illustrations chapter figure 1.
For machines with a Y connection: see illustrations chapter figure 2.
For machines with a three-phase connection: see illustrations chapter figure 3.
For machines with a single-phase connection: see illustrations chapter figure 4.
4. Water Installation Rules
WATER REQUIREMENTS
Water used in coffee machines must be potable and suitable for human consumption (see laws and regulations in force).
Check on the machine’s water inlet that:
•
the pH level complies with the laws in force
•
the chloride value is less than 100 mg/l
If the values do not fall within the limits, an appropriate water treatment device must be inserted (respecting the local laws and
compatible with the machine).
If the machine uses water with a hardness exceeding 8°F (4.5 °D), a specific maintenance plan must be implemented according
to the hardness detected and machine usage.
WARNING
Only use the supplied parts for installation. If other parts are installed, they must be new (not used) and they must be able to come
in contact with potable water suitable for human consumption (according to local laws in force).
WATER CONNECTIONS
Place the machine on a flat surface and stabilize it by adjusting and securing the feet.
Hook up the water connections as shown in the Illustrations chapter Figure 5, respecting the hygiene, water safety, and antipollution laws in the country of installation.
Note: If the water pressure can rise above six bar, install a pressure reducer set at 2-3 bar. See Illustrations chapter Figure 6.
Water draining tube: place the end of the water draining tube in a drain with a siphon for inspection and cleaning.
IMPORTANT: The curves of the draining tube must NOT bend as shown in Illustrations chapter Figure 7.
24
These chapters in the manual are to be used by qualified, authorized technical staff.
5. Installation Check-up
WARNING: AFTER INSTALLATION, CHECK TO SEE IF THE MACHINE IS WORKING PROPERLY (see the
Installation Module C)
English
WATER CONNECTIONS
•
No leaks from the connections or tubes
FUNCTIONING
•
Boiler and operating pressures are normal.
•
The pressure gauge is working properly.
•
The self-leveling device is working properly.
•
The expansion valves are working properly
WARNING: ONCE THE MACHINE HAS BEEN INSTALLED AND IS READY FOR USE, BEFORE ALLOWING THE
WORKER TO START USING THE MACHINE, WASH THE INTERNAL COMPONENTS ACCORDING TO THE
INSTRUCTIONS BELOW:
GROUPS
•
Hook up the filter holders to the groups (without coffee).
•
Let each group dispense water for about a minute.
HOT WATER
•
Continuously dispense hot water (pressing the appropriate button) until at least 5 liters of water have been used for a machine with 2 groups, 8 liters for a machine with 3 groups and 10 liters for a machine with 4 groups (see the “Cleaning and
Maintenance” Chapter in the User’s Manual).
STEAM
•
Dispense steam from the nozzles for about a minute, using the appropriate buttons.
25
English
26
USE
6. Setting at work
“Before switching on the machine, ensure the
following:
The mains switch is on.
The water mains tap is open”.
1
1a
ON
ON
Press the luminous main switch (1); the related indicator
light switches on. For DT versions, the key LEDs also light up.
If the water level in the boiler is lower than the minimum limit,
the boiler will be filled to the right level, indicated by restored
pressure in the manometer-pump.
English
CAREFULLY PAY ATTENTION TO THE
SEQUENCE FOR ACTIVATING THE
SWITCHES (1) AND (1A).
Wait until the operating pressure (approx. 1.2 bar) appears
on the manometer (14).
At this point, the machine is ready for use.
ONLY AFTER the boiler filling process has been completed
should you press the light switch that activates the
resistance (1A); the related indicate light switches on and
the heating phase begins.
7. Cup-Warmer (when provided)
Place only coffee cups, cups and glasses to be used in
conjunction with the coffee machine on the cup-warming
plate.
Ensure that the coffee cups are completely drained before
placing them on the cup-warming plate.
No other objects shall be placed on the cup-warming plate
(11).
Press the button (12) and check to see that the light turns
on.
12
11
ON
8. Heating phase
DT version. During heating, if one of the coffee dispensing
push buttons is pressed, the machine dispenses a coffee at
the temperature reached at the time.
DT
C
18
2
C version. During heating, if one of the coffee dispensing
button (2) is pressed, the machine dispenses a coffee at the
temperature reached at the time.
Heating is completed when the boiler gauge indicator (14)
remains stable in the P green area.
The machine is now ready to dispense coffee, steam and hot
water.
DT version. To make sure that the dispenser unit and the
filter holder (10) are at similar temperatures, press the coffee
dispensing push button (18) and let the machine dispense
coffee for a few seconds. Then press again the push button
(18) to stop dispensing.
10
14
10
P
C version. To make sure that the dispenser unit and the
filter holder (10) are at similar temperatures, press the coffee
dispensing switches (2) and let the machine dispense coffee for
a few seconds. Then press the switch (2) to stop dispensing.
27
14
9. Delivery of the coffee
English
Remove the filter holder (10), empty out any coffee grouts and
fill it up with 1 or 2 servings of ground coffee, depending on
the filter holder used.
Press the ground coffee in filter down uniformly, using the
grinder/doser presser.
Remove any residues of ground coffee from the filter rim.
Fit and tighten the filter holder (10) on the coffee dispenser
unit, positioning the cup (or cups) under the nozzle (or nozzles)
of the filter holder (10).
DT
DT version. Press the coffee dispensing push button (16,
17, 19, 20) for the required serving; the machine will stop
automatically.
Press the push button (18) for continuous dispensing.
Dispensing, whether for dosed servings or in the continuous
dispensing mode, can be interrupted at any time by pressing
the STOP push button (18).
16
10
18
17
20
19
C
2
C version. Press the coffee dispensing button (2) and
dispense.
When the desired dose is obtained, press button (2) again to
stop dispensing.
10
10. Other hot beverage
Scalding hazard! Use the appropriate insulating
devices (A) to move the water and steam wands.
7
9
Steam dispensing
Complete immerse the left or right steam nozzle (6) (if
supplied) in the container with the beverage to be heated.
Turn the steam adjustment knob (7) counter-clockwise.
Wait until the beverage has reached the desired temperature.
Afterwards, turn the knob (7) clockwise to stop the steam from
exiting.
8
A
6
Note. At the conclusion of each steam dispensing phase,
clean the inside of the steam nozzle as follows: turn the nozzle
towards the cup tray and carefully activate steam dispensing
at least once.
A
Heating milk for frothy coffee (cappuccino)
General indications
Milk is a delicate biological product and can easily deteriorate.
Heat modifies its structure. Milk must be kept at a storage
temperature no higher than 5°C (41°F) from the moment the
container is opened and throughout its entire period of use.
Our storage appliances are suitable for this purpose.
NOTE: at the end of the work day (or not more than 24 hours
from the time the container is opened), any remaining milk
must be discarded.
When the amount of foam and sufficiently warm temperature
are reached, stop the steam by turning the knob (7) in the
opposite direction.
When the steam jet pipe (6) is no longer required, clean it
thoroughly with a sponge and a clean cloth.
Dispensing hot water
Place a container beneath the hot water tube (8) and turn the
hot water dispensing knob (9) counter-clockwise.
When the desired amount is reached, stop the hot water by
turning the knob (9) clockwise.
Use a tall narrow jug and fill it up to about the half-way mark.
Then plunge the steam jet pipe (6) into the milk.
Gradually open up the steam tap (7) and heat the milk for a
few seconds.
28
11. Programming the coffee measures (only DT version)
How to access the programming function
To enter the programming mode, press push button (18) and
keep it pressed for about 8 seconds; the blinking LED light
sequence above the keys and the intermittent buzzer indicates
that the machine is in the programming phase.
To exit the programming mode, after programming the various
drinks, press push button (18) again.
16
17
English
“Before programming the coffee dispensing push
buttons fill the filter holder with the correct serving
of ground coffee. Don’t use coffee grouts for programming servings.”
18
20
19
Fit and tighten the filter holder (10) on the coffee dispenser
unit, positioning the cup (or cups) under the nozzle (or nozzles)
of the filter holder (10).
Press (and keep momentarily pressed) the coffee dispensing
push button (16, 17, 19 or 20) corresponding to the required
serving to be programmed; the LED of the key to be
programmed stays on and does not blink.
When the amount of coffee in the cup reaches the required
level, release the coffee dispensing push button.
Repeat the above operations for the other coffee push
buttons.
Note: if you make a programming mistake, use a new dose of
ground coffee and repeat the operation.
10
11.1 Programming the Drying time (when provided)
The drying phase allows the coffee dispensing panel to dry
and sends water inside of it to the drain tube.
Start
dispensing
At the end of each dispensing cycle, the drying time counter
starts (the factory setting is 5 seconds for all keys).
To program a longer or shorter drying time, please follow
these steps:
• Press and hold down any STOP/prog (18) key for about
8 seconds. The sequenced blinking LED lights above the
keys and the intermittent buzzer indicate that the machine
is in the “coffee dose” programming phase;
• Press and hold down the STOP/prog (18) key for the left
dispensing group: a different buzzer sound indicates that
the machine is in the drying time programming phase;
• Press any dispensing key (16, 17, 19 or 20) and hold it
down for the seconds you want to assign for the drying
time. Afterwards, release the key;
• At the end of the “drying time ” programming procedure,
press a STOP/prog (18) key to return to the coffee dose
programming level;
• Press a STOP/prog (18) key again to exit the programming
menu.
Dispensing EV ON
Dispensing EV OFF
Dispensing Time
Drying EV OFF
Drying EV ON
Drying time
Note: Accessing the Drying Time programming screen zeros
the 5 second factory setting for all keys.
29
11. Cleaning and maintenance
For correct application of the food safety system (HACCP), please follow the instructions in this paragraph.
CLEANING DISPENSING UNIT - This operation must be made on all the groups at the end of each working day
1
2
3
4
English
Pour in a packet or dosing
Using a brush, clean the cover Insert the rubber disk into the cupful of detergent powder.
Remove the filter holder from gasket.
filter-holder with its filter.
the coffee group.
5
6
7
Attach the filter-holder to the Press the stop button and press it
again after 10 seconds. Repeat this Remove the filter holder; Press the stop button and
dispenser unit.
execute the rinse cycle with water for about 30”.
step 10 times.
FILTER-HOLDERS - This operation must be made on all the filter-holders at the end of each working day
1
Put a liter of cold water in a
suitable container and add
detergent.
2
3
Remove the filters from the filter-holders.
4
5
Soak the filters and the filterholders in this solution for
about 2 hours.
A
Place the filters back in the filter holder, making sure that the
Remove any residue with a sponge and rinse well with cold
anchoring spring (A) of the filter is in its slot.
water.
30
STEAM AND HOT WATER DISPENSING PIPES - This operation must be made at the end of each working day
Using a clean sponge, wash with hot water removing any organic
residue present. Rinse carefully.
To clean the inside of the steam nozzle, follow these steps:
Turn the nozzle towards the cup tray and carefully activate steam
dispensing at least once.
English
GRILLE AND DRIP BASIN - This operation must be made at the end of each working day
1. Remove the grille from the basin.
2. Extract the basin.
3. Rinse the grid and tray under running
water.
1
2
Danger of burns
DO NOT insert your hands beneath the
front panel.
DISCHARGE BASIN - This operation must be made at the end of each working day
1. After removing the tray, remove
the lid to the draining tray.
2. Remove any residues with a
sponge and rinse well with cold
water.
3. Pour about a liter of hot water into
the discharge basin to remove any
discharge residues.
1
2
3
BODYWORK - This operation must be made at the end of each working day
Use a soft cloth and cleaning products WITHOUT ammonia or
abrasives, removing any organic residue present in the work
area.
NOTE. Do not spray liquids into the panel slots.
ATTENTION
When the machine has not been used for more
than 8 hours, and in any case once a day, the
internal components must be washed before
use, in accordance to the following instructions:
Hot water
Dispense hot water repeatedly (using the relative
command) until at least 5 liters of water have been
dispensed from the 2-group machine, 8 liters of water
from the 3-group machine and 10 liters from the 4-group
machine.
Supply Groups
Steam
Allow the steam to flow for approximately one minute,
using the appropriate commands.
Insert the filter carriers into the groups (without coffee) and
dispense from each group for one minute.
31
13. Rules for the worker operating the machine
BEFORE YOU START
WARNING: BEFORE YOU START OPERATING THE MACHINE, WASH THE INTERNAL COMPONENTS
FOLLOWING THE INSTRUCTIONS INDICATED BELOW.
THESE STEPS MUST BE REPEATED AT LEAST ONCE A DAY AND WHEN THE MACHINE HAS NOT BEEN
OPERATED FOR MORE THAN 8 HOURS.
English
Groups
•
Hook up the filter holders to the groups (without coffee).
•
Let each group dispense water for about a minute.
Hot Water
•
Continuously dispense hot water (pressing the appropriate button) until at least 5 liters of water have been used for a machine with 2 groups, 8 liters for a machine with 3 groups and 10 liters for a machine with 4 groups (see the “Cleaning and
Maintenance” Chapter in the User’s Manual).
Steam
•
Dispense steam from the nozzles for about a minute, using the appropriate buttons.
ON THE JOB
Steam dispensing
•
Before heating the beverage (water, milk, etc.), open the steam nozzle for at least 3 seconds and let the steam escape so
that the condensation is eliminated.
Coffee dispensing
•
If the machine has not been used for more than an hour, before making coffee, dispense about 100 cc and discard the
liquid.
Hot water dispensing
•
If the machine has not been used for more than an hour, before using the hot water, dispense about 200 cc and discard the
liquid.
Cleaning the coffee circuits
•
Please read the specific section in the user’s manual to learn how to clean these circuits.
32
14. Caution
Danger of burns
The areas marked with this sign become hot. Great
care should be taken when in the vicinity of these
areas.
WARNING: Hot surface
ACHTUNG: Heisse Oberfläche
ATTENTION: Surface chaude
ATTENZIONE: Superficie calda
The manufacturer disclaims all liability for damages to
items or persons due to improper use or due to the coffee
machine being used for reasons other than its intended
use.
Never work the coffee machine with wet hands or naked
feet.
MACHINE CLOSE-DOWN
When the machine remains unattended for
a long period of time (at night, during the
weekly closing day or during holidays) the
following operations shall be performed:
- Remove the plug or switch off the main
switch.
- Close the water tap.
Non-compliance with these safety measures
exonerates the manufacturer from all liability
for malfunctions or damage to persons or
items.
Danger of Burns
Do not place the hands or other parts of the body close to the
coffee distribution points, or near to the steam and hot water
nozzles.
If the cup heating tray is missing, DO NOT insert your hands
beneath the front panel.
Ensure that the machine is not handled by children or persons
who have not been instructed in its correct use.
15. Maintenance and Repairs
If the power supply cord is damaged, switch off the machine
and request a replacement from the service center.
If the machine is not working properly, turn off the machine, turn
off the main off-on switch, and call the service center.
To ensure safety during operation, it is
absolutely necessary to:
- f o l l o w a l l t h e m a n u f a c t u r e r ’s
instructions;
- have qualified and authorized technicians
periodically check that all safety devices
are intact and functioning properly (the
first inspection within three years of
purchase and every year after that).
WARNING: Maintenance by unqualified people
can jeopardize the safety and conformity of the
machine.
Only use qualified, authorized technicians for
repairs.
WARNING
Only use original spare parts guaranteed by the
manufacturer.
If original spare parts are not used, the manufacturer warranty will no longer be valid.
WARNING
After maintenance, perform the installation
CHECK-UP as indicated in the specific section
of the user’s manual.
33
English
Cup-warming plate
Place only coffee cups, cups and glasses to be used in
conjunction with the coffee machine on the cup-warming
plate.
Ensure that the coffee cups are completely drained before
placing them on the cup-warming plate.
No other objects shall be placed on the cup-warming plate.
GENERAL
16. Dismantling the machine
Improper disposal of electric equipment that fails to respect
the laws in force will be subject to administrative fines and
penal sanctions.
Electrical equipment cannot be disposed of as ordinary
urban waste: it must be disposed of according to the special
EU directive for the recycling of electric and electronic
equipment.
English
GRUPPO CIMBALI electrical equipment is marked with a
pictogram of a garbage can inside a barred circle. This symbol
means that the equipment was sold on the market after August
13, 2005, and must be disposed of accordingly.
Due to the substances and materials it contains, inappropriate
or illegal disposal of this equipment, or improper use of the
same, can be harmful to humans and the environment.
DISMANTLING THE MACHINE
To protect the environment, please
proceed in compliance with the local laws
in force.
17. Defects - Malfunctions
Direct action by the customer
Before calling service personnel, to avoid useless expense, check whether the machine problem corresponds to one of the cases
listed below.
PROBLEM
CAUSE
SOLUTION
The coffee machine is not working.
No electricity supply.
Check the electricity supply.
Check the position of the ON/OFF
switch (1).
The coffee machine is not heating up.
Wrong position of the switch (1a).
Press the switch (1a).
Leaking from the filter holder rim (10).
Underpan gasket dirty with coffee.
Clean using the special brush
provided.
Coffee dispensing time too short.
Coffee ground too coarse.
Coffee too old.
Use a finer grind.
Use new coffee.
Coffee drips out of machine.
Filter holes blocked or filter holder (10)
outlet hole dirty.
Coffee ground too fine.
Clean.
Loss of water under the machine.
Discharge well clogged up.
Discharge pan hole blocked.
Clean.
Clean.
Machine heated up, but it does not
dispense coffee.
Water supply or water softener tap
closed. No water in system.
Open.
Wait until water is available or call a
plumber.
The automatic level control devices
remain in operation.
Same causes as above.
Same solution as above.
34
Use a coarser grind.
Immagini - Illustrations - Images - Abbildungen - Im genes - Imagens
Fig.
1
Abb.
Fig.
5
Abb.
Fig.
7
Abb.
A
Fig.
2
Abb.
Fig.
3
Abb.
MACCHINA
MACHIN
MACHIN
MASCHIN
M UINA
M UINA
A) eventuale dispositivo per il trattamento dell’acqua
A) possible water treatment device
A) ventuel dispositif pour le traitement de l’eau
A) inheit zur Wasseraufbereitung (sofern installiert)
A) posible dispositivo para el tratamiento del agua
A) eventual dispositivo para o tratamento da gua
nstallare un rubinetto alimenta ione ac ua
nstall a water feeding tap
installer un obinet alimentation eau
asserversorgungshahn erforderlich
nstalar un grifo alimentaci n agua
nstalar um Torneira alimenta o gua
PR SSION MA . R T
WAT R MAINS MA . PR SSUR
Fig.
4
Abb.
PR SSION MA . AU D
MA . DRUC D R
WASS RL ITUNG
Collegamento trifase Three phase connection
Raccordement triphas Dreiphasig Anschlu
Cone i n trif sica iga o trif sica
T Grigio (Nero) - Grey (Black) - Gris (Noir)
Grau (Schwarz) - Gris (Negro) - Cinza (Preto)
S Nero - Black - Noir - Schwarz - Negro - Preto
R Marrone - Brown - Brun - Braun - Mar n - Marron
N Azzurro - Blue - Bleu - Blau - Az l - Azul
Collegamento monofase Single phase connection
Raccordement monophase Einphasigem Anschlu
Cone i n monof sica iga o mono f sica
N Bianco - White - Blanc
N Azzurro - Blue - Bleu
Wei - Blanco - Branco
Blau - Az l - Azul
T Nero - Black - Noir
T Marrone - Brown - Marron
Schwarz - Negro - Preto
Braun - Mar n - Marron
1
2
1
Fig.
6
Abb.
SCARICO A
PA IM NTO
DRAIN
ILL
IDANG DU LOCAL
BOD NAB LUSS
PR SION MA . R D
D SCARGA
PR SS O MA . R D
D SCARGA
6 bar - 0,6 MPa
Colore cavi
ires colour Couleur cables
arbe der Dr hte Color cables Cor cabos
/8 GAS - GA G S
Min.
5 mm.
Cambio alimenta ione elettrica - Changing the electric power supply - Changement de l’alimentation lectri ue
Austausch des Net teils - Cambio alimentaci n el ctrica - Mudan a de alimenta o el ctrica
Questi capitoli del manuale sono ad uso del personale tecnico qualificato e autorizzato.
These chapters in the manual are to be used by qualified, authorized technical staff.
Ces chapitres du manuel sont à l’usage du personnel technique qualifié et autorisé.
Diese Kapitel des Handbuches wenden sich an qualifizierte und offiziell befugte Fachtechniker.
Estos capítulos del manual son para su uso por parte del personal técnico cualificado y autorizado.
Estes capítulos do manual são para serem utilizados pelo pessoal técnico qualificado e autorizado.
1
2
B
A
Svitare la vite (A) e allentare la vite (B)
Unscrew the screw (A) and loosen the screw (B).
D visser la vis (A) et d sserrer la vis (B)
Die Schraube (A) losschrauben und die Schraube (B) lockern
Destornillar el tornillo (A) y aflojar el tornillo (B)
Desapertar o parafuso (A) e afrouxar o parafuso (B)
Rimuovere la bacinella - Remove the tray
Retirer la cuvette - Die Wanne abnehmen
uitar la bandeja - Remover o tabuleiro
3
Spingere il coperchio della scatola elettrica verso l interno macchina, sollevarlo e rimuoverlo.
Push the lid of the electric box toward the inside of the machine. Lift and remove it.
Pousser le couvercle du boitier lectrique vers l’int rieur de la machine, le soulever et le retirer.
Die Abdeckung des Netzteilgeh uses zur Maschine hin schieben, anheben und abnehmen.
mpujar la tapadera de la caja el ctrica hacia el interior de la m quina, levantarla y quitarla.
mpurrar a tampa da caixa el ctrica para o interior da m quina, levant -la e remov -la.
2
4
C
Allentare le 2 viti di fissaggio (C) e rimuovere la fiancata sinistra. - Loosen the 2 fastening screws (C) and remove the left side.
Desserrer les 2 vis de serrage (C) et retirer le c t gauche. - Die beiden Schrauben (C) lockern und das linke Seitenpaneel abnehmen.
Aflojar los 2 tornillos de fijación (C) y quitar el lateral izquierdo. - Afrouxar os 2 parafusos de fixação (C) e remover o lado esquerdo.
5
locco termina ione
Terminal block
loc d ach vement
inheit um abelanschluss
lo ue de la terminaci n
rupo de termina o
issacavo Cable clamp
Câble de fixation - Kabelklemme
Sujetacable - Fixador de cabo
orsettiera Terminal strip
o te bornes
lemmleiste
ornera
uadro de bornes
Tramite un caccaivite a croce rimuovere i fili dalla morsettiera; quindi allentare le viti del fissacavo e rimuovere il cavo di alimentazione elettrica.
Use a Philips screw to remove the cables from the terminal strip. Loosen the cable clamp screws and remove the electric power supply cable.
Retirer les fils de la boîte à bornes, à l’aide d’un tournevis cruciforme; puis desserrer les vis du fixe-câble.
Mit einem Kreuzschraubenzieher die Leiter von der Klemmleiste abziehen; ausschließlich die Schrauben zur Kabelbefestigung lockern und das Netzkabel abziehen.
Mediante un destornillador de estrella desmontar los cables de la bornera; luego aflojar los tornillos del sujeta cable y quitar el cable de alimentación eléctrica.
Através de uma chave de fendas em cruz remover os fios do quadro de bornes e em seguida afrouxar os parafusos do fixador de cabos. Remover aindar o cabo de alimentação eléctrica.
Attenersi alle indicazioni delle pagine seguenti a seconda della tipologia di collegamento.
ollow the instructions on the next pages according to type of connection.
Se conformer aux indications de les pages suivantes selon le type de branchement.
Halten Sie sich je nach Art des Anschlusses an die auf der n chsten Seiten aufgef hrten Angaben.
Respetar las indicaciones de las siguientes páginas según la tipología de conexión.
Respeitar as indicações das páginas seguintes segundo a tipologia de conexão.
ATTENZIONE! Nel caso di collegamenti trifase senza neutro o monofase il cavo di alimentazione elettrica deve
essere sostituito.
WARNING! In the event of a three-phase connection without a neutral wire or a single-phase connection, the
electric cable must be replaced.
ATTENTION Dans le cas de branchements triphas s sans neutre ou monophas , le c ble d’alimentation lectri ue
doit tre remplac .
U BEACHTEN: Bei dreiphasigem Anschlu ohne neutralen Leiter sowie bei einphasigem Anschlu mu das
Netzkabel ausgetauscht werden.
¡ATENCIÓN! En el caso de conexiones trifásicas sin neutro o monofásicas, hay que sustituir el cable de
alimentaci n el ctrica.
ATENÇÃO! No caso de conexões trifásicas sem neutro ou monofásico o cabo de alimentação eléctrica tem de
ser substitu do.
Sezioni nominali dei cavi da utilizzare:
Nominal sections of cables to use:
Sections nominales des câbles à utiliser:
Nominaler Leiterquerschnitt:
Secciones nominales de los cables que hay que utilizar:
Secções nominais dos cabos a utilizar:
Colore cavi
ires colour Couleur cables
Collegamento trifase Three phase connection
Raccordement triphas Dreiphasig Anschlu
Cone i n trif sica iga o trif sica
T Grigio - Grey - Gris - Grau - Gris - Cinza
S Nero - Black - Noir - Schwarz - Negro - Preto
R Marrone - Brown - Brun - Braun - Mar n - Marron
N Azzurro - Blue - Bleu - Blau - Az l - Azul
8 - 15
22 -2
22 -2
N
min. H 5
min. H 5
min. H 5
- o H 5RN- - 5 x 1,5mm2
- o H 5RN- - x 2,5mm2
- o H 5RN- - x mm2
arbe der Dr hte Color cables Cor cabos
Collegamento monofase Single phase connection
Raccordement monophase Einphasigem Anschlu
Cone i n monof sica iga o mono f sica
1
N Bianco - White - Blanc
Wei - Blanco - Branco
T Nero - Black - Noir
Schwarz - Negro - Preto
2
N Azzurro - Blue - Bleu
Blau - Az l - Azul
T Marrone - Brown - Marron
Braun - Mar n - Marron
Collegamento Trifase Three phase connection
ranchement triphas
Dreiphasig Anschluss - Conexión trifásica - Conexão tri-fásico
Collegamento a stella trifase con neutro
Star connection three phase with neutral wire
ranchement toile triphas avec neutre
Sternanschluss dreiphasig ohne neutralen eiter
Conexión de estrella (trifásica con neutro)
Conexão em estrela (tri-fásico com neutro)
Collegamento a triangolo trifase sen a neutro
Triangle connection three phase without neutral wire
ranchement triangle triphas sans neutre
Dreiecksanschluss (dreiphasig, ohne neutralen Leiter)
Conexión de triángulo (trifásica sin neutro)
Conexão em triângulo (tri-fásico sem neutro)
Cavo - Cable - Câble
abel - Cable - Cabo
Cavo - Cable - Câble
abel - Cable - Cabo
Ponticello
Bridge
Pontet
Br cke
Puente
Shunt
Morsettiera
Terminal strip
Boîte à bornes
lemmleiste
Bornera
uadro de bornes
Blocco terminazione
Terminal block
Bloc d’ach vement
inheit zum abelanschluss
Bloque terminación
Grupo de terminação
Morsettiera
Terminal strip
Boîte à bornes
lemmleiste
Bornera
uadro de bornes
Blocco terminazione
Terminal block
Bloc d’ach vement
inheit zum abelanschluss
Bloque terminación
Grupo de terminação
Collegamento monofase Single phase connection
ranchement monophas
Einphasiger Anschluss - Conexión monofásica - Conexão mono-fásico
Collegamento monofase con poten a ridotta
Single phase connection with reduced power
accordement monophas
puissance reduite
inphasen nschluss mit redu ierter leistung
Conexión monofásica con potencia reducida
Conexão monofásica com potência reduzida
Collegamento monofase con poten a totale
Single phase connection with full power
accordement monophas
pleine puissance
inphasen nschluss mit esamtleistung
Conexión monofásica con plena potencia
Conexão monofásica com potência total
S
versioni gruppi
for group versions
T dans les
versions groupes
usf hrungen mit
bgabeeinheiten
S
versiones grupos
S vers s de grupos
Cavo - Cable - Câble
abel - Cable - Cabo
Cavo - Cable - Câble
abel - Cable - Cabo
Ponticelli
Bridges
Pontets
Br cken
Puentes
Shunt
Ponticelli
Bridges
Pontets
Br cken
Puentes
Shunt
Morsettiera
Terminal strip
Boîte à bornes
lemmleiste
Bornera
uadro de bornes
Morsettiera
Terminal strip
Boîte à bornes
lemmleiste
Bornera
uadro de bornes
Blocco terminazione
Terminal block
Bloc d’ach vement
inheit zum abelanschluss
Bloque terminación
Grupo de terminação
Blocco terminazione
Terminal block
Bloc d’ach vement
inheit zum abelanschluss
Bloque terminación
Grupo de terminação
P = 4,2 - 4,9 kW
P = 3,0 - 3,4 kW
SOLO PER COLLEGAMENTO MONOFASE A POTEN A RIDOTTA: applicare l etichetta adesiva (fornita in dotazione) con il nuovo
valore di potenza in luogo del valore citato sulla targa dati della macchina.
ONLY FOR A SINGLE-PHASE CONNECTION WITH REDUCED POWER: Apply the sticker (supplied) with the new power rating over
the rating mentioned on the machine’s data plate.
UNIQUEMENT POUR BRANCHEMENT MONOPHASE A PUISSANCE REDUITE: Appliquer l’étiquette adhésive (prévue à cet effet)
avec la nouvelle valeur de puissance à la place de la valeur citée sur la plaque de données de la machine.
NUR BEI EINPHASIGEM ANSCHLUSS MIT REDU IERTER LEISTUNG: Das (mitgelieferte) lebeetikett mit der Angabe der neuen
Leistung anstelle der Plakette mit den Maschinenkenndaten anbringen.
S LO PARA CONE I N MONOF SICA CON POTENCIA REDUCIDA: aplicar la etiqueta adhesiva (suministrada en dotación) con
el nuevo valor de potencia en lugar del valor citado en la placa de datos de la m quina.
S PARA CONE O MONOF SICA COM POT NCIA REDU IDA: aplicar a etiquea adesiva (fornecida em dotação) com o novo
valor de pot ncia em vez do valor mencionado na placa de dados da m quina.
3,0-3,4kW
5
Cambio della Tensione di Alimentazione del Trasformatore - Changing the Voltage of the Transformer
Changement de la Tension D'alimentation du Transformateur - Änderung der Transformator-Speisespannung
Cambio de Tension de Alimentacion del Transformador - Mudança de Tensão de Alimentação do Transformador
La macchina predisposta in fabbrica per la tensione di alimentazione indicata sulla
targa dati, se la tensione di rete fosse diversa (ovviamente nell ambito della stessa
categoria di tensione: . 2 - 22 - 2 ) necessario cambiare i collegamenti del
filo di fase come indicato in figura.
The machine is factory-made for the voltage indicated on the nameplate data. If
the voltage is different (obviously in the range of the same voltage category, that is
. 2 - 22 - 2 ), the connections of the phase wire must be changed as shown
in the figure.
La machine est pr dispos e en usine pour la tension d alimentation indiqu e sur la
plaquette des donn es, si la tension d alimentation est diff rente (bien s r dans le cadre
de la m me cat gorie de tension: . 2 - 22 - 2 ) il est n cessaire de changer les
branchements du fil de phase, comme indiqué sur la figure.
Das Ger t ist im Werk auf den Speisespannungswert eingestellt worden, der auf dem
Typenschild angegeben ist. Sollte das Stromnetz einen anderen Spannungswert
aufweisen (selbstverst ndlich innerhalb derselben Spannungskategorie: 2 - 22
-2
.) m ssen die Anschl sse der Phasenleiter wie in der Abbildung dargestellt
ge ndert werden.
La máquina ya está predispuesta desde su salida de la fábrica para la tensión de
alimentación indicada en la placa datos, en el caso de que la tensión de la red fuese
diferente (claro est en el mbito de la misma catoria de tension: . 2 - 22 - 2 )
es necesario cambiar las conexiones del cable de fase indicado en la figura.
A máquina encontra-se foi preparada na fábrica para a tensão de alimentação indicada
na placa com os dados técnicos. No caso em que a tensão de alimentação seja diversa
(obviamente no âmbito da mesma categoria de tensão: V. 200 - 220 - 240) é necessário
proceder à mudança das ligações do fio de fase tal como indicado na figura.
6
limenta ione del Trasformatore
oltage of the Transformer
Tension D alimentation du Transformateur
Transformator Speisespannung
limentacion del Transformador
limenta o do Transformador
IT
GRUPPO CIMBALI S.p.A.
ia A. Manzoni, 17
2 82 Binasco
(MI) Italy
GB GRUPPO CIMBALI S.p.A.
ia A. Manzoni, 17
2 82 Binasco
(MI) Italy
GRUPPO CIMBALI si riserva il diritto di apportare
cambiamenti all equipaggiamento della macchina a
seconda delle esigenze di singoli Paesi e di effettuare
modifiche dovute agli avanzamenti del progresso
tecnico.
Nessuna parte di questa pubblicazione pu essere
usata, copiata o pubblicata senza il permesso scritto di
GRUPPO CIMBALI S.p.A.
Copyright by GRUPPO CIMBALI S.p.A., Milano
Tutti i diritti riservati
GRUPPO CIMBALI reserves the right to make changes to
the machines in accordance with the needs of individual
countries and on the basis of technological progresses.
This publication may not, either in whole or in part, be
used, copied or published without the written authorisation of GRUPPO CIMBALI S.p.A.
Copyright by GRUPPO CIMBALI S.p.A., Milan, Italy
All rights reserved
FR GRUPPO CIMBALI S.p.A.
DE GRUPPO CIMBALI S.p.A.
ia A. Manzoni, 17
2 82 Binasco
(MI) Italy
ia A. Manzoni, 17
2 82 Binasco
(MI) Italy
La soci t GRUPPO CIMBALI se r serve le droit
d'apporter des changements à l'équipement de la
machine selon les exigences des pays, et d effectuer
des modifications dûes aux avancements du progrès
technique.
Aucune partie de cette publication ne peut tre utilis e,
copi e ou publi e sans l autorisation crite de GRUPPO
CIMBALI S.p.A.
Copyright by GRUPPO CIMBALI S.p.A., Milano
Touts droits r serv s
GRUPPO CIMBALI beh lt sich vor, nderungen der
Maschine entsprechend den spezifischen nationalen
Gegebenheiten sowie entsprechend dem ortschritt der
Technik vornehmen zu k nnen.
Die vorliegende er ffentlichung darf in keinen Teilen
ohne entsprechende Genehmigung der irma GRUPPO
CIMBALI S.p.A. vervielf ltigt, kopiert oder ver ffentlicht
werden.
Copyright by GRUPPO CIMBALI S.p.A., Milano
Alle Rechte vorbehalten
ES GRUPPO CIMBALI S.p.A.
PT GRUPPO CIMBALI S.p.A.
ia A. Manzoni, 17
2 82 Binasco
(MI) Italy
ia A. Manzoni, 17
2 82 Binasco
(MI) Italy
GRUPPO CIMBALI se reserva el derecho de aportar
cambios al equipamiento de la m quina seg n las
exigencias de cada uno de los pa ses y de realizar
modificaciones debidas a los desarrollos del progresso
t cnico.
Ninguna parte de esta publicación se puede usar, copiar
o publicar sin el permiso escrito de GRUPPO CIMBALI
S.p.A.
Copyright by GRUPPO CIMBALI S.p.A., Mil n
Todos los derechos est n reservados
GRUPPO CIMBALI reserva-se o direito de modificar
o equipamento da m quina segundo as exig ncias de
cada País e efectuar alterações devidas aos avanços do
progresso tecnológico.
Nenhuma parte desta publicação poderá ser utilizada,
copiada ou publicada sem autorização escrita de GRUPPO CIMBALI S.p.A.
Copyright by GRUPPO CIMBALI S.p.A., Milano
Todos os direitos são reservados
7
SERVICE LINE
IT
Il GRUPPO CIMBALI e il "SERVICE LINE"
Il servizio assistenza della società GRUPPO CIMBALI, nell'intento di essere vicino ai SIGG. Clienti nella scelta dei prodotti
per il miglior utilizzo della macchina da caff , visualizza la linea:
ECO LINE - Prodotti per la pulizia
A) 610-004-129 liquido
per i cappuccinatori;
B) 610-004-220 in polvere
per i gruppi, i portafiltri, le tazze da caffè;
C) 610-004-224 bustine
per i gruppi, i portafiltri, le tazze da caffè;
D) 61 -21 pastiglie
per i gruppi nelle macchine superautomatiche.
Per ordinare trasmettete il numero di codice al s. Concessionario.
GB GRUPPO CIMBALI and the "SERVICE LINE"
The GRUPPO CIMBALI Company s client service, the aim of which is to assure top coffee-machine performance for its clients
at all times, also makes available its ECO LINE, a series of specific cleaning products expressly designed for this purpose.
ECO LINE - Cleaning products
A) For cappuccino makers
in liquid form
610-004-129;
B) For dispensers, filter-holders, coffee cups
in powder form
610-004-220;
C) For dispensers, filter-holders, coffee cups
in small envelops
610-004-224;
D) or superautomatic-machine dispensers
in tablet form
61 -21 .
Order directly from your local distributor and refer to the particular item you require by its number, as shown above.
FR
GRUPPO CIMBALI et la "SERVICE LINE"
La service d'assistance de la société GRUPPO CIMBALI, dans l'intention d'être à côté de ses clients, dans le choix des
produits et en vue d'une meilleure utilisation de la machine à café, propose la ligne:
ECO LINE - Produits de nettoyage
A) 610-004-129 liquide
pour les fouettes-lait;
B) 610-004-220 en poudre
pour les groupes, les porte-filtre, les tasses à café;
C) 610-004-224 sachets
pour les groupes, les porte-filtre, les tasses à café;
D) 61 -21 pastilles
pour les groupes des machines tout-auto.
Pour commander, transmettre le numéro de code à votre concessionnaire.
DE
GRUPPO CIMBALI und die "SERVICE LINE"
ES
GRUPPO CIMBALI y el "SERVICE LINE"
Mit der Absicht dem unden bei der Produktwahl f r den bestm glichen Gebrauch der affeemaschine beizustehen, weist
der undendienst der GRUPPO CIMBALI Gesellschaft auf folgende Produktlinie hin:
ECO LINE - Produkte f r die S uberung
A) 610-004-129 Flüssig
für die Cappuccino-Bereiter;
B) 610-004-220 in Pulverform
für die Gruppen, die Filterhalter, die Kaffeetassen;
C) 610-004-224 Tüten
für die Gruppen, die Filterhalter, die Kaffeetassen;
D) 61 -21 Tabletten
f r die affeegruppen der vollautomat Maschinen.
r eine Bestellung bitte dem ertreter die atalog-Nr. angeben.
Con el deseo de facilitar a los Srs. CLIENTES la selección de los productos para el uso correcto de la máquina de café, el
servicio de asistencia de la sociedad GRUPPO CIMBALI les muestra la linea:
ECO LINE - Productos para la limpieza
A) 610-004-129 líquido
para los cappuccinadores;
B) 610-004-220 en polvos
para los equipos, los portafiltros, las tazas de café;
C) 610-004-224 en sobres
para los equipos, los portafiltros, las tazas de café;
D) 61 -21 en pastillas
para los equipos de las m quinas superautom ticas.
Para los pedidos, envío el número de código a su Concesionario.
PT
GRUPPO CIMBALI e o "SERVICE LINE"
O Serviço de Assistência de empresa GRUPPO CIMBALI, com a finalidade de aconselhar os Clientes na escolha dos
produtos para a melhor utilização da máquina de café, apresenta a linha:
ECO LINE - Produtos para a limpeza
A) 610-004-129 líquido
para o kit cappuccino;
B) 610-004-220 en pó
para os grupos, manípulo dos filtros, chávenas de café;
C) 610-004-224 carteiras
para os grupos, manípulo dos filtros, chávenas de café;
D) 61 -21 pastilhas
para os grupos das m quinas superautom ticas.
Para encomendar, indicar o número de código ao seu Concessionário.
8
Il Costruttore si riserva il diritto di modificare senza preavviso le caratteristiche
delle apparecchiature presentate in questa pubblicazione
The Manufacturer reserves the right to modify the appliances presented in this
publication without notice
Le Fabricant se réserve le droit de modifier sans préavis les caractéristiques
des appareils présentés dans cette publication
Der Hersteller behält sich das Recht vor, die in dieser Broschüre vorgelegten
Geräte ohne Voranzeige zu ändern
El Constructor se reserva el derecho de modificar sin preaviso las
caracteristicas de las maquinas tratadas en este manual
O Constructor reserva-se o direito de modificar sem aviso previo as
máquinas tratadas neste manual
GRUPPO CIMBALI SpA - 20082 BINASCO (MILANO) ITALY
CERT. NR. 50 100 3685