1
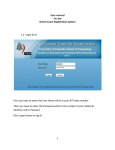
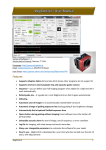
User Manual for the BITBIT Online Application Online Application2011 1.0 1.1 After you enter into the BIT (Bachelor of Information Technology) Registration System the following screen will appear in your browser Filling Personal Details First you have to fill up the personal details form 1.1.a Click on the blank box in front of the label Full Name and type your full name in the box as well as you have to fill Sinhala name and Tamil name by using Unicode. There are two links to get assist to fill Sinhala and Tamil name E.g.(English) – VERANGA SOORIYABANDARA PALLAWELA E.g .(Sinhala) - වේරංග සූරියබණ්ඩාර පල්ාවල E.g (Tamil ) - வேறங்க சூரியபண்டார பல்லாவேல 1.1.b 1.1.c Then click on the next blank box and type your last name and initials E.g. – (Last Name ) PALLAWELA E.g.- (Initials ) V.S *Then click on the arrow pointed below at the right corner of the next dialog box Then a list of choices for the Title will appear as given below Place your mouse pointer on the relevant title so that it would be highlighted Then (click on it) or (press the Enter key) Then the list would disappear and your selected title would appear in the title box e.g.-for Priyankara title would be Mr. If you want to change your selection you can repeat from 1.1a 2 of 19 1.1.d Then select sex by clicking the blank circle in front of the text “Male” or ”Female” as relevant for you If selected the blank circle would contain a black dot in front of the relevant text (You can select only one of them) 1.1.e Then select the citizenship from the drop down list in the same way you selected your Title e.g.-whether you are a Sri Lankan or Foreign National 1.1.f Filling the NIC or Passport No You can enter either National Identity Card No. or Passport No. You have to first select the relevant field by clicking the blank Circle in front of the text and then enter the specific no (Note that if you have selected NIC you have to supply your NIC No.) 3 of 19 If you are supplying the NIC No you have to enter nine digits and the last letter in upper case (V / X / ...) First two digits will be your birth year Eg-836451234V 1.1.g Filling the Data of Birth As soon as you click on the Date of Birth box a calendar will appear as given below 4 of 19 You can select the month and year from the calendar navigating through it by or button. Click on the relevant date and it would be selected and appear in a blue lined square and after the selection the selected value will be in the box in number format Eg-1983-12-20 Alternatively you can type the Date of Birth in the given format (YYYY-MM-DD) At this time the monthly Calendar would disappear The current date is marked in red in the calendar Ex-Here in this example the Date of Birth is 20th Dec 1983 After you have finished your personal details click on the “Next” button to proceed (Check whether all the information is correct as you are moving to a new page) The “Reset” button can be used to clear all the text you entered and your selections. So that you can restart from the beginning If * mark appears in front of the text box it says that information is essential for your registration process (Without entering those details you can not proceed to the next page) If you tried to proceed without filling a required field you will see an error message in red and you will be redirected to the same form you were being filling last If the NIC No. and Date Of birth do not tally with each other you will see an error message “Invalid NIC No”. Then you have to correct them 5 of 19 2.0 6 of 19 2.1 Then the latter part of the personal details form will appear 7 of 19 2.1.a Fill your home address as in the format in the example (Number, Road and City separately) Choose the country from the drop down list if it is not Sri Lanka, Enter your telephone number with all digits Ex-0112568422 Then enter a valid E-mail address of regular use Note that your Application Number would appear at the bottom of the right corner in every form (Write down that number for future use) Click on the “Next” button to proceed We will not be able to correspond with you. You had filled an incorrect address see 12.0 8 of 19 3.0 Filling Educational Qualifications There are three options. You can select one only To select an option click the white button infront of the appropriate text If you are selecting option “c” you must type the list of certificates with the offering institute in the blank box supplied below (No need of filling the text box if you have selected option “a” or “b”) An example of selecting c is given below 9 of 19 Click “Next” to continue 4.0 Filling A/L Results You can choose the year and subject from drop down lists and you should type the grade attained in upper case 10 of 19 (If you have done only three subjects you can omit the last row) Click “Next” to continue 5.0 Selecting the District You can select only one district Choose the district you would prefer to appear for the registration and click “Next” to continue (It may or may not be your hometown district) Most registrations are carried out in Colombo. However we have done registration only in Kandy, Galle and Jaffna. Selecting center Other than Colombo does not guarantee. That you will be called them to registration If your district is not in the list .You can request a district not in the list by type in the name in the given example. 11 of 19 6.0 Filling Employment Details 6.1.a You can choose the options one or both by ticking the check box in front of the text 6.1.b Then you have to fill designation and monthly salary by typing (If you are not employed you can leave those fields blank) This completes filling the application form. Click “Next” to proceed When You Clicked the “Next” button all the details you have entered will appear in one page 12 of 19 7.0 13 of 19 14 of 19 Check if all the information you have entered are correct. You would not be able to change this information after this step unless you submit a new application form You can edit the information in forms one by one by clicking the “Edit” button in top of all form topics Drag to the bottom of this page and verify all the information When you are sure that information entered are correct click the “Next” button to continue As soon as you clicked the “Continue” button you will see the information in read only style and a declaration at the bottom 15 of 19 If you have any issue not clear regarding the declaration please contact us on Tel If you are agreeing with the terms and conditions tick the checkbox relevant and click the submit button (If you do not agree with the terms and conditions you cannot proceed further) Remember that if the check box is ticked we assume that you agree with the terms we can cancel your registration for submitting false information. When you click the “Submit” button this would appear 16 of 19 8.0 You can see the Application No on the screen and note down it for future use 9.0 Printing the Bank Payment Voucher You can view the payment voucher that is being ready to print by clicking the “View” button in front of the text “Please print your payment voucher” You will see the print preview of the payment voucher and the application form. Some data you filled would be printed on the voucher automatically You can now get the print out of the payment voucher by clicking the “Print” button on top left corner of the PDF You need to sign on it stating the date of payment and it is ready for handing over to any branch of Peoples Bank with the required payments 17 of 19 (Handing over the copy of voucher is compulsory for your registration) There are four payment voucher slips. 1. EDC copy 1 ( Post this to us) 2. Candidate c copy 2(Keep this with you) 3. Thimbirigasyaya bank copy(Bank will keep this) 4. Bank copy ( Bank will keep this) 10.0 Sending a Hard Copy of the Application Form You can view the print preview of the application form by clicking the “View” button in front of the text “Please print your application” You must get a printout of the application form (The data you entered would be filled automatically to the form) and sign on it in front of an attester and send to the address below 18 of 19 12.0 Continuing from a halted point Until you confirm the submission of the application you have to enter NIC/Passport No in the form you can go back and edit it for that . After supply in the application number of the previous form which was halted as the username and NIC/Passport No you can click on the “Search” button You can continue filling the previous form from the halted point. If you have missed or want to edit data in the previous steps you can go to the previous form by clicking “Back” ************ 19 of 19