1
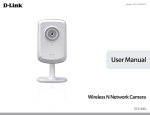
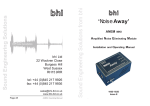
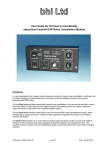
DTNA Noise Away
Amplified DSP noise cancelling Speaker
User Manual
bhi Ltd
DSP noise cancellation products for radio and voice communications
1067-105D iss D
Important Information:
Copyright
This publication, including all photographs and illustrations is protected under international
copyright laws, with all rights reserved. Neither this manual, nor any of the material within,
may be copied or reproduced without the written consent of bhi Ltd.
Disclaimer
The information in this document is subject to change without notice. bhi Ltd makes no
representations or warranties with respect to the contents hereof and specifically disclaims
any implied warranties of merchantability or fitness for any particular purpose.
Furthermore, bhi Ltd reserves the right to revise this publication and to make changes from
time to time in the content hereof without obligation of bhi Ltd to notify any person of such
revision or changes.
Table of Contents
1. Packing List ……………………………………………………………………..page 2
2. Introduction……………………………………………………………………..page 3
3. DSP noise cancellation………………………………………………………...page 3
4. Installation………………………………………………………………………..page 4
5. Speaker operation………………………………………………………………page 4
6. DSP function button.……………………………………………………….…..page 5
7. Setup mode………………………………………………………………………page 5
8. Demonstration modes…………………………………………………………..page 6
9. Noise reduction levels…………………………………………………………..page 6
10. Specification………………………………………………………………….….page 7
11. Troubleshooting/FAQ’s…...…………………………………………………....page 7
12. bhi Support……………………………………………………………………...page 7
1. Packing List
The DTNA Noise Away is shipped with the following:
•
•
•
•
•
DTNA noise cancelling speaker
3.5mm audio lead
Speaker mounting bracket
Fused DC power lead 1030-FPL
Operating manual
Page 2
2. Introduction
The bhi DTNA Noise Away amplified DSP noise cancelling speaker greatly improves the
clarity and intelligibility of speech in radio and voice communication systems. It is suitable
for use in base station applications where background noise and interference mean that
you cannot clearly hear what is being said. The speaker will enable the user to listen and
concentrate “stress-free”. Suitable applications where the speaker will be of great benefit
are: Amateur radio, two-way radios, HF radios, marine communications, scanners, taxi
base stations etc. The DTNA Noise Away incorporates unique DSP technology to remove
unwanted background noise and interference from speech and has up to 8 DSP filter
levels, allowing the user to optimise for their level of noise and interference. The speaker
simply connects into the extension speaker socket or headphone socket of the radio
communications equipment.
The DTNA Noise Away comprises a 4” bass driver and a 1” tweeter unit, and an amplified
DSP noise cancelling unit capable of producing up to 2.5Watts RMS audio power. The
unit requires an audio input signal of between 80 and 500mW level and a DC supply of
between 12 and 18 Volts (300mA). The unit is supplied with a 1.2 metre audio cable with
a moulded 3.5mm jack plug for the audio input, as well as a 2.1mm fused DC power lead
and user manual.
The bhi DTNA Noise Away is easy to set up and its functions are microprocessor
controlled, enabling simple operation via two the pushbuttons on the front of the speaker
grille: Power on/off audio bypass and DSP filter on/off and level select. The last selected
settings remaining in the memory when the unit is switched off.
Note: The speaker is designed for speech signals and is not really suitable for music.
3. DSP Noise cancellation.
The bhi DSP processes the incoming signal and differentiates the speech from the noise.
The unwanted noise and interference is then attenuated to leave only the speech. The
following diagrams are taken from actual audio signals and illustrate how the signal is
being processed.
Original signal.
Speech with a lot of background noise
Page 3
Processed speech.
Speech with reduced noise
4. Installation
The speaker is supplied with a mounting bracket that can be left on in case of permanent
fixing, or removed altogether depending on personal choice.
Connect the 3.5mm mono plug lead supplied to the extension speaker socket of your
radio, and then connect the black and red terminals at the other end of the audio lead to
the corresponding red and black screw terminals on the rear of the speaker.
Connect the fused DC power lead supplied to a power supply capable of providing 12 18VDC @ 300mA. (The centre pin of the 2.1mm power connector is positive and the lead
with the white stripe is positive), or use a suitable mains plug-in 12V DC power supply
(300mA).
5. Speaker Operation
Once installed and connected, apply power to both the audio source and the speaker.
Press the power/bypass switch located in the speaker front grill. When power is applied to
the speaker, the LED will flash and turn red or orange depending on whether 4 or 8 levels
of noise cancelling have been selected. The power button switches the module on and off.
When the module is switched off, the audio bypasses the module, so the circuit will
behave as if the module isn’t present and the unit becomes a passive extension speaker.
Note: If the power is on and the DSP is switched off, the audio still passes through the
DSP, but without any signal processing.
6. DSP Function button
This button is used to set the following:
• DSP filter on/off
• DSP level select
• 8 levels of noise cancellation select
• Demonstration mode select
DSP mode
4 Levels
8 Levels
OFF
RED
ORANGE
ON
GREEN
GREEN
Table 1. LED mode indication.
Page 4
7. Setup mode
To change the number of DSP levels or listen to the demonstration modes, it is necessary
to put the module into the setup mode.
To do this, ensure the module is switched off. Press and hold the DSP level button. Turn
on the module and a 2 tone beep will be heard indicating that the module is in the set up
mode.
Releasing the button after the first 2 tone beep will enter demonstration mode 1.
Releasing after the second 2 tone beep will enter demonstration mode 2.
Releasing after the third 2 tone beep will set the unit to level 2 in the 4 level mode.
After the fourth beep, keep the button depressed. 4 beeps will indicate 4 level mode and 8
beeps 8 levels. Release the button to select the desired level mode.
The module will return to normal operation after this. The colour of the LED will indicate
the mode of operation.
8. Noise reduction levels.
4 or 8 levels of noise reduction are available. The amount
of noise and tone reduction is shown in the table below.
Level
(4)
1
2
3
4
Level
(8)
Tone Reduction
White Noise Reduction
1
4dB
9dB
2
5dB
11dB
3
6dB
13dB
4
8dB
15dB
5
16dB
17dB
6
21dB
20dB
7
25dB
24dB
8
65dB
35dB
Table 2. Tone and noise reduction levels.
The column marked level (4) shows the noise and tone reduction when operating the
module with 4 levels, and the level (8) column shows it for 8 levels.
With the DSP noise cancelling switched on (green LED), holding down the function button
will continuously change the DSP level until the desired level is reached.
Release the button. The module will retain this level until it is changed.
Page 5
9. Demonstration modes.
Demonstration mode 1
The module switches the noise cancellation
on for 1.5 seconds, then off for 1.5 seconds.
It will then move to the next level and repeat
the process. This mode is particularly
effective at demonstrating the different DSP
levels. A lternatively pass a clean audio
signal through the module to see hear how
little the DSP alters the speech.
Demonstration mode 2
The module switches the noise cancellation
on for 3 seconds then off for 3 seconds. This
is a good demonstration of the before and
after effects of the noise cancellation.
Note: To exit the demonstration modes hold
down the DSP button until a 2 tone beep is
heard.
Start
Start
Noise cancellation
On
Noise cancellation
On
Wait 3 Seconds
Wait 1.5 Seconds
Noise cancellation off
Noise cancellation off
Wait 3 Seconds
Increase DSP
noise cancellation
level
No
DSP button
pressed?
Yes
2 tone beep
No
Highest
Level?
Yes
Normal operation
Normal operation
Page 6
10. DTNA Noise Away Specifications
DC Power
DC input voltage
Current consumption
12 to 18 Volts DC
300mA
Audio Input
Impedance
Minimum input level
Maximum i/p audio
Terminated with approximately 8 Ohm load
50 mV – 500mV
5 Watt
Audio output
Output load
Audio bandwidth
Controls
Indications
Connections
2.5W 8ohm
50 – 4.3KHz
Power bypass/Function button
Power ON/ FUNCTION
2.1mm DC power jack (Centre +ve)
3.5 mm mono plug lead 2m long
4mm binding posts
DSP noise cancelling
Number of levels
Indication
Noise reduction
Tone reduction
4 or 8 filter levels (selectable)
Visual and audio indication of filter level
9 – 35dB
4 – 65 dB
Physical dimensions
Weight
Dimensions
1.65Kg
200(H) x 150(D) x 160(W)mm
11. Troubleshooting/FAQs
Speaker doesn’t work at all, no sound from the speaker:
• Check that the power connector on your power supply is suitable for the power
socket on the speaker (2.1mm, centre positive).
• Check that you have switched your radio communication equipment on and that you
have a signal for the speaker to process. To verify this, remove the audio connector
from the external speaker socket on your equipment.
• Check that the Desk Top “Noise Away” Power LED is on.
The speaker works but the noise cancellation doesn’t appear to improve the audio
quality of the signal:
• Check that the filter is switched on (green LED).
• Increase the filter level to see if this makes a difference.
• Increase the volume on the audio source.
4. Troubleshooting/FAQs
The volume from the speaker is low and cannot be increased:
• The speaker is designed to work with the external speaker sockets of radio
communications equipment, and although it will work with some earphone and
headphone sockets, there may be occasions where the signal output from these
Page 7
types of output sockets is not enough for the speaker electronics to process the
signal effectively. bhi have another product that will work with these levels of signal,
the NEIM1031MKII (DSP Noise Eliminating In-line Module). Please contact bhi for
more information. See end of operating manual for contact information.
Sometimes there is a short delay before the noise cancellation is active:
• This is due to the time the DSP takes to start processing the signals. This gives you
the opportunity to check that the DSP is not taking out any detail from the signal.
Sometimes I can hear a processing sound in the speakers when no signal is
present:
• This is caused by the DSP processor and is normal. When a signal is applied you
should not be able to hear this in the speaker.
12. bhi support
Every DTNA Noise Away noise eliminating speaker comes with a 12 month guarantee
against defective materials and workmanship. If you do have a problem then please refer
to the troubleshooting guide (section 11). If you have not resolved your problem then
please contact us. Before you make your call please have the following information to
hand:
1. Your serial number (found on the back of the unit).
2. Details of when and where you purchased the unit.
See our website for FAQs for answers to other common questions, otherwise most queries
can be resolved over the telephone. If not we will arrange with you to have your unit sent
back to us for analysis, repair or replacement (if within 12 months from date of purchase, if
outside the guarantee period an estimate of the cost of repair will be given). For contact
details please refer to the back cover of this manual. If you have any suggestions for
improvements please complete and return the customer feedback form.
Note: Opening the case should only be done to make audio adjustments as described at
the end of this manual. This may void any warranty if the correct procedure is not carried
out.
Weee Statement for correct disposal of this product
(Applicable in the European Union and other European countries with separate collection
systems).
This marking shown on the product or its literature, indicates that it should not be
disposed of with other household wastes at the end of its working life. To prevent
possible harm to the environment or human health from uncontrolled waste
disposal, please separate this from other types of wastes and recycle it
responsibly to promote the sustainable reuse of material resources.
Household users should contact either the retailer where they purchased this product, or
their local government office, for details of where and how they can take this item for
environmentally safe recycling. Business users should contact their supplier and check
the terms and conditions of the purchase contract. This product should not be mixed with
other commercial wastes for disposal.
Page 8
bhi DTNA Noise Away Speaker Dis-Assembly and Audio Adjustment Procedure
The Speaker is set up to operate with a wide audio input level range. But under certain
conditions, like using the speaker with a shortwave receiver, you may need to adjust the
audio settings of the amplified DSP module to obtain optimum performance.
Note: This procedure should only be carried out by people with the relevant skills.
1. Using a very fine flat blade screwdriver of something similar like a letter opener,
carefully prise the grille off by pushing the tool into one of the corners where the
speaker grille touches the speaker housing. Carefully lever the grille up and then
pull the grille out from the from of the speaker front.
2. Carefully pull the grille to one side to expose the 6 screw holes. Using a suitable
Philips or pozi screwdriver remove the screws (can be 4 or 6 screws).
3. Remove the front half of the speaker and remove the baffle material and lay to one
side so that the circuit board is accessible.
4. Connect your radio to the speaker, connect the power to the speaker and switch the
radio on. With the speaker in bypass mode (power off), turn the radio volume to
your normal audio level. Now switch the speaker on.
5. Look at the red LED near the large electrolytic cap and relay (see schematic below).
If this is flashing red then you need to adjust the pot P2 counter clockwise so that
there is the odd flash of red or none at all from the LED.
6. If the LED is not flashing then you need to adjust P2 clockwise until the LED flashes
then back it off and adjust as in 5.
7. If you wish to increase the audio output you can adjust the potentiometer P1
clockwise to give you the desired level. Please be aware that if you increase this
level, when you turn the speaker off it will revert to bypass and the audio output will
be lower. If you turn the volume up on your radio to compensate and then switch
the speaker back on, the volume may be too loud for you.
8. Once you are happy with all the audio levels and audio quality, re-assemble the
speaker carefully (remember to put the white baffle material back in the speaker
prior to fitting the screws).
Page 9
bhi Ltd
PO Box 318
Burgess Hill
West Sussex
RH15 9NR
England
Telephone: + 44 (0)845 217 9926
Fax: + 44 (0)845 217 9936
Email: [email protected]
Web: www.bhi-ltd.com
Page 10
1072-105D iss D