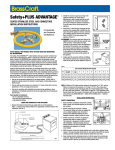
1
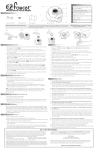
Infrared Sensor Faucet Adapter- “55/64”-27F+“15/16"-27M Owner Instruction for Auto Spout Adaptor: Regular Thread for Dual 55”/64”-27 Female +“15/16"-27 Male A. Functional Specification: P| 1 01. ON/OFF/RESET Button 07. Fix Cap 08. Rubber 02. LOCK Light – (Green) Washer 03. RENEW BATTERY 09. Light - – (Red) Thread Adaptor 04. Battery Holder 10. 05. Aerator Input Filter Washer 06. Sensor Device Specification Guidance: 1. Power Supply: 4 AAA Batteries. 2. Sensor Range: 2” ~ 10” (5~25 Cm). ─── It’s Based on the Basin and Illumination. 3. Power Rating: 0.0006 W 4. Net Weight: 165 g. 5. Working Pressure: 10 ~ 125 Psi. Package Contents: (1.) Flat Wrench (5.) User Manual (2.) Rubber Washer (3.) Fix Cap (4.) Thread Adaptor ─ Dual Upside: 55”/64” – 27 Female Downside: 15”/16” – 27 Male Regular Thread Dual - “55/64"-27 Female + “15/16"-27 Male for Regular Thread Size Infrared Sensor Faucet Adapter- “55/64”-27F+“15/16"-27M B. Install Auto Spout to the Faucet 1. Insert 4 AAA Batteries. (Suggest After Your Adaptor Installation Successfully, then Make the 4 Batteries Installed.) (1.) Pull Out The Battery Holder. (2.) Insert 4 AAA Batteries. Make Sure Your Hands are Dry and Clean! (3.) Push the Battery Holder Back and Secure it Well. 2. Faucet with External Thread ─ (Use Upside Thread 55”/56”-27 Female Thread) (1.) Remove the Existing Faucet‘s Aerator from the Faucet ※ Ensure the Existing Rubber Washer is Removed ! (2.) Install the Adaptor which Parts inside the Package. UPSIDE Thread: 1.↑ Fix Cap + 2. ↓Rubber Washer + 3. ↑Thread Adaptor + 4. ↑ Flat Wrench (3.) With “Flat Wrench” to Tighten Thread Adaptor; Orient towards Horizontal or Vertical Direction. (4.) Turn the Fix Cap SNUGLY with YOUR HAND ONLY. ── Make sure Fix Cap is Not Surpass the Threaded. (Screw the Fix Cap to the Input Filter Washer Thread) Dual - “55/64"-27 Female + “15/16"-27 Male for Regular Thread Size P| 2 Infrared Sensor Faucet Adapter- “55/64”-27F+“15/16"-27M 3. Faucet with Internal Thread ─ (Use Downside Thread 15”/16”-27 Male Thread) (1.) Remove the Existing Faucet‘s Aerator from the Faucet ※ Ensure the Existing Rubber Washer is Removed ! P| 3 (2.) Install the Adaptor which Parts inside the Package. DOWNSIDE Thread: 1.↑ Fix Cap + 2. ↓Rubber Washer + 3. ↑Thread Adaptor + 4. ↑ Flat Wrench (3.) With “Flat Wrench” to Tighten Thread Adaptor; Orient towards Horizontal or Vertical Direction. (4.) Turn the Fix Cap SNUGLY with YOUR HAND ONLY. ── Make sure Fix Cap is Not Surpass the Threaded. (Screw the Fix Cap to the Input Filter Washer Thread) Dual - “55/64"-27 Female + “15/16"-27 Male for Regular Thread Size Infrared Sensor Faucet Adapter- “55/64”-27F+“15/16"-27M 4. RESET the Sensor Range ─── It will Take about 15 Sec to Set Up! a. Auto-Detect Sensor Range for 2” ~ 10” (5~ 25 Cm) - Automatically 1. Turn Off the Faucet. 2. Press the “RESENT” Button for about 5 Sec., until “The Green Light” Begins to Flash. 3. When the Green Light STOPS to Flash, then, Release Your Finger. (It Needs Another 5 Sec. to Detect its Sensor Range Automatically.) 4. Turn On the Faucet. b. Manual Adjust Sensor Range for 2” ~ 10” (5~ 25 Cm) – by Hand 1. Turn Off the Faucet. 2. Use Your One Hand to Locate the Distance You Need. ─ Find out Your Sensor Distance between 5 to 25 Cm BY Placing Your One Hand UNDER the Sensor Device. 3. Use the Other Hand’s Finger Press the “RESET” Button for 5 Sec. until “The Green Light” Begins to Flash, then, Release Your Finger. 4. When the Green Light STOPS Flashing, Remove Your Hand from the Sensor Device. 5. It’s the New Sensor Range You Feel Like. 6. Turn On the Faucet. CAUTION! Before Using this Auto Spout, Read its Operation Instruction and follow its Safety Rules. SAFETY RULES: Always Check Water Temperature Carefully before Placing Your Hands under the Auto Spout. Never Block the Sink or Basin’s Drain when Auto Spout is Unattended. Always Turn OFF the Faucet when Leaving House for Prolonged Periods (i.e. for Vacation). DO NOT Wash, Knock, Rotate and Immerse Auto Spout! Dual - “55/64"-27 Female + “15/16"-27 Male for Regular Thread Size P| 4 Infrared Sensor Faucet Adapter- “55/64”-27F+“15/16"-27M SOME TYPES OF FAUCET ARE UNFIT TO INSTALL AUTO SPOUT: 1. The Faucet’s Outlet is not Round. 3. Pull-Out Faucet. 2. The Faucet’s Spout is too Short. 4. Shower Head. OTHERS: IF FAUCET WITHOUT THREAD: Use the Screwed Connector ─── (Not Included in the Package). Buy it from the Hardware Store. IF FAUCET WITH DIFFERENT THREAD: Use a Proper Thread Adaptor ─── (Not Included in the Package). Buy it from the Hardware Store. If Needed , Please Refer to this Web-Site for a Complete Line of Adaptor’s Features as to Faucet Repair: http://www.columbiapipe.com/PIN_ASSETS/PIN_Data/parsed/BrassCraft/Spec_Sheet/(23)%20faucet%20repa ir.pdf - Switch Your Faucet’s Thread Size to Our ‘Regular Thread’: - “55/64"-27 Female + “15/16"-27 Male LOW BATTERY INDICATOR – “RENEW BATTERY” Select 4 AAA Batteries Installing to Auto Spout. Auto Spout can Work about 9 to 12 Months if apply to High Quality Alkaline Batteries ─── It Depends on Usage and Battery’s Brand. When Batteries Weaken, Auto Spout will Shut OFF automatically and “RENEW BATTERY” ,the Red Light will Begin to Flash ─── Indicating that Batteries Need to be Replaced with New Ones. Dual - “55/64"-27 Female + “15/16"-27 Male for Regular Thread Size P| 5 Infrared Sensor Faucet Adapter- “55/64”-27F+“15/16"-27M NOTES: (a.) To Fill Containers, Sink, Kettles, Vessels etc. with Water: ─ by Manual to Keep Water Flowing 3 Min. You can Press the “ON/OFF” Button with Your Finger; Water will Keep Flowing for about 3 Minutes, then, Stop. During the Time, You can Shut Off the Water by Press the “ON/OFF” Button Once More. Sensor will Retrieve to Automatic Condition after Flowing for 3 minutes or Shut Off by Your Finger. P| 6 (b.) Avoid Rotating/Moving Auto Spout after it has been Installed Completely onto the Faucet. MAINTENANCE: Water Systems Contain Particulates Cause Flowing Water may Reduce Via the Auto Spout after Several Months. Should it Happen, Clean Impurities from the ” Input Filter Washer”. Do NOT Drive Out the Auto Spout’s Aerator! CARE & CLEANING: Keep Auto Spout’s Surface Clean and Dry. DON NOT WASH Auto Spout with any Water or Detergents or Liquids. Clean ONLY with Damp Towel. NEVER Immerse Auto Spout Into/Onto Water or any Liquid. ATTENTION: [Troubleshoot] 1. Always Turn the Faucet’s Handle In “COLD” Position, if You are Not Sure the Water Temperature. Auto Spout Can Resist HOT Water Temperature to 82℃/179℉. ”WATCH OUT” the Hot Water Temperature! 2. Water is Leaking from the Faucet’s Adaptor after Auto Spout is Installed Completely, Check if the “Faucet’s Rubber Washer” is Removed and the “Adaptor’s Rubber Washer” is Placed in the Correct Position. 3. ONLY Clean Auto Spout with Damp Towel; Do NOT Wash or Clean with any Water or Detergents or Liquids or Artificial Cleansers. Never Immerse Auto Spout into/onto the Water or any Liquid. 4. Corroded Batteries may Result in I.C. Circuit Damage. Keep Hands Dry & Clean when Installing Batteries. 5. When Objects Keep within the Sensor Area; Water will STOP Flowing after 1 Minute, and Green “LOCK” Light will be Flashing. It Means You should Remove Objects from the Sensor Area. When Removed, it will Retrieve to Automatic Mode. 6. When Objects are NOT Detected, such as Dark Color, Transparency and Silverwares of Objects which are Not Easily to be Detected, Press the “ON/OFF” Button by Manual to Activate the ON & OFF Function. 7. In the Direct Sunlight Shining Environment, Auto Spout May Not Work; Reduce Sensor Range to Activate the Function. ONLY “HANDS” “CLOSE TO” the Sensor Part may Succeed. 8. When Auto Spout is Unattended, do NOT Obstruct the Drainage of Sink or Basin. If there has an Extended Period in Your Absence on Your Location. Make the Faucet’s Handle in the Condition of “Turn-OFF”. 9. Water Keeps Turning ON and can NOT Stop, although Try to Regulate the Sensor Range by Manual; Press “ON/OFF” Button for 5 Sec. to Retrieve the Function and Let it Auto-Detect its Sensor Range by itself. 10. When Auto Spout is Malfunction, the “LOCK” Green Light will Flash; Clean the Sensor with Damp Towel and Press “RESET” Button for 5 Sec. to Retrieve the Function. ※If Fails, Remove 4 Batteries from Auto Spout and Lay Aside for over to 10 Minutes, then Restart. Dual - “55/64"-27 Female + “15/16"-27 Male for Regular Thread Size