1
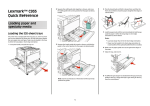
Clinical Assistant
User's Guide
May 2011
www.lexmark.com
Lexmark and Lexmark with diamond design are trademarks of Lexmark International, Inc., registered in the United States and/or other countries.
All other trademarks are the property of their respective owners.
Edition notice
May 2011
The following paragraph does not apply to any country where such provisions are inconsistent with local law: LEXMARK INTERNATIONAL,
INC., PROVIDES THIS PUBLICATION “AS IS” WITHOUT WARRANTY OF ANY KIND, EITHER EXPRESS OR IMPLIED, INCLUDING, BUT NOT LIMITED
TO, THE IMPLIED WARRANTIES OF MERCHANTABILITY OR FITNESS FOR A PARTICULAR PURPOSE. Some states do not allow disclaimer of
express or implied warranties in certain transactions; therefore, this statement may not apply to you.
This publication could include technical inaccuracies or typographical errors. Changes are periodically made to the information herein; these
changes will be incorporated in later editions. Improvements or changes in the products or the programs described may be made at any
time.
References in this publication to products, programs, or services do not imply that the manufacturer intends to make these available in all
countries in which it operates. Any reference to a product, program, or service is not intended to state or imply that only that product,
program, or service may be used. Any functionally equivalent product, program, or service that does not infringe any existing intellectual
property right may be used instead. Evaluation and verification of operation in conjunction with other products, programs, or services,
except those expressly designated by the manufacturer, are the user’s responsibility.
For Lexmark technical support, visit support.lexmark.com.
For information on supplies and downloads, visit www.lexmark.com.
If you don't have access to the Internet, you can contact Lexmark by mail:
Lexmark International, Inc.
Bldg 004-2/CSC
740 New Circle Road NW
Lexington, KY 40550
USA
© 2011 Lexmark International, Inc.
All rights reserved.
UNITED STATES GOVERNMENT RIGHTS
This software and any accompanying documentation provided under this agreement are commercial computer software and documentation
developed exclusively at private expense.
Trademarks
Lexmark and Lexmark with diamond design are trademarks of Lexmark International, Inc., registered in the United States and/or other
countries.
All other trademarks are the property of their respective owners.
Contents
Edition notice...............................................................................................2
Using the applications..................................................................................5
Using Scan to EMR.....................................................................................................................................5
Scanning documents at the printer .................................................................................................................... 5
Using Clinical Forms..................................................................................................................................6
Bookmarking forms............................................................................................................................................. 6
Configuring folders for bookmarks .....................................................................................................................7
Printing bookmarks............................................................................................................................................. 7
Searching for bookmarks and folders .................................................................................................................8
Saving bookmarks as shortcuts...........................................................................................................................8
Using Physician Orders Routing.................................................................................................................8
Scanning and sending documents using Physician Orders Routing....................................................................8
Using Card Copy........................................................................................................................................9
Loading cards on the scanner glass .................................................................................................................... 9
Copying and e‑mailing scanned cards...............................................................................................................10
Using Background and Idle Screen..........................................................................................................11
Changing the background image using the printer control panel ....................................................................11
Troubleshooting.........................................................................................12
Physician Orders Routing troubleshooting..............................................................................................12
The printer times out before completing an action..........................................................................................12
Card Copy troubleshooting.....................................................................................................................12
Application prints two or more cards on one page or saves them as one file..................................................12
Printer cannot scan multiple cards ...................................................................................................................12
Index..........................................................................................................13
Contents
3
Contents
4
Using the applications
LexmarkTM Clinical Assistant is a collection of applications used to customize your multifunction printer (MFP) for your
work environment. Several applications have been installed on the MFP to help make frequently performed tasks faster
and more efficient. This allows you to do the following directly from the printer:
• Scan documents at the printer, and then send the scanned documents to a network destination. From the network
destination, the documents can be either stored or rerouted.
• Easily access frequently used forms and other regularly printed information.
• Scan documents and then send them electronically to be printed by a different printer at another location, such as
Radiology or building maintenance.
• Print both sides of a scanned card on a single page, saving paper and displaying the information on the card in a
more convenient manner.
Using Scan to EMR
Scanning documents at the printer
1 Load the document into the scanner.
Note: Documents may be loaded into the scanner in multiple ways. For information on the different methods of
loading documents into the scanner, see the User's Guide that came with the printer.
2 Touch the application icon. If prompted, enter the user name and password used to access the printer. Contact
your system support person for login information.
3 Select the destination where you want to receive the scanned document. If prompted, enter the user name and
password required to access the destination. Contact your system support person for login information.
4 Some additional job options may be available depending on how the application has been configured. Follow the
instructions on the screen to update the options. Contact your system support person for more information on
each option.
5 Touch Scan It. Depending on how the application has been configured, you may have the option to preview and
make adjustments to scanned pages.
6 To scan additional documents, load the next document into the scanner and select one of the following from the
confirmation screen:
• Touch Yes, to same destination to scan the document to the previous destination.
• Touch Yes, to a different destination to scan the document to a different destination.
• Touch No to finish the operation and return to the printer Home screen.
Using the applications
5
Using Clinical Forms
Bookmarking forms
Adding a bookmark using the printer control panel
1 From the printer home screen, touch the application icon.
2 If necessary, touch Options.
3 Touch .
4 Type a name for the new bookmark. This name will be displayed when selecting a form to print.
5 If you want to use a PIN to limit access to the bookmark, then touch Confidential, select On, and then touch
6 Touch
.
.
7 If prompted, enter a four‑digit PIN, and then touch
8 Touch the location of the file you want to bookmark, and then touch
• Network—The form is on a network share.
• FTP—The form is on an FTP site.
• HTTP—The form is on a Web page.
• HTTPS—The form is on a secure Web page.
.
9 If you selected HTTP or HTTPS, then enter the URL of the bookmark.
10 If you selected Network or FTP, then select an authentication option, and then touch
.
Authentication options include the following:
• Guest(Network Folder)/Anonymous—This does not require users to be authenticated.
• Use device authentication credential—This requires users to enter the authentication credentials as specified
on the printer.
• Prompt for username and password—This requires users to enter their system user name and password.
• Use static username and password—This requires administrators to specify a static user name and password
when they configure the bookmark. Users will not be prompted to enter these credentials at the printer.
11 Follow the instructions on the touch screen to enter the location of the file you want to bookmark. Use
progress through the screens.
Editing or deleting a bookmark using the printer control panel
1 From the printer home screen, touch the application icon.
2 Touch the bookmark you want to edit or delete.
3 If necessary, touch Options.
Using the applications
6
to
4 Touch
to edit a bookmark or
to delete a bookmark.
5 Follow the instructions on the touch screen to edit or delete the bookmark or bookmarks. Use
to progress
through the screens.
Note: If the bookmark is confidential, then you will be prompted for the four‑digit PIN.
Configuring folders for bookmarks
Adding a folder using the printer control panel
1 From the home screen of the printer control panel, touch the application icon.
2 If necessary, touch Options.
3 Touch
.
4 Enter a name for the folder, and then touch
.
The folder will appear in the list of bookmarks.
Adding a bookmark to a folder using the printer control panel
1 From the home screen of the printer control panel, touch the application icon.
2 Touch the folder you want to use.
3 Touch
.
4 If necessary, touch Options.
5 Touch .
6 Enter the information for the new bookmark. For more information, see “Adding a bookmark using the printer
control panel” on page 6.
Editing or deleting a folder
1 From the home screen of the printer control panel, touch the application icon.
2 Touch the folder you want to edit or delete.
3 If necessary, touch Options.
4 To edit the folder, touch
.
To delete the folder, touch .
5 Follow the instructions on the screen to edit or delete the folder.
Printing bookmarks
1 From the home screen of the printer control panel, touch the application icon.
2 Touch the name of the bookmark you want to print, and then touch
Using the applications
7
.
3 Follow the instructions on the screen to print the bookmark.
Searching for bookmarks and folders
1 From the printer home screen, touch the application icon.
2 Touch
.
3 Enter a keyword in the Search For field, and then touch
.
The results of your search are displayed.
Saving bookmarks as shortcuts
You can turn frequently accessed bookmarks into shortcuts that show up on the printer home screen. Instead of
touching the application to access the list of bookmarks, users can touch the shortcut to access the bookmark
immediately.
1 From the home screen of the printer control panel, touch the application icon.
2 Touch the name of the bookmark you want to save, and then touch
3 Touch
.
.
4 Enter the name for the shortcut as you want it to appear on the printer home screen, and then touch
5 Select an icon graphic for the shortcut, and then touch
6 From the confirmation screen, touch
7 Touch
to print the shortcut, or touch
.
.
.
.
Note: The icon appears on the printer home screen. Because of space constraints, users may need to scroll
through the printer home screen to access all of the available icons.
Using Physician Orders Routing
Scanning and sending documents using Physician Orders Routing
1 Load the document into the scanner.
Note: Documents may be loaded into the scanner in multiple ways. For information on the different methods
for loading documents into the scanner, see the printer User's Guide.
2 From the printer home screen, touch the application icon.
3 Select the destination printer where you want to send the document, and then touch OK or Next.
4 Select the priority level for the scan, and then touch OK or Next.
Note: The printer displays a preview of your scanned document if the printer has a hard disk installed and Scan
Preview is enabled from the application configuration settings.
Using the applications
8
5 To scan another page, touch Accept and continue or Scan the Next Page.
To re‑scan the current page, touch Discard.
6 If there are no more pages to scan, touch Finish the job.
A confirmation screen appears to indicate whether the document is sent successfully.
Note: If you are using the Automatic Document Feeder (ADF) to load the document, all pages will scan automatically.
If you are scanning each page individually using the scanner glass, after each page is scanned, load the next page into
the scanner and then touch Accept and continue or Scan the Next Page. Touch Finish the job when all of the pages
are scanned.
Using Card Copy
Loading cards on the scanner glass
Place the cards facedown on the scanner glass, and then flip them over when prompted by the application.
Note: When loading multiple cards, make sure to leave at least 3 cm space between the cards, and at least 1 cm at
the edges of the scanner glass to prevent images from being clipped when copying.
For a single card:
For two cards:
You can load the cards horizontally on the scanner glass.
Using the applications
9
You can also load the cards vertically on the scanner glass.
For three or more cards:
Note: For printers that support the Embedded Solutions Framework (eSF) 2.0, you can scan only up to four cards at
one time.
Copying and e‑mailing scanned cards
1 From the printer home screen, touch the application icon.
2 Load the cards on the scanner glass.
Note: For printers that support eSF 2.0, you can scan only up to four cards at one time.
3 Adjust the settings as necessary.
If your printer supports eSF 2.0, then touch Multi Card to copy more than one card.
4 Touch Scan.
5 If the printer is configured to send the scanned cards as an e‑mail attachment, then set the e‑mail destination:
a Enter the recipient e-mail address or verify the default e-mail address.
b To add additional recipients, touch Next Address. You can also select an address from the list to edit it. For more
information about entering e-mail addresses, see the printer User's Guide.
c Touch E‑mail It.
Using the applications
10
6 When the first scan completes, turn the cards over and then select Scan.
7 When the second scan completes, remove the cards, and then touch OK.
The printer prints a copy of the scanned cards if the application is configured to create a printed output.
Using Background and Idle Screen
Changing the background image using the printer control panel
1 From the home screen, touch Change Background.
2 Select the background you want to use, and then touch OK.
Using the applications
11
Troubleshooting
Physician Orders Routing troubleshooting
The printer times out before completing an action
SET THE AUTOMATIC SCREEN TIMEOUT DELAY SETTING TO A LONGER INTERVAL
1 From the printer home screen, navigate to:
Menus icon > Settings > General Settings > select Timeouts
2 Adjust the amount of time in seconds that you want the printer to remain idle before timing out and reverting
to the home screen, and then touch Submit.
Card Copy troubleshooting
Application prints two or more cards on one page or saves them as one file
MAKE SURE TO LEAVE AT LEAST 3 CM SPACE BETWEEN THE CARDS WHEN PLACING THEM ON THE SCANNER
GLASS
Card Copy lets you print both sides of a scanned card on a single page. When copying two or more cards, the
image‑split function may not work properly if the cards are placed too close together. Leave at least 3 cm space
between each card on the scanner glass to avoid printing multiple cards on one page or saving them as one image
file.
For more information, see “Loading cards on the scanner glass” on page 9.
Printer cannot scan multiple cards
Try one or more of the following:
MAKE SURE YOUR PRINTER HAS A HARD DISK INSTALLED
The multiple‑card scanning feature is available only on printers with hard disks. To check if your printer comes with
an internal or optional hard disk, see the printer User's Guide.
TURN ON THE MULTIPLE‑CARD SCANNING OPTION
Do one of the following:
• In the application configuration settings, make sure Muti Card Scan is selected.
• From the printer control panel, touch the application icon, and then touch Multi Card.
Troubleshooting
12
Index
A
F
application prints two or more
cards on one page 12
folder
deleting 7
editing 7
folders
adding using the printer control
panel 7
searching for 8
B
background image
changing 11
bookmarks
adding to folder using the printer
control panel 7
adding using the printer control
panel 6
creating folders using the printer
control panel 7
deleting using the printer control
panel 6
editing using the printer control
panel 6
printing 7
saving as shortcuts 8
searching for 8
C
cannot scan multiple cards 12
Card Copy
copying cards 10
e‑mailing scanned cards 10
cards
loading on scanner glass 9
changing the background image 11
using the printer control panel 11
configuring the application
adding bookmarks from the
printer control panel 6
deleting bookmarks using the
printer control panel 6
editing bookmarks using the
printer control panel 6
copying cards 10
L
loading cards on scanner glass 9
N
notices 2
P
printer times out before completing
an action 12
printing bookmarks 7
S
scanning and sending documents 8
scanning documents at the
printer 5
searching for bookmarks 8
searching for folders 8
shortcuts
creating 8
T
troubleshooting
application prints two or more
cards on one page 12
cannot scan multiple cards 12
printer times out before
completing an action 12
D
documents
scanning and sending 8
E
e‑mailing scanned cards 10
Index
13