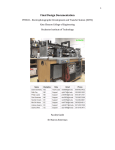
1
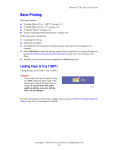
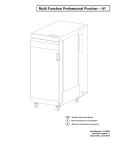
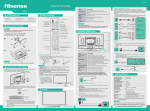
Lexmark™ C935
Quick Reference
2 Squeeze the width guide tabs together as shown, and move
the width guide to the correct position for the paper size being
loaded.
4 Flex the sheets back and forth to loosen them, and then fan
them. Do not fold or crease the paper. Straighten the edges on
a level surface.
Loading paper and
specialty media
5 Load the paper stack with the recommended print side faceup.
Loading the 520-sheet trays
Load the paper in either the long-edge or short-edge
orientation as shown below:
The printer has a standard 520-sheet tray (Tray 1), and it may have
one or more optional 520-sheet trays. All 520-sheet trays support
the same paper sizes and types. Paper may be loaded in the trays
in either the long-edge or short-edge orientation.
1 Grasp the handle, and pull the tray out.
Notes:
3 Squeeze the length guide tab inward as shown, and slide the
guide to the correct position for the paper size being loaded.
• Load sizes larger than A4 in the short-edge orientation.
• Paper must be loaded in the short-edge orientation to
create booklets if the optional booklet finisher is installed.
6 Make sure the paper guides are secure against the edges of
the paper.
7 Align the tray, and insert it.
8 If a different type of paper was loaded than the type previously
Note: Use the size indicators on the bottom of the tray to help
position the guides.
1
loaded in the tray, change the Paper Type setting for the tray
from the control panel.
Loading the 867- and
1133-sheet trays
3 Flex the sheets back and forth to loosen them, and then fan
them. Do not fold or crease the paper. Straighten the edges on
a level surface.
Using the multipurpose feeder
Although the 867-sheet tray and the 1133-sheet tray are different
in appearance, they support the same paper sizes and types and
require the same process for loading paper. Use these instructions
to load paper in either tray:
1 Grasp the handle, and open the tray.
4 Load the paper stack with the recommended print side faceup.
2 Squeeze the length guide tab inward as shown, and slide the
guide to the correct position for the paper size being loaded.
5 Make sure the paper guides are secure against the edges of
1
Paper guides
2
Size indicators
3
Stack height limiter
the paper.
6 Insert the tray into the printer.
1 Pull the multipurpose feeder tray down.
7 If a different type of paper was loaded than the type previously
2 Grasp the extension, and gently pull it out until it is fully
loaded in the tray, change the Paper Type setting for the tray
from the control panel.
2
extended.
3 Prepare the paper for loading.
• Flex sheets of paper back and forth to loosen them, and
then fan them. Do not fold or crease the paper. Straighten
the edges on a level surface.
• Load letter, A4, and transparencies with the recommended
print side facedown and the long edge of the paper
entering the printer first.
5 Make sure the paper is as far into the multipurpose feeder as
it will go with very gentle pushing. Paper should lie flat in the
multipurpose feeder. Make sure the paper fits loosely in the
multipurpose feeder and is not bent or wrinkled.
• Hold transparencies by the edges, and then fan them.
Straighten the edges on a level surface.
Note: Avoid touching the print side of the transparencies.
Be careful not to scratch them.
• Load A3, A5, B4, folio, legal, and statement paper with the
recommended print side facedown and the short edge of
the paper entering the printer first.
6 From the control panel, set the Paper Size and Paper Type.
Printing
Printing a document from
Windows
• Flex a stack of envelopes back and forth to loosen them,
and then fan them. Straighten the edges on a level surface.
1 With a document open, click File ª Print.
2 Click Properties, Preferences, Options, or Setup.
3 Adjust the settings.
Notes:
– Adjust the additional paper guide to accommodate
4 Load the paper, and then adjust the paper guides so that they
lightly touch the edges of the paper stack.
SRA3 and 12 x 19 paper sizes.
– Do not exceed the maximum stack height by forcing
paper under the stack height limiter.
• Load envelopes with the flap side up.
Warning—Potential Damage: Never use envelopes
with stamps, clasps, snaps, windows, coated linings, or
self-stick adhesives. These envelopes may severely
damage the printer.
Note: Load only one size and type of paper at a time.
3
4 Click OK.
5 Click OK or Print.
Printing confidential and other
held jobs
Printing confidential and other held
jobs from Windows
Holding jobs in the printer
2 Click Properties, Preferences, Options, or Setup.
When sending a job to the printer, you can specify in the Print
Properties that you want the printer to hold the job in memory
until you start the job from the control panel. All print jobs that
can be initiated by the user at the printer are called held jobs.
3 Click Other Options, and then click Print and Hold.
Note: Confidential, Repeat, Reserve, and Verify print jobs may be
deleted if the printer requires extra memory to process additional
held jobs.
5 Click OK or Print, and then go to the printer to release the job.
Job type
Description
Confidential
When you send a Confidential print job to
the printer, you must create a PIN in Print
Properties. The PIN must be four digits using
the numbers 0–9. The job is held in printer
memory until you enter the PIN from the
control panel and choose to print or delete
the job.
Repeat
Reserve
Verify
When you send a Repeat print job, the
printer prints all requested copies of the job
and stores the job in memory so you can
print additional copies later. You can print
additional copies as long as the job remains
stored in memory.
When you send a Reserve print job, the
printer does not print the job immediately.
It stores the job in memory so you can print
the job later. The job is held in memory until
you delete it from the Held Jobs menu.
When you send a Verify print job, the printer
prints one copy and holds the remaining
copies in printer memory. Verify lets you
examine the first copy to see if it is
satisfactory before printing the remaining
copies. Once all copies are printed, the job is
automatically deleted from printer memory.
1 With a document open, click File ª Print.
4 Select your job type (Confidential, Reserve, Repeat, or Verify),
and then assign a user name. For a confidential job, also enter
a four-digit PIN.
6 From the control panel, press
repeatedly until
and then press .
appears next to your user name,
8 Press
repeatedly until
job name, and then press
appears next to the job type or
.
If you selected a job name, proceed to step 10 on
page 4.
9 After selecting your job type, use the keypad to enter your PIN.
If you enter an invalid PIN, the Invalid PIN screen appears.
• To re-enter the PIN, make sure
and then press
Try again appears,
.
• To cancel the PIN, press
repeatedly until
.
appears, and then press
Cancel
10 Press
repeatedly until
appears next to the job you want
to print, and then press .
11 Press
repeatedly until
appears next to the number of
copies you want to print, and then press .
Note: Use the keypad to enter a number if necessary.
Confidential and Verify print jobs are automatically deleted from
memory after they print. Repeat and Reserve jobs continue to be
held in the printer until you choose to delete them.
4
A USB Direct interface is located on the control panel. Insert a USB
flash memory device to print supported file types. Supported file
types include: .pdf, .gif, .jpeg, .jpg, .bmp, .png, .tiff, .tif, .pcx,
and .dcx.
Many USB flash memory devices are tested and approved for use
with the printer. For more information, visit the Lexmark Web site
at www.lexmark.com.
Notes:
• Hi-Speed USB devices must support the Full-speed standard.
repeatedly until
Held jobs appears, and then press .
7 Press
Printing from a USB flash
memory device
Devices only supporting USB Low-speed capabilities are not
supported.
• USB devices must support the FAT (File Allocation Tables)
system. Devices formatted with NTFS (New Technology File
System) or any other file system are not supported.
• Before printing an encrypted .pdf file, enter the file password
from the control panel.
• You cannot print files for which you do not have printing
permissions.
To print from a USB flash memory device:
1 Make sure the printer is on and Ready or Busy appears.
2 Insert a USB flash memory device into the USB Direct interface.
Notes:
• If you insert the memory device when the printer requires
attention, such as when a jam has occurred, the printer
ignores the memory device.
• If you insert the memory device while the printer is
printing other jobs, Printer Busy appears. After the
other jobs are processed, you may need to view the held
jobs list to print documents from the flash memory device.
Maintaining the printer
1 Unpack the replacement waste toner box and accessories.
Replacing the waste toner box
Replace the waste toner box when 82 Replace waste toner
box appears. The printer will not continue printing until the waste
toner box is replaced.
3 Press
until
appears next to the document you want to
print, and then press .
Note: Folders found on the flash memory device appear as
folders. File names are appended by the extension type (for
example, .jpg).
4 Press
to print one copy, or enter the number of copies using
the keypad, and then press
to initiate the print job.
Note: Do not remove the USB flash memory device from the
USB Direct interface until the document has finished printing.
If you leave the USB flash memory device in the printer after
leaving the initial USB menu screen, you can still print .pdf's
from the USB flash memory device as held jobs.
2 Open Door E (front printer door).
Canceling a print job from the
control panel
If the job is formatting or already printing, and Cancel a job
appears on the first line of the display:
1 Press
until
Cancel appears.
A list of jobs appears.
2 Press
until
and then press
appears next to the job you want to cancel,
.
Canceling <filename> appears.
Note: Once a print job is sent, to easily cancel a job, press
Stopped screen appears. Press
appears, and then press .
until
. The
1
Waste toner box
2
Door E6
3
Door E
4
Printhead lens cleaner
5
E6 Door tab
Warning—Potential Damage: To avoid overexposing the
photoconductors, do not leave the door open for more than
10 minutes.
Cancel a job
5
3 Grasp the E6 Door tab, and then push the door down.
5 Remove the waste toner box.
4 Remove the old printhead lens cleaner from Door E, and then
6 Place the plastic cover over the waste toner box.
discard it.
7 Place the waste toner box in the recycling bag.
8 Use the new printhead lens cleaner to clean the printhead
lenses.
6
9 Insert the new waste toner box.
10 Place the new printhead lens cleaner in the notches of Door E.
2 Release the bar by pressing the E5 button located on the
12 Close Door E.
bottom of the E5 latch, lift the E5 latch, and then press the bar
down.
13 Remove all paper from the printer paper path.
Visit www.lexmark.com/recycling to learn how to recycle the
waste toner box.
Replacing a photoconductor
Replace the black photoconductor when 84 Replace black
pc unit appears. Replace the cyan, magenta, and yellow
photoconductors when 84 Replace color pc units
appears.
1 Open Door E (front printer door).
11 Close Door E6.
Warning—Potential Damage: To avoid overexposing the
photoconductors, do not leave the door open for more than
10 minutes.
7
3 Remove the photoconductor(s) specified on the display.
Photoconductor color Opening name
Black
E1
Cyan
E2
Magenta
E3
Yellow
E4
4 Unpack the replacement photoconductor.
7 Press the button forward to insert the photoconductor while
removing the casing.
9 Close Door E.
5 Align and insert the end of the photoconductor.
8 Lift the bar up, and then press latch E5 down so that it holds
the bar in position.
6 Remove the tape from the top of the photoconductor.
Replacing a toner cartridge
Replace the specified toner cartridge (cyan, magenta, yellow, or
black) when 88 Replace <color> toner appears. The
printer will not continue printing until the specified cartridge is
replaced.
1 Make sure the printer is on and Ready or 88 Replace
<color> toner appears.
2 Unpack the new cartridge, and set it near the printer.
3 Open Door E (front printer door).
8
4 Unlock the specified cartridge by turning the cartridge
counterclockwise until the arrow-shaped handle points
toward the unlock symbol.
6 Align the arrow-shaped handle with the unlock symbol, and
8 Close Door E.
then insert the toner cartridge all the way into the opening.
Cleaning the exterior of the
printer
5 Remove the cartridge by gently pulling it away from the
printer.
7 Lock the cartridge by turning the arrow-shaped cartridge
handle clockwise until it points toward the lock symbol.
1 Make sure that the printer is turned off and unplugged from
the wall outlet.
CAUTION—SHOCK HAZARD: To avoid the risk of
electric shock, unplug the power cord from the wall
outlet and disconnect all cables to the printer before
proceeding.
2 Remove paper from the paper support and paper exit tray.
3 Dampen a clean, lint-free cloth with water.
Warning—Potential Damage: Do not use household
cleaners or detergents, as they may damage the finish of the
printer.
4 Wipe only the outside of the printer, making sure to remove
any ink residue that has accumulated on the paper exit tray.
Warning—Potential Damage: Using a damp cloth to clean
the interior may cause damage to your printer.
5 Make sure the paper support and paper exit tray are dry before
beginning a new print job.
9