1
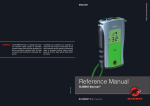
FOREWORD
Thank you very much for choosing a Barryvox
avalanche beacon. Barryvox stands for qualityconscious development, production and
testing. State-of-the-art technology
has been applied for use under extremely
hard conditions. Due to the choice of
personal settings the latest generation
of avalanche beacons are ideally
suited to the user’s needs and abilities.
The default setting, which can be restored
at any time, is the most appropriate
one for novices and average users. To
operate the beacon in this setting
only a single key will be used and the
functions are limited to the very
user-friendly Digital Search Mode.
Advanced and professional users have the
possibility to activate special functions in
order to meet their individual requirements.
The beacon is fully compatible with
all beacons that meet the requirements of the ETS 300 718 standard
and operates at a frequency of 457 kHz.
An avalanche beacon does not
provide you protection from avalanches! As an outdoor recreationalist you must keep yourself well informed about avalanche prevention.
Also, you should always plan your tours
carefully. Avalanche rescue must be
practiced regularly to ensure quick
success. However, it is only the means of
last resort for the worst case.
Be aware that, in spite of practice
and all the technical advances, only
about half of all victims who have been
The new Barryvox
provides both digital
and analog search
modes.
completely buried in avalanches are
rescued alive!
This User’s Manual contains important
information about how to operate
the beacon, rescue companions,
as well as some basics of avalanche
awareness.
For your own personal safety, please take
time to read this information.
Before using the Barryvox, remove
the protective sheet from the front
panel and carefully stick the avalanche rescue plan on the cover of
the battery compartment on the back
of the beacon.
The enclosed quick reference chart is
intended to be a useful guide when you are
on your tour.
An avalanche beacon
does not provide protection from avalanches!
As an outdoor recreationalist
you must keep yourself well
informed about avalanche prevention and always plan your
tours carefully.
We wish you lots of fun and
thank you for your confidence!
www.barryvox.com
1
CONTENTS
Controls and Indicators
See the fold out front and rear covers.
10.
Transmit Mode (SEND) ........ 17
11.
Search Mode (SEARCH) ........ 17
1.
Quick Start – Barryvox
in 10 steps ................................ 3
12.
Automatic Revert to SEND .. 17
2.
The Basics of Avalanche
Awareness ................................ 6
Recognizing Danger ...................... 6
Assessing the Risk ........................ 7
Precautions .................................. 8
Avalanche Warning Services .......... 8
Literature...................................... 8
International Avalanche Risk Scale 9
13.
Primary Search Phase .......... 18
14.
14.1
14.2
14.3
14.3.1
Secondary Search Phase ...... 19
Digital Search Mode .................. 19
Multiple Burials .......................... 22
Analog Search Mode .................. 24
Pinpoint Location and Flux Lines .. 25
15.
Personal Settings .................. 26
16.
Restoring the Default
Setting .................................... 28
17.
Emergency Search
Mode ESM .............................. 28
18.
Earphones .............................. 28
19.
Maintenance and Repair ...... 28
2.1
2.2
2.3
2.4
2.5
2.6
3.
3.1
3.2
3.3
3.4
3.5
Companion Rescue ................ 10
Avalanche Conduct .................... 10
Personal Rescue Equipment ........ 10
“Avalanche Rescue Plan” ............ 11
Rescue – First Aid........................ 12
Notifying Organized Rescue
Services – Reporting the Accident 12
4.
How to Handle
the Barryvox .......................... 13
20.
Periodic Checks ...................... 28
21.
Glossary of Terms .................. 29
5.
Harness System /
Wrist Strap.............................. 13
22.
Problems and Solutions ...... 30
6.
Inserting /
Replacing Batteries .............. 14
23.
Warranty ................................ 30
24.
Technical Data........................ 31
7.
Startup .................................... 15
25.
Approval/Conformity ............ 31
8.
Battery Status Display.......... 16
26.
9.
Group Test (CHECK) .............. 16
EC-Declaration
of Conformity ........................ 32
2
www.barryvox.com
Q U I C K S TA R T
1.
Quick Start – Barryvox
in 10 steps
Stick the enclosed avalanche rescue plan
on the cover of the battery compartment!
An avalanche beacon does not
provide protection from avalanches!
As an outdoor recreationalist, you must
keep yourself well informed about avalanche
prevention. Also, you should always plan
your mountain tours carefully.
Avalanche rescue must be practiced
regularly to ensure quick success.
We strongly advise you to also carry
a shovel and an avalanche probe.
Avoid in general that there are electronic
devices (i.e. cellular phones) or metal parts
(i.e. pocket knife) in close proximity to a
transceiver which is turned on.
The harness system should be
worn on the innermost layer of clothing,
inside other layers. Wear the beacon
on your body throughout the tour; not in
your backpack!
A layer of clothing should always cover
the beacon!
Please note the instructions on the back
of the harness system.
Personal rescue
equipment:
• Avalanche beacon
• Avalanche shovel
• Avalanche probe
Before using it for the first time, the harness
system must be fitted properly to your body.
When performing a search, release the red
buckle on the front. During the search, the
Barryvox remains attached to your body by
means of the snap hook and the wrist strap.
If you carry the Barryvox in your trouser pocket, make sure the pocket’s zipper is closed throughout the tour. Sewn-on pockets
are not suitable. Whatever way it is carried,
the transceiver’s display must face the
body!
The ON/OFF switch is on the back of
the Barryvox. In the upper position, the
beacon is switched off. In the lower
position, the beacon is switched on. To
switch the beacon on or off, press the
ribbed button and then slide it up or
down.
Once the beacon has started up, it runs a
self-test. If the self-test has been run
successfully, this is indicated by a triple
beep. Then, the remaining battery life as a
percentage of the full charge is displayed.
The flashing SEND LED confirms that the
beacon is properly transmitting.
Before leaving
the hut or trailhead,
check the beacons
of all group
members.
Barryvox User’s Manual
3
Q U I C K S TA R T
Before a group leaves the hut
or trailhead, the beacons of all group
members must be checked.
For this check, the group test function
(CHECK) is activated on just one of the
beacons. Keep the MODE key pressed during
the self- and battery test, until “CH” appears
on the display. Now check that all the
beacons of the group members are in SEND
mode.
The test is successful if you can hear clear
beeps from all beacons when they are at
a distance of approximately one meter.
After completion of the group test,
the Barryvox must be returned to the
S E N D mode. This can be done by pressing
the MODE key for at least 2 seconds.
If different transceiver types are used in a
group, do a double group check testing
transmit and receive separately!
The transmit mode (SEND) is
the normal operating mode when outdoors or in all situations where there
is any risk of an avalanche.
Pressing the MODE key three times,
each time within one second, enters the
SEARCH (receiving) mode.
It is highly recommended to switch off cell
phones while searching!
SEND mode:
normal operating
mode when outdoors.
SEND LED flashing
4
You can return to the SEND mode by
keeping the MODE key pressed for at
least 2 seconds.
On the back of the Barryvox, you
will find important instructions about
what to do in case of an avalanche. When
the Barryvox prompts you to start the primary search by displaying the lightning
arrow, the available search strategies and
the width of the search strips indicated
on the back of the beacon should be taken
into account.
In primary search, turn the Barryvox in
all directions!
Particular attention should be paid
to the following points:
●
Use the beacon in a calm and
concentrated way.
Avoid jerky movements. This will
allow you to complete your search
in the quickest and most reliable
way!
●
Hold the beacon horizontally
in front of you.
●
Watch the distance and direction
information on the display.
●
Move in the indicated direction.
Enter the SEARCH
mode by briefly
pressing the MODE
key 3 times within
one second each.
www.barryvox.com
●
If the distance decreases, then you
are approaching the victim.
●
If the distance increases, then you
are moving away from the victim.
Continue the search in the opposite
direction.
●
The closer you approach the victim,
the slower and more concentrated
your movements should be.
usually be recognized within the search strip
width.
Switch off the transceivers of rescued
persons in order to make continued
search easier.
The beacon has an automatic revert
to SEND feature (optional). If there is no
user interaction, the beacon automatically
reverts to the SEND mode (preset to
8 minutes).
You are notified of the impending switchover by 20 seconds of warning tone.
To remain in SEARCH mode, press any key
during the alarm period.
In the digital SEARCH mode,
multiple burials are indicated by the
following symbol:
Additionally, the analog tones are now
enabled to differentiate between the individual transmitters. The beacon favors the
nearest transmitter. Multiple burials will
Primary search:
In order to obtain the
best range, slowly
turn the transceiver in
all directions
Work with the beacon in a calm and
concentrated manner.
Avoid jerky movements.
Barryvox User’s Manual
5
THE BASICS OF
AVA L A N C H E A WA R E N E S S
2.
The Basics of
Avalanche Awareness
We would like to provide you with some basic information about this complex subject.
We recommend that you take a course
and continuously update your knowledge
by further training.
The snow slab: a primed trap
Most winter recreationalists involved in an
avalanche accident have triggered the avalanche themselves due to the additional load
that they imposed on the snowpack.
The snowpack is fragile.
Snow on a steep slope is like a primed trap.
If you touch the trigger, the trap snaps shut.
Remember that a small snow slab of 100 m3
weighs approximately 25 tons!
2.1 Recognizing Danger
Particularly Critical Weather Situations
The risk of avalanches rises abruptly after
a snowfall accompanied by stormy winds
and low temperatures. Slopes which have
been loaded by snow drift (= snow driven
by the wind) are particularly dangerous!
Drifting snow may also accumulate during
windy periods after a snowfall, in very clear
weather.
Most winter recreationalists are caught in
slab avalanches that
they have triggered with their
own additional load.
6
The first fine day after a period of snowfall is particularly dangerous.
Most accidents occur when, after a period
of several weeks of fine, cold weather, a cold
front with stormy winds brings the fresh
snow which everybody has been waiting for!
With these types of weather conditions,
10–20 cm of fresh snow may be sufficient
to create a critical situation, which can
last for several days.
The risk of avalanches can also increase rapidly with a sudden and strong rise in
temperature (warm winds, rain). With subsequent cooling, the risk will be reduced
again.
With an irregular and thin snowpack, the
risk is extremely hard to recognize. This
is often the case in early winter or during
periods of low precipitation.
In spring, when the snow has undergone
considerable metamorphosis, as a rule the
risk increases in parallel to the passage
of the day: e.g. from LOW (early in the
morning after a clear night) to CONSIDERABLE in the afternoon.
The risk of avalanches
rises abruptly after
a snowfall accompanied
by stormy winds and
low temperatures.
The first fine day after
a period of snowfall is
particularly dangerous.
www.barryvox.com
Alarm signals:
• Whumphing noises
and shooting cracks
when walking on the snow
surface.
• Recent spontaneous
avalanches
• Remote triggering
• Vibrations of the snowpack,
“Hollow” sounds
Particularly dangerous
slopes:
Extremely steep, often
scattered with boulders,
shadowed, covered with freshly
driven snow, rarely used.
Risk factors are cumulative!
Triggering the Trap Through the
Additional Weight of a Person
2.2 Assessing the Risk
Critical Amounts of New Snow
If the new snow which has fallen in the
last 1–3 days is:
10–20 cm with unfavorable conditions
20–30 cm with moderate conditions
30–50 cm with favorable conditions
then you should assume that the risk
level is CONSIDERABLE.
Unfavorable conditions
• strong winds (>50 km/h)
• low temperatures (< –8 ºC)
• slope rarely used
Favorable conditions
• light winds
• temperature slightly below 0 ºC
• slope used regularly
The steeper the slope and the more it
is in the shade, the greater the probability of triggering an avalanche.
The chances of triggering an avalanche are
increased by large groups without spacing
between group members, by taking hard
turns when descending on skis, but above
all by falls and jumps (over snow cornices)
and similar shock-type loading.
At and above a CONSIDERABLE level of
risk, remote triggering becomes a possibility.
The person triggering the avalanche may
be dozens of meters away from the fracture
line. This is particularly fatal at the base of
a slope because you may set the entire
snowpack lying above you in motion!
Note: Sparsely wooded slopes (trees separated enough to ski or snowboard through)
do not protect from avalanches.
Also, scattered boulders sticking up through
the snow surface will not prevent slab
avalanches.
Barryvox User’s Manual
7
THE BASICS OF
AVA L A N C H E A WA R E N E S S
2.3 Precautions
Basic Precautions
Always take these elementary precautions
regardless of the risk level:
●
Set beacons to SEND (a shovel and
an avalanche probe must be part of
your personal rescue equipment)
●
Keep off sites with a deposit of
wind-transported snow
●
Be aware of the temperature throughout the day, particularly in spring
(also applies to access routes;
e. g. to a hut)
●
Continuously re-check the conditions
during the tour
2.4 Avalanche Warning Services
Handle the Snowpack with Care
To handle the snowpack with care, spacing
between group members should be maintained. When climbing, the spacing should
be at least 10 meters. When descending,
take into account the increased loading.
Stay about 30–50 meters apart.
Hazardous slopes must be traversed one
person at a time.
Proper Techniques for Safe Travel
in Avalanche Country
When the risk is HIGH, the possibilities
outside the secure ski area runs are extremely limited. When the risk is CONSIDERABLE, you should avoid all slopes steeper
than 35 º degrees. Slopes steeper than 30º
must be crossed one person at a time.
8
In this situation, give preference to regularly
used slopes. Treat the snow surface with the
utmost care; avoid jumping or shock loading
the slope!
When the risk level is MODERATE,
you should avoid slopes steeper than 40 º
(frequently interspersed with rock)
in all orientations.
It would be impossible in the context of
this User’s Manual to publish a list of all the
avalanche warning services.
Up-to-date information about all avalanche
warning services (worldwide) can be found
on the Homepage of Cyber Space Avalanche
Center: http://www.csac.org
2.5 Literature
Further information about the topics of avalanches and tour planning directed specifically at outdoor recreationalists can be found in
the following books:
“The Avalanche Handbook” David
McClung & Peter Schärer, The Mountaineers.
Available through book retailers.
“Snow Sense; a Guide to Evaluating
Snow Avalanche Hazard” Jill Fredston &
Doug Fesler.
Available from the Alaska Mountain Safety
Center or through book retailers.
www.barryvox.com
2.6 International Avalanche Risk Scale
Risk
Level
LOW
M O D E R AT E
CONSIDERABLE
HIGH
V E RY
HIGH
Snowpack
Typical
Indications
Tours
Snowpack
generally well
bonded.
None.
Generally favorable
conditions.
On some steep
slopes snowpack
only moderately
bonded.
Difficult
to recognize.
Generally favorable conditions.
Careful choice of route on
steep slopes of orientation and
altitude as given in the avalanche
forecast.
On many steep
slopes medium
to poor snowpack bonding
only.
“Whumphing”
noises.
Some spontaneous avalanches.
Remote triggering
at the foot
of slopes.
Partly unfavorable conditions.
Experience in assessing avalanche
risk required.
Wherever possible avoid steep
slopes of orientation and altitude
as given in the avalanche forecast.
Poor bonding
of snowpack
on most steep
slopes.
Spontaneous
avalanches.
Remote
triggering.
Unfavorable conditions.
Tours only in moderately steep
terrain < 30º.
Be aware of avalanche runout
zones.
Generally
poor bonding
of snowpack,
mostly
unstable.
Spontaneous
avalanches
and remote
triggering on a
large scale.
Very unfavorable conditions.
Refrain from tours.
No alarm
signals.
Barryvox User’s Manual
9
C O M PA N I O N R E S C U E
3.
Companion Rescue
3.1 Avalanche Conduct
Companion rescue means the victims are
located and rescued by the other members
of the group immediately after the avalanche
has occurred.
The rescue of buried victims is a race against
time!
During the first quarter of an hour after
an avalanche has occurred, most of the
buried victims can be rescued alive. Then,
the chances of survival drop very rapidly.
Companion rescue yields the greatest
chances of survival for a buried person.
If caught:
●
●
●
●
Try escaping to the side
Toss poles and release skis
They act as an anchor
Try to remain on the surface
Close your mouth, cover your face
with your arms
Create an air pocket when
the avalanche comes to a
standstill
➔
➔
As observer:
●
Fix the victim’s last-seen point and
the direction of flow of the avalanche.
Primary search stripe defined
(see Section “Primary Search
Phase”)
➔
3.2 Personal Rescue Equipment
We recommend that you carry a
radio or mobile phone (range?) with
you to notify organized rescue
services.
The rescue
of buried victims
is a race against time!
Companion
rescue yields the
greatest chances
of survival.
10
Personal rescue
equipment:
• Avalanche beacon
• Avalanche
shovel
• Avalanche
probe
www.barryvox.com
3.3 “Avalanche Rescue Plan”
The avalanche rescue plan lists all the basic
actions for a promising approach to companion rescue.
The procedures must be adapted to the
actual situation.
For additional information about companion
rescue, please consult the appropriate
literature.
The avalanche rescue plan is split
into four sections:
Search strategy
for one rescuer
on foot or on skis
Instructions for the
secondary search phase
Search strategy
for multiple rescuers
Instructions for the
primary search phase
Memory aid
for companion
rescue
Searching
for multiple burials
Barryvox User’s Manual
11
C O M PA N I O N
RESCUE
3.4 Rescue – First Aid
3.5 Notifying Organized
Rescue Services – Reporting
the Accident
It is not possible to pinpoint a buried victim
with absolute accuracy using a beacon.
The depth of burial and the spatial
orientation of the person to be recovered
can, however, be determined by using an
avalanche probe. Always probe rectangularly to the snow surface. Make sure the
hole you are digging is wide enough.
Be aware of the victim’s air pocket and
do not inflict injury on the victim!
In case of multiple burials, the beacons
of rescued persons must be switched off
as soon as possible.
It is not possible within the context of this
User’s Manual to publish a complete list of
all mountain and air rescue services.
First aid: After checking on the patient,
life saving and life maintaining measures
must be started immediately.
The rescued person must be protected
against hypothermia.
Avalanche victims should be transported
as smoothly as possible. (If possible by
helicopter.)
Please enquire locally before starting your
tour about the rescue services in charge and
about telephone numbers and radio frequencies for notifying organized rescue services.
The notification should include
the following items:
Who
–
What
–
Where
–
When
–
How many –
Weather
is calling?
has happened?
is the site of the accident?
did the accident occur?
injured (type of injury),
rescuers?
– in the accident area
The depth of burial and the spatial orientation
of the victim can be determined by means
of an avalanche probe.
Make sure the hole you are digging is wide enough.
Multiple burials:
Switch off the beacons of rescued victims
immediately.
12
www.barryvox.com
O P E R AT I N G
INSTRUCTIONS
4.
How to Handle
the Barryvox
5.
During the design of the Barryvox, care was
consistently taken to achieve a robust and
reliable design. As with all other beacons,
however, the Barryvox contains ferrite
antennas that are sensitive to shock.
In your own interest, therefore, these lifesaving beacons should be handled with
great care!
Never drop your Barryvox on the floor,
transport the beacon with care and avoid
mechanical shocks. Store the beacon in
a dry place that is not subjected to extreme
cold or heat and is not exposed to direct
sunlight.
It is strongly recommended that you let periodically check the propre function of your
transceiver. (see chapter “Periodic Checks”)
Avoid in general that there are electronic
devices (i.e. cellular phones) or metal parts
(i.e. pocket knife) in close proximity to a
transceiver which is turned on.
Harness System /
Wrist Strap
The Barryvox is supplied with a comfortable
harness system.
The harness system must always be worn
on the innermost layer of clothing. Keep it
on your body throughout the tour; not in
your backpack!
A layer of clothing should always
cover the beacon.
The harness system consists of an adjustable shoulder strap (grey/black) as well as
an adjustable elastic waist belt (black). Once
the harness system has been adjusted to fit
your body, only the big black buckle needs
to be opened or closed.
The Barryvox is pushed into the harness
system as shown in the picture on the next
page and attached to the red ring on the
harness system using the red snap hook of
the wrist strap.
The harness system must be worn over
the innermost layer of clothing
Never drop your
Barryvox on the floor,
transport it with
great care and avoid
mechanical shocks.
Barryvox User’s Manual
13
O P E R AT I N G I N S T R U C T I O N S
6.
In order to use the Barryvox for searching,
open the red buckle on the front. The beacon
remains firmly attached to the harness
system/body by the snap hook or to the
wrist/body by means of the wrist strap.
Adjusting the length of the wrist strap
(quick catch) facilitates comfortable use.
If you carry the Barryvox in your trouser pocket, make sure the pocket’s zipper is closed throughout the tour. Sewn-on pockets
are not suitable.
Whatever way it is carried, the transceiver’s
display must face the body!
Wear the harness
system on the innermost layer of clothing.
A layer of clothing
should always cover
the beacon.
14
Inserting /
Replacing Batteries
Batteries:
Use only 1.5 V alkaline batteries (Type
LR03/AAA). Use 3 new batteries of the same
type. Do not use rechargeable batteries
and replace all three at the same time.
Open the battery compartment:
Press the cover firmly inwards with a fingernail, then push the cover horizontally to the
left and hinge it upwards.
Close the battery compartment:
Hinge the cover downwards, then press
firmly on the notch and simultaneously push
the cover horizontally to the right until it
clicks into place.
When inserting the batteries please
note the following:
●
●
●
Keep both the compartment and
the batteries dry.
(Moisture in the battery compartment
may cause corrosion of the contacts)
Do not touch the contacts.
Regularly check on the battery
compartment and clean/dry it.
When storing the Barryvox for any extended
period of time (summer!), remove the
batteries and leave the battery compartment
open.
www.barryvox.com
7.
Startup
The ON/OFF switch is located on the back of
the Barryvox. To switch the beacon on or
off, press the ribbed button and then
slide it up or down. In the upper position, the Barryvox is switched off and in
the lower position it is switched on.
A bi-directional locking mechanism ensures
that the Barryvox cannot inadvertently be
switched on or off.
Once the Barryvox has been switched
on, it runs an automatic self-test.
All electronic circuits, the antennas and the
display are checked.
If the battery voltage is very low, the selftest cannot be run.
If the self-test has been completed
successfully, this is confirmed by a triple
beep.
Then, the remaining battery capacity is
displayed for four seconds as a percentage
of full capacity.
If the self-test fails, an error code is displayed for 20 seconds and an alerting tone
is produced.
The error codes are explained in the section
on “Problems and Solutions”.
Check your Barryvox before you leave home
to go for a tour. Switch it on and check the
display of the self-test and of the battery
test. This gives you a chance to replace low
capacity batteries or to repair any defects.
Check your Barryvox
at home before you
set out for a tour.
Battery capacity
indication
Display
during self-test
Direction indicators
“Automatic
revert off” indicator
“Multiple burials”
indicator
Battery capacity in %
“Primary search
phase” indicator
Digits
for distance display
Barryvox User’s Manual
15
O P E R AT I N G I N S T R U C T I O N S
8.
9.
Battery Status Display
The following table shows the boundary
values for the battery status display.
Low temperatures, age and brand can
affect the battery life.
99% indicates:
200 hours SEND mode
or 15 hours SEARCH
mode minimum
less than 20% or Emergency reserve:
when battery
20 hours SEND mode
symbol displayed: and 1 hour SEARCH
mode, the batteries
must be replaced as
soon as possible!
If the battery capacity has dropped below
20%, you are warned by an acoustic alarm
when you switch on the Barryvox.
Before leaving
the hut or the trailhead the beacons
of all group members
must be checked.
16
Group Test
(CHECK)
Before leaving the hut or trailhead,
the beacons of all group members must
be checked.
To run the test, the group test function
is activated on a single beacon from
the group. Keep the MODE key pressed
during the self- and battery test until
“CH” is displayed. Now check that all the
members of the group have their beacons
in the SEND mode.
The test is successful if a beep can be
heard clearly at a distance of 1 meter.
Make sure the individual members of the
group are sufficiently far apart to avoid
interference.
After five minutes the Barryvox automatically
reverts to SEND. You are notified about
the impending switchover by 20 seconds of
warning tone.
To remain in CHECK mode, press any key
during the alarm period.
After completion of the group test
the Barryvox must be switched to the
SEND mode. To do this, press the MODE
key for at least 2 seconds.
If different transceiver types are used in a
group, do a double group check testing
transmit and receive separately!
Group test display
(CHECK)
www.barryvox.com
10. Transmit Mode
(SEND)
12. Automatic Revert
to SEND
The SEND mode is the normal operating
mode outdoors or in all other situations
where there is any risk of an avalanche.
Every signal pulse transmitted is checked
and acknowledged by the flashing of the
SEND indicator.
In the absence of any user interaction,
the beacon automatically reverts to the
SEND mode after a predefined time
(preset to 8 minutes).
You are notified of the impending switchover by a 20 second warning tone. To remain
in SEARCH mode, press any key during
the alarm period.
This ensures that a Barryvox cannot be left
in SEARCH mode, e.g. after a search or
search training, etc. It is automatically
switched to SEND mode.
In the event of a second avalanche burying
the rescuers themselves, this function allows
them to be located through their beacons.
11. Search Mode
(SEARCH)
The SEARCH mode is entered by briefly
pressing the MODE key 3 times, each time
within 1 second.
This procedure ensures that the SEARCH
mode cannot be entered unintentionally.
The Barryvox is now in the digital search mode.
It is highly recommended to switch off cell
phones while searching!
You can return the Barryvox to the SEND
mode by pressing the MODE key for at least
2 seconds.
The digital SEARCH mode eases and
simplifies the locating of a victim.
The analog SEARCH mode is equivalent
to the traditional analog search using a
bracketing pattern. It offers advantages
to experienced users under certain special
circumstances.
SEND mode:
normal operating
mode outdoors.
Enter the SEARCH
mode by briefly
pressing the MODE
key 3 times within
one second each.
Barryvox User’s Manual
17
PRIMARY
SEARCH PHASE
13. Primary Search Phase
From the start of the search until clearly
heard signals are received, you are in the
primary search phase.
Regardless of the receive mode selected,
the following search strategies apply:
Search strategy
“Last-seen point known”
Search strategy
“Last-seen point not known”
Rescue:
Single person on foot or on skis
20
40
40
Last-seen point
Rescue: Multiple persons
20
40
40
20
s
ter
me
40
Primary search stripe from the last-seen point
in the direction of the flow of the avalanche
All distances in meters
In order to obtain the best range, slowly turn the beacon in all
directions. If a signal is received stop moving the beacon. Proceed in
this direction until the signal can be heard clearly. This marks
the end of the primary search phase.
18
www.barryvox.com
SECONDARY SEARCH PHASE
D I G I TA L S E A R C H M O D E
14. Secondary Search Phase
14.1 Digital Search Mode
The digital search mode offers the user
optical guidance.
At distances above 40 meters the display
prompts you by means of the lightning arrow
to apply one of the “Primary Search Phase”
strategies:
Even in this early phase, a well-trained
rescuer may shorten the search path with
the aid of the analog tones or recognize a
multiple burial situation through the typical
dual tones.
If the distance to the victim is less
than 40 meters, the distance and the
direction are given.
The microprocessor automatically adjusts
the sensitivity of the receiver for optimum
detection of the received signals.
This search mode requires less training and
makes it easier to locate a victim. Due to the
laws of physics, it is not possible to determine the distance with absolute precision.
The figures shown are only to be interpreted
as relative. Focus is therefore on the
tendency, to increase or decrease and
not the absolute values. Due to the
changing shape of the flux lines in the
immediate vicinity of a victim, the direction
display is suppressed at distances below
3 meters. The pinpoint location is done by
means of the distance display only.
Important points to be noted
when using the digital search mode:
●
●
The digital search
mode requires less
training and makes it
easier to locate
a victim.
●
●
●
Hold the Barryvox horizontally
in front of you.
Watch the distance and direction
information on the display.
Move in the indicated direction.
If the distance decreases, you are
getting closer to the victim.
If the distance increases, you are
moving away from the victim.
Continue the search in the opposite
direction.
Barryvox User’s Manual
19
SECONDARY SEARCH PHASE
D I G I TA L S E A R C H M O D E
Operator guidance
in the digital SEARCH mode:
Less than 3 meters:
Pinpoint location
using distance indication
only (*)
More than 3 meters:
Secondary search phase using
direction and distance
indication
Start
●
●
20
More than 40 meters:
Analog tones/Primary search phase
The closer you get to the victim,
the more slowly and concentrated
you should move.
Normally you would approach the
victim in a curved line. You thus follow
the path of the flux lines.
●
Warning:
Electrical cables and large metal
objects (e.g. high voltage power
lines or ski lift cables) can interfere
with the digital search.
They can produce misleading indications for direction and distance.
www.barryvox.com
Pinpoint Location:
Depending on the burial depth of the victim,
the pinpoint location starts earlier or later,
normally when the distance indication is
3 meters or less. In this phase, hold
the beacon directly above the snow
surface!
Now search for the point with the smallest
distance shown. This value is equivalent
to the approximate burial depth.
Now use an avalanche probe to
precisely locate the victim.
The lowest distance indicated is 0.3.
At this point, all of the direction indicators
are shown.
(*) As an option, the direction indication
can be displayed till the very end of the
search. See section “Personal Settings” for
more information.
Flux line method
Hold the beacon
directly above the
snow surface for pinpoint location!
Use a probe for exact
location.
When working with
the beacon, remain calm and
concentrated.
Avoid jerky movements.
This will allow you to
complete your search in the
quickest and most reliable
way!
Barryvox User’s Manual
21
SECONDARY SEARCH PHASE
M U LT I P L E B U R I A L S
14.2 Multiple Burials
In the digital search mode, multiple
burials are indicated by the following
symbol:
When this symbol is shown, the speaker is
set to reproduce the analog tones. These
assist you in separating the various transmitters acoustically.
The Barryvox indicates the nearest victim.
Multiple burials are usually detected within
the search strip width, however depending on
the position and distance between the
rescuer and victims the distance can vary
considerably.
Switch off the transceivers of rescued
persons in order to make continued
search easier.
If you are not absolutely certain about the
number of buried victims, you must search
the whole of the avalanche area using
the search pattern as described in the section
on the “Primary search phase!”
Procedure on the Avalanche Debris:
Search strategy for multiple burials wide
apart
Mark the point on the avalanche where
the “multiple burial” symbol is shown or
where you left the primary search grid.
Search for the first victim using the information on the display and the analog tones.
Once the first victim has been located, you
or other helpers should immediately rescue
the person.
To continue the search for further buried
victims, return to the point previously
marked. Carry on searching strictly
22
following the primary search grid until the
Barryvox indicates another victim.
At the beginning, the transceiver still indicates the already located victim, as it is still
closest to you. Ignore the indications until
you realise that the transceiver is now
tracking a new victim.
Search strategy for multiple burials
in close proximity
In this case the interpretation of the analog
tones is extremely important. They have to be
interpreted in conjunction with the indicated
distance. Example:
• There is a triple beep and the distance
indication varies between 3.5 and 4.8 m
➾ within a radius of approx. 5 m,
3 victims may be expected.
Treat the situation by searching the potential
area using a “micro search strip” pattern.
The more victims there are and the closer
they are together, the narrower should the
micro search strips be laid over the potential
area. Hold the transceiver in this phase
always in the same orientation close to the
snow surface and concentrate on the increase and decrease of the distance indication,
respectively to the volume of the analog
tones.
In addition, the probe can be used to quickly
locate multiple burials in close proximity.
www.barryvox.com
The transceiver is locating victim 1 The transceiver is locating the victims
using the “search strategy for
2 – 4 using the “search strategy for multimultiple burials wide apart”
ple burials in close proximity”
3
4
2-5m
2
¶
“Within approx.
5 m there is
one victim”
“Within approx.
7 m, there are
3 victims”
∞
¡º
¡£
“Within
approx. 25 m
there are
at least
3 victims”
™∞
¡•
™∞
Marking
£™
Barryvox User’s Manual
23
SECONDARY SEARCH PHASE
ANALOG SEARCH MODE
14.3 Analog Search Mode
The analog SEARCH mode provides the
acoustic search as known from earlier
beacons. Victims are located by means of
an audible change in the intensity of the
received signal. For best results, this search
mode requires intensive user training.
In order to be able to use the analog
SEARCH mode, you must set the search
mode to “dA” in the configuration. See the
section on “Personal Settings” for more
information.
Once you have enabled your Barryvox
for analog search, you can switch between
analog and digital search at any time by
briefly pressing the MODE key while in the
SEARCH mode.
You must now manually adjust the sensitivity of the receiver by means of the UP
and DOWN keys.
A1 corresponds to the smallest and A8
to the greatest distance from the victim.
Bracketing method
(secondary search phase)
Display in the
analog SEARCH
mode (here indicating the second
lowest level of
sensitivity).
24
The analog
search mode
requires
intensive
training.
When you select the A8 level, this is only
shown for the first 3 seconds.
Then the display changes to a single dot
in order to improve the quality of the analog
tones.
Pressing any key returns the full display.
www.barryvox.com
Bracketing Method in the
Analog Search Mode:
Flux lines
Rules
● Maximize tone
Search for the strongest signal
on a straight line.
● Reduce tone
Reduce the volume until it can just
about be clearly heard.
● Search at right angles
Turn through 90° from the first search
direction.
Max.
Min.
Max.
Remember
● Hold the beacon vertically
● Move swiftly
The volume will only change
when you move.
● Search quietly
With low volume the differences
in volume can be clearly heard.
Transmitter
The three-dimensional shape
of the flux lines (pinpoint search)
14.3.1 Pinpoint Location
and Flux Lines
Depending on the burial depth of the victim
the pinpoint search begins earlier or later,
but normally around level A3 and below.
During this phase hold the beacon vertically above the snow surface!
After determination of the first maximum,
use an avalanche probe to pinpoint the
victim.
If the victim is buried at a great depth, use
a pinpoint method such as “pinpoint
in a circle” or “pinpoint over a cross”.
Detailed information about pinpoint search
methods can be found in the specialized
literature.
The three-dimensional shape of the magnetic flux lines around the buried beacon
does not permit an absolutely precise
location. You must use an avalanche probe
or a pinpoint search method to quickly
locate and rescue a victim!
Barryvox User’s Manual
25
PERSONAL SETTINGS
15. Configuration
SEARCH MODE
To enter the configuration menu press both
the UP and the DOWN keys during the
self- and battery test and keep them pressed
until the menu is displayed.
To change between the various menu
items, briefly press the MODE key. To change
the setting of a menu item, press the UP
or DOWN key.
To exit the configuration menu, press
the MODE key continuously for at least
2 seconds.
In the absence of any user interaction,
the beacon automatically reverts to the
SEND mode after one minute.
You are notified of the impending switchover by a 6 second warning tone. To remain
in the configuration menu, press any key
during the alarm period.
Use the UP and
DOWN keys to change
the settings!
Digital
SEARCH
mode only
Digital and
analog
SEARCH modes
MODE
DIRECTION INDICATION
Direction
indication
stops at 3.0 m
To exit the configuration menu, press
the MODE key
for at least 2 seconds.
26
Direction
indication
stops at 0.3 m
www.barryvox.com
MODE
AU TO M AT I C R E V E R T
TO S E N D
E A R P H O N E VO L U M E
The default delay time of 8 minutes is
the first-choice setting for most users.
Change this setting only if you have
good reason to do so (e.g. as an
avalanche dog trainer). This setting
is extremely important for your personal
safety!
No automatic
revert to SEND mode.
This symbol is displayed:
MODE
Quiet
Loud
MODE
S P E A K E R C O N F I G U R AT I O N
I N T H E D I G I TA L
SEARCH MODE
Revert to SEND mode
after 4 minutes.
Revert
to SEND mode
after 8 minutes.
MODE
Primary search
phase: analog tone.
Secondary
search phase:
the speaker is
muted
Primary search phase:
analog tone.
Secondary search phase:
digital tones, increasing
in number when
approaching the victim.
Primary search phase:
analog tone.
Secondary search phase:
analog tone.
Note:
Bold italics
= Factory default settings,
equal to the settings after
restoring the default
configuration
Barryvox User’s Manual
27
VA R I O U S
16. Restoring the Default
Configuration
18. Earphones
During the self- and battery test, simultaneously press all three keys (UP + DOWN +
MODE) and keep them pressed until “FA”
is displayed.
All user settings will now be restored
to their default values.
For confirmation, “FA” blinks three times
on the display.
17. Emergency Search Mode ESM
If the display does not work, a search can
be conducted in Emergency Search Mode.
After turning on the unit, immediately press
the MODE and UP keys and keep them
pressed until the red SEND indicator is flashing. In this case switching to the Search Mode
activates a purely acoustic receive mode.
(see chapter on “Analog Search Mode”).
The use of earphones
offers substantial
advantages when
searching for victims,
particularly when
the background noise
is high
(wind, helicopter, etc.).
28
Standard earphones (e.g. from a Walkman)
can be used. The volume can be adjusted
(see the section on “Personal Settings”).
As soon as the earphones are plugged in,
the built-in speaker is disabled so as not to
disturb other rescuers.
19. Maintenance and Repair
Barryvox beacons which do not operate
properly (errors according to the “Problems
and Solutions” list, failure of the group test,
have mechanical defects) in spite of correctly
inserted, fully-charged batteries, must be
returned to one of the Barryvox service
centers indicated on the inside of the
cover of this manual.
20. Periodic Checks
In order to check the correct functioning
of the beacon we strongly recommend that
it be sent to a Barryvox service center every
3 years for a functional test (You will be
charged for this service). A list of service
centers can be found on the inside of
the cover.
We recommend that you have this checkup
done during the summer months so that
your Barryvox is ready for use in time for
the new season.
www.barryvox.com
GLOSSARY OF TERMS
21. Glossary of Terms
Term
Description
Synonyms
SEND
The beacon is transmitting. SEND is the normal
operating mode outdoors or in all situations
in which a risk of an avalanche exists.
SEND mode
transmit
SEARCH
SEARCH is the mode used to
locate buried victims.
SEARCH mode
receive
CHECK
CHECK indicates that the beacon
is ready for group testing.
(See the section on “Group Test”)
PRESS
PRESS simply indicates that a key
is to be pressed.
Primary
search phase
As long as no detectable signal is received
from a victim, you are in the primary search phase.
The avalanche debris is searched using
a specific grid. (See the back of the beacon
and the section “Primary Search Phase”)
Bracketing
method
A search procedure in which the buried
victim is located using analog tones and
a right-angled search path.
Analog tone
The tone as received from the transmitter.
Digital tone
A tone which is generated locally by the receiver.
Barryvox User’s Manual
grid search
29
PROBLEMS AND SOLUTIONS
22. Problems and Solutions
Fault symptom /
error code
Problem description
Solution
No self-test
when the
beacon is
switched on
The electronics
are faulty.
1. Check and replace batteries.
2. If this does not solve the problem the
beacon needs repair. Please refer to the
instructions in the Section “Maintenance and Repair”.
The batteries are low.
The batteries must be replaced as soon
as possible. Refer to the instructions in the
Sections “Inserting/Replacing Batteries” and
“Battery Status Display”.
The SEND
indicator
does not
flash
The beacon is not
transmitting
any signals.
1. Check whether the beacon is
switched on.
2. Check whether the beacon is
in the SEND mode.
3. Check the batteries and if necessary
replace them.
4. If this does not solve the problem
the beacon needs repair. Please refer
to the instructions in the Section
“Maintenance and Repair”.
E1, E2,
E3, E4
The electronics
are faulty.
The beacon needs repair. Please refer to
the instructions in the Section “Maintenance
and Repair”.
displayed
when
in SEARCH
mode
23. Warranty
We provide a warranty for the Barryvox
beacon (excluding harness system and wrist
strap) for a period of 5 years from the date of
purchase as shown on the purchase receipt.
In case of a warranty claim, all parts that can
be shown to have material or manufacturing
defects will be replaced free of charge.
30
Damage that can be traced to incorrect handling or normal wear and tear is excluded.
The warranty becomes null and void for
beacons which have been opened by the
customer or any unauthorized third party
as well as for beacons which have been used
with spare parts or accessories which are
www.barryvox.com
S P E C I F I C AT I O N S
not original or are not recommended by the
manufacturer.
When no defect can be detected, you will be
charged for the functional test. Work carried
out under warranty does not extend the warranty responsibilities or the period of the
warranty on the beacon.
A warranty of six months is provided on
replaced parts.
Warranty claims can only be accepted if
the beacon is sent for repair together with
the purchase receipt. Shipping and handling will be charged to the owner of the
beacon. Any additional warranties and
any liability for consequential damages
are explicitly excluded.
24. Technical Data
Operating frequency
Batteries
Battery life
457 kHz (international standard frequency)
3 L Type IEC-LR03 1.5 V alkaline (AAA)
200 hours SEND minimum,
usually more than 300 hours
Maximal range
about 60 meters
Temperature range
–20° to +40 °C
Dimensions ( L L W L D)
108 L 68 L 25 mm
Weight
170 g (incl. batteries)
Earphone jack
For standard HiFi earphones
The Barryvox fully complies with the standards ETS 300718
25. Approval/Conformity
Manufacturer
Ascom Systec Ltd.
Country of manufacture Switzerland
USA/Canada
Canada:
34871021670
FCC ID:
OQQOPTO 3000
This device complies with part 15 of the FCC
Rules
Model No.
Barryvox OPTO 3000
Code number
Operation is subject to the following
two conditions:
this device may not cause interference,
and
this device must accept any interference,
including interference that may cause
undesired operation of the device.
All information supplied without liability. Status July 2004
Technical data and specifications may change without notice for future transceivers.
Barryvox User’s Manual
31
E C - D E C L A R AT I O N
OF CONFORMITY
32
www.barryvox.com