1
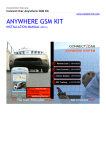
Wire Connection Guide Anywhere G2 Anywhere G2 Unit quick installation guide (07/01/2011) www.connect2car.com Instructions on how to use or operate this device may be found in the operations manual. This manual explains the installation and connection of the Connect2Car Anywhere G2. It is recommended that you read these simple guidelines carefully before use, in order to ensure the safe operation of the module. The unit should be installed by a professional Auto Security Installer. For further support: Visit our online FAQ which answers most general questions at: http://www.connect2car.com/connect2car-‐anywhere-‐g2/faqs-‐g2 Connect2Car online forum support: http://connect2car.com/support/phpBB2/ EMAIL: [email protected] PHONE: +1.914.356.8720 Mon-‐Fri 9am-‐6pm Central Standard Time. US 1. SYSTEMS OVERVIEW: 1.1. About the Connect2Car Anywhere Hardware Device The ANYWHERE GSM KIT is specially designed to interface with any vehicle to instantly enable Remote Control, tracking and monitoring of the Vehicle conveniently with a mobile. The hardware uses the cell phone network (GSM) to communicate with the owners phone. Connect2Car has 3 main ways to remotely control your vehicle: 1. TEXT CONTROL: Control your vehicle via an interactive text system which works with any text enabled phone. You Text your car with a command, and it texts you back with a confirmation. Visit www.connect2car.com/text for more details. 2. WEB CONTROL : Control your vehicle via any web browser. Just visit www.connect2car.com/track and log in with your account information. 3. APP CONTROL: Control your vehicle using the Smartphone app for your mobile phone. Visit www.connect2car.com/for-‐mobile to check App availability for your phone. See user manual for details on how to use each method to control your vehicle. BOX CONTENTS GPS ANTENNA MAIN CONNECTOR HARNESS GSM ANTENNA ANTENNA CONNECTIONS Connect the 2 antenna connectors, and mount the antennas on the backside of the dashboard or any of the vehicles inside plastic panels (behind plastic as much as you can for best reception). The Antenna’s are highly sensitive, so as long as they are not boxed in a small tight metal enclosure, they will receive reception just fine. • BE CAREFUL NOT TO ACCIDENTAL SWAP THE GSM AND GPS CONNECTORS. THE UNIT WILL NOT FUNCTION PROPERLLY IF THE ANTENNAS ARE SWAPPED. • DO NOT MOUNT THE ANTENNAS VISIBLY ON THE DASHBOARD, as this compromises the hidden security of the vehicle. If an intruder cuts off the antenna cable of the GPS/GSM antenna, it can cause the user not to locate the vehicle in the event of an emergency; so hiding the Antenna is key to successful security in the event of theft. DEVICE OPERATION Activate your unit using the Activation ID and instructions contained in the box packaging. See User/Manual Guide for device operation details. WIRE CONNECTIONS FOR MAIN CONNECTOR HARNESS PIN 1 2 3 4 5 6 7 Connect2Car Unit Wire BLACK BLUE GREEN BLUE GREEN BLUE GREEN 8 9 10 Connection point Comments Reserved. Ignore Reserved. Ignore Reserved. Ignore Reserved. Ignore Reserved. Ignore Reserved. Ignore Reserved. Ignore WHITE ORANGE WHITE Arm input (negative input) Reserved. Ignore Siren/Door monitor wire/ Alarm Monitor Wire. (positive input) 11 12 13 14 ORANGE WHITE ORANGE WHITE ignore Disarm input (negative input) Reserved. Ignore Ignition Detect (Positive input) 15 16 ORANGE YELLOW Reserved. Ignore Ignition Kill/ Starter kill (negative output) 17 18 ORANGE BLACK 19 PURPLE 20 YELLOW 21 YELLOW 22 YELLOW 23 24 BLACK RED Reserved. Ignore 5V accessories Ground (optional) 5V accessories output (optional) Remote Start Trigger /Activation. Negative output Door Lock Output/Arm. Negative output Door Unlock Output/Disarm Negative output Ground Power 12V Connect to Arm output of Aftermarket/factory Alarm Connect to the siren activation output, door pin sensor or dome light output or any sensor you want to trigger an Alarm alert when unit is armed. Once this input is triggered, it will send an alert to the owners phone. Connect to Disarm output of Aftermarket/factory Alarm Connect to the Ignition wire of the vehicle to detect when ignition is on. Should be connected to an ignition kill, starter interrupt. (For preferred instant shut down of Vehicle, connect this as an ignition kill via a relay) Connect to Remote Starter Activation input of aftermarket remote starter Connect to Door Lock. (if available) Also connect to Arm wire output of Factory Alarm or Aftermarket Alarm. Connect to Door Unlock (if available) Also connect to Disarm wire output of Factory Alarm or Aftermarket Alarm Connect to Battery Negative Connect to Battery Positive IGNITION DETECT CONNECTION (PIN 14) WHITE WIRE It is strongly recommended to connect this pin to the ignition key to support the power saving function when the vehicle is off. Ignition Detection INDICATOR LIGHTS DESCRIPTION LED TYPE POWER LED GSM LED GPS LED DEVICE STATE External Power supply has been disconnected and internal battery is running low. External Power supply is connected and device is charging its internal backup battery. Unit will only charge the internal battery when the ignition is on. (Via ignition detect wire) External Power supply is connected and the internal battery is fully charged. External Power has been disconnected, device is running on internal battery and internal battery is not low. Device is searching for GSM network. Device has found the GSM network and registered on the network. GPS is not needed at the moment. GPS data is invalid, or no GPS data GPS is attempting to fix on satellites GPS has fixed, and is holding GPS on. LED STATE Slow Flash Fast Flash Steady Light Off Fast Flash Slow Flash Off Slow Flash Fast Flash Solid Light NON USA CUSTOMERS: GSM SIM INSERTION GUIDE For successful operation of the unit, the unit will need a GSM sim card with GPRS/internet data or SMS. For cheaper costs to communicate with the server, a gprs plan is recommended. The device will attempt to use GPRS/internet data to communicate, and if it does not succeed, it will use SMS to communicate. To set up the APN settings for your GPRS/internet provider, you can use your connect2Car online account to send the settings to the device, or you can also send the settings via Connect2Car TXT Control. • Press the yellow button on the right side of the SIM cards slot to eject the SIM card holder. • Put the SIM in the SIM card holder. Pay attention to the direction of the SIM also. Insert the SIM card holder back into the device.