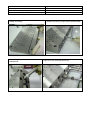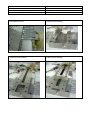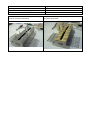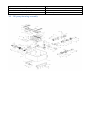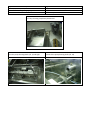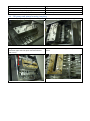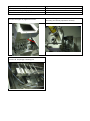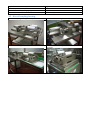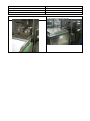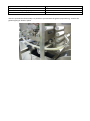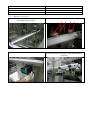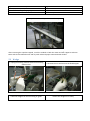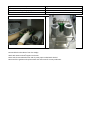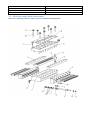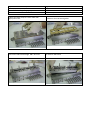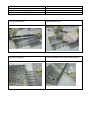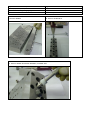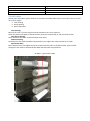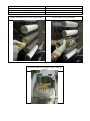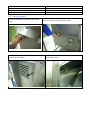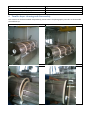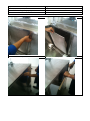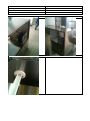
1
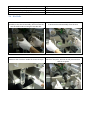
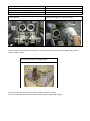
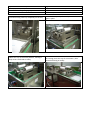
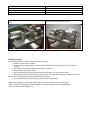
PHARMAGEL ENGINEERING SPA GK 72 ENCAPSULATION LINE SUPPLIED TO Machine preparation, start-up and Maintenance MANUAL Document No: 2144_2009_M_09_10 CURRENT ISSUE Issue No: 0 Date: Reason for Issue: For comments Sign-Off Issued by Reviewed by Print Name M.Lambri M.Incardona Approved by E.Peviani Signature Date PREVIOUS ISSUES (Type Names) Issue No. 0 1 2 3 Date Issued by Reviewed by Approved by Reason for Issue Department: Technical Department Machine preparation, start-up and Maintenance MANUAL Document N°: 2144_2009_M_09_10 Author: M.Lambri Page 2 of 82 Equipment Name: GK 72 Encapsulation Line Equipment SN: GK72101005 Data: 06 Sep 2010 Index 1 2 3 4 General specifications ............................................................................................................................... 4 1.1 Technical specifications ..................................................................................................................... 4 1.2 Working conditions............................................................................................................................ 5 1.3 Safety devices .................................................................................................................................... 5 Installation ................................................................................................................................................. 6 2.1 Moving method and conditions ........................................................................................................ 6 2.2 Installation room conditions ............................................................................................................. 7 2.3 Installation and first check ................................................................................................................ 7 2.4 Precautions ........................................................................................................................................ 8 2.5 Correct operations and not allowed operations ............................................................................... 8 2.6 Unavoidable dangers ......................................................................................................................... 9 Machine Set-up ....................................................................................................................................... 10 3.1 Fill Block Pump assembling procedure ............................................................................................ 10 3.2 Fill pump housing assembly............................................................................................................. 14 3.3 Fill pump housing synchronization .............................................................................................. 17 3.4 Fill pump and pump housing coupling ......................................................................................... 19 3.5 Die roll coupling housing............................................................................................................... 21 3.6 Die rolls assembly ............................................................................................................................ 23 3.7 Die rolls alignment ........................................................................................................................... 25 3.8 Pump housing assembling on the machine.................................................................................. 27 3.9 Chute assembly and mangle roll assembling on the machine .................................................... 31 3.10 Wedge assembling on the machine .............................................................................................. 32 3.11 Frontal part Connection .................................................................................................................. 33 3.12 Spreader boxes assembling on the machine ................................................................................. 33 3.13 Fill line setup .................................................................................................................................... 36 3.14 Gelatine line setup........................................................................................................................... 37 3.15 Oil roller lubrication......................................................................................................................... 38 3.16 Pump housing lubrication................................................................................................................ 38 3.17 Synchronizing the machine ............................................................................................................. 38 3.18 Capsule conveyor assembling on the machine ............................................................................. 39 Production start ....................................................................................................................................... 41 4.1 Checking the fill ............................................................................................................................... 41 4.2 Drying............................................................................................................................................... 41 4.3 Stopping the machine...................................................................................................................... 42 4.4 Tumble dryer programming ............................................................................................................ 42 Department: Technical Department Machine preparation, start-up and Maintenance MANUAL Document N°: 2144_2009_M_09_10 Author: M.Lambri 5 Page 3 of 82 Equipment Name: GK 72 Encapsulation Line Equipment SN: GK72101005 Data: 06 Sep 2010 Dismantling the equipment and cleaning procedures ............................................................................ 43 5.1 Spreader boxes and gelatine pipeline ............................................................................................. 43 5.2 Capsule conveyor............................................................................................................................. 45 5.3 Wedge.............................................................................................................................................. 46 5.4 Die-Rolls ........................................................................................................................................... 48 5.5 Die-Rolls housing ............................................................................................................................. 50 5.6 Chute assembly and mangle rolls .................................................................................................... 53 5.7 Medicine Pump housing disassembly.............................................................................................. 55 5.8 Medicine pump disassembly ........................................................................................................... 60 5.9 Medicine pump block disassembly .................................................................................................. 66 5.10 Oil roller ........................................................................................................................................... 70 5.11 Casting drums .................................................................................................................................. 72 6 Tumble dryer cleaning and disassembly ................................................................................................. 74 7 Tumble dryer cleaning ............................................................................................................................. 77 8 Utilities and cleaning media .................................................................................................................... 77 9 8.1.1 Manual cleaning solution ........................................................................................................ 77 8.1.2 Automatic cleaning solution .................................................................................................... 77 Maintenance............................................................................................................................................ 80 9.1 Die roll housing assembly e column assembly ................................................................................ 80 9.2 Oil Roller assembly .......................................................................................................................... 80 9.3 Chute assembly / mangle roll .......................................................................................................... 80 9.4 Pump housing assembly .................................................................................................................. 80 9.5 Cooling drums .................................................................................................................................. 80 9.6 Chiller / cooling system ................................................................................................................... 80 9.7 Tumble dryer ................................................................................................................................... 80 9.8 Service ............................................................................................................................................. 80 10 Troubleshooting .................................................................................................................................. 81 Every effort has been made to ensure the accuracy of this document. However, the information contained herein is subject to change without notice. Pharmagel Engineering spa reserves the right for such change, without prior notice. Department: Technical Department Machine preparation, start-up and Maintenance MANUAL Document N°: 2144_2009_M_09_10 Author: M.Lambri Page 4 of 82 Equipment Name: GK 72 Encapsulation Line Equipment SN: GK72101005 Data: 06 Sep 2010 1 General specifications 1.1 Technical specifications GK 72 Encapsulation machine Serial number Manufacturing year Loudness Dimensions Weight Maximum speed GK72101005 2010 <75dB 1486x2385x2022 (h) mm 1200 8 rpm Tumble Dryer Overall dimensions Tumble speed N° 2 unit 2090x1399x1317 (h) mm 0 – 24 rpm Electrical panel Line voltage requested Power Safety device 400 V 50 Hz 3 phases + N + G 27 KVA IP 55 Department: Technical Department Machine preparation, start-up and Maintenance MANUAL Document N°: 2144_2009_M_09_10 Author: M.Lambri Page 5 of 82 Equipment Name: GK 72 Encapsulation Line Equipment SN: GK72101005 Data: 06 Sep 2010 1.2 Working conditions Installation room specifications Temperature: 22-24 °C Relative humidity: 15-20% Product specifications Gelatine viscosity: 9000-14000 cps at 60 °C 1.3 Safety devices The safety switches are in the machine side panel ; turn the motor power off when the electrical panel is open, leaving the auxiliary tensions on. IT’S DANGEROUS TO REMOVE OR CHANGE THE SAFETY DEVICES Department: Technical Department Machine preparation, start-up and Maintenance MANUAL Document N°: 2144_2009_M_09_10 Author: M.Lambri Page 6 of 82 Equipment Name: GK 72 Encapsulation Line Equipment SN: GK72101005 Data: 06 Sep 2010 2 Installation 2.1 Moving method and conditions All the equipment is forwarded in wooden boxes . All the machines are fixed on the box bottom by crossed wood sticks and completely enveloped in plastic foils. The outfit accessories and spare parts are packed in carton boxes. If the equipment needs to be packed , all the machines must be fitted in their wooden box in the same way as previously specified (see packing list in VTOP package). During the unpacking operation, please check the supply carefully; all the components must be verified in the shipment documents. If any piece of equipment is missing or damaged , please immediately contact Pharmagel Engineering Spa , and emit the reserve in the forwarder documents. The equipment is provided with directional wheels so that it can be moved without any additional device. Lift the equipment with a system suitable and adequate to its weight and size . It must be moved with caution and placed to avoid any damage and/or crash. During the lifting time , please be sure the equipment is firmly fixed in order to avoid any accidental fall and/or turn upside down Department: Technical Department Machine preparation, start-up and Maintenance MANUAL Document N°: 2144_2009_M_09_10 Author: M.Lambri Page 7 of 82 Equipment Name: GK 72 Encapsulation Line Equipment SN: GK72101005 Data: 06 Sep 2010 2.2 Installation room conditions The equipment must be installed at atmospheric pressure; the air must not include aggressive particles, and maximum humidity must not damage any instrument. The installation room must be provided of fire safety equipment ; the user must install all the adequate safety and controls systems, preventing also external accidents. Please consider the following place conditions: Do not expose the equipment to rain; Do not use equipment in humid or wet rooms: o Humidity max: 85% o Room temperature: 15-40 °C Installation room must have a good lighting; Keep the floor dry clean ,without oil or dirt spots 2.3 Installation and first check The power line must be placed in room before the equipment installation, in order to be ready for connection at the equipment installation . Procedures at the first start up: 1. 2. 3. 4. Please verify and remove all the safety packing system; then carefully clean all the equipment; Place the equipment in the chosen position; Connect the equipments to all the Utility as in the drawings and P&ID attached. Connect the electrical wires as in the drawings attached and check them again; start the motors for a rotational test. The cables connections must comply with the RST polarization standard Attention : the machine can be seriously damaged by an incorrect phase connection DO NOT APPLY POWER AND DO NOT MOVE ANY PIECE WITHOUT OUR TECNICIANS CONSENT Department: Technical Department Machine preparation, start-up and Maintenance MANUAL Document N°: 2144_2009_M_09_10 Author: M.Lambri Page 8 of 82 Equipment Name: GK 72 Encapsulation Line Equipment SN: GK72101005 Data: 06 Sep 2010 2.4 Precautions a) The power supply must comply with specifications set in the functional design specifications data , and the must not be different of more than 5% of the nominal voltage. b) Avoid any wrong usage of the electrical cable, install only cables of section appropriate to the power installed . The power cable must not be handled to pull out the plug from the socket . Protect the cables from high temperature, oil and sharp edges. Use power cable extension only if approved and marked. c) All the instruments and equipment must be protected from stray currents ,electrostatic differential and/or potential, by adequate protection instruments and/or ground connections and electrical coupling connections. d) The user is obliged to verify all the safety devices for each installation and for any used fluid. 2.5 Correct operations and not allowed operations All the equipment must be installed and used in respect of the rules in force in the installation country ; the user must be aware and apply all of them. The machine builder do not take upon himself any responsibility for any damage that may occur to people, object , or installations due to inappropriate use of the equipment. The user must not put inside the machine any raw material at a temperature different from the minimum and maximum design temperature. It is forbidden to put inside the machine any raw material and/or mixture that will eat into, rust and/or corrode the contact surfaces. It’s forbidden to use compressed air and any diesel oil and/or solvent spray. The constructor is not responsible for any damage produced by inflammable and/or explosive materials introduced or used in the equipment if it was not designed for them. It’s forbidden to modify in any way the equipment, it’s own functions and the technical documentation attached, unless given authorization from the machine builder; please take care of this maintenance and usage manual as it will match all the machine lifetime. Do not remove any avalanche protector. It’s forbidden to put anything inside the motor’s cover and to shut the power OFF bypassing the main switch. The workers must remark to their people in charge any malfunction and/or any possible dangerous situation , avoiding any operation out of their knowledge . The workers must inform the machine builder about any fault in the accident-prevention procedures or in any estimated dangerous situations. All the maintenance operations must be performer at atmospheric pressure and the machine must be isolated from the main power. Department: Technical Department Machine preparation, start-up and Maintenance MANUAL Document N°: 2144_2009_M_09_10 Author: M.Lambri Page 9 of 82 Equipment Name: GK 72 Encapsulation Line Equipment SN: GK72101005 Data: 06 Sep 2010 It’s forbidden to put any load on the equipment. The equipment must not be exposed to a possible hydraulic ram. 2.6 Unavoidable dangers The worker must pay attention to the risk of possible leakage current in the main switch, in the operational panel . Department: Technical Department Machine preparation, start-up and Maintenance MANUAL Document N°: 2144_2009_M_09_10 Author: M.Lambri Page 10 of 82 Equipment Name: GK 72 Encapsulation Line Equipment SN: GK72101005 Data: 06 Sep 2010 3 Machine Set-up 3.1 Fill Block Pump assembling procedure Refer to the following scheme in order to proceed with disassembling action : Department: Technical Department Document N°: 2144_2009_M_09_10 Author: M.Lambri Page 11 of 82 Equipment Name: GK 72 Encapsulation Line Equipment SN: GK72101005 Data: 06 Sep 2010 1-BANKS assembling 2- BANKS assembling trought SOCKET HEAD SCREW Machine preparation, start-up and Maintenance MANUAL 3- assembling INSIDE & OUTSIDE WASHER , PLUNGER SEAL 4- Tight the screw with appropriate key Department: Technical Department Document N°: 2144_2009_M_09_10 Author: M.Lambri Page 12 of 82 Equipment Name: GK 72 Encapsulation Line Equipment SN: GK72101005 Data: 06 Sep 2010 5- PLUNGERS insertion 6- SIDE PLATE assembling 7- SLIDE VALVE assembling 8- TOP PLATE assembling Machine preparation, start-up and Maintenance MANUAL Department: Technical Department Machine preparation, start-up and Maintenance MANUAL Document N°: 2144_2009_M_09_10 Author: M.Lambri 9- Fix the screw on TOP PLATE Page 13 of 82 Equipment Name: GK 72 Encapsulation Line Equipment SN: GK72101005 Data: 06 Sep 2010 10- gasket positioned Department: Technical Department Machine preparation, start-up and Maintenance MANUAL Document N°: 2144_2009_M_09_10 Author: M.Lambri 3.2 Fill pump housing assembly Page 14 of 82 Equipment Name: GK 72 Encapsulation Line Equipment SN: GK72101005 Data: 06 Sep 2010 Department: Technical Department Machine preparation, start-up and Maintenance MANUAL Document N°: 2144_2009_M_09_10 Author: M.Lambri Page 15 of 82 Equipment Name: GK 72 Encapsulation Line Equipment SN: GK72101005 Data: 06 Sep 2010 1-Pump housing completely dismantled 2-Fix the pump housing block (ref. 2) and tight 3-View of the pump housing shaft (ref. 24) Department: Technical Department Document N°: 2144_2009_M_09_10 Author: M.Lambri Page 16 of 82 Equipment Name: GK 72 Encapsulation Line Equipment SN: GK72101005 Data: 06 Sep 2010 4-Fix the cam (ref 43) with the special compass key. 5-Top view of the pump housing assembled 6-Install the two slide (ref. 6 and 7) and the two yoke bracket left and right (ref. 8)and tight. 7-Install the two pump block support left and right (ref. 15)and tight. Machine preparation, start-up and Maintenance MANUAL Department: Technical Department Machine preparation, start-up and Maintenance MANUAL Document N°: 2144_2009_M_09_10 Author: M.Lambri Page 17 of 82 Equipment Name: GK 72 Encapsulation Line Equipment SN: GK72101005 Data: 06 Sep 2010 3.3 Fill pump housing synchronization Check the fill pump housing alignment as shown The photo shows a correct installation A B C Please verify in your pump housing that : The crank shaft A must be parallel to the guide on the right handside ; at the same time the ‘guide pin’ B on the cam must be aligned with the ‘zero point’ sensor C and the hole in the front. If the ‘zero point’ sensor is then aligned correctly with the ‘guide pin’ ,please push the relevant button on the machine and the led will light up to confirm . Department: Technical Department Machine preparation, start-up and Maintenance MANUAL Document N°: 2144_2009_M_09_10 Author: M.Lambri Page 18 of 82 Equipment Name: GK 72 Encapsulation Line Equipment SN: GK72101005 Data: 06 Sep 2010 To synchronize the medicine pump housing please proceed as follows : 1-The crank shaft must be parallel and horizontal as the guide on the right 2-Unscrew the cam central pivot with a compass key Align the cam ‘guide pin ‘ to the hole on the housing and relevant sensor , then screw the cam central pivot with a compass key. Department: Technical Department Machine preparation, start-up and Maintenance MANUAL Document N°: 2144_2009_M_09_10 Author: M.Lambri Page 19 of 82 Equipment Name: GK 72 Encapsulation Line Equipment SN: GK72101005 Data: 06 Sep 2010 3.4 Fill pump and pump housing coupling 1-Lift the fill pump using the support frame supplied 2-Install the fill pump on the pump housing. 3-Tight the four screw to fix the fill pump. Insert the lubrication pipe with the quick connection device (red arrow). 4-Insert the medicine flexible pipes and put the gasket. Department: Technical Department Machine preparation, start-up and Maintenance MANUAL Document N°: 2144_2009_M_09_10 Author: M.Lambri 5-Fix the fill hopper by tighten the screw. 7-Fasten all the plunger retaining nut Page 20 of 82 Equipment Name: GK 72 Encapsulation Line Equipment SN: GK72101005 Data: 06 Sep 2010 6-Put the fill hopper cover and the air filter if necessary (see fill line preparation section). Department: Technical Department Machine preparation, start-up and Maintenance MANUAL Document N°: 2144_2009_M_09_10 Author: M.Lambri Page 21 of 82 Equipment Name: GK 72 Encapsulation Line Equipment SN: GK72101005 Data: 06 Sep 2010 3.5 Die roll coupling housing 1-Die roll coupling housing on trolley 2-Unlock the the fixing knob 3-Slide the housing on the mobile lift 4-Put the mobile lift in position in front of the machine Department: Technical Department Machine preparation, start-up and Maintenance MANUAL Document N°: 2144_2009_M_09_10 Author: M.Lambri 5-Slide it in position Page 22 of 82 Equipment Name: GK 72 Encapsulation Line Equipment SN: GK72101005 Data: 06 Sep 2010 6-Fix the die roll housing with the knob positioned in the middle of the two die rolls. Department: Technical Department Machine preparation, start-up and Maintenance MANUAL Document N°: 2144_2009_M_09_10 Author: M.Lambri Page 23 of 82 Equipment Name: GK 72 Encapsulation Line Equipment SN: GK72101005 Data: 06 Sep 2010 3.6 Die rolls assembly 1-Die rolls on a proper trolley. 2-INSERT the right roll and then the left 3-Closed the Yoke Department: Technical Department Document N°: 2144_2009_M_09_10 Author: M.Lambri Page 24 of 82 Equipment Name: GK 72 Encapsulation Line Equipment SN: GK72101005 Data: 06 Sep 2010 4-Closed manually the chute conveyor 5-Fix manually the Yoke Machine preparation, start-up and Maintenance MANUAL 6-Tight the two knobs securing the yoke assembly to the die roll assembly. Department: Technical Department Machine preparation, start-up and Maintenance MANUAL Document N°: 2144_2009_M_09_10 Author: M.Lambri Page 25 of 82 Equipment Name: GK 72 Encapsulation Line Equipment SN: GK72101005 Data: 06 Sep 2010 3.7 Die rolls alignment The cavities in the right die roll must be aligned with the cavities in the left one . The machine supplied is already mounted and tested with the correct die roll alignment. In this situation the worker don’t need to align the die rolls any further. To check the alignment, place the telecamera Leica 1near the die roll housing, put and fix the camera with the knob and proceed to focus on the die rolls front tag ; you will see also the cavities alignment with a proper illumination. 1-Assemble the telecamera support frame 1 Item available as an option. 2-Fix the camera with the bottom knob Department: Technical Department Document N°: 2144_2009_M_09_10 Author: M.Lambri Page 26 of 82 Equipment Name: GK 72 Encapsulation Line Equipment SN: GK72101005 Data: 06 Sep 2010 3-Adjust the camera at maximum distance with the rear knob. 4-Correct camera installation Machine preparation, start-up and Maintenance MANUAL 5-Put the die rolls in place , connect the camera wiring and proceed to focus on the die rolls front tag Please follow instruction of the Telecamera Leica on software and alignment Department: Technical Department Machine preparation, start-up and Maintenance MANUAL Document N°: 2144_2009_M_09_10 Author: M.Lambri Page 27 of 82 Equipment Name: GK 72 Encapsulation Line Equipment SN: GK72101005 Data: 06 Sep 2010 3.8 Pump housing assembling on the machine 1-Fill pump on trolley. 3-Put the safety 2-Slide the fill pump on the mobile lift Department: Technical Department Machine preparation, start-up and Maintenance MANUAL Document N°: 2144_2009_M_09_10 Author: M.Lambri 4-Lift the pump Page 28 of 82 Equipment Name: GK 72 Encapsulation Line Equipment SN: GK72101005 Data: 06 Sep 2010 5-Slide the pump on the encapsulation machine pay attention to the coupling of the two shaft Department: Technical Department Machine preparation, start-up and Maintenance MANUAL Document N°: 2144_2009_M_09_10 Author: M.Lambri 6-Rear view of the two shaft 8-Connect the two quick connection. Page 29 of 82 Equipment Name: GK 72 Encapsulation Line Equipment SN: GK72101005 Data: 06 Sep 2010 7-Screw the two block to fix pump Department: Technical Department Machine preparation, start-up and Maintenance MANUAL Document N°: 2144_2009_M_09_10 Author: M.Lambri 10-Insert the fill flexible pipe inside their position and close. Page 30 of 82 Equipment Name: GK 72 Encapsulation Line Equipment SN: GK72101005 Data: 06 Sep 2010 11-Install the level sensor on the top of the hopper. Department: Technical Department Machine preparation, start-up and Maintenance MANUAL Document N°: 2144_2009_M_09_10 Author: M.Lambri Page 31 of 82 Equipment Name: GK 72 Encapsulation Line Equipment SN: GK72101005 Data: 06 Sep 2010 3.9 Chute assembly and mangle roll assembling on the machine 1-Chute assembly on trolley 2-Remove the chute assembly and install it on the correct position below the die roll housing, by sliding it on the two shelves. 3-Tight the two knobs 4-Adjust the position of the two brush as shown below 5-Insert the left and right belt conveyor 6-Fix them from below Department: Technical Department Machine preparation, start-up and Maintenance MANUAL Document N°: 2144_2009_M_09_10 Author: M.Lambri Page 32 of 82 Equipment Name: GK 72 Encapsulation Line Equipment SN: GK72101005 Data: 06 Sep 2010 3.10 Wedge assembling on the machine 1-Wedge on the trolley 2-Insert the wedge by sliding it on the support 3-Plug the fill pipeline. 4-Insert the heating element and the temperature probe. Department: Technical Department Machine preparation, start-up and Maintenance MANUAL Document N°: 2144_2009_M_09_10 Author: M.Lambri Page 33 of 82 Equipment Name: GK 72 Encapsulation Line Equipment SN: GK72101005 Data: 06 Sep 2010 3.11 Frontal part Connection Position the frontal part of the machine in front of the encapsulation machine. Slide the machine on the top of the rail, until it stop. Check that the multicontact plug below is installed properly Now follow the instruction on the GK72 HMI manual, in order to operate on the touch screen and close the machine. 3.12 Spreader boxes assembling on the machine Place the spreader boxes in position over each casting drum. Secure the spreader boxes to the machine frame housing by pivot screws in the pivot brackets. The spreader box body must rest on the drums. Department: Technical Department Machine preparation, start-up and Maintenance MANUAL Document N°: 2144_2009_M_09_10 Author: M.Lambri Page 34 of 82 Equipment Name: GK 72 Encapsulation Line Equipment SN: GK72101005 Data: 06 Sep 2010 Lower the gate completely until it rests on the drums; check that the 0.05-mm thickness gauge do not pass through along the contact line between the box and the drum. Put the graduated scale, on the adjusting gate, at zero: unscrewing the dowel on the knob and rotating it until it reaches the zero. Then block it. During the adjustment of the ribbon thickness, the two adjusting studs of each spreader box must be screwed at the same time . The adjustment must be done rotating each of them: clockwise, to increase the thickness anticlockwise, to reduce it Insert the cartridge heaters in the spreader boxes. 1-Spreader box on the proper trolley 2-Install the spreader box and fix it with clamps Department: Technical Department Document N°: 2144_2009_M_09_10 Author: M.Lambri Page 35 of 82 Equipment Name: GK 72 Encapsulation Line Equipment SN: GK72101005 Data: 06 Sep 2010 3-Insert heating element and probe 4-Install the level sensor from the box Machine preparation, start-up and Maintenance MANUAL Department: Technical Department Machine preparation, start-up and Maintenance MANUAL Document N°: 2144_2009_M_09_10 Author: M.Lambri Page 36 of 82 Equipment Name: GK 72 Encapsulation Line Equipment SN: GK72101005 Data: 06 Sep 2010 3.13 Fill line setup The fill can be transferred from the tank to the fill pump, in two different modalities, prepare the fill line according to the schematics below. With recirculation (for paste) The product is continuously keep in recirculation between the tank (TK001) and the hopper (POS001) installed on the fill pump (POS002), by a transfer pump (POS008); a filter of 0.2 µm (FL001), installed on the top of the tank (TK001), assure the integrity of the product. With level sensor (for oil) A level sensor (FL001), installed on the hopper (POS001) of the fill pump (POS002), control the transfer pump (on/off) (POS008), in order to maintain a stable level inside the hopper (POS001); in this case two filter (FL001 and FL002) of 0.2 µm installed on the top of the hopper and the tank, guarantees the integrity of the product. Department: Technical Department Machine preparation, start-up and Maintenance MANUAL Document N°: 2144_2009_M_09_10 Author: M.Lambri 3.14 Gelatine line setup Connect the pipeline as per diagram below. Page 37 of 82 Equipment Name: GK 72 Encapsulation Line Equipment SN: GK72101005 Data: 06 Sep 2010 Department: Technical Department Machine preparation, start-up and Maintenance MANUAL Document N°: 2144_2009_M_09_10 Author: M.Lambri Page 38 of 82 Equipment Name: GK 72 Encapsulation Line Equipment SN: GK72101005 Data: 06 Sep 2010 3.15 Oil roller lubrication The encapsulating machine has a gelatine ribbon lubrication system which allows an extremely precise dosage of the lubricant oil. It depends on the type of capsules and on the type of product to encapsulate. Fill the oil roller tanks , located on the right side of control board , through the two different tank gates, using: Middle Chain Triglycerides Oil (100%) Middle Chain Triglycerides Oil mixed with Lecithin Oil (0.1% of Soya bean oil in Middle Chain Triglycerides Oil) For the oil filter cleaning see the maintenance section. Oil level is controlled and visible on HMI ; at minimum level an alarm will turn on the control panel. The excess oil is guided towards two small tanks aside the machine under the cooling drums 3.16 Pump housing lubrication Fill the Medicine Pump Housing with Middle Chain Triglycerides Oil A gear pump , installed in the pump housing and speed controlled by panel, feed the pump with lubrication oil: it will pass through and fall in the pump housing . 3.17 Synchronizing the machine The movement of the medicine pump must be synchronised with the die rolls rotation. The timing mark on the face of the injection segment corresponds to the upper edge of the injection holes. The timing mark on the die rolls corresponds to the trailing edge of the cavities. When the machine is synchronised, the fill will be fully injected immediately before these two lines meet. However, tolerance must be made for the thickness of the gelatine ribbon. Please refer to HMI for pumps homing . The machine is now ready for production Department: Technical Department Machine preparation, start-up and Maintenance MANUAL Document N°: 2144_2009_M_09_10 Author: M.Lambri Page 39 of 82 Equipment Name: GK 72 Encapsulation Line Equipment SN: GK72101005 Data: 06 Sep 2010 3.18 Capsule conveyor assembling on the machine 1-Conveyor on trolley 3-Plug the conveyor motor power cable 2-lift the conveyor and slide it on the machine side to pull it out 4-fix 4 screw at the side of chute discharge lips Department: Technical Department Machine preparation, start-up and Maintenance MANUAL Document N°: 2144_2009_M_09_10 Author: M.Lambri Page 40 of 82 Equipment Name: GK 72 Encapsulation Line Equipment SN: GK72101005 Data: 06 Sep 2010 5-Conveyor installed Department: Technical Department Machine preparation, start-up and Maintenance MANUAL Document N°: 2144_2009_M_09_10 Author: M.Lambri Page 41 of 82 Equipment Name: GK 72 Encapsulation Line Equipment SN: GK72101005 Data: 06 Sep 2010 4 Production start Read HMI user manual before production start to get acquainted to machine functions. To start the production proceed as follows: 1. Switch on the spreader box cartridge heaters on the control panel and adjust the spreader box opening gates to .030" with the help of the adjusting gauge stud . Allow spreader boxes to heat up. 2. Switch on the Gelatine Pipeline heaters on the control panel and let it heat up for 10 minutes . 3. Connect the gelatine tank conical valve to the Gelatine Pipeline with the silicone tube provided by us. Connect the air feeding , open the valve and, after one minute, switch on the machine. 4. Start to fill the spreader boxes from the control panel by spreader boxes level control. 5. Add one litre of vegetable oil in the medicine hopper. Switch on the cooling fan and adjust the temperature to 15° C and the speed of the air. 6. Start up the machine at 2.5 r.p.m. 7. The gelatin will become ribbon in a couple of minutes. 8. Start the oil rollers lubrication from the control panel and , as the ribbons emerge from the drums, feed them through the oil rollers , die rolls, and mangle rolls. 9. Lower the segment and start the segment heating element at requested setpoint temperature . 10. As soon as the segment reach the desired temperature , put the die rolls in the CUTTING position and immediately operate on the shut-off valve. 4.1 Checking the fill Check the capsules shape, fill weight and shell thickness and make necessary adjustments. The fill weight varies by altering the pump dosing stroke . As soon as satisfactory capsules are produced, drain the vegetable oil from the hopper. Connect the hopper to the main supply by the Cleanline Medicine Pump line. The first few hundred capsules contain a mixture of vegetable oil as fill material, and must be rejected. As soon as production starts, check the capsules fill and shell weights. Counting from the timing mark, take the first and the last capsules from the dies. Wash them in a beaker full of ether to remove the external traces of lubricant. Weight on the balance and record the weights. Partially dissect the sample capsules at the seam and wash again in order to remove all traces of fill and allow ether to evaporate. Place the shell on the balance and record the net weight. (The difference between the two weights is the true weight of the fill). Repeat these sampling tests as frequently as the precision of the order requests. Then take the capsules from the second and from the last but one cavity of the dies. Take them progressively inwards. After sampling, make any necessary adjustments to the pump travel and spreader box openings until desired fill and shell weights are obtained. After half an hour, it should not be necessary to make many adjustments to the spreader boxes and pump travel, although adjustments to the cartridge heaters and conditioned air may be required from time to time. 4.2 Drying Newly formed capsules drop from the machine onto a conveyor, which is arranged so that the rejected can be sent in one direction and the perfect capsules in the other. It is important to see that the conveyor is running to reject capsules at all time during the machine set-up. Capsules that pass the initial inspection reach a tumble dryer for the first stage of drying. Department: Technical Department Machine preparation, start-up and Maintenance MANUAL Document N°: 2144_2009_M_09_10 Author: M.Lambri Page 42 of 82 Equipment Name: GK 72 Encapsulation Line Equipment SN: GK72101005 Data: 06 Sep 2010 After being in the tumble dryer for approximately 2 to 3 hours, the capsules are placed on trays. Later, they are transferred in the drying tunnel until they reach the required hardness in approximately 37 to 72 hours. When this process is completed, the capsule are ready for inspection. 4.3 Stopping the machine Stop injection of fill material, switch off the segment heaters, release pressure on the die rolls and raise the pump housing assembly to the idling position. Switch off the Gelatine Feeding System. Close the gelatine tank valve. Switch off the Cleanline Fill Pump. Keep the pipeline in place for washing cycle. 4.4 Tumble dryer programming The tumble dryer programming is set from the control panel : please refer to chapter 6 to program the baskets work in the proper way . It is possible to modify charge and discharge time, and rotational speed. For a proper discharge time program, proceed as follows: Maximum discharge time: CT = first basket charge time N = basket number The stop time during the rotation change is fixed in 12 seconds, so the basket maximum discharge time MTS will be : Example: N = 3 baskets CT = 600 seconds Department: Technical Department Machine preparation, start-up and Maintenance MANUAL Document N°: 2144_2009_M_09_10 Author: M.Lambri Page 43 of 82 Equipment Name: GK 72 Encapsulation Line Equipment SN: GK72101005 Data: 06 Sep 2010 5 Dismantling the equipment and cleaning procedures 5.1 Spreader boxes and gelatine pipeline After each production run, remove the two spreader boxes from the machine (see pictures below) and place them on the appropriate trolley. Wash the spreader boxes in the washing room by immersion in hot water or in the washing machine; use hot water and rinse with demineralised water. Dry with industrial paper soaked with alcohol. 1-Remove the level sensor from the box 2-Remove the whole heating element and temperature probe wirings CAUTION : do not hit the cooling drum while removing the spreader box : the drums can be permanently damaged 3-Unscrew the locking , then remove the spreader box 4-Store the spreader box on the proper trolley and proceed to washing Department: Technical Department Machine preparation, start-up and Maintenance MANUAL Document N°: 2144_2009_M_09_10 Author: M.Lambri Page 44 of 82 Equipment Name: GK 72 Encapsulation Line Equipment SN: GK72101005 Data: 06 Sep 2010 After the spreader box disassembly it is possible to proceed with the gelatine pipe washing : connect the gelatine piping as shown in photo Department: Technical Department Machine preparation, start-up and Maintenance MANUAL Document N°: 2144_2009_M_09_10 Author: M.Lambri Page 45 of 82 Equipment Name: GK 72 Encapsulation Line Equipment SN: GK72101005 Data: 06 Sep 2010 5.2 Capsule conveyor 1-Main capsule conveyor lean on machine frame and tumble dryer conveyor 2-Remove 4 screw at the side of chute discharge lips 3-unplug the conveyor motor power cable 4- lift the conveyor and slide it on the machine side to pull it out Department: Technical Department Machine preparation, start-up and Maintenance MANUAL Document N°: 2144_2009_M_09_10 Author: M.Lambri Page 46 of 82 Equipment Name: GK 72 Encapsulation Line Equipment SN: GK72101005 Data: 06 Sep 2010 5- Lay it down on a trolley and remove the capsules After removing the capsules trapped , wash the residual oil with hot water and 10% Uppercut solution. Rinse with de-mineralised water and dry with industrial paper moistened with alcohol. 5.3 Wedge 1- unplug the heating element Remove the heating element and 3-Pull the wedge from the seat along its guide 2- Unscrew the nut and remove the flexible pipes 4-Place the wedge on its trolley Department: Technical Department Machine preparation, start-up and Maintenance MANUAL Document N°: 2144_2009_M_09_10 Author: M.Lambri Page 47 of 82 Equipment Name: GK 72 Encapsulation Line Equipment SN: GK72101005 Data: 06 Sep 2010 Disassemble the distributor from the wedge Wash with water and 10% Uppercut solution. Rinse with de-mineralised water and dry with paper soaked with alcohol. Remove all the gaskets and replace them with new ones for a new production. Department: Technical Department Machine preparation, start-up and Maintenance MANUAL Document N°: 2144_2009_M_09_10 Author: M.Lambri Page 48 of 82 Equipment Name: GK 72 Encapsulation Line Equipment SN: GK72101005 Data: 06 Sep 2010 5.4 Die-Rolls 1-Unscrew the two knobs securing the yoke assembly to the die roll assembly, then unscrew the two die shaft knobs securing the two die rolls. 2-Remove the Yoke Assembly from the seat 3-Remove the 2 bracket beside the chute conveyor 4-Pull and push the central knobs to release the die rolls from the yoke ; Pull the die roll yoke and let it slide on its guide Department: Technical Department Document N°: 2144_2009_M_09_10 Author: M.Lambri Page 49 of 82 Equipment Name: GK 72 Encapsulation Line Equipment SN: GK72101005 Data: 06 Sep 2010 5-Yoke released 6-Remove the right roll and then the left Machine preparation, start-up and Maintenance MANUAL Do not bump the dies against metal surface : the die rolls could be permanently damaged and perform badly in ribbon cutting 7-Store the die rolls on a proper trolley. Die rolls are washed with water and 10% UPPERCUT solution or similar They are rinsed with water and dried with industrial paper soaked with alcohol. Department: Technical Department Machine preparation, start-up and Maintenance MANUAL Document N°: 2144_2009_M_09_10 Author: M.Lambri Page 50 of 82 Equipment Name: GK 72 Encapsulation Line Equipment SN: GK72101005 Data: 06 Sep 2010 5.5 Die-Rolls housing 1-unscrew the plug connecting Siemens encoder on the back of the die roll housing 3-Put ht e mobile service lift in front of the machine and lift at die roll housing height ; push the tray until it fits in the guides on the machine frame 2-Unplug compressed air from the front and back pneumatic cylinders 4-Lock the tray with pin , now you can pull the die roll housing on the tray Department: Technical Department Machine preparation, start-up and Maintenance MANUAL Document N°: 2144_2009_M_09_10 Author: M.Lambri Page 51 of 82 Equipment Name: GK 72 Encapsulation Line Equipment SN: GK72101005 Data: 06 Sep 2010 5-pull the housing until lays completely on the tray 6-Unlock the tray and pull it until you can lock it again in place 7-Move the tray to the lower position , housing is ready to be transferred to trolley 8-Put the mobile service lift in front of the trolley for housing, move the tray for connection , then move the housing on trolley Department: Technical Department Machine preparation, start-up and Maintenance MANUAL Document N°: 2144_2009_M_09_10 Author: M.Lambri 9-Lock the housing on trolley with the proper fixing knob Page 52 of 82 Equipment Name: GK 72 Encapsulation Line Equipment SN: GK72101005 Data: 06 Sep 2010 10-Dieroll housing stored on trolley Washing Procedure Follow this procedure in order to wash the die roll housing: Suck by vacuum all the residual Pour hot water and detergent (water and 10% Uppercut solution) from the top of the die roll housing Run slowly the machine at minimum speed for 5 minutes Stop and suck all the dirty water . Rinse accurately with hot de-mineralised water and again run at minimum speed Rinse with alcohol to remove all the water residual. Dry with industrial paper soaked with alcohol be sure not to leave paper residual inside the die roll housing Spray some oil on the gears and the shafts of the die roll housing While washing the die roll housing, check accurately the movement of the coupling shaft Clean accurately the coupling frame front flange, the coupling flange and the coupling slider . Clean also the die shaft sliding block Department: Technical Department Machine preparation, start-up and Maintenance MANUAL Document N°: 2144_2009_M_09_10 Author: M.Lambri Page 53 of 82 Equipment Name: GK 72 Encapsulation Line Equipment SN: GK72101005 Data: 06 Sep 2010 5.6 Chute assembly and mangle rolls 1-Unfasten the pin under the chute conveyor 2-Pull the conveyor along its seat to remove 3-Unfasten the knob at the far side to release the chute and mangle roll assembly 4-Unscrew as in picture to put the brushes in safe position Department: Technical Department Machine preparation, start-up and Maintenance MANUAL Document N°: 2144_2009_M_09_10 Author: M.Lambri 5-Assembly is ready to be removed Page 54 of 82 Equipment Name: GK 72 Encapsulation Line Equipment SN: GK72101005 Data: 06 Sep 2010 6-Store on the proper trolley ; disassemble to clean The Chute Assembly is removed from the machine and partially disassembled. Completely dismount the conveyor belt and the capsule chute All the parts are washed with 10% Uppercut solution in hot water. After rinsing with demineralised water, they are dried with industrial paper soaked with alcohol. Department: Technical Department Machine preparation, start-up and Maintenance MANUAL Document N°: 2144_2009_M_09_10 Author: M.Lambri Page 55 of 82 Equipment Name: GK 72 Encapsulation Line Equipment SN: GK72101005 Data: 06 Sep 2010 5.7 Medicine Pump housing disassembly 1-Unlock the clamp and remove the fill level sensor 2-Remove completely the flexible pipes fastening guide pulling the handle 3-Fastenig guide removed ; put the flexible pipes in the pump housing , be careful with oil spraying Department: Technical Department Machine preparation, start-up and Maintenance MANUAL Document N°: 2144_2009_M_09_10 Author: M.Lambri Page 56 of 82 Equipment Name: GK 72 Encapsulation Line Equipment SN: GK72101005 Data: 06 Sep 2010 4- Unplug the fill pump lubrication pipes on the right side. 5- Put the mobile service lift in front of the pump housing, lift at correct height ,push the tray until it locks in front of the pump housing base 6-Lock the tray with the pump housing base 7-Unscrew the two knobs under the pump base to release the pump free Department: Technical Department Machine preparation, start-up and Maintenance MANUAL Document N°: 2144_2009_M_09_10 Author: M.Lambri 8-Lift the upper pump block 10-Put the safety bracket in place on the back of medicine pump housing , then pull the tray onto the mobile service lift and Page 57 of 82 Equipment Name: GK 72 Encapsulation Line Equipment SN: GK72101005 Data: 06 Sep 2010 9-Pull the pump housing on the mobile service lift tray 11-Safety bracket in place on the back of the medicine pump housing Department: Technical Department Machine preparation, start-up and Maintenance MANUAL Document N°: 2144_2009_M_09_10 Author: M.Lambri Page 58 of 82 Equipment Name: GK 72 Encapsulation Line Equipment SN: GK72101005 Data: 06 Sep 2010 12-Medicine pump housing on mobile service lift 13-Lift down the medicine pump housing until low position 14-Put the mobile service lift in front of the trolley for medicine pump housing and lock them on place ; then remove the safety bracket 15-Transfer the medicine pump housing onto the trolley Department: Technical Department Machine preparation, start-up and Maintenance MANUAL Document N°: 2144_2009_M_09_10 Author: M.Lambri 16-Lock the medicine pump housing on the trolley with the same safety bracket Page 59 of 82 Equipment Name: GK 72 Encapsulation Line Equipment SN: GK72101005 Data: 06 Sep 2010 Department: Technical Department Machine preparation, start-up and Maintenance MANUAL Document N°: 2144_2009_M_09_10 Author: M.Lambri Page 60 of 82 Equipment Name: GK 72 Encapsulation Line Equipment SN: GK72101005 Data: 06 Sep 2010 5.8 Medicine pump disassembly 1-Medicine pump on trolley ready for dismantle 2-Open the trolley wing , leave the safety bracket in place 3-Remove the hopper cover 4-Remove 8 nuts and the hopper Department: Technical Department Document N°: 2144_2009_M_09_10 Author: M.Lambri Page 61 of 82 Equipment Name: GK 72 Encapsulation Line Equipment SN: GK72101005 Data: 06 Sep 2010 5-Use the trolley wings to manage the dismantled pieces 6-Unscrew the nuts and then remove the medicine flexible pipes Machine preparation, start-up and Maintenance MANUAL 7-Remove the four screws to dismantle the assembly ; remove also the fill pump lubrication pipe Department: Technical Department Document N°: 2144_2009_M_09_10 Author: M.Lambri Page 62 of 82 Equipment Name: GK 72 Encapsulation Line Equipment SN: GK72101005 Data: 06 Sep 2010 8-Unfasten all the plunger retaining nut 9-Plunger free from frame 10-Remove the medicine pump from the housing 11-Dismantled medicine pump on trolley wing Machine preparation, start-up and Maintenance MANUAL Department: Technical Department Document N°: 2144_2009_M_09_10 Author: M.Lambri Page 63 of 82 Equipment Name: GK 72 Encapsulation Line Equipment SN: GK72101005 Data: 06 Sep 2010 12-Medicine pump without pump block 13-Remove the 4 screws and remove the two plates 14-Remove the plates and store them on trolley wings 15-Remove the 6 screws to pull out the inner yoke bracket Machine preparation, start-up and Maintenance MANUAL Department: Technical Department Machine preparation, start-up and Maintenance MANUAL Document N°: 2144_2009_M_09_10 Author: M.Lambri Page 64 of 82 Equipment Name: GK 72 Encapsulation Line Equipment SN: GK72101005 Data: 06 Sep 2010 16-Inner yoke bracket removed and placed on trolley wing 17-Dismantle the cam with a compass key 18-Cam dismantled 19-Remove the four screws holding the pump housing Department: Technical Department Machine preparation, start-up and Maintenance MANUAL Document N°: 2144_2009_M_09_10 Author: M.Lambri Page 65 of 82 Equipment Name: GK 72 Encapsulation Line Equipment SN: GK72101005 Data: 06 Sep 2010 20-Pump housing completely dismantled and ready for washing Department: Technical Department Machine preparation, start-up and Maintenance MANUAL Document N°: 2144_2009_M_09_10 Author: M.Lambri Page 66 of 82 Equipment Name: GK 72 Encapsulation Line Equipment SN: GK72101005 Data: 06 Sep 2010 5.9 Medicine pump block disassembly Refer to the following scheme in order to proceed with disassembling action : Department: Technical Department Machine preparation, start-up and Maintenance MANUAL Document N°: 2144_2009_M_09_10 Author: M.Lambri 1-Move the block pump to a clean table with appropriate tools 3-Unscrew TOP PLATE trought M6 x 40 screw Page 67 of 82 Equipment Name: GK 72 Encapsulation Line Equipment SN: GK72101005 Data: 06 Sep 2010 2-Remove the TOP PLATE gasket 4- Remove TOP PLATE Department: Technical Department Document N°: 2144_2009_M_09_10 Author: M.Lambri Page 68 of 82 Equipment Name: GK 72 Encapsulation Line Equipment SN: GK72101005 Data: 06 Sep 2010 5- Remove SLIDE VALVE 6- Remove SIDE PLATE 7- Remove PLUNGERS 8- Unscrew BANKS trought SOCKET HEAD SCREW Machine preparation, start-up and Maintenance MANUAL Department: Technical Department Document N°: 2144_2009_M_09_10 Author: M.Lambri Page 69 of 82 Equipment Name: GK 72 Encapsulation Line Equipment SN: GK72101005 Data: 06 Sep 2010 9- Remove BANKS 10- Remove GLAND NUT Machine preparation, start-up and Maintenance MANUAL 11- Remove INSIDE & OUTSIDE WASHER , PLUNGER SEAL Department: Technical Department Machine preparation, start-up and Maintenance MANUAL Document N°: 2144_2009_M_09_10 Author: M.Lambri Page 70 of 82 Equipment Name: GK 72 Encapsulation Line Equipment SN: GK72101005 Data: 06 Sep 2010 5.10 Oil roller The Oil roller lubrication system needs to be cleaned if the ribbon lubrication is not uniform. This is carried out in three stages: Tank cleaning Pump cleaning Special filter MTP Tank cleaning Remove the cover from the mygliol oil tank situated on the rear of machine. Clean with water and Uppercut 50-50 solution, blow with compressed air and rinse with alcohol. Tank filters cleaning Check and clean the filters on the lubrication tank outlet Pipeline cleaning Disconnect the PVC tubes and blow compressed air (not higher than 3 bar) toward the oil roller. Special filter MTP Blow compressed air (not higher than 3 bar) toward the PVC tubes in the Special filter. Inject alcohol through the PVC tubes in the Special filter MTP and blow with compressed air. Oil Roller – Special filters MTP Department: Technical Department Machine preparation, start-up and Maintenance MANUAL Document N°: 2144_2009_M_09_10 Author: M.Lambri 1-Remove the plate in front of on the MTP filter Page 71 of 82 Equipment Name: GK 72 Encapsulation Line Equipment SN: GK72101005 Data: 06 Sep 2010 2-Pull the filter out of the support 3-Store the filters on the proper trolley , ready for washing Department: Technical Department Machine preparation, start-up and Maintenance MANUAL Document N°: 2144_2009_M_09_10 Author: M.Lambri Page 72 of 82 Equipment Name: GK 72 Encapsulation Line Equipment SN: GK72101005 Data: 06 Sep 2010 5.11 Casting drums 1-Remove manually the knobs to remove the carter 3-Open the lateral door 2-Pull out with the sucker tools the carter 4-Unlock the knob Department: Technical Department Document N°: 2144_2009_M_09_10 Author: M.Lambri Page 73 of 82 Equipment Name: GK 72 Encapsulation Line Equipment SN: GK72101005 Data: 06 Sep 2010 5- slide the cover 6-clean the drums Machine preparation, start-up and Maintenance MANUAL Department: Technical Department Machine preparation, start-up and Maintenance MANUAL Document N°: 2144_2009_M_09_10 Author: M.Lambri Page 74 of 82 Equipment Name: GK 72 Encapsulation Line Equipment SN: GK72101005 Data: 06 Sep 2010 6 Tumble dryer cleaning and disassembly Each section can be disassembled independently please follow the photographic procedure to disassemble the tumble dryer. 1-Tumble Dryer general view 3-Remove the two mini basket 2-Open the frontal cover Department: Technical Department Document N°: 2144_2009_M_09_10 Author: M.Lambri Page 75 of 82 Equipment Name: GK 72 Encapsulation Line Equipment SN: GK72101005 Data: 06 Sep 2010 4-Unscrew and rotate the filter holder 5-Remove the filter 6-Unscrew the back panel 7-Remove the back panel Machine preparation, start-up and Maintenance MANUAL Department: Technical Department Machine preparation, start-up and Maintenance MANUAL Document N°: 2144_2009_M_09_10 Author: M.Lambri 8-Fan plenum view rear view 9-First basket conveyor details Page 76 of 82 Equipment Name: GK 72 Encapsulation Line Equipment SN: GK72101005 Data: 06 Sep 2010 Department: Technical Department Machine preparation, start-up and Maintenance MANUAL Document N°: 2144_2009_M_09_10 Author: M.Lambri Page 77 of 82 Equipment Name: GK 72 Encapsulation Line Equipment SN: GK72101005 Data: 06 Sep 2010 7 Tumble dryer cleaning The baskets are removed from the tumble dryer and carried on a special trolley to the equipment washing room, where the operator removes the remaining capsules and then starts to clean. The baskets are cleaned with water at 60° C and then washed with 10% Uppercut solution. After that, they are rinsed with de-mineralised water and dried with industrial paper soaked with alcohol. 8 Utilities and cleaning media 8.1.1 Manual cleaning solution Uppercut 10 % solution Puligen D-Solo Ethilic alcohol Industrial paper (conforms to law for product in contact with food) 8.1.2 Automatic cleaning solution Diverflow VC26 Diverflow VC2 Department: Technical Department Machine preparation, start-up and Maintenance MANUAL Document N°: 2144_2009_M_09_10 Author: M.Lambri Page 78 of 82 Equipment Name: GK 72 Encapsulation Line Equipment SN: GK72101005 Data: 06 Sep 2010 UPPERCUT Description: Ecological degreasing soluble in water. It doesn't contain phosphates. Pourpose and use Uppercut, thanks to the special agent DRK-55 also penetrates through the fat substances breaking up the more difficulty dirty. Fat and residues will easily be removed with a simple throw of water. Uniting the degreasing power to the environmental safety (it can be in fact also used for cleanings inside establishments in the food industry), UPPERCUT is one of the most versatile and effective available detergents on the market today. Component: alkaline silicate, polypropylene- glycol-ethers, non ionic surface-actives, water. Chemical physical property: Aspect: liquid Colour: pink Odour: unscented pH: 12,9 Boiling point: around 100°C Point of inflammability: not inflammable Relative density: 1,05 Solubility in water: complete Biodegradability: The contained surface- actives in the product are biodegradable in superior measure to 90%. To use according to the good working practices avoiding to disperse the product in the environment. Department: Technical Department Machine preparation, start-up and Maintenance MANUAL Document N°: 2144_2009_M_09_10 Author: M.Lambri Page 79 of 82 Equipment Name: GK 72 Encapsulation Line Equipment SN: GK72101005 Data: 06 Sep 2010 PULYGEN Product for the daily cleaning of mechanical parts, stainless steel, tiles, washable walls and crystals, cleanser for hard surfaces. Composition: it mixes the synergy of non ionic surface-active emulsifying agents. Exempted by foam, it is not corrosive and it doesn't absolutely irritate the skin. Biodegradability: 90%. It doesn't contain phosphorus. Aspect: liquid clear of yellow colour. Dosing: pour the product on the surface to clean, passing a rag or wet sponge; it isn’t necessary to rinse. D SOLO Description: alkaline detergent with strong binding action for recycle washings. Physical state: liquid clear colourless unscented pH(sol 1%): 12,7 Alkalinity: Na2O: 17% NaOH: 22% Specific weight at 15°C: 1,27 Middle life: 12 months Biodegradability: 90% Contained in P: exempt Method of titration: collect – 10ml, titrant - HCl 0,25 Ns, indicator - metilorange, conc. % = 0,5 * ml consumed HCl Concentration of use: 1%-5% in water to 55°C. Department: Technical Department Machine preparation, start-up and Maintenance MANUAL Document N°: 2144_2009_M_09_10 Author: M.Lambri Page 80 of 82 Equipment Name: GK 72 Encapsulation Line Equipment SN: GK72101005 Data: 06 Sep 2010 9 Maintenance ALL THE MAINTENANCE OPERATIONS MUST BE DONE IN SAFE CONDITIONS , AT ATMOSPHERIC PRESSURE AND WITH THE MAIN POWER SHUT OFF. DURING THE MAINTENANCE OPERATIONS THE WORKERS MUST COMPLY WITH THE ACCIDENT PREVENTION RULES IN ORDER TO BE IN SAFE CONDITION 9.1 Die roll housing assembly e column assembly Daily or production end : check that the change gear surface is clean ; check for oil leakage from the pump housing shaft. Monthly : check the internal die roll housing; clean and lubricate with Teflon spray if necessary. Put teflon grease on idle gear. Half yearly : lubricate with Teflon spray the internal parts of column assembly and die roll housing. 9.2 Oil Roller assembly Daily or production end : empty the excess oil tank. Weekly : dismantle the oil rollers and clean the filters. 9.3 Chute assembly / mangle roll Production end : disassemble the chute assembly and the mangle rolls and wash all the pieces. Weekly :remove die rolls , chute assembly front cover plate and clean. 9.4 Pump housing assembly Production end : remove the pump from the pump housing, wash and replace the gaskets. Check the Pump Yoke cross bar . Replace if worn out. 9.5 Cooling drums Production end : check the overall conditions ; check the revolution: it must be regular, without any vibrations. Remove any gelatine residual without any metallic tool. Do not scratch. 9.6 Chiller / cooling system Half yearly :check for possible leakage in the case. Check the functions of the valves. 9.7 Tumble dryer Production end: start a general cleaning of the system 9.8 Service The user is allowed to execute all the operations described with details in the chapter of the Standard Maintenance . Any other kind of operation on the machine must be asked for approval from the Technical Department of Pharmagel Egineering , describing any possible fault , operations or overhaul requested. In certain circumstances Pharmagel Engineering can agree for a direct service, or can give authorization and detailed repair instructions at the user maintenance service. Department: Technical Department Machine preparation, start-up and Maintenance MANUAL Document N°: 2144_2009_M_09_10 Author: M.Lambri Page 81 of 82 Equipment Name: GK 72 Encapsulation Line Equipment SN: GK72101005 Data: 06 Sep 2010 10 Troubleshooting Problem Reason Adjustment Cold spreader box Damaged heating element Electrical panel malfunction Damaged heating element Damaged electrical panel The spreader box opening is wrong Hard blocks of gelatine in the spreader box opening Gelatine viscosity too high Gelatine pipe is blocked Replace heating element Call service Replace heating element Call service Spreader box opening adjustment Cold gelatine tank Wrong ribbon thickness Ribbon splits in two part Spreader boxes do not fill up Only one spreader box fills up Gelatine pipe is blocked Floating unit malfunction Floating unit not properly set Gelatine pour out of spreader box Gelatine too much liquid Air bubbles in the ribbon Air bubbles in the gelatine tank Gelatine level too low Ribbon difficoult separatation from cooling drum Clean way the blocks with hot water Check gelatine temperature Check the pipeline heating is on – Stop the machine and clean the pipeline with hot water Check the pipeline heating is on – Stop the machine and clean the pipeline with hot water Dismantle the spreader box ,clean up and set the floating unit. Set the unit and wait for spreader box reaction Lower the heating temperature Set floating unit Substitute the gelatine tank Cooling system malfunction Stop the production for a while and let the level come up again. Call service Spreader box temperature too high Check the probe possible malfunction Department: Technical Department Machine preparation, start-up and Maintenance MANUAL Document N°: 2144_2009_M_09_10 Author: M.Lambri The ribbons do not slide well between die rolls and the segment Underweight capsule Page 82 of 82 Equipment Name: GK 72 Encapsulation Line Equipment SN: GK72101005 Data: 06 Sep 2010 Oil roller lubrication malfunction Segment not perfectly centred Damaged segment Blocked cavities Fill leakage on gasket Fill leakage on spider tube Air bubbles Fill leakage in the net Leakage capsule or bad welding Deformed capsules Air bubbles in the capsule fill Segment not perfectly centred Damaged segment The segment do not Continuous fill leakage from the segment Die rolls not aligned Low segment temperature Gelatine residual glued to the segment Too high production speed Ribbon not perfectly regular Segment temperature too high Damaged segment teflon coating Gelatine residual in the die roll cavities Segment not perfectly centred Damaged segment Shut off valve in wrong position Air bubbles in the hopper fill Check the oil level in the back tank Check the “elastoflex “ fast connection of oil roller feeding Check the pressure set in the lubrication tanks Call service Put the segment in centre again Replace the segment Dismantle and clean Check plungers gasket and shut off valve gasket Check piepes and connections Try to increase the injection pump stroke Put the segment in centre again Replace the segment Check and eventually replace with a proper segment Air inclusion in the fill line gasket Check alignment and adjust Increase temperature Clean the segment surface with hot water wet cloth Lower the speed Check and adjust Lower the temperature Replace segment Check and replace Put segment in centre again Replace segment Check Check the gasket between fill tank and fill pump , and the fill pump seal