1
StorageTek 8 Gb FC PCI-Express
HBA, Emulex Installation Guide For
HBA Models SG-XPCIE1FC-EM8-Z,
SG-PCIE1FC-EM8-Z, SG-XPCIE1FCEM8-N, SG-PCIE1FC-EM8-N and SGXPCIE2FC-EM8-Z, SG-PCIE2FC-EM8-Z,
SG-XPCIE2FC-EM8-N, SG-PCIE2FC-EM8N, 7105391
Part No: E20759-04
August 2015
Part No: E20759-04
Copyright © 2014, 2015, Oracle and/or its affiliates. All rights reserved.
This software and related documentation are provided under a license agreement containing restrictions on use and disclosure and are protected by intellectual property laws. Except
as expressly permitted in your license agreement or allowed by law, you may not use, copy, reproduce, translate, broadcast, modify, license, transmit, distribute, exhibit, perform,
publish, or display any part, in any form, or by any means. Reverse engineering, disassembly, or decompilation of this software, unless required by law for interoperability, is
prohibited.
The information contained herein is subject to change without notice and is not warranted to be error-free. If you find any errors, please report them to us in writing.
If this is software or related documentation that is delivered to the U.S. Government or anyone licensing it on behalf of the U.S. Government, then the following notice is applicable:
U.S. GOVERNMENT END USERS. Oracle programs, including any operating system, integrated software, any programs installed on the hardware, and/or documentation, delivered
to U.S. Government end users are "commercial computer software" pursuant to the applicable Federal Acquisition Regulation and agency-specific supplemental regulations. As
such, use, duplication, disclosure, modification, and adaptation of the programs, including any operating system, integrated software, any programs installed on the hardware, and/or
documentation, shall be subject to license terms and license restrictions applicable to the programs. No other rights are granted to the U.S. Government.
This software or hardware is developed for general use in a variety of information management applications. It is not developed or intended for use in any inherently dangerous
applications, including applications that may create a risk of personal injury. If you use this software or hardware in dangerous applications, then you shall be responsible to take all
appropriate fail-safe, backup, redundancy, and other measures to ensure its safe use. Oracle Corporation and its affiliates disclaim any liability for any damages caused by use of this
software or hardware in dangerous applications.
Oracle and Java are registered trademarks of Oracle and/or its affiliates. Other names may be trademarks of their respective owners.
Intel and Intel Xeon are trademarks or registered trademarks of Intel Corporation. All SPARC trademarks are used under license and are trademarks or registered trademarks of
SPARC International, Inc. AMD, Opteron, the AMD logo, and the AMD Opteron logo are trademarks or registered trademarks of Advanced Micro Devices. UNIX is a registered
trademark of The Open Group.
This software or hardware and documentation may provide access to or information about content, products, and services from third parties. Oracle Corporation and its affiliates are
not responsible for and expressly disclaim all warranties of any kind with respect to third-party content, products, and services unless otherwise set forth in an applicable agreement
between you and Oracle. Oracle Corporation and its affiliates will not be responsible for any loss, costs, or damages incurred due to your access to or use of third-party content,
products, or services, except as set forth in an applicable agreement between you and Oracle.
Documentation Accessibility
For information about Oracle's commitment to accessibility, visit the Oracle Accessibility Program website at http://www.oracle.com/pls/topic/lookup?ctx=acc&id=docacc.
Access to Oracle Support
Oracle customers that have purchased support have access to electronic support through My Oracle Support. For information, visit http://www.oracle.com/pls/topic/lookup?
ctx=acc&id=info or visit http://www.oracle.com/pls/topic/lookup?ctx=acc&id=trs if you are hearing impaired.
Référence: E20759-04
Copyright © 2014, 2015, Oracle et/ou ses affiliés. Tous droits réservés.
Ce logiciel et la documentation qui l’accompagne sont protégés par les lois sur la propriété intellectuelle. Ils sont concédés sous licence et soumis à des restrictions d’utilisation et
de divulgation. Sauf stipulation expresse de votre contrat de licence ou de la loi, vous ne pouvez pas copier, reproduire, traduire, diffuser, modifier, breveter, transmettre, distribuer,
exposer, exécuter, publier ou afficher le logiciel, même partiellement, sous quelque forme et par quelque procédé que ce soit. Par ailleurs, il est interdit de procéder à toute ingénierie
inverse du logiciel, de le désassembler ou de le décompiler, excepté à des fins d’interopérabilité avec des logiciels tiers ou tel que prescrit par la loi.
Les informations fournies dans ce document sont susceptibles de modification sans préavis. Par ailleurs, Oracle Corporation ne garantit pas qu’elles soient exemptes d’erreurs et vous
invite, le cas échéant, à lui en faire part par écrit.
Si ce logiciel, ou la documentation qui l’accompagne, est concédé sous licence au Gouvernement des Etats-Unis, ou à toute entité qui délivre la licence de ce logiciel ou l’utilise pour
le compte du Gouvernement des Etats-Unis, la notice suivante s’applique:
U.S. GOVERNMENT END USERS. Oracle programs, including any operating system, integrated software, any programs installed on the hardware, and/or documentation, delivered
to U.S. Government end users are "commercial computer software" pursuant to the applicable Federal Acquisition Regulation and agency-specific supplemental regulations. As
such, use, duplication, disclosure, modification, and adaptation of the programs, including any operating system, integrated software, any programs installed on the hardware, and/or
documentation, shall be subject to license terms and license restrictions applicable to the programs. No other rights are granted to the U.S. Government.
Ce logiciel ou matériel a été développé pour un usage général dans le cadre d’applications de gestion des informations. Ce logiciel ou matériel n’est pas conçu ni n’est destiné
à être utilisé dans des applications à risque, notamment dans des applications pouvant causer des dommages corporels. Si vous utilisez ce logiciel ou matériel dans le cadre d’
applications dangereuses, il est de votre responsabilité de prendre toutes les mesures de secours, de sauvegarde, de redondance et autres mesures nécessaires à son utilisation dans des
conditions optimales de sécurité. Oracle Corporation et ses affiliés déclinent toute responsabilité quant aux dommages causés par l’utilisation de ce logiciel ou matériel pour ce type
d’applications.
Oracle et Java sont des marques déposées d’Oracle Corporation et/ou de ses affiliés. Tout autre nom mentionné peut correspondre à des marques appartenant à d’autres propriétaires
qu’Oracle.
Intel et Intel Xeon sont des marques ou des marques déposées d’Intel Corporation. Toutes les marques SPARC sont utilisées sous licence et sont des marques ou des marques
déposées de SPARC International, Inc. AMD, Opteron, le logo AMD et le logo AMD Opteron sont des marques ou des marques déposées d’Advanced Micro Devices. UNIX est une
marque déposée d’The Open Group.
Ce logiciel ou matériel et la documentation qui l’accompagne peuvent fournir des informations ou des liens donnant accès à des contenus, des produits et des services émanant de
tiers. Oracle Corporation et ses affiliés déclinent toute responsabilité ou garantie expresse quant aux contenus, produits ou services émanant de tiers, sauf mention contraire stipulée
dans un contrat entre vous et Oracle. En aucun cas, Oracle Corporation et ses affiliés ne sauraient être tenus pour responsables des pertes subies, des coûts occasionnés ou des
dommages causés par l’accès à des contenus, produits ou services tiers, ou à leur utilisation, sauf mention contraire stipulée dans un contrat entre vous et Oracle.
Accessibilité de la documentation
Pour plus d’informations sur l’engagement d’Oracle pour l’accessibilité à la documentation, visitez le site Web Oracle Accessibility Program, à l’adresse http://www.oracle.com/
pls/topic/lookup?ctx=acc&id=docacc.
Accès au support électronique
Les clients Oracle qui ont souscrit un contrat de support ont accès au support électronique via My Oracle Support. Pour plus d’informations, visitez le site http://www.oracle.com/
pls/topic/lookup?ctx=acc&id=info ou le site http://www.oracle.com/pls/topic/lookup?ctx=acc&id=trs si vous êtes malentendant.
Contents
Using This Documentation ................................................................................. 7
1 HBA Overview ................................................................................................. 9
Kit Contents ................................................................................................... 9
HBA Features and Specifications ....................................................................... 9
Operating System and Technology Requirements ................................................ 11
System Interoperability ................................................................................... 11
Host Platform Support ............................................................................ 11
Storage Support .................................................................................... 13
Switch Support ..................................................................................... 14
Boot Support ................................................................................................ 15
Environmental Requirements ........................................................................... 15
2 Hardware Installation and Removal .............................................................. 17
Observing ESD and Handling Precautions ......................................................... 17
Installing the Hardware .................................................................................. 18
▼ To Install the HBA ........................................................................... 18
▼ To Connect the Optical Cable ............................................................. 22
▼ To Apply Power .............................................................................. 23
(LED) Status ........................................................................................ 24
Testing the Installation ................................................................................... 25
▼ To Verify Proper Installation (Oracle Solaris) ........................................ 25
▼ To Verify Attached Storage (Oracle Solaris) .......................................... 28
Replacing the SFP+ Unit on the HBA ............................................................... 30
Removing the Hardware ................................................................................. 30
▼ To Remove the Hardware .................................................................. 30
▼ To Remove the HBA Hardware .......................................................... 31
3 HBA Software Installation ............................................................................. 33
Driver Software for the Oracle Solaris OS ......................................................... 33
5
Contents
Oracle Solaris Diagnostic Support ............................................................ 33
Installing Software For the Red Hat and SUSE Linux OSes .................................. 34
▼ To Install the HBA Software For the Linux OS ...................................... 34
▼ To Install the HBA Software For the VMware Technology ....................... 35
Installing Software For the Windows Server 2008 or Windows Server 2012 OS ......... 35
▼ To Install the Software For the Windows Server 2008 or Windows Server
2012 OS .............................................................................................. 36
Configuration and Diagnostic Utilities ............................................................... 36
4 Known Issues ................................................................................................ 37
Reboot Fails on the SPARC Enterprise M8000 System ......................................... 37
6
StorageTek 8 Gb FC PCI-Express HBA, Emulex Installation Guide For HBA Models SG-XPCIE1FC-EM8-Z, SGPCIE1FC-EM8-Z, SG-XPCIE1FC-EM8-N, SG-PCIE1FC-EM8-N and SG-XPCIE2FC-EM8-Z, SG-PCIE2FC-EM8-Z,
SG-XPCIE2FC-EM8-N, SG-PCIE2FC-EM8-N, 7105391 • August 2015
Using This Documentation
■
■
■
Overview – Describes how to install and maintain the host bus adapter
Audience – Technicians, system administrators, and authorized service providers
Required knowledge – Advanced experience troubleshooting and replacing hardware
Product Documentation Library
Documentation and resources for this product and related products are available at http://
docs.oracle.com/cd/E19292-01/index.html.
Feedback
Provide feedback about this documentation at http://www.oracle.com/goto/docfeedback.
Using This Documentation
7
8
StorageTek 8 Gb FC PCI-Express HBA, Emulex Installation Guide For HBA Models SG-XPCIE1FC-EM8-Z, SGPCIE1FC-EM8-Z, SG-XPCIE1FC-EM8-N, SG-PCIE1FC-EM8-N and SG-XPCIE2FC-EM8-Z, SG-PCIE2FC-EM8-Z,
SG-XPCIE2FC-EM8-N, SG-PCIE2FC-EM8-N, 7105391 • August 2015
1
♦ ♦ ♦ C H A P T E R 1 HBA Overview
This chapter provides a basic overview of the single and dual port StorageTek 8 Gb Fibre
Channel (FC) PCI-Express host bus adapter (HBA), Emulex (referred to as StorageTek 8
Gb FC PCI-Express HBA in this document), which uses Emulex technology. This chapter
also describes the various operating systems, host platforms, storage, and infrastructure
configurations that support the HBA and lists the HBA environmental requirements.
This chapter contains the following topics:
■
■
■
■
■
■
■
“Kit Contents” on page 9
“HBA Features and Specifications” on page 9
“System Interoperability” on page 11
“Operating System and Technology Requirements” on page 11
“System Interoperability” on page 11
“Boot Support” on page 15
“Environmental Requirements” on page 15
Kit Contents
■
■
■
■
StorageTek 8 Gb FC PCI-Express HBA, Emulex
Extra PCI full-size bracket
Accessing Documentation document
P002403-05A China RoHS Material disclosure
HBA Features and Specifications
The StorageTek 8 Gb FC PCI-Express HBA, Emulex (single port: SG-XPCIE1FC-EM8-Z,
SG-PCIE1FC-EM8-Z, SG-XPCIE1FC-EM8-N, SG-PCIE1FC-EM8-N, 7105391 dual port:
SG-XPCIE2FC-EM8-Z, SG-PCIE2FC-EM8-Z, SG-XPCIE2FC-EM8-N, SG-PCIE2FCEM8-N) consists of a single-wide, FC bus expansion board. The board interfaces a four- or
eight-lane PCI-Express bus, with the four or eight lanes supporting one or two Fibre Channel
Chapter 1 • HBA Overview
9
HBA Features and Specifications
(FC) optical media ports. Each independent FC port operates at 8 Gbit/sec and features 8/4/2
autonegotiation.
See Table 1-1 for a list of the HBA features.
TABLE 1-1
HBA Features and Specifications
Feature
Description
PCIconnector
x8
PCI signaling environment
PCI Express x8 (8 active lanes)
PCI lane usage
x8 lanes
PCItransfer rate (maximum)
PCI Express Generation One x8 (2.5 GT/s) in an electrically x8 slot (default)
PCI Express Generation Two x4 (5.0 GT/s) in an electrically x4 slot
Number of FC ports
One (single port) or Two (dual port)
Number of devices supported
126 devices per FC loop; 510 devices in Fabric mode
FC bus type (external)
Fiber-optic media, short-wave, multi-mode fiber (400‐M5- SN-S)
FC transfer rate
400 MBps per port maximum, half-duplex
800 MBps per port maximum, full-duplex
FC topologies
Switched fabric (N-Port), arbitrated loop (NL-Port), and point-to-point (N-Port)
RAM
1.5 MB, parity protected, per port
BIOS ROM (FC)
One 4-MB (dual-port) or 2-MB (single-port) flash ROM
NVRAM
One 2-KB EEPROM per port
External connectors
One Small-Form Factor Pluggable (SFP) multimode optic with LC-style connectors per port
Maximum FC cable length
2 Gb/s: 500 meters using 50/125 mm core OM3 fiber
300 meters using 50/125 mm core OM2 fiber
150 meters using 62.5/125 mm core OM1 fiber
4 Gb/s: 380 meters using 50/125 mm core OM3 fiber
150 meters using 50/125 mm core OM2 fiber
70 meters using 62.5/125 mm core OM1 fiber
8 Gb/s: 150 meters using 50/125 mm core OM3 fiber
50 meters using 50/125 mm core OM2 fiber
21 meters using 62.5/125 mm core OM1 fiber
LED indicators
Two LEDs per port (yellow and green) on the front panel as status indicators.
Maximum power consumption
13.3W (dual port), 10.1W (signal port)
Form Factor
Low-profile MD2 form factor
10
StorageTek 8 Gb FC PCI-Express HBA, Emulex Installation Guide For HBA Models SG-XPCIE1FC-EM8-Z, SGPCIE1FC-EM8-Z, SG-XPCIE1FC-EM8-N, SG-PCIE1FC-EM8-N and SG-XPCIE2FC-EM8-Z, SG-PCIE2FC-EM8-Z,
SG-XPCIE2FC-EM8-N, SG-PCIE2FC-EM8-N, 7105391 • August 2015
Operating System and Technology Requirements
Operating System and Technology Requirements
The HBA requires the OS and technology levels listed in Table 1-2.
TABLE 1-2
Supported Operating System/Technology Versions (Minimum) Operating System/Technology
Supported Versions (minimum)
Oracle Solaris OS for the x86 (64-bit) platform
■ Oracle Solaris 10 01/13 with patches 149174-04, 144189-02, and 150401-16
■ Oracle Solaris 11.1 with SRU 16
■ Oracle Solaris 11.2
To obtain the latest patches and SRUs, go to http://support.oracle.com
Oracle Solaris OS for the SPARC (64-bit) platform
■ Oracle Solaris 10 01/13 with patches 149173-04, 144188-02, and 150400-16
■ Oracle Solaris 11.1 with SRU 16
■ Oracle Solaris 11.2
To obtain the latest patches and SRUs, go to http://support.oracle.com
Linux OS
■ Oracle Linux 5.9 (Red Hat Compatible Kernel (RHCK) and Unbreakable
Enterprise Kernel (UEK) 2, at minimum)
■ Oracle Linux 6.4 (RHCK and UEK2, at minimum)
■ Red Hat Enterprise Linux 5.9 (64-bit)
■ Red Hat Enterprise Linux 6.4 (64-bit)
■ SUSE Linux Enterprise Server 11 SP2 (32-bit and 64-bit)
Microsoft Windows OS Standard, Enterprise, and
Datacenter Editions
■ Window Server 2008 R2 including SP1
■ Windows Server 2012
VMware Technology
■ VMware ESX/ESXi 5.0
■ VMware ESX/ESXi 5.1
System Interoperability
This section provides information about selected platforms and storage that are compatible with
the heterogeneous FC network design of the HBA. This section contains the following topics:
■
■
■
“Host Platform Support” on page 11
“Storage Support” on page 13
“Switch Support ” on page 14
Host Platform Support
The HBA is supported by the platforms listed in Table 1-3. For up-to-date information, see your
system Product Notes and web pages.
Chapter 1 • HBA Overview
11
System Interoperability
TABLE 1-3
Platform Support
Platform
Supported OS/Technology
Oracle SPARC Servers
SPARC Enterprise T2000
Oracle Solaris
SPARC Enterprise T5120
Oracle Solaris
SPARC Enterprise T5140
Oracle Solaris
SPARC Enterprise T5220
Oracle Solaris
SPARC Enterprise T5240
Oracle Solaris
SPARC Enterprise T5440
Oracle Solaris
SPARC Enterprise M4000
Oracle Solaris
SPARC Enterprise M5000
Oracle Solaris
SPARC Enterprise M8000
Oracle Solaris
SPARC Enterprise M9000-32
Oracle Solaris
SPARC Enterprise M9000-64
Oracle Solaris
SPARC M5-32
SPARC T4-1
Oracle Solaris
SPARC T4-2
Oracle Solaris
SPARC T5-2
Oracle Solaris
SPARC T5-4
Oracle Solaris
SPARC T5-8
Oracle Solaris
Sun Fire V445
Oracle Solaris
Sun Fire V245
Oracle Solaris
Sun Ultra U45
Oracle Solaris
Oracle x86 Servers
Sun Blade X4-2B
Sun Fire X4100 M2
Oracle Solaris, Windows, Linux, VMware
Sun Fire X4200 M2
Oracle Solaris, Windows, Linux, VMware
Sun Fire X4600
Oracle Solaris, Windows, Linux, VMware
Sun Fire X4600 M2
Oracle Solaris, Windows, Linux, VMware
Sun Fire X4440
Oracle Solaris, Windows, Linux, VMware
Sun Fire X4450
Sun Fire X4240
Oracle Solaris, Windows, Linux, VMware
Sun Fire X4140
Oracle Solaris, Windows, Linux, VMware
Sun Fire X4150
12
Sun Fire X2100 M2
Oracle Solaris, Windows, Linux, VMware
Sun Fire X2200 M2
Oracle Solaris, Windows, Linux, VMware
Sun Server X2-4
Oracle Solaris, Linux, VMware, and Windows
Sun Server X3-2
Oracle Solaris, Linux, VMware, and Windows
Sun Server X3-2L
Oracle Solaris, Linux, VMware, and Windows
StorageTek 8 Gb FC PCI-Express HBA, Emulex Installation Guide For HBA Models SG-XPCIE1FC-EM8-Z, SGPCIE1FC-EM8-Z, SG-XPCIE1FC-EM8-N, SG-PCIE1FC-EM8-N and SG-XPCIE2FC-EM8-Z, SG-PCIE2FC-EM8-Z,
SG-XPCIE2FC-EM8-N, SG-PCIE2FC-EM8-N, 7105391 • August 2015
System Interoperability
Platform
Supported OS/Technology
Sun Server X4-2
Oracle Solaris, Linux, VMware, and Windows
Sun Server X4-2L
Oracle Solaris, Linux, VMware, and Windows
The host system must have at least one PCI-Express 8-lane slot to support the HBA.
Storage Support
This section lists the arrays and tape storage supported by the HBA. This section contains the
following topics:
■
■
■
“Array Support” on page 13
“Storage System Support” on page 13
“Tape Storage Support” on page 13
Array Support
The HBA supports connecting to, using a supported switch, the following arrays:
■
■
■
StorageTek 2540
StorageTek 6140
StorageTek 6540
Storage System Support
The HBA supports connecting to, using a supported switch, the following storage systems:
■
■
■
StorageTek 9990
StorageTek 9980/9985
StorageTek 9970
Tape Storage Support
The HBA supports connecting to, using a supported switch, the following tape storage:
■
■
■
StorageTek SL48 tape library
StorageTek SL24 tape autoloader
StorageTek SL500 modular library
Chapter 1 • HBA Overview
13
System Interoperability
■
■
■
■
■
■
■
■
■
■
StorageTek SL1400 tape library
StorageTek SL3000 tape library
StorageTek L8500 modular library
StorageTek Virtual Tape Library (VTL): VTL Value and VTL Plus
StorageTek T10000A and T10000B
StorageTek T9840C, and T9840D tape drives
StorageTek T9940B tape drive
IBM and HP LT03 tape drives
IBM and HP LT04 tape drives
Quantum S4 tape drive
Switch Support
The HBA supports the following Fibre Channel switches:
■
■
■
■
■
■
■
■
■
■
■
■
■
■
■
■
■
■
■
■
■
Brocade DCX backbone switch
Brocade 200E switch
Brocade 300 switch
Brocade SW4100 switch
Brocade SW4900 switch
Brocade SW5000 switch
Brocade SW5100 switch
Brocade SW5300 switch
Brocade SW7500 switch
Cisco MDS9124 24-port multilayer fabric switch
Cisco MDS 9134 multilayer fabric switch
Cisco MDS 9140 multilayer fabric switch
Cisco MDS 9216A multilayer fabric switch
Cisco MDS 9216i multilayer fabric switch
Cisco MDS 9222i multiservice modular switch
Cisco MDS 9509 multilayer director
Cisco MDS 9513 multilayer director
McData Mi10K director
McData 6140 director
QLogic 9000
QLogic 5800
The HBA is supported by all 1-Gb Ethernet switches.
14
StorageTek 8 Gb FC PCI-Express HBA, Emulex Installation Guide For HBA Models SG-XPCIE1FC-EM8-Z, SGPCIE1FC-EM8-Z, SG-XPCIE1FC-EM8-N, SG-PCIE1FC-EM8-N and SG-XPCIE2FC-EM8-Z, SG-PCIE2FC-EM8-Z,
SG-XPCIE2FC-EM8-N, SG-PCIE2FC-EM8-N, 7105391 • August 2015
Boot Support
Boot Support
The HBA supports the following minimum boot types:
■
■
■
■
■
■
■
■
Oracle Solaris 10 01/13 for the x86 and SPARC environments
Oracle Solaris 11.1 for the x86 and SPARC environments
Preboot Execution Environment (PXE) boot capable (for x86 systems)
RHEL 5.9 and 6.4
SLES 11 SP2
VMware ESX/ESXi 5.0 and 5.1
Windows Server 2008, R2 including SP1
Windows Server 2012
Environmental Requirements
The HBA environmental requirements are listed in Table 1-4.
TABLE 1-4
HBA Environmental Requirements Specification
Operating
Non-Operating
Temperature
0˚ to 55˚C, non-condensing
-40˚C to 70˚C, non-condensing
Airflow
150 lfm
n/a
Humidity
10% to 90% RH, non-condensing, 27˚C max wet bulb
93% RH, nonconducting, 38˚C max wet bulb
Altitude
3200m
12,200m
Vibration
0.20G in all axes swept for 5-500 Hz sine
1.0G in all axes 5-500-5 Hz sine
Shock
5G, 11 ms half-sine
30G, 11 ms half-sine
Chapter 1 • HBA Overview
15
16
StorageTek 8 Gb FC PCI-Express HBA, Emulex Installation Guide For HBA Models SG-XPCIE1FC-EM8-Z, SGPCIE1FC-EM8-Z, SG-XPCIE1FC-EM8-N, SG-PCIE1FC-EM8-N and SG-XPCIE2FC-EM8-Z, SG-PCIE2FC-EM8-Z,
SG-XPCIE2FC-EM8-N, SG-PCIE2FC-EM8-N, 7105391 • August 2015
2
♦ ♦ ♦ C H A P T E R 2 Hardware Installation and Removal
This chapter describes the tasks required to install and remove the HBA. Refer to your system
installation or service manual for detailed instructions.
This chapter contains the following topics:
■
■
■
■
■
“Observing ESD and Handling Precautions” on page 17
“Installing the Hardware” on page 18
“Testing the Installation” on page 25“Testing the Installation” on page 25
“Replacing the SFP+ Unit on the HBA” on page 30
“Removing the Hardware” on page 30
Observing ESD and Handling Precautions
Caution - Damage to the HBA can occur as the result of careless handling or electrostatic
discharge (ESD). Always handle the HBA with care to avoid damage to electrostatic sensitive
components.
To minimize the possibility of ESD-related damage, use both a workstation antistatic mat and
an ESD wrist strap. You can get an ESD wrist strap from any reputable electronics store or from
Oracle as part number #250-1007. Observe the following precautions to avoid ESD-related
problems:
■
■
■
■
Leave the HBA in its antistatic bag until you are ready to install it in the system.
Always use a properly fitted and grounded wrist strap or other suitable ESD protection
when handling the HBA, and observe proper ESD grounding techniques.
Hold the HBA by the edge of the PCB, not by the connectors.
Place the HBA on a properly grounded antistatic work surface pad when it is out of its
protective antistatic bag.
Chapter 2 • Hardware Installation and Removal
17
Installing the Hardware
Installing the Hardware
The hardware installation process involves the following general steps, as described in these
sections:
■
■
■
■
■
“To Install the HBA” on page 18
“To Connect the Optical Cable” on page 22
“To Apply Power” on page 23
“To Verify Proper Installation (Oracle Solaris)” on page 25
“To Verify Attached Storage (Oracle Solaris)” on page 28
To Install the HBA
The HBA comes with a low-profile PCIe bracket installed. A standard bracket is included in
the box with the HBA. The low-profile mounting bracket is shorter than the standard bracket;
approximately 3.11 in. (7.9 cm) compared to 4.75 in. (12.06 cm). If you need to change the
bracket for HBA installation, you must first remove the optical transceiver (two transceivers on
the two-port adapter) from its housing. This procedure covers how to install the HBA and, if
necessary, how to remove the transceiver and change the bracket safely.
The HBA uses different types of transceivers. This procedure shows an example of one type.
1.
Attach an antistatic strap (refer to “Observing ESD and Handling
Precautions” on page 17).
2.
Refer to your system installation or service manual to determine an appropriate
PCI-Express slot in which to install the HBA.
3.
Shut down, power off, and unplug the system, if required.
4.
Remove the system case.
5.
Remove the blank panel from an empty PCI-Express slot.
6.
(Optional) Perform the following steps to replace the PCI bracket.
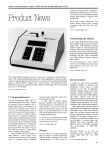
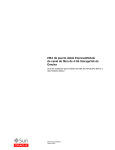
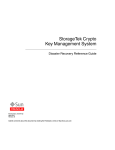
a. Remove the transceiver from its cage assembly (see Figure 2-2) by pulling
the bail (handle) out and down to release the latch and gently pull the
transceiver out of its housing.
Do not force it. After the latch is released, the transceiver slides out easily..
Caution - This is a delicate operation–take care not to damage the transceiver.
18
StorageTek 8 Gb FC PCI-Express HBA, Emulex Installation Guide For HBA Models SG-XPCIE1FC-EM8-Z, SGPCIE1FC-EM8-Z, SG-XPCIE1FC-EM8-N, SG-PCIE1FC-EM8-N and SG-XPCIE2FC-EM8-Z, SG-PCIE2FC-EM8-Z,
SG-XPCIE2FC-EM8-N, SG-PCIE2FC-EM8-N, 7105391 • August 2015
To Install the HBA
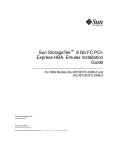
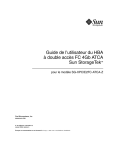
FIGURE 2-1
Optical Transceiver
Chapter 2 • Hardware Installation and Removal
19
To Install the HBA
FIGURE 2-2
A Partly Extracted Optical Transceiver and an Optical Transciever That is Latched
In Place
b. Observing ESD precautions, store the transceiver in an ESD-safe place.
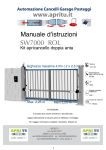
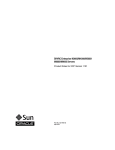
c. Remove the mounting bracket screws from the top of the HBA.
20
StorageTek 8 Gb FC PCI-Express HBA, Emulex Installation Guide For HBA Models SG-XPCIE1FC-EM8-Z, SGPCIE1FC-EM8-Z, SG-XPCIE1FC-EM8-N, SG-PCIE1FC-EM8-N and SG-XPCIE2FC-EM8-Z, SG-PCIE2FC-EM8-Z,
SG-XPCIE2FC-EM8-N, SG-PCIE2FC-EM8-N, 7105391 • August 2015
To Install the HBA
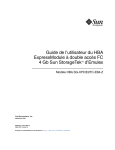
FIGURE 2-3
Removing the Bracket Mounting Screws
d. Remove the bracket and store it for future use.
e. Align the new mounting bracket tabs with the holes in the HBA.
Caution - Be careful not to push the bracket past the transceiver housing's grounding tabs.
Make sure the LEDs are properly aligned with the holes in the bracket.
f. Re-install the screws that attach the HBA to the bracket.
g. Re-install the transceiver by sliding it into the housing.
When the latch engages, it clicks.
h. Push the bail back into place.
7.
Insert the HBA into the empty PCI-Express 8-lane slot and press firmly until the
adapter is seated.
8.
Secure the mounting bracket of the HBA to the case with the panel screw or clip.
9.
Replace the computer case and tighten the case screws.
Chapter 2 • Hardware Installation and Removal
21
To Connect the Optical Cable
The HBA is now installed in the computer and is ready for media attachment.
To Connect the Optical Cable
Note - The HBA does not allow normal data transmission on an optical link unless it is
connected to another similar or compatible Fibre Channel product (that is, multimode to
multimode).
Use multimode fiber-optic cable, intended for short-wave lasers, that adheres to the
specifications in the following table.
Fiber-Optic Cable
Maximum Length
Minimum Length
Connector
OM3 - Multimode 50/125 micron fiber (2000
MHz*km bandwidth cable)
2.125 Gb/s: 0.5m - 500m
.5 meters
LC
.5 meters
LC
.5 meters
LC
4.25 Gb/s: 0.5m - 380m
8.5 Gb/s 0.5m – 150m
OM2 - Multimode 50/125 micron fiber (500
MHz*km bandwidth cable)
2.125 Gb/s: 0.5m – 300m
4.25 Gb/s: 0.5m – 150m
8.5 Gb/s 0.5m – 50m
OM1 - Multimode 62.5/125 micron fiber (200
MHz*km bandwidth cable)
2.125 Gb/s: 0.5m – 150m
4.25 Gb/s: 0.5m – 70m
8.5 Gb/s 0.5m – 21m
1.
22
Connect the fiber-optic cable to an LC connector on the HBA (see Figure 2-4).
StorageTek 8 Gb FC PCI-Express HBA, Emulex Installation Guide For HBA Models SG-XPCIE1FC-EM8-Z, SGPCIE1FC-EM8-Z, SG-XPCIE1FC-EM8-N, SG-PCIE1FC-EM8-N and SG-XPCIE2FC-EM8-Z, SG-PCIE2FC-EM8-Z,
SG-XPCIE2FC-EM8-N, SG-PCIE2FC-EM8-N, 7105391 • August 2015
To Apply Power
FIGURE 2-4
2.
Attaching the Optical Cable
Connect the other end of the cable to the FC device.
After the optical cable is connected to the HBA, you can power on the system.
To Apply Power
1.
Verify that the HBA is securely installed in the system.
2.
Verify that the correct fiber-optic cable is attached.
3.
Refer to your system installation or service manual to determine how to power
on the system.
Chapter 2 • Hardware Installation and Removal
23
To Apply Power
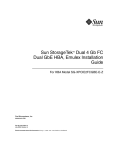
(LED) Status
Yellow and green LEDs can be seen through openings in the mounting bracket of the HBA.
Each port has a corresponding set of yellow and green LEDs (see Figure 2-5).
FIGURE 2-5
LEDs
Figure Legend
1
2
24
Port 0 LEDs
Port 1 LEDs
StorageTek 8 Gb FC PCI-Express HBA, Emulex Installation Guide For HBA Models SG-XPCIE1FC-EM8-Z, SGPCIE1FC-EM8-Z, SG-XPCIE1FC-EM8-N, SG-PCIE1FC-EM8-N and SG-XPCIE2FC-EM8-Z, SG-PCIE2FC-EM8-Z,
SG-XPCIE2FC-EM8-N, SG-PCIE2FC-EM8-N, 7105391 • August 2015
Testing the Installation
Observe the light-emitting diode (LED) status for the power-on self test (POST) results as
shown in the following table.
Green LED
Yellow LED
State
Off
Off
Wake-Up Failure (Dead Board)
Off
On
POST failure (Dead Board)
Off
Slow Blink
Wake-Up Failure Monitor
Off
Fast Blink
Failure in POST
Off
Flashing
POST Processing in Progress
On
Off
Failure While Functioning
On
On
Failure While Functioning
On
2 Fast Blinks
2 Gb Link Rate – Normal, Link up
On
3 Fast Blinks
4 Gb Link Rate – Normal, Link up
On
4 Fast Blinks
8 Gb Link Rate – Normal, Link up
Slow Blink
Off
Normal – Link Down or not started
Slow Blink
On
Not Defined
Slow Blink
Slow Blink
Off-line for Download
Slow Blink
Fast Blink
Restricted Off-line Mode (Waiting for Restart)
Slow Blink
Flashing
Restricted Off-line Mode, Test Active
Fast blink
Off
Debug Monitor in Restricted Mode
Fast blink
On
Not Defined
Testing the Installation
This section contains the following topics:
■
■
“To Verify Proper Installation (Oracle Solaris)” on page 25
“To Verify Attached Storage (Oracle Solaris)” on page 28
To Verify Proper Installation (Oracle Solaris)
1.
Use the show-devs command at the ok prompt to list the installed devices.
The HBA can be identified in the output by looking for the SUNW,emlxs@n and SUNW,emlxs@n,1
node names, where n is usually a single-digit number from 0 to 9. In this example, there are two
dual port and one single port HBAs installed.
{0} ok show-devs
/pci@7c0/pci@0
/pci@7c0/pci@0/pci@9
Chapter 2 • Hardware Installation and Removal
25
To Verify Proper Installation (Oracle Solaris)
/pci@7c0/pci@0/pci@8
/pci@7c0/pci@0/pci@2
/pci@7c0/pci@0/pci@2
/pci@7c0/pci@0/pci@1
/pci@7c0/pci@0/pci@9/SUNW,emlxs@0,1
/pci@7c0/pci@0/pci@9/SUNW,emlxs@0
/pci@7c0/pci@0/pci@9/SUNW,emlxs@0,1/fp@0,0
(continued)
/pci@7c0/pci@0/pci@9/SUNW,emlxs@0,1/fp@0,0/disk
/pci@7c0/pci@0/pci@9/SUNW,emlxs@0/fp@0,0
/pci@7c0/pci@0/pci@9/SUNW,emlxs@0/fp@0,0/disk
/pci@7c0/pci@0/pci@8/SUNW,emlxs@0
/pci@7c0/pci@0/pci@8/SUNW,emlxs@0/fp@0,0
/pci@7c0/pci@0/pci@8/SUNW,emlxs@0/fp@0,0/tape/pci@7c0/pci@0/pci@8/SUNW,emlxs@0/fp@0,0/
disk
/pci@7c0/pci@0/pci@2/network@0,1
/pci@7c0/pci@0/pci@2/network@0
/pci@7c0/pci@0/pci@1/pci@0,2
/pci@7c0/pci@0/pci@1/pci@0
/pci@7c0/pci@0/pci@1/pci@0,2/SUNW,emlxs@2,1
/pci@7c0/pci@0/pci@1/pci@0,2/SUNW,emlxs@2
/pci@7c0/pci@0/pci@1/pci@0,2/SUNW,emlxs@1,1
/pci@7c0/pci@0/pci@1/pci@0,2/SUNW,emlxs@1
/pci@7c0/pci@0/pci@1/pci@0,2/SUNW,emlxs@2,1/fp@0,0
/pci@7c0/pci@0/pci@1/pci@0,2/SUNW,emlxs@2,1/fp@0,0/disk
/pci@7c0/pci@0/pci@1/pci@0,2/SUNW,emlxs@2/fp@0,0
/pci@7c0/pci@0/pci@1/pci@0,2/SUNW,emlxs@2/fp@0,0/disk
/pci@7c0/pci@0/pci@1/pci@0,2/SUNW,emlxs@1,1/fp@0,0
/pci@7c0/pci@0/pci@1/pci@0,2/SUNW,emlxs@1,1/fp@0,0/tape
/pci@7c0/pci@0/pci@1/pci@0,2/SUNW,emlxs@1,1/fp@0,0/disk
/pci@7c0/pci@0/pci@1/pci@0,2/SUNW,emlxs@1/fp@0,0
/pci@7c0/pci@0/pci@1/pci@0,2/SUNW,emlxs@1/fp@0,0/tape
/pci@7c0/pci@0/pci@1/pci@0,2/SUNW,emlxs@1/fp@0,0/disk
/pci@7c0/pci@0/pci@1/pci@0/ide@8
/pci@7c0/pci@0/pci@1/pci@0/usb@6
/pci@7c0/pci@0/pci@1/pci@0/usb@5
/pci@7c0/pci@0/pci@1/pci@0/isa@2
/pci@7c0/pci@0/pci@1/pci@0/ide@8/cdrom
/pci@7c0/pci@0/pci@1/pci@0/ide@8/disk
/pci@7c0/pci@0/pci@1/pci@0/usb@6/hub@1
/pci@7c0/pci@0/pci@1/pci@0/isa@2/serial@0,3f8
/pci@780/pci@0
/pci@780/pci@0/pci@9
/pci@780/pci@0/pci@8
/pci@780/pci@0/pci@2
/pci@780/pci@0/pci@1
/pci@780/pci@0/pci@9/scsi@0
(continued)
/pci@780/pci@0/pci@9/scsi@0/disk
26
StorageTek 8 Gb FC PCI-Express HBA, Emulex Installation Guide For HBA Models SG-XPCIE1FC-EM8-Z, SGPCIE1FC-EM8-Z, SG-XPCIE1FC-EM8-N, SG-PCIE1FC-EM8-N and SG-XPCIE2FC-EM8-Z, SG-PCIE2FC-EM8-Z,
SG-XPCIE2FC-EM8-N, SG-PCIE2FC-EM8-N, 7105391 • August 2015
To Verify Proper Installation (Oracle Solaris)
/pci@780/pci@0/pci@9/scsi@0/tape
/pci@780/pci@0/pci@8/SUNW,emlxs@0,1
/pci@780/pci@0/pci@8/SUNW,emlxs@0
/pci@780/pci@0/pci@8/SUNW,emlxs@0,1/fp@0,0
/pci@780/pci@0/pci@8/SUNW,emlxs@0,1/fp@0,0/tape
/pci@780/pci@0/pci@8/SUNW,emlxs@0,1/fp@0,0/disk
/pci@780/pci@0/pci@8/SUNW,emlxs@0/fp@0,0
/pci@780/pci@0/pci@8/SUNW,emlxs@0/fp@0,0/tape
/pci@780/pci@0/pci@8/SUNW,emlxs@0/fp@0,0/disk
/pci@780/pci@0/pci@1/network@0,1
/pci@780/pci@0/pci@1/network@0
/packages/SUNW,builtin-drivers
{c} ok
2.
To positively identify the port as a StorageTek 8 Gb FC port, use the cd command
to change to the SUNW,emlxs@n directories, and use the .properties command.
In this example, the .properties command output displays the properties of the two ports in a
dual port HBA.
ok cd /pci@780/pci@0/pci@8/SUNW,emlxs@0
{c} ok .properties
assigned-addresses
82060010 00000000 00300000 00000000
82060018 00000000 00304000 00000000
81060020 00000000 00000000 00000000
82060030 00000000 00340000 00000000
port_wwn
10 00 00 00 c9 71 be fc
node_wwn
20 00 00 00 c9 71 be fc
alternate-reg
01060020 00000000 00000000 00000000
reg
00060000 00000000 00000000 00000000
03060010 00000000 00000000 00000000
03060018 00000000 00000000 00000000
02060030 00000000 00000000 00000000
compatible
pciex10df,fc40.10df.fc42.3
pciex10df,fc40.10df.fc42
pciex10df,fc42
pciex10df,fc40.3
pciex10df,fc40
pciexclass,0c0400
pciexclass,0c04
clock-frequency
02625a00
#size-cells
00000000
#address-cells
00000002
copyright
Copyright (c) 2000-2007 Emulex
model
LPe12002-S
name
SUNW,emlxs
device_type
scsi-fcp
manufacturer
Emulex
fcode-version
3.01a1
fcode-rom-offset
0000c400
interrupts
00000001
class-code
000c0400
subsystem-id
0000fc42
00002000
00004000
00000100
00040000
00000100
00000000
00001000
00000100
00020000
Chapter 2 • Hardware Installation and Removal
27
To Verify Attached Storage (Oracle Solaris)
subsystem-vendor-id
revision-id
device-id
vendor-id
{c} ok
000010df
00000003
0000fc40
000010df
assigned-addresses
82080110 00000000 03504000
82080118 00000000 03506000
81080120 00000000 00003100
82080130 00000000 03580000
10 00 00 00 c9 4b 3b 39
20 00 00 00 c9 4b 3b 39
01080120 00000000 00000000
00080100 00000000 00000000
03080110 00000000 00000000
03080118 00000000 00000000
02080130 00000000 00000000
pci10df,fc20
02625a00
00000000
00000002
Copyright (c) 2008 Emulex
LPe12002-S
SUNW,emlxs
scsi-fcp
Emulex
1.50a8
0000c000
00000000
000c0400
00000002
00000000
00000010
00000000
00000000
0000fc22
000010df
00000002
0000fc20
000010df
port_wwn
node_wwn
alternate-reg
reg
compatible
clock-frequency
#size-cells
#address-cells
copyright
model
name
device_type
manufacturer
fcode-version
fcode-rom-offset
devsel-speed
class-code
interrupts
latency-timer
cache-line-size
max-latency
min-grant
subsystem-id
subsystem-vendor-id
revision-id
device-id
vendor-id
{0} ok
00000000
00000000
00000000
00000000
00002000
00002000
00000100
00040000
00000000
00000000
00000000
00000000
00000000
00000100
00000000
00001000
00000100
00020000
To Verify Attached Storage (Oracle Solaris)
If online storage is connected to the HBA, use the apply show-children command
to list the attached storage.
28
StorageTek 8 Gb FC PCI-Express HBA, Emulex Installation Guide For HBA Models SG-XPCIE1FC-EM8-Z, SGPCIE1FC-EM8-Z, SG-XPCIE1FC-EM8-N, SG-PCIE1FC-EM8-N and SG-XPCIE2FC-EM8-Z, SG-PCIE2FC-EM8-Z,
SG-XPCIE2FC-EM8-N, SG-PCIE2FC-EM8-N, 7105391 • August 2015
To Verify Attached Storage (Oracle Solaris)
Note - You might need to use the reset-all command before using the apply show-children
command.
In the example that follows, four SANS with 14 to 16 drives each and an FC tape drive are
attached to the two ports or a dual-port HBA.
{14} ok
Device
LUN
LUN
LUN
LUN
LUN
LUN
LUN
LUN
LUN
LUN
LUN
LUN
LUN
LUN
Device
LUN
LUN
LUN
LUN
LUN
LUN
LUN
LUN
LUN
LUN
LUN
LUN
LUN
LUN
LUN
LUN
show-children
PortID 10600 WWPN 200600a0b8220346
0
Disk
SUN
CSM100_R_FC
1
Disk
SUN
CSM100_R_FC
2
Disk
SUN
CSM100_R_FC
3
Disk
SUN
CSM100_R_FC
4
Disk
SUN
CSM100_R_FC
5
Disk
SUN
CSM100_R_FC
6
Disk
SUN
CSM100_R_FC
7
Disk
SUN
CSM100_R_FC
8
Disk
SUN
CSM100_R_FC
9
Disk
SUN
CSM100_R_FC
a
Disk
SUN
CSM100_R_FC
b
Disk
SUN
CSM100_R_FC
c
Disk
SUN
CSM100_R_FC
d
Disk
SUN
CSM100_R_FC
PortID 10700 WWPN 50020f2300006cee
0
Disk
SUN
T300
1
Disk
SUN
T300
2
Disk
SUN
T300
3
Disk
SUN
T300
4
Disk
SUN
T300
5
Disk
SUN
T300
6
Disk
SUN
T300
7
Disk
SUN
T300
8
Disk
SUN
T300
9
Disk
SUN
T300
a
Disk
SUN
T300
b
Disk
SUN
T300
c
Disk
SUN
T300
d
Disk
SUN
T300
e
Disk
SUN
T300
f
Disk
SUN
T300
(continued)
Device PortID 20600 WWPN 200600a0b8220345
LUN 0
Disk
SUN
CSM100_R_FC
LUN 1
Disk
SUN
CSM100_R_FC
LUN 2
Disk
SUN
CSM100_R_FC
LUN 3
Disk
SUN
CSM100_R_FC
LUN 4
Disk
SUN
CSM100_R_FC
LUN 5
Disk
SUN
CSM100_R_FC
LUN 6
Disk
SUN
CSM100_R_FC
0612
0612
0612
0612
0612
0612
0612
0612
0612
0612
0612
0612
0612
0612
0301
0301
0301
0301
0301
0301
0301
0301
0301
0301
0301
0301
0301
0301
0301
0301
0612
0612
0612
0612
0612
0612
0612
Chapter 2 • Hardware Installation and Removal
29
Replacing the SFP+ Unit on the HBA
LUN
LUN
LUN
LUN
LUN
LUN
LUN
Device
LUN
LUN
LUN
LUN
LUN
LUN
LUN
LUN
LUN
LUN
LUN
LUN
LUN
LUN
LUN
LUN
Device
LUN
{14} ok
7
Disk
SUN
CSM100_R_FC
0612
8
Disk
SUN
CSM100_R_FC
0612
9
Disk
SUN
CSM100_R_FC
0612
a
Disk
SUN
CSM100_R_FC
0612
b
Disk
SUN
CSM100_R_FC
0612
c
Disk
SUN
CSM100_R_FC
0612
d
Disk
SUN
CSM100_R_FC
0612
PortID 20700 WWPN 50020f2300003206
0
Disk
SUN
T300
0301
1
Disk
SUN
T300
0301
2
Disk
SUN
T300
0301
3
Disk
SUN
T300
0301
4
Disk
SUN
T300
0301
5
Disk
SUN
T300
0301
6
Disk
SUN
T300
0301
7
Disk
SUN
T300
0301
8
Disk
SUN
T300
0301
9
Disk
SUN
T300
0301
a
Disk
SUN
T300
0301
b
Disk
SUN
T300
0301
c
Disk
SUN
T300
0301
d
Disk
SUN
T300
0301
e
Disk
SUN
T300
0301
f
Disk
SUN
T300
0301
PortID 20900 WWPN 500104f00047457b
0
Removable Tape
STK
T9840B
1.34
Replacing the SFP+ Unit on the HBA
The Small Form Factor Pluggable (SFP+) optics unit on this card is considered a part of the
card, NOT as a separate field replaceable unit (FRU). Therefore, in the event that the SFP
+ unit malfunctions, you must return the entire card in order to receive a replacement SFP
+ unit. Always return any malfunctioning card with the SFP+ unit attached. For information
about removing the card from a system in order to return it, see “To Remove the HBA
Hardware” on page 31.
Removing the Hardware
To Remove the Hardware
The following procedures describe how to remove the HBA. Refer to your system installation
or service manual for detailed HBA adapter removal instructions.
30
StorageTek 8 Gb FC PCI-Express HBA, Emulex Installation Guide For HBA Models SG-XPCIE1FC-EM8-Z, SGPCIE1FC-EM8-Z, SG-XPCIE1FC-EM8-N, SG-PCIE1FC-EM8-N and SG-XPCIE2FC-EM8-Z, SG-PCIE2FC-EM8-Z,
SG-XPCIE2FC-EM8-N, SG-PCIE2FC-EM8-N, 7105391 • August 2015
To Remove the HBA Hardware
The hardware removal process involves these general steps:
1.
Halting the operating system and removing power from the server blade, or
computer.
2.
Removing the HBA hardware.
To Remove the HBA Hardware
1.
Use an ESD strap (refer to “Observing ESD and Handling
Precautions” on page 17).
2.
Refer to your system documentation to shut down, power off, and unplug the
system.
3.
Disconnect all cables.
4.
Unscrew the case screws and remove the system case.
5.
Remove the mounting bracket of the HBA from the system by unscrewing the
panel screw or removing the clip, whichever is being used.
You can now remove the HBA.
Chapter 2 • Hardware Installation and Removal
31
32
StorageTek 8 Gb FC PCI-Express HBA, Emulex Installation Guide For HBA Models SG-XPCIE1FC-EM8-Z, SGPCIE1FC-EM8-Z, SG-XPCIE1FC-EM8-N, SG-PCIE1FC-EM8-N and SG-XPCIE2FC-EM8-Z, SG-PCIE2FC-EM8-Z,
SG-XPCIE2FC-EM8-N, SG-PCIE2FC-EM8-N, 7105391 • August 2015
3
♦ ♦ ♦ C H A P T E R 3 HBA Software Installation
After you have completed the hardware installation and powered on the system, follow the
instructions in this chapter for your operating system to install the HBA driver and any other
utilities that are required.
This chapter contains the following topics:
■
■
■
■
“Driver Software for the Oracle Solaris OS” on page 33
“Installing Software For the Red Hat and SUSE Linux OSes” on page 34
“Installing Software For the Windows Server 2008 or Windows Server 2012
OS” on page 35
“Configuration and Diagnostic Utilities” on page 36
Driver Software for the Oracle Solaris OS
The HBA driver is included with the Oracle Solaris OS versions supported by the HBA (see
“Operating System and Technology Requirements” on page 11). The following additional
patches and SRUs are required:
■
■
■
Oracle Solaris 10 01/13 (for the SPARC environment): patches 149173-04, 144188-02,
and 150400-16 (or greater)
Oracle Solaris 10 1/13 (for the x86 environment): patches 149174-04, 144189-02, and
150401-16 (or greater)
Oracle Solaris 11.1: SRU 16
You can download the latest patches and SRUs from this web site: http://support.oracle.
com.
Oracle Solaris Diagnostic Support
Diagnostic support for the HBA is included in the Oracle VTS software. The Oracle VTS
software is available for download at: http://support.oracle.com/
Chapter 3 • HBA Software Installation
33
Installing Software For the Red Hat and SUSE Linux OSes
For information about the Oracle VTS software, see the Oracle VTS documentation at: http://
docs.oracle.com/cd/E19719-01/index.html
The emlxtest utility, which is included in the Oracle VTS software, supports the following
functions:
■
■
■
■
Connectivity verification
Firmware version and checksum test
Self-test
Loopback tests
■
■
■
■
External
Internal, single-bit
Internal, 10-bit
Mailbox
Installing Software For the Red Hat and SUSE Linux OSes
No updates are required to support the HBA on minimum supported versions of Linux.
For diagnostic support, you might need to rebuild the Linux driver. Before rebuilding the
drivers for Linux, you must have the required Linux OS installed on the hard disk. The driver
and utilities are available for download at the Emulex support site for Oracle.
To Install the HBA Software For the Linux OS
1.
Go to the Emulex support site for Oracle at:
http://www.emulex.com/downloads/oracle.html
34
2.
Locate the StorageTek section, and click the model number (SG-model-number) of
the HBA for which you want to install software.
3.
Locate the Linux Driver section, and click Download to copy the driver files to a
local file system.
4.
Click Download to copy the management utilities to a local file system.
5.
Click Manual to copy the PDF manual, and then follow the installation and
configuration procedures.
6.
Click PDF Manual to download installation, configuration, and troubleshooting
information.
StorageTek 8 Gb FC PCI-Express HBA, Emulex Installation Guide For HBA Models SG-XPCIE1FC-EM8-Z, SGPCIE1FC-EM8-Z, SG-XPCIE1FC-EM8-N, SG-PCIE1FC-EM8-N and SG-XPCIE2FC-EM8-Z, SG-PCIE2FC-EM8-Z,
SG-XPCIE2FC-EM8-N, SG-PCIE2FC-EM8-N, 7105391 • August 2015
To Install the HBA Software For the VMware Technology
7.
Install the driver for Linux as described in the Emulex Driver and Utilities for
Linux User Manual.
8.
Install the management utilities as described in the Emulex driver and utilities
documentation.
To Install the HBA Software For the VMware
Technology
You must obtain the drivers from VMware.
1.
Go to the Emulex support site for Oracle at:
http://www.emulex.com/downloads/oracle.html
2.
Locate the StorageTek section, and click the model number (SG-model-number) of
the HBA for which you want to install software.
3.
Click Download to copy the management utilities to a local file system.
4.
Click Manual to copy the PDF manual, and then follow the installation and
configuration procedures.
5.
Click PDF Manual to download installation, configuration, and troubleshooting
information.
6.
Obtain the driver from VMware and install the driver as described in the VMware
documentation.
7.
Install the management utilities as described in the Emulex driver and utilities
documentation.
Installing Software For the Windows Server 2008 or
Windows Server 2012 OS
The HBA driver and applications kits for the Windows Server 2003 or Windows Server 2008
OS is available for download at the Emulex support site for Oracle.
Chapter 3 • HBA Software Installation
35
To Install the Software For the Windows Server 2008 or Windows Server 2012 OS
To Install the Software For the Windows Server
2008 or Windows Server 2012 OS
1.
Go to the Emulex support site for Oracle at:
http://www.emulex.com/downloads/oracle.html
2.
Locate the StorageTek section, and click the model number (SG-model-number) of
the HBA for which you want to install software.
3.
Locate the driver section for Windows.
4.
Download the Driver Kit by clicking Download.
5.
Click PDF Manual to download the installation guide for the Windows OS.
6.
Install the driver and management utilities for the Windows OS as described in
the installation guide.
Configuration and Diagnostic Utilities
Use the HBAnywhere utility or the lputil command-line interface (CLI) utility to configure the
HBA. These utilities are available for Linux and Windows OSes and provide support for the
following functions:
■
■
■
■
■
■
■
■
Discover local and remote hosts, HBAs, targets, and LUNs
Reset HBAs
Set HBA driver parameters
Update firmware
Enable or disable the system BIOS
Run diagnostic tests on HBAs
Manage out-of-band HBAs
Manage local and in-band remote HBAs
For more information about the HBAnyware and lputil utilities, download their user manuals
from the Emulex support site for Oracle.
36
StorageTek 8 Gb FC PCI-Express HBA, Emulex Installation Guide For HBA Models SG-XPCIE1FC-EM8-Z, SGPCIE1FC-EM8-Z, SG-XPCIE1FC-EM8-N, SG-PCIE1FC-EM8-N and SG-XPCIE2FC-EM8-Z, SG-PCIE2FC-EM8-Z,
SG-XPCIE2FC-EM8-N, SG-PCIE2FC-EM8-N, 7105391 • August 2015
4
♦ ♦ ♦ C H A P T E R 4 Known Issues
This chapter contains any known issues with the HBA. Specific bug identification numbers are
provided for Service Personnel. This section contains the following topic:
■
“Reboot Fails on the SPARC Enterprise M8000 System ” on page 37
Reboot Fails on the SPARC Enterprise M8000 System
Bug 15495849
Issue: On the SPARC Enterprise M8000 system, if you use the stmsboot command to provide
dual paths to the boot device, on occasion the boot device is not found and the reboot does not
succeed.
At the console, the following message will be printed:
Can't open boot device
Workaround: When this occurs, retry the boot operation. The system will now reboot as
expected.
Chapter 4 • Known Issues
37
38
StorageTek 8 Gb FC PCI-Express HBA, Emulex Installation Guide For HBA Models SG-XPCIE1FC-EM8-Z, SGPCIE1FC-EM8-Z, SG-XPCIE1FC-EM8-N, SG-PCIE1FC-EM8-N and SG-XPCIE2FC-EM8-Z, SG-PCIE2FC-EM8-Z,
SG-XPCIE2FC-EM8-N, SG-PCIE2FC-EM8-N, 7105391 • August 2015