1
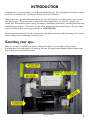
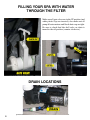
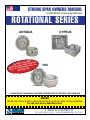
STRONG SPAS
OWNERS
MANUAL
United States & European Models
ROTATIONAL SERIES
ANTIGUA
CYPRUS
IT
SUBM HIN 30
O
T
E
R
IT
FAILU N CARD W S ALL
O
I
ID
TRAT
SE VO
S
I
A
G
H
E
C
R
R
OF PU RANTIES
DAYS
WAR
RIO
PLEASE READ THIS MANUAL BEFORE ATTEMPTING TO OPERATE YOUR NEW SPA
CAUTION:
Having more than one GFCI used on the electrical circuit will render the spa inoperable.
The spa must be on a dedicated circuit.
POOLS & SPAS
1-800-STRONG-9
P.O. BOX 108, ROUTE 11 NORTHUMBERLAND, PA 17857
TABLE OF CONTENTS
Introduction / Knowing Your Spa...................................... 3
Safety Instructions................................................................. 4
Installation Instructions....................................................... 5
Filling Your Spa...................................................................... 6
Electrical - General................................................................ 8
European Wiring.................................................................... 14
Air Controls & Waterfall..................................................... 15
Roto Spa Fittings (Jets)..................................................... 16
Control Panel......................................................................... 17
Removing Air Locks............................................................. 18
Trouble Shooting.................................................................. 20
Initial Start-up........................................................................ 21
Spa Maintenance . ................................................................ 23
Winterizing Your Spa............................................................ 24
Control Pack Codes............................................................. 26
Frequently Asked Questions (FAQ)................................. 28
Warranty Information........................................................... 30
Registration Card.................................................................. 31
Warnings..................................................................Back Cover
2
A PDF VERSION OF THIS MANUAL IS ALSO AVAILABLE BY CALLING TECH SUPPORT
QUESTION? PROBLEMS? PLEASE CONTACT YOUR DEALER FOR ASSISTANCE.
INTRODUCTION
Congratulations on your purchase of our Rotational Molded spa. We at Strong Pools & Spas are excited to assist your family in “Creating a Lifestyle that Lasts a Lifetime”.
With proper care, operation and maintenance, your spa will provide your family many years of comfort and pleasure. Please take time to read all the instructions before you install or operate your
Strong Spa. This manual explains safety precautions, installation instructions, operating directions and
maintenance procedures. If you have any questions after reading this manual, please call your dealer
or Strong Pools & Spas service representative at 1-800-787-6649.
Please read and understand all safety instructions, operating instructions and all warnings and cautions
before adding water or attaching electrical power.
Knowing your spa..
Parts of your spa you should know before calling tech support or your dealer with a problem.
Knowing these few simple parts will speed up the time you spend on the phone with tech support and
help us help you solve problems faster.
1-800-STRONG-9
3
IMPORTANT
SAFETY INSTRUCTIONS
WARNING:
People with infectious diseases should not use a spa.
The use of alcohol, drugs or medication before or during spa use may lead to unconsciousness
with the possibility of drowning.
DO NOT use the spa immediately following strenuous exercise.
Persons suffering from heart disease, diabetes, high or low blood pressure or any other serious
illness and pregnant women should consult with their physician before using the spa.
Excessive water temperature can be dangerous. Before entering the spa, the user should measure the water temperature with an accurate thermometer, since the tolerance of the water temperature regulating devices may vary as much as +/-3°C(5°F) The Water should never exceed
40°C (104°F) and lower water temperature is recommended for extended use (exceeding 10 minutes) and for young children.
Long exposure at higher temperature can result in dizziness and/or hyperthermia. Hyperthermia
occurs when the internal temperature of the body reaches a level several degrees above the normal body temperature of 98.7°F (36.7°C). The symptoms of hyperthermia include dizziness,
fainting, drowsiness or lethargy.
The affects of hyperthermia include:
Unawareness of impending hazard.
Failure to perceive heat.
Failure to recognize the need to exit the spa.
Physical inability to exit the spa.
Fetal damage in pregnant women.
Unconsciousness resulting in a danger of drowning.
CHILDREN SHOULD BE SUPERVISED IN
OR NEAR THE SPA AT ALL TIMES!
4
QUESTION? PROBLEMS? PLEASE CONTACT YOUR DEALER FOR ASSISTANCE.
INSTALLATION INSTRUCTIONS
Spa Location:
Improper installation may result in equipment damage and will void the warranty. Your spa
must be placed on a flat, level surface.
The space you choose to install your spa is a very important decision, you should consider all
of the listed suggestions.
Check your local code office for understanding of building, fencing, gates, electrical, plumbing and enclosure required codes.
A location should be selected to compliment your lifestyle, the view from your house
and the ability to supervise the spa.
Position the spa in relation to the surroundings of trees, sunlight exposure, wind, bathroom location, landscaping and evening lighting.
A spa filled with water is very heavy, if the spa is placed on flooring or decking, be sure
the structure is strong enough to support the weight. The necessary support should be at
least 75 pounds per square foot.
Install your spa, in a way that will allow easy access to the equipment door.
Storage area for maintenance equipment and chemicals (storing chemicals inside your
spa cabinet will void the warranty).
Indoor Considerations:
The interior of your home where the spa is located must be able to withstand high humidity.
The spa chemicals may have some corrosive effect.
Floor drain is needed to carry off splashed water from the spa.
It is strongly advised NOT to locate a spa on second story location that may be above finished
living space.
1-800-STRONG-9
5
FILLING YOUR SPA WITH WATER
THROUGH THE FILTER
Make sure all gate valves are in the UP position (and
white plastic clips are inserted), also make sure all
pump & heater unions and black drain cap are tight.
Be sure to check that blue ball valve on drain is
turned to the off position (counter-clockwise).
DRAIN LOCATIONS
6
QUESTION? PROBLEMS? PLEASE CONTACT YOUR DEALER FOR ASSISTANCE.
REMOVING THE FILTER AND FILLING YOUR SPA
To remove the filter, grab the
filter from the top and turn it
counter-clockwise. Then lift
the filter out of the spa (as
shown). After the spa is filled
you insert the filter back in the
spa by turning it clockwise.
Place your hose into
the filter hole and turn
on the water. Let your
spa fill until the water
is about 1” above the
top of the filter. As
shown in photo below.
Be sure that the filter plug
is removed with the filter
when removing the filter.
Fill your spa until the water level is
about 1” above the top of the filter.
1-800-STRONG-9
7
ELECTRICAL - GENERAL INSTRUCTIONS:
It is recommended that a licensed electrician install the power to your spa, in accordance with
the National Electric Code and/or any local electrical codes in effect at the time of installation.
Power supply installation must include a properly rated GFCI circuit breaker. The circuit breaker must be dedicated and should not be shared with any other appliances. It should be labeled
and easily accessible to users. Power supply must be hard wired into the power pack. DO NOT
USE EXTENSION OR PLUG-TYPE CORDS OF ANY KIND. The use of a shut-off box
near the spa is recommended. Metal surfaces within 5 feet of the spa must be grounded to the
spa.
110V
N
L1
L2
GRND
NEUTRAL
THREE WIRE
& GROUND
8
HOT BLACK
THESE WIRES GO
TO THE PC BOARD
CONTROL CIRCUIT
QUESTION? PROBLEMS? PLEASE CONTACT YOUR DEALER FOR ASSISTANCE.
IF USING THE STANDARD 110V SERVICE, YOU MUST USE A DEDICATED LINE,
WHICH MEANS THAT THERE CAN NOT BE ANY OTHER HOUSEHOLD ITEMS CONNECTED TO THE CIRCUIT OR OUTLET AT ALL! HAVING ANY OTHER ELECTRICAL APPLIANCES AT ALL ON THIS CIRCUIT WHILE THE SPA IS RUNNING WILL
TRIP THE BREAKER IMMEDIATELY. DO NOT USE ANY TYPE OF EXTENSION
CORDS BETWEEN THE SPA AND THE WALL OUTLET, THIS WILL ALSO CAUSE
THE BREAKER TO TRIP AND CAN BE A POTENTIAL FIRE HAZARD.
Standard Outlet with GFI Spa cord.
GFI Outlet with Standard spa plug.
PLEASE CHECK YOU LOCAL BUILDING CODES AND ONLY USE A CERTIFIED
ELECTRICIAN TO INSTALL ANY ELECTRICAL COMPONENTS TO YOUR SPA.
1-800-STRONG-9
9
Rotational Spa 220 Volt Wiring Diagram
House Breaker Box
OFF OFF OFF OFF OFF
RECOMMENDED
ON ON ON ON ON
40 AMP GFI Rated Breaker
8 Guage, 4 wire
RED (HOT)
BLACK (HOT)
GRN
WHT
ON
BOTTOM VIEW OF G.F.C.I.
(SQUARE D)
OFF
G.F.C.I. Breaker Box
Front View of G.F.C.I. (Square D)
RED (HOT)
FROM SPA
BLK (HOT)
FROM SPA
ON
WHT
GRN (GROUND)
BLK (HOT)
WHT
GRN (GROUND)
(3/
WHT
3&%
Ground
RED (HOT)
Hot
BLK (HOT)
Hot
#-,
RED (HOT)
8)5
LOAD
OUT
(RED)
USE COPPER
240V
WIRE MIN 8 AWG 40A 60Hz
LOAD
OUT
(BLK)
Neutral
WHT (NEUTRAL)
WHT
FROM SPA
4:45&. #09
GRN (GROUND)
OFF
SPA CIRCUIT BOARD
220V
THREE WIRE
& GROUND
10
N
L1
L2
GRND
THESE WIRES GO
TO THE PC BOARD
CONTROL CIRCUIT
ILLUSTRATIONS COURTESY OF BALBOA INSTRUMENTS
QUESTION? PROBLEMS? PLEASE CONTACT YOUR DEALER FOR ASSISTANCE.
220V CONVERSION
The four steps to convert your spa from 110 volts to 220 volts
STEP 1
STEP 2
1-800-STRONG-9
11
STEP 3
DIP SWITCHES #2, #7, and #10 ARE THE ONLY DIP SWITCHES THAT
ARE IN THE ON POSITION TO RUN AT 110 VOLTS. ADJUSTING ANY
OTHER DIP SWITCH WILL RENDER THE SPA INOPERABLE AND MAY
CAUSE PERMANENT DAMAGE. THIS ALSO VOIDS ALL WARRANTIES.
STEP 4
Your finished, Check STEP 5 on the next page to be sure
your wiring looks exactly like the photo in STEP 5.
PLEASE CHECK YOU LOCAL BUILDING CODES AND ONLY USE A CERTIFIED
ELECTRICIAN TO INSTALL ANY ELECTRICAL COMPONENTS TO YOUR SPA.
12
QUESTION? PROBLEMS? PLEASE CONTACT YOUR DEALER FOR ASSISTANCE.
Your wiring should look like this. If wiring appears differently,
DO NOT power your spa and contact our tech support for assistance.
STEP 5
220V
THREE WIRE
& GROUND
N
L1
L2
GRND
THESE WIRES GO
TO THE PC BOARD
CONTROL CIRCUIT
1-800-STRONG-9
13
THIS SECTION IS FOR EUROPEAN USERS ONLY
EUROPEAN WIRING DIAGRAM
House Breaker Box
ON ON ON ON ON
OFF OFF OFF OFF OFF
BROWN (HOT)
BLUE (NEUTRAL)
GREEN/
YELLOW
(GROUND)
BROWN (HOT)
BLUE
(NEUTRAL)
N
1
TEST
0 OFF
#-6
#3/
(3/
Ground
GREEN/
YELLOW
(GROUND)
Hot
USE COPPER
230V
WIRE MIN. 8 AWG - 20A 50Hz
GREEN/
YELLOW
(GROUND)
Neutral
N
BLUE (NEUTRAL)
BROWN (HOT)
4:45&. #09
2
SPA CIRCUIT BOARD
ILLUSTRATIONS COURTESY OF BALBOA INSTRUMENTS
230Volt - 20 AMP Euro Edition
Electrical Connections
Two Wire & Earth
(Also known as Ground)
L1
L2
These wires go to
the PC Board Control
Circuit.
GRND
Earth/Ground = Green & Yellow wire
L1 = Positive/Live = Brown wire
L2 = Negative/Neutral = Blue wire
NOTE: This change MUST be preformed by a certified electrician.
14
Substitute these common HOT, NEUTRAL, EARTH GROUND colors for your countries standard.
QUESTION? PROBLEMS? PLEASE CONTACT YOUR DEALER FOR ASSISTANCE.
AIR CONTROLS & WATERFALL
Turning the air control knobs will adjust the amount of air pressure coming out of the jets. You can adjust them
from MINIMAL to FULL power.
ON
OFF
WATERFALL FLOW ADJUSTMENT
1-800-STRONG-9
15
ROTO SPA FITTING TYPES
2” BLACK FIXED
2” STAINLESS ADJUSTABLE SPINNER
3” STAINLESS ADJUSTABLE DIRECTIONAL
16
2” STAINLESS FIXED
2” STAINLESS ADJUSTABLE DIRECTIONAL
SUCTION
QUESTION? PROBLEMS? PLEASE CONTACT YOUR DEALER FOR ASSISTANCE.
CONTROL PANEL IDENTIFICATION
Jet Press JET key to activate pump. The system will run for 15 minutes on HI at which
time it will automatically shut down unless the water temperature is below the set
temperature, the spa is in a filtration cycle, or it is shut off manually prior to the 15
minute period.
Light Press LIGHT to turn the light on/off. It will automatically shut off in 4 hours unless
done so manually prior to 4 hours.
Light Sequence & Sample Lighting: Pressing the Light button will change the color
or the LED lights, To adjust the color press the light button to turn the lights on,
then press it again to turn them off. When you press it for the third time the lights
will turn on but change color.
Warm Press WARM key to adjust temperature. The maximum set point is 104º F.
Cool Press COOL key to adjust temperature down. The minimum set point is 70º F.
To program, press WARM, then JETS. Press WARM to adjust from 2 -8. Press JETS to exit
programming. The default filter time is two (2) hours.
1-800-STRONG-9
17
Prior to spa operation, plumbing fittings on pump & control pack must be tightened.
Spa is shipped with loose unions to avoid damage during transportation. There are
FOUR unions that require hand tightening prior to operation of your spa. When filling
the spa with water, keep observing these fittings for any slight water drips. If a drip is
observed, just hand tighten until dripping ceases.
REMOVING AN AIR LOCK
NOTE: See Union Adjustment Information before operating spa. Before starting up your spa, make sure
you have read and understand all of the previous instructions. Make sure the spa has been installed correctly, including the electrical wiring connections as specified,
• Spa’s water is at the correct level
• Ensure all gate valves are opened
• The circuit breaker on the control panel has automatic functions that operate upon start up and normal
operation to protect the system. Upon power up, “PR” will appear for 30 seconds while system is in purge
mode and then normal operation will assume. Approximately two minutes after the system has been
powered up the first filtration cycle will begin to operate. Any time after the start up, you will be able to
change the filter cycle and reset your temperature set point.
Upon startup, the pump may sound sluggish and the flow from the
jets will be minimal, this indicates you have an air lock in the pump.
To release the air from the pump, simply open the highest union (or
upper union) to release the air trapped in the water lines, or gently,
using a 17mm or 18mm wrench (varies on pump size) slowly loosen
the black plastic hex head bolt in front of pump. You will hear air being pushed out the union or bolt, once the air stops and water starts to
come out, the pump will pick up speed and the jets flow will increase.
Carefully tighten the union or bolt until the water does not leak from
the union or bolt. Be careful not to overtighten the black hex head
bolt this may cause the bolt to strip or you may pinch the gasket.
Strong recommends that you loosen the upper union to relieve the air
from the lines since this method lessens the chance of stripping the
hex bolts.
18
QUESTION? PROBLEMS? PLEASE CONTACT YOUR DEALER FOR ASSISTANCE.
1-800-STRONG-9
19
TROUBLESHOOTING
No power to spa:
1. Check proper connection to the pack
2. Check fuse in pack. (30 AMP Slow Blow)
3. Must have very good ground connection - If none call your dealer.
Trips Breaker:
1. Make sure your spa is on a dedicated line.
2. Check breaker to make sure it is wired properly.
3. First take note to how the pump runs before it trips.
Trips instantly:
1. Mis-wired - check electrical wiring.
2. Breaker replacement.
3. Short in Ozone - unhook to check - call your dealer.
4. Short in pumps - unhook to check - call your dealer.
Poor Water Flow:
1. Clean filter.
2. Check if adjustable jets (are all open).
3. May have air lock, prime pump by loosening top pump union.
4. If water diverter valves are present make sure they are all the way open.
5. If gate valves are present, make sure they are all the way open.
6. If none of this works possible line obstruction or impeller loose on pump drive shaft.
No water or air flow to jet:
1. If adjustable jets, probably in off position. (At times the jets can lock into position, may require some effort.)
2. Pinched line, cutting off flow before reaching spa.
3. Water diverter valve if present may be closed.
Air controls not working:
1. Remove cap on air valve, (with flat head screw driver) and make sure internals are not
broken or improper alignment.
2. If internals are broke, call your dealer.
Jets only have one speed:
1. Programming error, call your dealer.
2. Button not responding, call your dealer.
Heat not working:
1. Make sure the desired temperature is higher than current temperature.
2. Make sure spa is in standard mode. If problem persists contact your dealer or manufacturer.
20
QUESTION? PROBLEMS? PLEASE CONTACT YOUR DEALER FOR ASSISTANCE.
SYSTEM SETTINGS
When your spa is first actuated, it will go into Priming mode, indicated by “Pr.” The Priming
mode will last for less than 5 minutes (press “Warm” or “Cool” to skip Priming Mode) and then
the spa will begin to heat the spa and maintain the water temperature in the Standard mode.
The start-up temperature is set at 100°F/37°C. The last measured temperature is constantly displayed on the LCD. Note that the last measured spa temperature displayed is current only when
the pump has been running for at least 2 minutes.
To display the set temperature, press the “Warm” or “Cool” pad once.
To change the set temperature, press the pad a second time before the LCD stops flashing. Each
press of the “Warm” or “Cool” pad will continue to either raise or lower the set temperature.
After three seconds, the LCD will stop flashing and display the current spa temperature.
Jets
Touch the “Jets” button once to turn the pump on or off, and to shift between low and high
speeds. If left running, the low speed of the pump will automatically turn off after 4 hours, and
the high speed will automatically turn off after 15 minutes.
Light
Press the “Light” button to turn the light on and off. If left on, the light automatically turns off
after 4 hours unless manually turned off prior to 4 hours.
Preset Filter Cycles
The first filter cycle begins 6 minutes after the spa is energized. The second filter cycle begins
12 hours later. Filter duration is programmable for 2, 4, 6, 8 hours or for continuous filtration
(indicated by “Filc”). The default filter time is 2 hours.
To program, press “Warm” or “Cool”, then “Jets”.
Press “Warm” or “Cool” to adjust. Press “Jets” to exit programming.
During the filter cycle, the low speed on the pump never turns off, and in Economy and Sleep
Mode, heating only occurs during the filter cycle.
1-800-STRONG-9
21
THIS SECTION IS FOR EUROPEAN USERS ONLY
Mode (OPTIONAL)
All Rotational molded spas are factory locked in STANDARD MODE.
Mode is changed by pressing the “Warm” or “Cool” button, then pressing the “Light” button.
Standard Mode is programmed to maintain the desired temperature. Note that the last measured spa temperature displayed is current only when the pump has been running for at least 2
minutes. “St” will be displayed momentarily when you switch into Standard Mode.
Economy Mode heats the spa to the set temperature only during filter cycles. “Ec” will display
solid when temperature is not current, and will alternate with temperature when temperature is
current.
Sleep Mode also heats the spa to the set temperature only during filtration cycles “Sl” will
display solid when temperature is not current, and will alternate with temperature when temperature is current, but only within 20 degrees of your set temperature. If you would like to use
Economy or Sleep Mode you must flip dip switch #7 to the OFF position.
SEE FIGURE 5 BELOW.
Freeze Protection
(Figure 5)
If the temperature sensors detect a drop to below 44°F/6.7°C within the heater, the pumps and
blower will automatically activate to provide freeze protection. The equipment stays on until 4
minutes after the sensors detect that the spa temperature has risen to 45°F/7.2°C or higher. In
colder climates, an optional additional freeze sensor may be added to protect against freeze conditions that may not be sensed by the standard sensors. Auz freeze sensor protection acts similarly except with the temperature thresholds determined by the switch and with out a 4-minute
delay in turnoff. See your dealer for details.
22
PLEASE CHECK YOU LOCAL BUILDING CODES AND ONLY USE A CERTIFIED
ELECTRICIAN TO INSTALL ANY ELECTRICAL COMPONENTS TO YOUR SPA.
CHILDREN SHOULD BE SUPERVISED IN
OR NEAR THE SPA AT ALL TIMES!
SPA MAINTENANCE
The maintenance and care of your spa is simple and easy to carry out, and if performed regularly as scheduled, problems will be minimal. It is important that the following procedures be read
through and carried out on a regular basis for the best, long term, overall performance of your
spa.
The filtering cycle of your spa should be operated at least two hours or more a day (whether or
not the heater is heating) to remove impurities and to prevent disposition of contaminants in
your spa. The filtering system works automatically. Keep the spa covered when not in use to
reduce the loss of heat and to keep debris from settling in the water.
Maintaining the spa's proper water chemical balance is essential to the comfort and safety of the
user. Water mineral content varies constantly and is directly affected by evaporation and the use
of cleaning and maintenance chemicals, which will increase mineral content, when added. If
the mineral content deviates from prescribed pH level (7.2-7.8) deposits on the spa walls, filter,
electric heating element or gas heater manifold and piping may adversely affect the condition of
your spa equipment.
Since the water capacity of your spa is far less than that of a swimming pool, the chemical reaction caused by the presence of one or more persons in the spa is more rapid and pronounced. In
other words, it is much more difficult to maintain the proper pH balance in a spa than in a swimming pool. For these reasons, it is important to check frequently, the total alkalinity of the water, the pH level, and the sanitize level, then add prescribed chemicals as necessary to maintain
the proper chemical balance. Failure to maintain a proper balance of chemicals in your spa will
result in an early, premature failure of your spa parts including, but not limited to, the spa cover,
piping, certain electrical components in the spa, electrical control box and topside panel, thus
voiding the warranty.
Always check with your pool and spa dealer to determine which chemicals and/or procedures
they recommend to maintain your spa correctly. STRONG POOLS & SPAS does hereby claim
no responsibility or liability for use of and quantities of the chemicals used.
1-800-STRONG-9
23
SPA MAINTENANCE CONTINUED
Spa Water - should be changed periodically, depending upon frequency of use and other conditions that may affect water suitability. Typically 60 to 90 days is a satisfactory interval under
normal conditions. With heavy usage, the interval between water changing may be less.
Spa Filter Cartridge - should be cleaned every 2 to 4 weeks depending on the frequency of
use. Rinse the filter cartridge with a pressure hose and re-install filter cartridge in the filter housing. When changing spa water it is good practice to soak the filter cartridge in filter cleaner. The
filter cleaner is specially made to remove accumulation of oils and other contaminates which
will ensure good, sanitary water and extended filter cartridge life.
Adding Chemicals - to your spa water: Add to the center of the spa with the pump running.
Make sure the water is heated. Never add chemicals to cold water, as this will effect chemical
action. Also, never add chemicals directly into the skimmer. Store all chemicals in a cool, dry
place and in such a way as to prevent children and pets from contacting.
WINTERIZING YOUR SPA
Before draining, power must be turned off at the GFCI circuit breaker. Attach a garden hose to
the drain and open the blue ball valve. (Figure 1) Water will start to drain. The water from the
spa is safe and will not harm your lawn or pets. You can also siphon the water from the spa. You
may have some water left in the spa that did not drain, you will have to remove a small amount
of water by hand, using a towel.
You must also use a wet-vac to remove the water from the lines by suction and/or blowing.
Water left in the line and jets might freeze and damage them. To adequately clean out the lines,
place the wet-vac over each jet face for 10-15 seconds. (Figure 2)
Be sure and loosen all four (4) unions to let excess water drain from the lines. Make sure you
retighten all four unions before adding your antifreeze. (Figure 3)
Remove the filter cartridge and do the same to the filter cavity. Also, let the water drain from the
heater tube by loosening the white unions on each side of the heater tube. Remember to retighten the white unions when completed. Use the wet-vac to vacuum up any water that may have
drained on the spa floor area. After all the water is removed from the spa, jets, and plumbing
pour a gallon of spa antifreeze or RV antifreeze into the filter cavity. (Figure 4)
24
QUESTION? PROBLEMS? PLEASE CONTACT YOUR DEALER FOR ASSISTANCE.
(Figure 1)
(Figure 2)
(Figure 3)
Note: Damage caused by improper winterizing will not be covered
under warranty. You may want to
contact a professional for proper
winterizing. If you have any questions, please call your dealer or
tech support.
ALWAYS TURN OFF YOUR GFI
BREAKER BEFORE DRAINING OR
SERVICING YOUR SPA!
(Figure 4)
1-800-STRONG-9
25
Problem: No message on display. Power has been cut off to spa.
Solution: The control panel will be disabled until power returns. Spa settings
will be preserved until next power up.
Problem: Temperature unknown.
Solution: After the pump has been running for 2 minutes, the temperature will
be displayed.
Problem: “Overheat” - The spa has shut down. One of the sensors has detected
that 110ºF/43ºC at the heater.
Solution: DO NOT ENTER THE WATER. Remove the spa cover and allow
water to cool. Once the heater has cooled reset by pushing any button. If spa
does not reset, shut off the power to the spa and call your dealer or service
organization.
Problem: “Overheat” - The spa has shut down. One of the sensors has detected
that the spa water is 110ºF/43ºC.
Solution: DO NOT ENTER THE WATER. Remove the spa cover and allow
water to cool. At 107ºF/42ºC, the spa should automatically reset. If spa does
not reset, shut off the power to the spa and call your dealer or service organization.
Problem: “Ice” - Potential freeze condition detected.
Solution: No action required. The pump and blower will automatically activate
regardless of spa status.
Problem: Spa is shut down. The sensor that is plugged into the Sensor “A”
jack is not working.
Solution: If the problem persists, contact your dealer or service organization. (May appear temporarily in an overheat situation and disappear when the
heater cools.)
Problem: Spa is shut down. The sensor that is plugged into the Sensor “B”
jack is not working.
Solution: If the problem persists, contact your dealer or service organization. (May appear temporarily in an overheat situation and disappear when the
heater cools.)
Problem: Sensors are out of balance. If alternating with spa temperature, it
may just be a temporary condition. If flashing by itself, spa is shut down.
Solution: If the problem persists, contact your dealer or service organization.
26
QUESTION? PROBLEMS? PLEASE CONTACT YOUR DEALER FOR ASSISTANCE.
Problem: A significant difference between temperature sensors has been detected. This could indicate a flow problem.
Solution: Check water level in spa. Refill if necessary. If water level is okay,
make sure the pumps have been primed. If problem persists, contact your dealer
or service organization.
Problem: Persistent low flow problems. (Displays on the fifth occurrence of
“HFL” message within 24 hours.) Heater is shut down, but other spa functions
continue to run normally.
Solution: Follow the action required for “HFL” message. Heating capability of
the spa will not reset automatically; you may press any button to reset.
Problem: Possible inadequate water, poor low, or air bubbles are detected in the
heater. Spa is shut down for 15 minutes.
Solution: Check water level in spa. Refill if necessary. If water level is okay,
make sure the pumps have been primed. Press any button to reset, or this message will automatically reset within 15 minutes. If problem persists, contact your
dealer or service organization.
Problem: Inadequate water detected in heater. (Displays on third occurrence of
“dr” message. Spa is shut down.
Solution: Follow action required for “dr” message. Spa will not automatically
reset. Press any button to reset.
On a fresh fill one or both of your pumps may be air locked, refer to page
18 for removing an air lock.
WARNING! SHOCK HAZARD! NO USER SERVICEABLE PARTS.
Do not attempt to service the control system. Contact your dealer or service organization for assistance. Follow all owner’s manual power connection instructions. Installation must be performed by a licensed electrician and all grounding connections
must be properly installed.
A PDF VERSION OF THIS MANUAL IS ALSO AVAILABLE BY CALLING TECH SUPPORT
1-800-STRONG-9
27
FREQUENTLY ASKED QUESTIONS
Q: Why is my spa not heating?
A: If you are running the spa at 110v, check to make sure there is a jumper wire between J11 &
J32, white AC to red AC. If there is not a white jumper wire between J11 & J32. Look on the
back side of your control box there should be a wire taped to the back of the box. If you are
running 110v or 220v check which mode you are in; standard, sleep, or economy. If problem
persist please contact your dealer or manufacturer.
Q: Why does the system power input fuse (30 A) keep blowing?
A: Chances are the control box is improperly wired or is connected to an insufficient power
source. Check all wires to GFI Breaker, and check all wires from GFI to your control box.
Make sure to replace any blown fuses with a fuse of the exact same type and rating. You may
also have a faulty pump, ozonator, or element. Please contact your dealer or manufacturer.
Q: Why does the control panel display OH?
A: 1. Overheat protection may occur if the pump is set to operate for extended periods.
2. In extremely hot weather, check for proper cabinet ventilation.
3. When the hot tub is in a filter cycle make sure pump 1 low-speed is on.
4. Check gate valves make sure that they are open.
5. Check for blockage in the filter cartridge, skimmer basket and pump intake fittings.
If problem persist please call your dealer or manufacturer.
FAQ
Q: Why isn’t the system maintaining the set temperature of the water?
A: Make sure that the water temperature displayed on the topside panel is at least 1 degree
below the heaters set temperature, and set the control to (standard mode).
Q: The system is receiving proper voltage, why doesn’t anything function?
A: 1. Check for blown fuses, burn marks or signs of tampering in the box.
2. Power down the spa, and reset the GFI, if problem persists contact your dealer or manufacturer.
28
QUESTION? PROBLEMS? PLEASE CONTACT YOUR DEALER FOR ASSISTANCE.
Q: Why does the GFI trip immediately upon power up?
A: 1. If this is a new installation, make sure GFI breaker is wired correctly.
Refer to page #10 .
2. Disconnect all the components (pumps, ozonator, and plug them back in one at a time to verify which component is causing the GFI to trip.
3. Check for any loose connections or cut wires in the box.
If problem persist contact your dealer or manufacturer.
Q: Why is my spa running all the time?
A: Check your filtration settings, you might be in continues filtration mode “Filc” or just set in
a high filtration. Factory setting is F2 or Fil 2 which means your spa will filtrate 2 hours out of
every 12 hours. Twice a day. If problem persists contact your dealer or manufacturer.
Q: After powering up my spa, Why do I get a Dr or Dry code on my topside display?
A: This indicates that there is insufficient amount of water in your heating tube, Due to an air
lock in your pump. Which is an air bubble in the water lines. You will need to bleed your pump
or pumps. Refer to page # 18. If problem persists contact your dealer or manufacturer.
Q: What the Ozonator does: (The Ozonator located inside your spa may either be a white
or black box)
A: With the correct amounts of ozone it reduces the need for high chemical doses, helps destroy bacteria, viruses, algae, yeasts, oxidizes other contaminants prolong equipment life, Reduces maintenance time & cost ozone purifies naturally.
FAQ
Q: Why can’t I just use an Ozone for water purification?
A: Ozone dissipates very quickly and cannot be measured over time. High ozone concentration is not good for the spa’s gaskets and seals.
Q: What is the most efficient way to run my spa?
A: 220 volt is the most efficient voltage to run, because it takes less time to heat up the spa,
which it will draw less amps, and the spa will maintain temperature better then 110 volt. And
factory settings for your filter cycle 2 hours out of every 12 hour period. 4 hours of filtration in a
24 hour period. Any further questions or concerns please contact your dealer or manufacturer.
1-800-STRONG-9
29
WARRANTIES
Shell: Limited Lifetime to the original purchaser of the spa.
Strong Spas warrants the original retail purchaser the integrity of the spas shell against leaks as a result of defects in
material or workmanship. This warranty does NOT cover damage due to abuse, vandalism, or acts of nature.
Plumbing: 1 YEAR Antigua & Cyprus - (90 Day Rio)
Strong Spas warrants the original retail purchaser the integrity of the spas plumbing against leaks as a result of defects in material or workmanship for a period of 1 year (90 Day for the Rio). (parts and labor) Stainless jets - all jets
must be kept under water. This warranty does NOT cover damage due to abuse, vandalism, or acts of nature.
Equipment: 1 YEAR Antigua & Cyprus - (90 Day Rio)
Strong Spas warrants the original retail purchaser the integrity of the spas Equipment Pack (pumps, heater, control
system) to be free from defects in material and workmanship for a period of 1 year (90 Day for the Rio) from the
date of the original retail purchase. This warranty does NOT cover damage due to abuse, vandalism, or acts of nature.
Ozonators & LED Lighting: 1 YEAR Antigua & Cyprus - (90 Day Rio)
Strong Spas warrants the original retail purchaser the integrity of the spas Ozonator and LED Lighting to be free
from defects in material and workmanship for a period of 1 year (90 Day for the Rio) from the date of the original
retail purchase. This warranty does NOT cover damage due to abuse, vandalism, or acts of nature.
EXCLUSIONS
• This limited warranty is enforceable only by the original retail purchaser. Fuses, covers, light bulbs, light lenses, spa pillows, seals on pumps and motors, and any dealer installed accessories are specifically excluded from this limited warranty.
• All warranties are null and void if any of the following occur:
- the spa has been subject to alteration, neglect, misuse or abuse.
- any damages caused by failure to install, maintain, and operate the spa in accordance with the recommendations contained in Strong Spas Owners Manual.
- any and all costs of spas removal and replacement including but not limited to removal and transportation, dam ages to landscaping, house structures.
- the spa has been used in a non-residential application or an application in which it was not designed.
- spa shell damage caused by excessive heat build-up due to failure to cover the spa while empty of water and/or exposure to direct sunlight.
- any damages caused by improper maintenance of spa water chemistry or by any undissolved spa chemicals which may cause bleaching of the spa shell and erosion or discoloration of stainless jets.
- any repairs that are done by any one other than authorized Strong Spas agent, or anyone without expressed writ
ten permission by Strong Spas warranty department.
DISCLAIMERS
ALL IMPLIED WARRANTIES ARE NULL AND VOID IF THE RETAIL PURCHASER FAILS TO RETURN THE
SPAS WARRANTY CARD BACK TO THE MANUFACTURER SUPPLIED WARRANTY ADDRESS WITHIN 30
DAYS FROM DATE OR PURCHASE. STRONG SPAS AND ITS AUTHORIZED AGENTS SHALL NOT BE LIABLE
FOR ANY INJURY, LOSS, COST OR OTHER DAMAGE, WHETHER INCIDENTAL, CONSEQUENTIAL, SPECIAL OR PUNITIVE, ARISING OUT OF ANY DEFECT COVERED BY THIS LIMITED WARRANTY, INCLUDING
WITHOUT LIMITATION, LOSS OF USE OF THE SPA AND COST FOR REMOVAL OF DEFECTIVE PRODUCT,
EVEN IF STRONG SPAS HAS BEEN ADVISED OF THE POSSIBILITY OF SUCH DAMAGE, THE LIABILITY OF
STRONG SPAS UNDER THIS LIMITED WARRANTY, IF ANY, SHALL NOT EXCEED THE ORIGINAL AMOUNT
PAID FOR THE DEFECTIVE PRODUCT. COVERAGE UNDER THIS LIMITED WARRANTY SHALL COMMENCE
AS OF THE ORIGINAL DATE OF PURCHASE AND THE DURATION OF SUCH COVERAGE SHALL NOT EXTEND FOR ANY REASON WHATSOEVER BEYOND THE STATED TIME PERIOD. THESE DISCLAIMERS
SHALL BE EQUALLY APPLICABLE TO ANY SERVICE PROVIDED BY STRONG SPAS OR ITS AUTHORIZED
AGENTS.
30
WARRANTY ISSUES? CONTACT [email protected]
LIMITATIONS
THIS LIMITED WARRANTY IS NONTRANSFERABLE AND ONLY APPLIES TO THE ORIGINAL PURCHASER.
THIS LIMITED WARRANTY SUPERSEDES THE PLACE OF ALL OTHER WARRANTIES EXPRESSED OR IMPLIED, IN FACT OR AT LAW, INCLUDING IMPLIED WARRANTIES OF FITNESS FOR A PARTICULAR PURPOSE. ALL WARRANTY SERVICE MUST BE AUTHORIZED BY STRONG SPAS AND PERFORMED BY ITS AUTHORIZED AGENT. NO DEALER, DISTRIBUTOR, SERVICE COMPANY, OR OTHER PARTY IS AUTHORIZED
TO CHANGE, MODIFY, OR EXTEND THE TERMS OF THIS LIMITED WARRANTY IN ANY MANNER WHATSOEVER. SOFT COVERS ARE NOT COVERED UNDER THE WARRANTY BY STRONG SPAS, WARRANTIES
FOR SOFT COVERS WILL BE COVERED BY THE COVER MANUFACTURER.
REGISTRATION
SAFETY PRECAUTIONS / DANGER - RISK OF INJURY
1. Please use the Hot Tub when others are present.
2. Children should be supervised at all times.
3. To avoid the risk of drowning, keep the filter clean and unclogged. Do not remove the suction drain cover. Do not
modify the suction or filtration systems.
4. Exercise caution when entering or leaving the Hot Tub. When changing positions, be sure of your footing before applying your full weight as water refraction can be misleading.
5. Do not stay in the water for extended periods of time. Set reasonable time limits. Leave the Hot Tub, cool down, take a
shower, relax, then return for another stay.
FOR YOUR RECORDS:
For future use, it is advisable that you write down some information pertaining to the model of the spa you have purchased. If you are unsure of the model name, frame size, etc., contact your dealer immediately to acquire the information needed. When making a warranty claim or just purchasing replacement parts, it is necessary to know the following
information.
PURCHASE DATE: _ _ _ _ _ _ _ _ _ _ _ _ _ _ _ _ _ _ _ _ _ _ _ _ _ _ _ _ _ _ _ _ _ _ _
MODEL NAME: _ _ _ _ _ _ _ _ _ _ _ _ _ _ _ _ _ _ _ _ _ _ _ _ _ _ _ _ _ _ _ _ _ _ _ _ _
SERIAL NUMBER: _ _ _ _ _ _ _ _ _ _ _ _ _ _ _ _ _ _ _ _ _ _ _ _ _ _ _ _ _ _ _ _ _ _ _ _
SHELL COLOR: _ _ _ _ _ _ _ _ _ _ _ _ _ _ _ _ _ _ _ _ _ _ _ _ _ _ _ _ _ _ _ _ _ _ _ _ _
PLEASE FILL OUT AND RETURN WITHIN 30 DAYS OF PURCHASE
REGISTRATION CARD
I have read and fully understand the warranties given to me by STRONG POOLS & SPAS and have assembled
my spa in accordance with THIS INSTRUCTION BOOKLET. Furthermore, I have read the SAFETY/PRECAUTIONS at the top of this warranty card. I am returning this card and a copy of my sales receipt to you,
signed by me, in order to register my spa in accordance with your warranties, within 30 days of purchase.
Purchaser’s Name:___________________________________ Purchase Date: _________________________
Address: __________________________________________ City, State, Zip: _________________________
Telephone No.: _____________________________________
Model Name:_______________________________________ Serial Number:__________________________
Dealer’s Name: _____________________________________
Address:___________________________________________
Signature:__________________________________________
Comments:________________________________________________________________________________
1-800-STRONG-9
31
RETAIN THIS BOOKLET FOR FUTURE REFERENCE
A PDF VERSION OF THIS MANUAL IS ALSO AVAILABLE BY CALLING TECH SUPPORT
1-800-STRONG-9
FOR ANY MISSING PARTS, PROBLEMS, OR QUESTIONS CALL:
MONDAY _ FRIDAY 9:00AM to 5:00PM EST.
(570) 275-2700
Be sure to have your spas serial number, model, and date of purchase ready when calling.
PLACE
STAMP
HERE
POOLS & SPAS
3204 Point Township Drive (Route 11)
P.O. BOX 108
Northumberland, Pa 17857
U.S.A.
QUESTION? PROBLEMS? PLEASE CONTACT YOUR DEALER FOR ASSISTANCE.