1
Cable Connectors
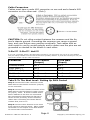
Cables must have a male XLR connector on one end and a female XLR
connector on the other end. (Duh!)
CAUTION: Do not allow contact between the common and the fixture’s chassis ground. Grounding the common can cause a ground
loop, and your fixture may perform erratically. Test cables with an
ohm meter to verify correct polarity and to make sure the pins are not
grounded or shorted to the shield or each other.
3-Pin??? 5-Pin??? Huh?!?
If you use a controller with a 5 pin DMX output connector, you will need to use a 5 pin to 3 pin adapter.
They are widely available over the internet and from specialty retailers If you’d like to build your own, the
chart below details a proper cable conversion:
Conductor
3-Pin Female
(Output)
5-Pin Male
(Input)
Ground/Shield
Pin 1
Pin 1
DMX Data (-)
Pin 2
Pin 2
DMX Data (+)
Pin 3
Pin 3
Not Used.
No Connection.
No Connection.
Not Used.
No Connection.
No Connection.
Take It To The Next Level: Setting Up DMX Control
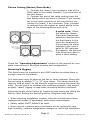
Step 1: Connect the male connector of the
DMX cable to the female connector (output)
on the controller.
Step 2: Connect the female connector of the
DMX cable to the first fixture’s male connector (input). Note: It doesn’t matter which
fixture address is the first one connected. We recommend connecting the fixtures in
terms of their proximity to the controller,
rather than connecting the lowest fixture
number first, and so on.
Step 3: Connect other fixtures in the chain
from output to input as above. Place a DMX
terminator on the output of the final fixture
to ensure best communication.
Page 8
PixelStorm™ COB User Manual Rev. A Copyright © 2015 Blizzard Lighting, LLC