1
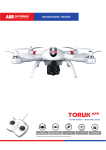
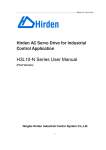
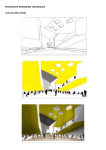
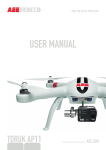
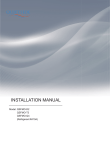
User Manual
VXD-001-B
X-Drone Manual.indd 1
22/07/2015 14:28
Contents
1. What’s in the box? 2. Setting up the X-Drone and equipment batteries
2.1 X-Drone battery specifications
2.2 Charging the X-Drone battery
2.3 Installing the X-Drone battery
2.4 Battery precautions
3. Preparing the X-Drone
27
8.1 Guide to the App
8.2 Video recording
8.3 Photo capture
8.4 Fast shot photo capture
8.5 Maximise the preview screen
8.6 Settings
9. Specifications
X-Drone Manual.indd 3
21
7.1 Compass calibration
7.2 Starting/stopping the motor
7.3 Basic flight
7.3 Basic flight
7.5 Battery level alarm function
8. Using the X-Drone app
19
6.1 Guide to the smartphone range extender
6.2 WiFi indicator
6.3 Power indicator
6.4 Pairing
6.5 Charging the smartphone range extender
7. Flying the X-Drone
14
5.1 Switching on the controller
5.2 Controller antenna
5.3 Controller operating instructions
5.4 Pairing the controller and the X-Drone’s receiver
6. X-Drone smartphone range extender
12
4.1 Installing the propellers
4.2 Removing the propellers
4.4 Propeller Guards
5. X-Drone controller
7
3.1 Flight indicators
3.2 microSD card slot
3.3 On-board camera
4. X-Drone propellers
4
6
31
22/07/2015 14:28
1. What’s in the box?
9
3
2
4
1
5
7
6
8
14
11
12
10
13
4
X-Drone Manual.indd 5
1. X-Drone
x1
8. X-Drone Battery Charger
x1
2. Propellers
x4
9. Smartphone Range Extender Adapter
x1
3. Propeller Guards
x4
10. Tool Set (Screwdriver and Wrench)
x1
4. Controller
x1
11. Screw for Smartphone Range Extender
x1
5. Smartphone Range Extender
x1
12. M3x12 Screws
x8
6. Smartphone Mount
x1
13. Controller Strap
x1
7. X-Drone Battery
x1
14. USB Cable
x1
5
22/07/2015 14:28
2. Setting up the X-Drone and
equipment batteries
Equipment
Power Supply
Controller
4 x AA Batteries
Smartphone Range Extender
T he range extender needs to be charged
through the built in mini USB charging port
X-Drone
X-Drone Battery (see below)
3. Preparing the X-Drone
1
2
3
2.1 X-Drone battery specifications
Capacity
5300mAh
Charging ambient temperature
0°C-50°C/32-122°F
Discharging ambient temperature
-20°C-50°C/-4-122°F
Charge/discharge ambient relative humidity
< 80%
5
4
2.2 Charging the X-Drone battery
7
Connect the X-Drone battery to the X-Drone battery charger and then connect the charger
to an AC power source (100-240V, 50/60Hz). Whilst charging the LED on the charger will
turn red, when fully charged the LED will turn green. After the battery is fully charged please
remove the battery and disconnect the charger.
6
8
9
10
2.3 Installing the X-Drone battery
11
Ensuring that the X-Drone is switched off, insert the battery into the battery compartment
on the X-Drone and lock the battery into position. If the battery lock is not fastened the
battery may not connect correctly which may affect flight safety or stop the X-Drone from
taking off.
12
2.4 Battery precautions
- Do not pull out the battery whilst the X-Drone is switched on as it may damage the unit.
- If the battery is not going to be used for a long time it is recommended that you
discharge the battery to a 40-50% charge level before storing. To maintain battery life
discharge and charge the battery every 3 months.
- D
o not continue to use or charge the battery if there is any expansion or damage to the
battery.
6
X-Drone Manual.indd 6-7
1. Propellers
5. Landing Gear
9. Power Switch
2. Motor
6. microSD card slot
10. Rear Indicator
3. Front Indicator
7. X-Drone Battery
11. Battery Level Display
4. Camera Lens
8. Tail Indicator
12. Battery Level Check Button
7
22/07/2015 14:28
3.1 Flight indicators
The X-Drone has three indicators on the front, rear and tail. When the X-Drone is switched
on the flight indicators will turn on. The front indicator is green and the rear indicator and
tail indicators are red.
Front indicator
Rear indicator
Tail indicator
Function
Front Indicator
Rear Indicator
Tail Indicator
Low battery alarm – level 1
Slow flash (1s on, 1s off)
Slow flash (1s on, 1s off)
N/A
Low battery alarm – level 2
Fast flash (twice at 1s intervals)
Fast flash (twice at 1s intervals)
Barometer abnormal state
Solid on
Slow flash (once every 3s)
GPS abnormal state
Solid on
Fast and slow flash at 3s intervals
Compass abnormal state
Fast flash
Solid on
Compass needs calibration
Slow flash
Solid on
Accelerometer abnormal state
Fast flash
Fast flash
Accelerometer needs calibration
Switches on, off, then permanently on
Switches on, off, then permanently on
Gyro abnormal state
Solid on
Fast flash
Gyro needs calibration
Solid on
Slow flash
Controller paired to X-Drone
Flash fast
GPS ready
Alternate between flashing fast and solid on
8
X-Drone Manual.indd 8-9
9
22/07/2015 14:28
3.2 microSD card slot
Status indicators on controller
Before using the X-Drone please insert the microSD card into the card slot whilst the power
is off. The X-Drone can take microSD and microSDHC cards up to a 32GB capacity.
There are three status indicators on the controller:
3.3 On-board camera
Controller power indicator Red LED – Solid on when the controller is switched on.
The on-board camera’s power is supplied by the X-Drone battery. The camera will turn on
when you turn the X-Drone on. You can take photos and videos through either the controller
or through the app.
Photo capture indicator
Camera Specifications
Video recording indicator
Resolution
1080p at 30fps (NTSC) /1080p at 25fps (PAL)
Image resolution
4608x3456
Green LED – Turns on, then off when the controller is turned on. Flashes slowly whilst
recording video and is solid on whilst pairing.
Video format
MOV (H.264 compression)
Storage
microSD/microSDHC up to 32GB
Photo modes
Single shot and fast shot
Green LED – Flashes once when a photo is captured, otherwise it remains off.
Camera function keys on controller
Start video recording
Photo capture
Stop video recording
10
X-Drone Manual.indd 10-11
11
22/07/2015 14:28
4. X-Drone propellers
TheX-Droneuses10inchpropellers,twowithgreyrotorbladecapsandtwowithblack
rotorbladecaps.
Propeller
Grey
Black
4.2 Removing the propellers
Whilstholdingthemotorwithyourhandorthesuppliedwrench,holdandrotatethe
propellerintheunlockingdirection(seeabove).
4.3 Precautions
Lock
Turnclockwisetolock
Turnanticlockwisetolock
Unlock
Turnanticlockwisetounlock
Turnclockwisetounlock
-Beforeeachflightcheckthatthepropellers
arecorrectlyandfirmlyinstalled.
Wrench
Unlockdirection
-Ensureallpropellersareintactbeforeeach
flight.
-Keepyourdistancefromrotatingpropellers
andthemotorstoavoidcutsandinjury.
4.1 Installing the propellers
-Onlyusepropellersthathavebeenprovided
byVehotoensureoptimalperformance.
Attachthepropellerswiththegreycapstothemotorshaftswithout“P”marksandattach
thepropellerswiththeblackcapstothemotorshaftswith“P”marks(circledbelow).
Tightenthepropellersasperthelockdirection(seeabove).
4.4 Propeller Guards
YoucanprotectyourX-Drone’spropellersfrombeingdamagedduringflightsbyinstalling
thepropellerguards.ToinstallapropellerguardremovethetwoM3x8screwsattheendof
eachmotor,thenplacethepropellerguardinpositionandattachusingtheM3x12screws
provided.Tightenthescrewsasrequired.PleasekeeptheM3x8screwsinasafeplaceand
replacewhennotusingthepropellerguards.
PLEASE NOTE: Thepropellersaredesignedforautomaticturning,thereforedonottighten
excessivelyduringinstallation.
12
X-Drone Manual.indd 12-13
13
22/07/2015 14:28
5. X-Drone controller
Joystick and S1-S4 switch functions
1
2
3
5
4
6
7
Left joystick
Up and Down – Throttle / Left and Right – Yaw
Right joystick
Up and Down – Pitch / Left and Right – Roll
S1
1 Normal Flight 2 Not allocated 3 Not allocated
S2
1 Joystick Calibration OK 2 X-Drone and WiFi Range Extender Pairing
3 Calibrating Joystick
S3
Related Control to Servo
S4
1 GPS Mode 2 Normal Mode 3 Null (Reserved)
(Tilt up)
Stop (Medium)
(Tilt Down)
8
10
9
14
12
13
- Insert 4 AA batteries (not provided) into the battery compartment as per positive and
negative directions
15
- E nsure that the two joysticks are in the centre position. Push switches S1 and S2 to the
top position.
16
5.1 Switching on the controller
11
17
- P
ush the power switch on the controller to on. The power indicator will turn on and stay
solid red.
Before each use make sure the controller has sufficient battery. If the batteries are low the
controller will make a sound to indicate low power. Please remove the batteries if you do not
intend to use the controller for a long time.
18
5.2 Controller antenna
1. Antenna
7. S4 3 position switch
13. Right joystick
2. Repeater
8. Remote control power indicator
14. Strap hole
3. Smartphone mount
9. Photo capture indicator
15. Stop video button 4. S2 3 position switch
10.Video recording indicator 16. Start video record button
5. S1 3 position switch
11. Battery compartment
17. Photo capture button
6. S3 Camera angle control
12. Left joystick
18. Remote control power switch
14
X-Drone Manual.indd 15
To maintain a strong communication between the controller antenna and the X-Drone
receiver antenna please keep the controller antenna pointing towards the sky and ensure
that there are no obstacles between the controller antenna and the X-Drone receiver. You
may lose control of the X-Drone if the antenna is obstructed. Make sure that the smartphone
range extender and smartphone (if applicable) do not block the antenna.
15
22/07/2015 14:28
5.3 Controller operating instructions
Controller
X-Drone Direction
Control Method
T heleftjoystickcontrolstheX-Drone
elevation.
X-Drone Direction
Control Method
T herightjoystickalsocontrolsthe
X-Droneleft&righttilt.
ushtheleftjoystickupwardsoverthe
P
centrepositiontomaketheX-Dronetake
offfromtheground.(Pleasepushtheleft
joystickslowlytopreventtheX-Drone
fromsuddenlyandunexpectedlyrising).
ushthejoystickleftandtheX-Drone
P
willtiltandflyleft.Pushthejoystickright
andtheX-Dronewilltiltandflyright.The
X-Dronewillkeeplevelandstraightifthe
joystickiscentred.
ushthejoystickup,theX-Dronerises.
P
Pullthejoystickdown,theX-Drone
descends.Keepthejoystickatthecentre
positionandtheX-Dronewillhoveratthat
particularheight.
ovethejoystickfastertoincreasethe
M
tiltangle(maximumis30degrees)and
fasterflightvelocity.
S 2isusedtocalibratetheleftandright
joysticks.
oveS2toposition3,andturnonthe
M
controller.Thenmovebothjoysticks
clockwiseandcounterclockwisetwice,
ensuringeachrotationreachesthe
maximumdegrees.Afterwards,release
thejoysticksandmoveS2toposition1.
T heleftjoystickalsocontrolsthe
X-Dronerotation.
ushthejoystickleftandtheX-Drone
P
rotatescounterclockwise.Pushthejoystick
rightandtheX-Dronerotatesclockwise.
Ifthejoystickiscentred,theX-Dronewill
flyinthesamedirectionwithoutrotating.
Position 2
Position 3
T hevideorecordingindicator(green)
willlightupfor3secondstoindicate
thecompletionofthecalibration.
S 4switchistheflightmodetoggle
switch.
T herightjoystickcontrolstheX-Drone’s
front&backtilt.
Positi on1-GPSmode
ushthejoystickupandtheX-Drone
P
willtiltandflyforward.Pullthejoystick
downandtheX-Dronewilltiltandfly
backwards.TheX-Dronewillkeeplevel
andstraightifthejoystickiscentred.
ovethejoystickfastertoincreasethe
M
tiltangle(maximumis30degrees)and
forfasterflightvelocity.
X-Drone Manual.indd 16-17
Position 1
T hejoystickcontrolstherotatingangular
velocityoftheX-Drone.Movethe
joysticktoincreaseX-Dronerotation
velocity.
16
Controller
Position2-NRM(normal)mode
Position 1
Position 2
Position 3
Position3-NULLisreservedfunction
17
22/07/2015 14:28
6. X-Drone smartphone
range extender
- In GPS mode, when both joysticks are in the neutral (centre) position, the X-Drone
will hover at a fixed-point.
- In normal mode, when all joysticks are in the neutral (centre) position, the X-Drone
will remain level, but may drift in a horizontal direction.
- When in GPS mode the X-Drone motors cannot be turned on until the GPS is ready.
5.4 Pairing the controller and the X-Drone’s receiver
The X-Drone smartphone range extender is a wireless communication device that works in
the 2.4GHz frequency band and is used to increase the effective communication distance
between the smartphone and the X-Drone. The communication distance is affected by the
surrounding environment, such as blockages due to trees, signal reflection by buildings,
interference by other same frequency bands.
6.1 Guide to the smartphone range extender
2
The controller and X-Drone have already been paired together prior to shipping. You only
need to follow the instructions below if the controller or receiver have changed.
Make sure that the controller is turned off and then turn on the X-Drone. The front, rear
and tail indicators will light up. When you hear a ‘beep’ sound turn on the controller. The
video indicator will light up indicating that pairing has commenced. When the tail indicator
continuously flashes fast the link between the controller and the X-Drone receiver has been
successfully established.
1
4 6 5
3
7
1. Power indicator
4. Power switch
2. WiFi indicator
5. Charging port
3. Locking screw
6. Pairing button
7. Base
6.2 WiFi indicator
WiFi Indicator (Blue)
Description
Solid on
Range extender startup completed
Flashing fast
Range extender not paired with onboard camera
Flashing slowly
Successfully paired smartphone range extender with onboard camera
6.3 Power indicator
18
X-Drone Manual.indd 19
Power Indicator
Description
Red light solid on
Range extender is on
Red light flashes
Range extender is charging or low battery, please charge asap
Red light solid on
Charging is complete
19
22/07/2015 14:28
7. Flying the X-Drone
6.4 Pairing
Flying environment requirements
The onboard camera and smartphone range extender have been paired prior to shipping so
it is not necessary to carry out pairing again. If the WiFi indicator flashes quickly or remains
solid on please follow the instructions below to repair.
- Do not use the X-Drone in inclement weather, such as strong winds, snow, rain and fog.
1. Turn on the controller, X-Drone and smartphone range extender respectively.
- W
hile flying the X-Drone stay away from obstacles, people, power lines, shelters, bodies
of water etc.
2. O
nce the smartphone range extender’s WiFi indicated turns solid blue move the S2
switch on the controller to the centre position, then move back to ‘OK’.
3. P
ress and hold the pairing button on the smartphone range extender for 3 seconds.
The smartphone range extender will automatically restart for re-pairing and then the
WiFi indicator will flash slowly to indicate that the smartphone range extender has been
successfully paired with the onboard camera.
6.5 Charging the smartphone range extender
- S elect an open area with no tall buildings in the flying site. The presence of a large
number of steel buildings in the area will affect the compass.
- D
o not fly in a complex electromagnetic environment (such as near mobile phone case
stations or towers) to avoid transmitter interference.
- Do not fly in restricted or no-fly zones and abide by relevant laws and regulations.
Pre-flight check
- E nsure controller, X-Drone, smartphone range extender and smartphone are fully
charged.
Connect the smartphone range extender adapter to the mini USB port on the smartphone
range extender and connect the adapter to charge. It will take approximately 2 hours for the
battery to fully charge.
- Ensure propellers are correctly installed.
To turn the smartphone range extender on move the power switch to the on position.
When the WiFi indicator blinks slowly the smartphone range extender is ready.
- Check if the motors start properly after the X-Drone is switch on.
- E nsure the microSD card is properly inserted before using the camera to capture photos
and videos.
Before each flight check that the smartphone range extender has sufficient charge.
Turn the smartphone range extender on then press the pairing button once:
Power indicator flashes once
Range extender has over 80% charge remaining
Power indicator flashes twice
Range extender has over 50% charge remaining
Power indicator flashes three times
Range extender is low on charge
20
X-Drone Manual.indd 20-21
21
22/07/2015 14:28
7.1 Compass calibration
7.2 Starting/stopping the motor
IMPORTANT:Makesuretocalibratethecompassbeforeuseorineverynewflightlocation.
Thecompassisverysensitivetoelectromagneticinterference,whichcancauseabnormal
compassdataleadingtopoorflightperformanceorevenflightfailure.Regularcalibrationis
requiredforoptimumperformance.
MakesurethattheS1-S4switchesareinthepositionsasshownbelow.Toggletheleftand
rightjoysticksasshownbelowtostartthemotor.ThisisknownasCombinationJoysticks
Command(CJC).Afterthemotorshavestartedreleasethejoysticksimmediately.
- Donotcalibratethecompassinastrongmagneticfield.
- D
onotcarryferromagneticmaterial,suchaskeys,mobilephones,etc.whilecalibrating
thecompass.
- Thepropellersmustberemovedbeforecalibrationtoavoidaccidentalinjury.
Inawide,openareaturnonthecontrollerandX-Droneandmakesurethattheequipment
isworkingproperlyandfollowtheprocedurebelowtocalibrate.
S1
S2
S3
S4
Toggle Left Joystick to bottom left corner
Toggle Right Joystick to bottom right corner
Step 1
Step 2
Toggle remote control joysticks to
the position below
Rotate X-Drone 360 degrees
horizontally twice
Step 3
Step 4
Rotate X-Drone 360 degrees
Rotate X-Drone vertically (nose left)
vertically twice (nose downwards)
until green lights turn OFF
PLEASE NOTE:WhentheS4switchisinGPSmodethemotorscannotturnonuntilthe
GPSisready.
TherearetwowaystostopthemotorsontheX-Drone:
1. A
ftertheX-Dronelandstogglethethrottle(left)joystick,thenperformCJC.Themotors
willimmediatelystop.Releasethejoysticksassoonasthemotorshavestopped.
Place X-Drone on the ground
Front indicator (Green)
starts blinking.
Then release the joysticks
MOVE TO STEP 2
Green lights turned
ON and solid
Fast lights
blinks
SUCCEED
FAIL
RESTART
CALIBRATION
22
X-Drone Manual.indd 23
23
22/07/2015 14:28
2. A
fter the X-Drone lands, toggle the throttle joystick to the lowest position and hold for
3 seconds to stop the motor.
7.4 Failsafe protections
If the X-Drone loses signal from the controller the Automatic Flight Control System will
return it to the home point* and land safely. This reduces the chances of the X-Drone getting
lost or crashing in case the controller signal is lost.
*The home point is the X-Drone’s position where the X-Drone successfully scanned and
connected to the satellite. To ensure that the X-Drone successfully flies back to the home
point if it enters failsafe mode please only take-off after the X-Drone’s GPS has successfully
connected to the satellite.
If you lose control of the X-Drone during flight the X-Drone will automatically follow the
procedure below:
1. The X-Drone will automatically slow down and hover in one location.
IMPORTANT: Do not stop the motor during flight or else the X-Drone will crash.
7.3 Basic flight
1. P
lace the X-Drone on flat, open ground and ensure that the tail indicator faces
toward you.
2. If the X-Drone regains signal from the controller within 2 seconds it will return to normal
flight mode and will not enter failsafe mode.
3. If the X-Drone does not regain signal from the controller within 2 seconds it will enter
failsafe mode and will initiate automatic flight control to return to the home point.
2. Turn on the controller, smartphone range extender and X-Drone.
- T he X-Drone will continue to hover for 15 seconds and will evaluate the vertical distance
to the home point
3. W
ait until the tail indicator flashes slowly and the X-Drone enters a safe flying state.
Perform CJC to start the motor.
- If the distance is more than 25 metres the X-Drone will commence flying back to the
home point.
4. P
ush the throttle (left) joystick up slowly to smoothly take off. Please refer to section
5.3 for detailed instructions on controller operating instructions.
- If the distance is less than 25 metres the X-Drone will fly up vertically until it is 25 metres
higher than the home point and then commence the return.
5. W
hen landing, slowly pull down the throttle joystick to make the X-Drone descend slowly
to the ground.
- W
hen the X-Drone reaches the home point it will hover for 5 seconds and then
automatically land.
6. A
fter landing pull the throttle joystick to the lowest position and hold for 3 seconds or
until the motors stop.
Please note: The X-Drone cannot automatically avoid obstacles in its path while it is in
failsafe mode.
7. A
fter the motors stop, turn off the X-Drone, smartphone range extender and transmitter,
one after the other.
24
X-Drone Manual.indd 25
25
22/07/2015 14:28
8. Using the X-Drone app
How to regain control on the controller
IftheX-DroneisoutofcontroltoggletheS4switchonthecontrollerseveraltimestoswitch
flightmode.Whenthesignalisrestored,thecontrollerwillregaincontrolandyoucan
continuetousethecontrollertooperatetheX-Drone.
7.5 Battery level alarm function
WhentheX-Dronebatterychargeislowyoumustlanditassoonaspossibleorelseitmay
losepowercompletelyandcrash.TheX-Dronehasatwolevelbatteryalarmfunction.Level
1isalowpoweralarmandlevel2isaseverelowpoweralarm.Bothlevelsareindicatesby
theflightindicatorlights:
Low power
alarm level
Flight indicator light status
Low power risk prompt
Level 1
2frontindicatorsand2rearindicates
willflashslowly.
Inlevel1alarmconditiontheX-Dronewillfly
normallyforafewminutesandtheninitiate
thelevel2alarm.
ecarefulwhileflying,keeptheX-Drone
B
withinsightanddonotflytohighortoofar.
Level 2
2frontindicatorsand2rearindicates
willflashquickly.
Inlevel2alarmconditiontheX-Dronewillfly
normallyforafewminutesandinitiatethe
failsafemodeandstarttoautomatically
land.
heninlevel2alarmconditionplease
W
returnandlandtheX-Droneassafelyas
possibleanddonotpushthethrottlehard
ormakebigmovementsduringflight.
ThefreeX-DroneappisavailableforiOSandAndroidandallowsyoutoconnectyour
X-Dronetoyourphoneusingthein-builtWiFi.
InstalltheapponyourphoneopentheAppStore(iOS)orPlayStore(Android)onyour
phoneandusethesearchfunctiontosearchforMuviX-Drone.Selecttheappandthen
clickontheinstallbuttontoinstalltheapponyourphone.
Connecting to the app
Turnonthecontroller,smartphonerangeextenderandtheX-Droneandthenturnonthe
WiFionyourphoneandthenenterthephone’sWiFisetti
ngs.LookforX-Droneinthelist
ofavailablenetworksandselecttoconnect.Youmayneedtorefreshthelistorscanfor
networksforthecamcordertoappear.PleaseenterMUVIXD01asthepassword.
ExittheWiFisetti
ngsandopentheX-Droneapponyourphone.Tofinishconnectingtap
intheapp.
DuringlowpowerautomaticlandingyoucanregaincontroloftheX-Dronebyswitchingthe
flightmode(S4switch).Howeverdonotdosorepeatedlyasitmayreducethebatterylifeor
theX-Dronemaycrashduetoinsuffi
cientpower.
26
X-Drone Manual.indd 26-27
27
22/07/2015 14:28
8.2 Video recording
8.1 Guide to the App
Make sure that you are in video record mode by pressing the Video button. The Video
button will turn blue to indicate that it is in video record mode. Start recording by pressing
the operation button. To stop recording press the operation button again.
1
2
4
3
5
8.3 Photo capture
Make sure that you are in photo capture mode by pressing the Photo button. The Photo
button will turn blue to indicate that it is in photo capture mode. Take a photo by pressing
the operation button.
8.4 Fast shot photo capture
7
10
6
Make sure that you are in fast shot capture mode by pressing the Fast Shot button. The Fast
Shot button will turn blue to indicate that it is in fast shot capture mode. Take several photos
in one second by pressing the operation button.
8
8.5 Maximise the preview screen
9
On iOS devices you can maximise the preview screen in Video, Photo and Fast Shot Mode.
To maximise the preview screen touch the preview area. You can view the maximised
preview screen in both portrait and landscape. To record video or capture a photo or fast
shot press the operation button at the bottom of the screen. To exit the maximised preview
screen press the back button at the top in the right hand corner.
Please note: On Android devices you can only view the X-Drone app in landscape.
1. Video Resolution
6. Operation button
2. Number of files stored on microSD card
7. Video button
3. Remaining recording time available
8. Settings button
4. Recording duration
9. Fast shot button
5. Video preview
10. Photo button
28
X-Drone Manual.indd 28-29
29
22/07/2015 14:28
9. Specifications
8.6 Settings
Camera To change settings on the X-Drone press the settings button to enter the settings menu. You
can only change the size in record settings when you are in video record mode first.
Ambient operating temperature
0-50°C/32-122°F
Sensor size
1/2.3
Record Settings
Photo resolution
16 mega pixels
Video Resolution
Full HD 1080p
Frame rate
PAL
NTSC
1080p at 25fps or 50 fps
1080p at 30fps or 60 fps
960p at 25fps or 48fps
960p at 30fps or 48fps
720p at 25fps or 50fps
720p at 30fps or 60fps
480p at 50fps or 100fps
480p at 60fps or 120fps
Video recording format
MOV (H.264 codec)
Photo format
JPG
Size
Set the resolution and frame rate for video capture
View
Set the angle of view between broad, medium, narrow and small
Bit Rate
Set the bit rate between normal and high bit rate
Capture Settings
Size
Choose between capturing 8, 12 or 16 mega pixel images
Fast Shot
hoose between capturing 3 photos in 1 second, 6 photos in 1 second or
C
10 photos in 1 second
Param Settings
Video Content Loop
Turn on to continually overwrite files when the memory becomes full
Controller
TV Output Format
Set the TV output to PAL or NTSC
Data transfer distance
500m (1640ft)
Date/Time
S et the date and time on the X-Drone to match the date and time on your
phone
Battery life
8 hours
Operating current/voltage
150mA/6V
4 x AA batteries
Format
Select yes to format the microSD card. Note: Formatting will delete all files
Battery
Version
Shows the version of firmware that you have
Type
Shows the model number of your X-Drone
Smartphone Range Extender
X-Drone
Operating frequency
2.4GHz
Communication distance (open field)
300m/948ft
Battery
5300 mAh LiPo
Transmitting power
<=17dBm
Weight
1.4kg/3.09lbs
Power consumption1.5W
Hover Accuracy
Horizontal: ±2.5m / 8.2ft , Vertical: ±0.8m/2.62ft
Maximum tilt angle30°
Maximum climb/descent speed
Maximum flight speed
Climb: 6 m/s (19.69ft/s); Descend: 4 m/s (13.12ft/s)
20m/s (65.62ft/s) (Not recommended)
Wheelbase
450mm/1.48ft
Flight time
20-25 minutes
30
X-Drone Manual.indd 30-31
31
22/07/2015 14:28
www.veho-world.com
X-Drone Manual.indd 32
22/07/2015 14:28