1
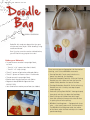
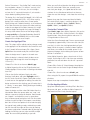
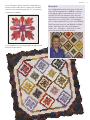
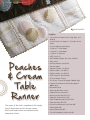
9
ISSUE
w w w. t h ro u g h t h e n e e d l e . c o m
Cut
Velvet
Slippers
Doodle Bag
Someday... Hawaii Quilt
Skinny Scarves
with lots of sparkle!
2 • THROUGH THE NEEDLE ONLINE
Table of Contents
Skinny Scarves
4 These long, narrow scarves made of t-shirt knit or sheer fabric are
fast to make and fun to wear – one, two, or even three at a time!
They’re a great item to make for craft fairs and bazaars — they also
make great gifts!
Cut Velvet Slippers with Lots of Sparkle
6 Looking for something quick and easy for Christmas gifts this year?
Embroidering a pair of slippers couldn’t be easier! For an elegant
look, add a design from the “Divine Flowers and Vines” Premier
Collection — a BERNINA exclusive.
Doodle Bag
8 Embellish this sturdy tote bag with a few spots of color and some
simple “stitch doodling” using needle and thread. Even if you’ve
never free-motion stitched before, you will find this easy project fun
to do!
Needle Minder
11 This handy needle-minder, created in BERNINA Embroidery
Software 6 for the BERNINA 830’s Jumbo Hoop, is stitched entirely
in the hoop. For smaller hoops, use the Hooping feature of the
software to split the design into parts and stitch it in multiple
hoopings.
Someday…Hawaii
14 If you love the look of Hawaiian appliqué, but have avoided it
because you just can’t imagine cutting all those intricate pieces, this
is the quilt for you! The intricate appliqué is cut and stitched using
the BERNINA CutWork Accessory and Software.
Peaches & Cream Table Runner
18 The curves of the circles complement the straight lines of the
pintucks on this luscious runner. The clever cutwork appliqué and
the decorative stitches that cover the circles are all sewn with
Circular Embroidery Attachment #83.
The Last Word
22 Valuable coupons, a list of quick links, and a sneak peek inside the
next issue of Through the Needle ONLINE.
M anagi ng E di t or / C r e a ti ve D i r e cto r
Jo L ei ch t e
C ont r i but i ng E dito r
B arb ara Wei l an d Ta lbe r t
G r aphi c A r t i s t
L i sa K l i n g b ei l
C ont r i but i ng A uth o r s
S u san B eck
B u n n y G at es
N i n a M cVei g h
Paisley Christmas
Collection 12355
© OESD 2011
Through the N eedl e Onl i ne i s p u blished six
ti m e s a ye a r b y BER N IN A o f Am e r i ca , I nc. for
m a ch i n e sti tch e r s a n d e m b r o i d e r e r s o f all types
a n d a l l ski l l l e ve l s.
Th i s p u b l i ca ti o n m a y b e sh a r e d a n d r e produced in
i ts o r i g i n a l fo r m a t, w i th th e sti p u l a ti o n that credit
b e g i ve n to Through the N eedl e Online .
3 7 0 2 Pr a i r i e L a ke C o u r t, Au r o r a , IL 6 0 504
b e r n i n a u sa .co m
th r o u g h th e n e e d l e .co m
© BER N IN A o f Am e r i ca , In c., 2 0 11
ISSUE 8 • 3
Needle Notes
Winter is my favorite time for sewing, all snug and warm in my sewing room, with pretty drifts of snow outside the
window and colorful piles of fabric and trims by my sewing machine. (In my dream sewing world, snow magically clears
itself from my driveway; no shoveling required!) Christmas, Hanakkuh, and Kwanza are only a few weeks away, and
we suspect that you haven’t quite completed your holiday shopping and sewing. For this issue of Through the Needle
ONLINE we’ve collected several quick-and-easy projects that lend themselves to stitching in multiples. Set up a sewing
assembly line and get stitching!
Make Sharon Clark’s handy “Needle Minder” for all of your sewing friends – who wouldn’t appreciate a book for
organizing their used machine needles? The ladies and girls on your list will love Susan Beck’s pretty scarves. They are
also terrific items to make in multiples for craft shows. Simply set up your serger and go! The appliquéd and stitched
embellishments on Sarah Goodman’s “Doodle Bag” take only minutes to complete; make these bags for your friends,
using a different assortment of shapes and squiggles for each one. And what could be simpler than embroidering a
design on slipper “blanks”? Bunny Gates’ “Cut Velvet Slippers” make a lovely stocking stuffer.
If you’re looking for a way to keep warm during chilly nights, Mary Beck’s “Someday… Hawaii” quilt will keep you
covered while also warming your spirit with thoughts of beaches and sunshine. Don’t let the intricate appliqué designs
scare you — BERNINA’s CutWork Software and Accessory make cutting and stitching a breeze! Decorate your home
for the holidays with Nina McVeigh’s elegant table runner. Choose colors to enhance your décor, or shades to celebrate
winter and the holiday season.
For more gift ideas, check out the back issues of Through the Needle ONLINE archived
at www.ThroughTheNeedle.com and visit the BERNINA USA blog, www.WeAllSew.com.
Send photos of your holiday sewing projects to [email protected] — we love to see
what you’re sewing! Happy Holidays!
Jo Leichte
Editor
Quilted
Holiday Stocking
It’s as easy as 3-2-1. With just three fabrics and two stitches you
can make one elegant stocking for the holidays. By adding a bit
of quilting and interesting ribbons and trims, you can design your
own unique look. Cheers to that!
Project by Lisa Klingbeil
Visit WeAllSew.com for more project instructions and sewing tips!
4 • THROUGH THE NEEDLE ONLINE
Skinny Scarves
by SUSAN BECK
These long, narrow scarves made of t-shirt knit
or sheer fabric are fast to make and fun to wear
– one, two, or even three at a time! They’re a
great item to make for craft fairs and bazaars –
and they also make great gifts!
Directions
Cut a rectangle of fabric 10” wide and 3 yards long.
Note: The more lightweight the fabric, the wider the
scarf can be (12”-14”). If the fabric has more bulk, you
can cut it very narrow (6”-8”).
Thread the serger for a 3-thread rolled hem, adjusting
the tensions as directed in your user manual. Generally,
the needle tension will be normal, the upper looper
tension will be loose, and the lower tension will be
tight. Sew a sample on fabric scraps to decide if the
resulting rolled edge looks the way you want it to.
Adjust the settings as needed. Different fabric types
and weights may
require different tension
adjustments for the
perfect rolled edge.
Serge all four edges of the scarf, starting at one end
and serging off the opposite end, and trimming the
edge slightly as you go.
Supplies
•3 yards of lightweight, sheer, or single knit fabric
in polyester, cotton, rayon, or silk (yardage will
make 4-6 scarves)
•Serger with 2- or 3-thread rolled hem capabilities
•Three cones or spools of fine (60-weight) thread
to match or blend with the fabric
•Seam sealant
ISSUE 9 • 5
Tip: Hold your hand lightly on the fabric to the left of
the foot to make sure the fabric is going under the
needle and not falling away after it passes the knife.
Option 3: To wear
two or three scarves
together, place them
side-by-side and treat
them as one.
option 3
Tips for a Perfect Rolled Edge
If the fabric is not rolling to the underside:
Once all four edges are stitched, place a dot of seam
sealant on each corner. Once the sealant is dry, clip the
thread tails close to the corners.
Option: Slightly round each corner, serging from start
to finish without stopping. Overlap the stitches at the
beginning and end of stitching, then secure the stitches
with seam sealant as directed above.
Wearing the Skinny Scarves
Option 1: Fold the scarf in half and place it around your
neck. Slip the two loose ends into the loop formed at
the fold.
Option 2: Place the center of the scarf at the center
front of your neck. Take each end to the back and then
back around to the front, leaving the ends loose on
each side.
option 1
•You may be trimming too much fabric away and
there isn’t enough to roll under. To correct this,
adjust the cutting width (to a higher setting).
This moves the knife to the right, which leaves
more fabric to roll to the underside as the stitch is
formed.
•The fabric may be too stiff or heavy to roll. In this
case, use a lighter weight fabric if rolled edges are
desired.
If you are having trouble feeding the fabric straight
under the foot, press the fabric, using spray starch
along the edge of the scarf. This will stabilize the
edge so that trimming is easier and the stitch forms
smoothly around the edge.
If the stitched edge has a lot
of “whiskers,” place a strip
of water-soluble stabilizer
(such as AquaFilm by OESD)
along the edge of the scarf,
then serge through both
layers. The stitch will form
over the stabilized edge,
giving a clean, smooth rolled
hem.
After stitching is complete,
hold the rolled edge with one hand and gently pull
the stabilizer from the stitching. Remove any excess
stabilizer with water if needed.
option 2
A 2-thread rolled edge can be used if your serger
has this capability. This stitch formation requires only
two threads (the right needle and lower looper) and
results in a more delicate edging than the 3-thread
rolled hem. It’s especially nice on sheers and other
filmy or lightweight fabrics.
Cut Velvet
Slippers
6 • THROUGH THE NEEDLE ONLINE
by BUNNY GATES
with lots of sparkle!
For additional projects featuring OESD’s “Divine Flowers & Vines”
Premier Collection #1102, visit www.berninausa.com.
Supplies
•Embroidery system
•OESD “Divine Flowers & Vines” Premier
Collection #1102
•Slippers from www.allaboutblanks.com
•OESD Hydrostick Tear-Away stabilizer
Looking for something quick and easy for Christmas gifts
this year? Embroidering a pair of slippers couldn’t be easier!
These Velcro-Closure Slippers from All About Blanks make
a wonderful personalized gift for children and adults. For
an elegant look, add a design from the “Divine Flowers and
Vines” Premier Collection — a BERNINA exclusive.
•OESD AquaFilm Topping
Plan the Layout
•505 Temporary Spray Adhesive
Open design #BE110209 from the Divine Flowers & Vines embroidery
collection in your embroidery software.
•Isacord Embroidery thread
•Organ Embroidery needle,
size 80/12 Sharp
If you do not have embroidery software, download the free BERNINA
Artlink 6 from www.berninausa.com > Products > Software.
•Water-soluble marker
Click on the Hoop icon and select the artista 255 x145 Oval w/X-Y
Lines. Print two copies of the template.
•Pen or pencil
•Crafting knife
•EZ Glitzer and crystals
•Large Oval Hoop
On both paper templates, outline the parts of the design that will be
used on the slippers, as well as the horizontal and vertical center lines.
Note: We’ve used a thick permanent marker instead of a pen or pencil
to make the lines easy to see in the photo.
ISSUE 9 • 7
From one paper
template, trim the
excess paper from
around the design.
Position the flower
template on the slipper
as desired, keeping the
design just to the left of
the Velcro strip. Transfer
the horizontal and
vertical center lines to
the slipper.
Tip: Be careful not to
get too close to the sole of the slipper, as this may cause
problems when stitching the design.
Place the slipper on the second paper template,
matching the center lines. Trace the slipper onto the
template. Note that the entire flap does not fit within
the hoop. When the flap is embroidered, the design
must be moved to the left far enough for the flap to fit
inside the hoop.
Embroider the Slipper
Hoop a layer of HydroStick Tear-Away Stabilizer. Mark
the horizontal and vertical center lines of the hoop. For
the slipper flap to fit inside the hoop the design must
be moved to the left; mark the new vertical center mark
on the center line. Attach the hoop to the embroidery
machine and use the onscreen editing features to move
the hoop until the needle is aligned with the new center
mark. Remove the hoop from the machine.
In the area where the slipper will be placed, moisten
the Hydrostick stabilizer using a damp sponge or an
envelope wetter. Place the slipper on the stabilizer,
aligning the horizontal and vertical placement lines;
finger press into place. Allow the stabilizer to dry for a
few minutes.
Tip: Slow down your machine and watch as its stitching.
You may need to gently hold the sole of the slipper to
keep it from pulling the slipper away from the stabilizer.
Remove the hoop from the embroidery machine.
Remove the slipper and stabilizer from the hoop and
trim the jump stitches.
Re-wet the HydroStick to remove the excess stabilizer
from the slipper.
Remove the excess AquaFilm Topping by gently tearing
it away from the stitches. Rinse away any remaining
stabilizer with plain water.
Mirror-image the design and repeat the above steps for
the other slipper.
Add the Finishing Touches
Some of the flowers and leaves in this collection are
stitched with multiple layers of satin stitching. Following
the instructions included with the collection and using
the chart to locate the specific satin areas to cut,
carefully slice these threads using a crafting knife. This
will add beautiful dimension to your embroidery.
Add EZ Glitz
Swarovski Crystals
as desired using the
EZ-Glitzer.
Thread Color Substitutions
Color #1
Brown Leaves Isacord 0722 — no change
Color #2
Dark Blue Petals Isacord 4332 — change
to Kiwi 5822
Lightly spray a piece of AquaFilm with 505 temporary
spray adhesive and place over the slipper.
Color #3
Dark Brown Petals and Cut Satin Leaves
Isacord 1565 — change to Bordeaux 2123
Attach the hoop
to the embroidery
machine. Stitch the
design, skipping
the sections not
outlined on the
template.
Color #4
Light Blue Cut Satin Petals Isacord 4732
— change to Grasshopper 5933
Color #5
Peach Flowers Isacord 1761 — change to
Blossom 1921
Color #6
Stamens Isacord 0643 — change to
Blossom 1921
Color #7
Stamen Outline Isacord 3654 — change to
Grasshopper 5933
Doodle
Bag
8 • THROUGH THE NEEDLE ONLINE
by SARAH GOODMAN
Embellish this sturdy tote bag with a few spots
of color and some simple “stitch doodling” using
needle and thread.
Even if you’ve never free-motion stitched before,
you will find this easy project fun to do!
Gather your Materials
•¾ yard of canvas or other heavyweight fabric,
cut into:
–Two 18” x 18” squares (tote front & back)
–Two 22” x 5” strips (straps)
•Three 5” squares of printed or solid-color fabrics
•Three 5” squares of Steam-a-Seam 2 fusible web
•Thread to match heavyweight fabric
•Black or dark thread to contrast with fabrics
•Edgestitch foot (BERNINA Edgestitch Foot
#10/10C/10D)
•Your favorite free-motion presser foot (see sidebar)
There are many presser foot options for free-motion
stitching, such as these BERNINA accessories:
•Darning Foot #9: Circular metal sole that sits
above, not touching, the feed dog.
•Freehand Embroidery Foot #24: Similar to Darning
Foot #9, but with a piece cut from the front for
added visibility between the toes of the foot.
•Teardrop Embroidery Foot #26: Similar to Darning
Foot #9, but with a smaller, tear-drop-shaped
needle opening.
•Freehand Quilting Foot #29/29C: Lozenge-shaped,
clear plastic sole that sits above the feed dog.
•Echo-Quilting and CutWork Foot #44: Large,
clear sole marked with concentric circles for ease
in spacing lines of echo quilting.
•BERNINA Stitch Regulator — Equipped with three
soles — clear metal, open metal, and clear plastic.
The BERNINA Stitch Regulator reads the motion
of the fabric under the foot and adjusts the motor
speed accordingly.
ISSUE 9 • 9
Make the Straps
Fold the strap pieces in half lengthwise, wrong sides
together, and press.
Open the strap and fold the outer edges in to meet the
center fold; press.
Re-fold along the original foldline and press with turned
edges even. Attach the edgestitch foot to the machine
and adjust the needle position to one side. Topstitch
close to each edge of the strap.
To prevent the strap ends from raveling, overcast the
edges with the Vari-overlock stitch using Overlock
Foot #2/2A.
Embellish the Tote Front
Affix a square of fusible web to the wrong side of each
5” square, following the manufacturer’s instructions.
Cut a 3”-diameter circle from each square of the
fusible-backed fabric. Peel away the paper backing.
Arrange the three
fabric circles on one of
the 18” squares (the
bag front) as desired.
Fuse in place following
the manufacturer’s
instructions.
Thread the machine with
black or dark thread
and lower the feed dog.
Attach your favorite free-motion presser foot to the
machine.
Create a “line drawing” over the fabric circles:
•Starting at the lower edge of the fabric, stitch a
“stem” up to the circle.
•Stitch a shape over the circle, several times if desired.
•Stitch back down to the lower edge of the tote-front
square.
The “doodling” is not exact, so just stitch until you are
satisfied with the results. Repeat for each circle until you
have three “drawings.”
Tip: Practice drawing these shapes (or make up
your own) using pen and paper before stitching
on the fabric. This will help improve your eye/hand
coordination when stitching on the fabric circles.
Make the Tote Bag
Place the two 18” fabric squares right sides together.
Stitch along the sides and bottom of the bag using a
½”-wide seam allowance, leaving the top edge open.
Apply a seam finish to the seam edges using one of the
following methods:
•Vari-overlock stitch using Overlock Foot #2/2A
•Serger 3- or 4-thread overlock
•Bias binding
To create the base
of the bag, align
the side and bottom
seamlines to form a
triangle as shown.
Draw a stitching line
perpendicular to the
seamline 2” from
the point of the
triangle.
10 • THROUGH THE NEEDLE ONLINE
Trim the excess fabric ½” from the stitching and finish
the seam allowances with the vari-overlock stitch and
Overlock Foot #2/2A.
Leaving the bag inside out, turn under ¼” at the upper
edge; press. Turn under again an additional 1” and
press. Pin in place.
Turn the bag right side out. From the outside, stitch
about 7/8” from the inner fold of the turned hem,
stitching as close to the edge as possible.
Pin one strap in place on the inside of the bag front,
with the outside edges 3” from the side seams; pin in
place. Repeat, pinning the second strap to the back of
the bag.
Stitch the straps end in
place with an X and a
square as shown.
Sarah Goodman
Sarah is a self-taught seamstress with an eye for
detail. She enjoys sewing everything from clothing
to home décor and is always
looking for new techniques to
learn. A wife and mom of two
living in Southern California,
she loves helping family and
friends realize an idea for a
sewing project. When she sees
something she likes, her usual
response is “I can make that!”
I S S U E 9 • 11
Needle
Minder
by SHARON CLARK
Supplies
•BERNINA Embroidery Software 6
•BERNINA 830 sewing and embroidery
machine
•Jumbo Hoop
•OESD Polymesh Cut-Away stabilizer
•One 17” x 24” rectangle of lightcolored fabric
•One 17” x 24” rectangle of “Vine”
Black/Gray from the Habitat Collection
by Benartex
•One 17” x 24” rectangle of Warm &
Natural quilt batting
•Wonder Under or Steam-a-Seam 2
fusible webbing
•505 Temporary Spray Adhesive
•Isacord embroidery thread
•Rotary cutter and mat
•¼” foot (BERNINA Patchwork Foot
#37/37D or Patchwork Foot with Guide
#57/57D)
This handy needle-minder, created in BERNINA Embroidery
Software 6 for the BERNINA 830’s Jumbo Hoop, is stitched
entirely in the hoop. For smaller hoops, use the Hooping
feature of the software to split the design into parts and
stitch it in multiple hoopings.
Open and Save the File
Select File > New to open a new file.
Select File > Save As; name the file NeedleMinder.ART and click OK.
Click on the Hoop icon to toggle the hoop off.
Right click on Grid icon to open the Options dialog box. Click on
the Grid tab and select Show Grid and Snap to Grid. Set Horizontal
spacing to 10.0 mm and Vertical spacing to 10.0 mm. Click OK.
Create the Grid
Left click on Outline and select Single.
Left click on the Rectangle tool; click and drag a rectangle on the
screen, then left click to place it. Press the ESC key on the keyboard to
deactivate the tool. Don’t worry about the exact size of the rectangle.
12 • THROUGH THE NEEDLE ONLINE
With the rectangle selected, click on the Object
Properties icon. Select the General tab; set the Width to
280 mm and the Height to 180 mm. Click OK.
Click Show All. If the drawn rectangle does not align
with the lines of the grid, left click and drag one of the
vertical lines to a grid line, watching the measurements
in the lower right corner of the screen. Do the same for
one of the horizontal lines.
Hold down the Ctrl key and press D on the keyboard
to create a duplicate rectangle. This will stitch first and
secure the fabric in place. The duplicate is not yet visible
in Color Film.
Add the Lettering
Right click on the Lettering icon to access the dialog box
through Object Properties. Type Universal in the box,
choose an alphabet, and set the height to about 17.8
mm and width to 100 mm. Click Apply.
Left click in the fourth horizontal grid line from the top
to center this word at the left of the filled-in columns.
Drag it so the horizontal grid line is running through the
center of the word horizontally, then deselect it. The left
edges will be aligned later.
In the still-open Object Properties dialog box, repeat this
process for each of the following:
Click Show All. Be sure the rectangle is selected.
•Embroidery
Left click on the Open Object tool. Starting from the
right side of the rectangle:
•Microtex
•Click where the top line of the rectangle and the
fourth line in from the edge (including the edge)
intersect.
•Quilting
•Click at the top intersection and pull the mouse down
vertically to the lower horizontal line.
•Topstitch
•Click, making sure they join.
You have made a column with three small grid squares.
Repeat six times for a total of seven identical columns.
Starting seven squares in from the left side of the
rectangle and two squares down from the top, use the
same Open Object tool process to create nine horizontal
rows.
Starting two grid squares down from the top, create
vertical lines on each grid line between the columns,
but do not do this for the far right column.
•Metallic
•Ballpoint
•Stretch
When all the words have been placed on the horizontal
lines, click OK.
Click on the Show Individual Objects icon in Color Film.
While holding down the Shift key, left click on the first
word and scroll down to the last word; they should all
turn blue.
Click on the Align Left to line up the left edges of the
words. Move the whole group, centering the word
“Embroidery.” Press ESC.
Save the design.
Press ESC to deactivate the Open Object tool.
Create the Numbers
Clean up the stitch path to make it more efficient by
deleting most of the jump stitches:
Use the same process to create the numbers as used for
the words, using the same alphabet and dimensions:
70, 75, 80, 90, 100, and 110. Place the numbers in
the top row of the first six columns (left the far right
column blank).
•In Color Film, click on Show Individual Objects; you
will see just a rectangular box in one square and the
grid in the other square.
•Click on the grid square.
Make the Candlewicking Stitches
•Scroll down to the last object; this should highlight all
but the first object (the rectangle).
Candlewicking knots in three sizes help keep track of
how much each needle has been used: lightly used,
moderately used, well used.
•Click on the Group icon at the lower left corner of the
screen.
•With these objects grouped, select the
Blackwork Run icon and press Enter. The
cleaned-up version of the design is visible in
Color Film. Notice that the number of jump
stitches is greatly reduced.
Save the design.
Click on Outline and select the candlewicking border.
Use the Open Object tool to draw a line from the left
edge of the far left square under the number 70 to the
right edge of that square. Left click to place; press enter.
Select and drag the line to center, and then refine using
the arrows to center it in the square.
ISSUE 9 • 13
Right click and drag a clone of the line to each of the
next two squares. (When you release the mouse the
clone will be placed; there is no need to left click.)
Stitch the design. There is no need to select the Basting
Stitch function because of the rectangle of securing
stitches.
Press ESC.
When the stitching is complete, remove the fabric from
the hoop. Trim, leaving ¼” beyond all edges of the
rectangle.
Left click and drag a box around the group of three
candlewicking stitches. Click on the Group icon.
Right click and drag to create five clones; center these
in each column below the numbers so there is a
candlewicking stitch in each square except the last one.
Deselect.
Left click and drag a box around the whole group
of candlewicking stitches. Click on the Group icon.
Deselect.
Save the design.
Insert an Ornamental Design
Select File > Insert Design. Open the ornamental design
of your choice or the free small flowers.ART design
available at www.ThroughTheNeedle.com.
While the design is selected, center it at the top of the
text. Press ESC.
Select a color for your design from the Color Bar.
Save the design.
Cut a piece of contrasting fabric and a piece of fusible
web the same size as your stitched-and-trimmed piece.
Adhere the sticky side of the fusible web to the wrong
side of the contrasting fabric. Peel off the paper backing
and adhere the sticky fabric to the embroidered piece.
Cut a 2”-wide bias strip for the binding; fold in half
lengthwide, wrong sides together, and press. Stitch
the binding to the outside of the project, ¼” from the
edge. Fold it over to the inside and align the edge with
the stitching. Hand-stitch in place.
Fold the needle minder into three sections. Stitch
corresponding parts of a snap closure to the outer
edges of the needle minder, one on the inside and one
on the outside. Make sure that the two halves meet
when the minder is closed.
Add a small decorative item such as a decorative button
to the outside of the needle minder.
Complete the Embroidery Design
Click on the first square in Color Film. Scroll down to
the last object; while holding the Shift key down, click
on the last object. All the objects should turn blue.
Alternatively, press Ctrl + A to select all of the objects.
Click the Group icon.
At the top of Color Film, click on Show Individual
Objects. This will show the combined objects in one
color group and show a continuous stitch-out.
Right click on the Hoop icon; select Jumbo Hoop #26.
Select the entire design.
Click on the Rotate Hoop icon two times to turn the
design to fit within the Jumbo Hoop.
Save the design.
Assemble the Needle Minder
Cut pieces of the quilting fabric and batting large
enough to hoop in the Jumbo Hoop. Lightly spray the
fabric with 505 temporary adhesive and adhere it to the
batting. Repeat to adhere the PolyMesh to the stabilizer,
making a stabilizer/batting/fabric sandwich. Hoop
securely.
Sharon Clark has a Piano Performance and
Education degree, and teaches students who range
from the very young to piano teachers. She has had
a passion for sewing for forty years. Thanks to her
talented software teacher, Suzanne Brown (left), the
never-ending support from Mary Collen (right), and
her wonderful dealer, Sewing Machine Service in
Renton, WA, she is now addicted to her BERNINA
830 LE and all things software. One of her favorite
things to do is sew with her very special sewing
friends. Visit her website at SharonInStitches.com.
http://www.sharoninstitches.com
14 • THROUGH THE NEEDLE ONLINE
Someday... Hawaii
by MARY BECK
Finished blocks: 8” x 8”
Finished quilt: 47” x 47”
If you love the look of Hawaiian appliqué, but
have avoided it because you just can’t imagine
cutting all those intricate pieces, this is the quilt
for you! Mary Beck (The Sewing Room, Tucson,
AZ) cut and stitched the intricate appliqué for
her quilt using the BERNINA CutWork Accessory
and Software. Are you wondering how this
quilt got its name? Mary’s wonderful husband
of 25 years told her that he would take her to
Hawaii…someday!
I have a confession to make. I never intended to do
machine embroidery. Ever. Then I purchased my first
BERNINA, the aurora 440QEE, and I haven’t looked
back since. When the CutWork Accessory and Software
was introduced, I just knew this was a tool I was going
to love.
Timeless Treasure’s “Tonga Treat Packs” (10” squares)
are perfect for the Hawaiian blocks that come with the
CutWork Software (in SP2). Because I could not find
a quilt pattern that suited me, I turned to the Quilter
program in BERNINA Embroidery Software 6 and
drafted a basic layout for my quilt.
I started with two
Tonga Treat Packs:
Sugar Plum for the
appliqués, block
frames, and inner
border, and Meringue
for the appliqué
backgrounds and
set-in triangles. I
purchased fabric
yardage for the two
outer borders and
binding, and used
leftover squares to
piece the back.
ISSUE 9 • 15
Darlene Zimmerman’s “Easy Scallop Tool” made creating
the wavy border a breeze. It is said that “necessity is the
mother of invention.” In this case, the set-in triangles
cut from the 10” squares did not quite fit, so I created a
unique border by adding leftover strips.
This design fits in the Deco 340 Hoop B (140 x 200) and
the Large Oval Hoop #26 (255 x 145). When cutting
designs with a machine other than a Deco I prefer
Echo-Quilting and CutWork Foot #44, as the wide base
of this foot minimizes the chance of the foot catching
under the cut edges of the fabric. However, this might
make the design too large for the Large Oval Hoop; in
this case, either reduce the size of the design slightly
or very carefully use Teardrop Embroidery Foot #26
instead. If you have a BERNINA 830, use the Jumbo
Hoop and cut multiple sets of shapes.
Create the Appliqué Files
Note: The shapes will be edited, and any changes made
to the appliqués will be reflected in the cutwork as well.
In the Cutwork Software choose File > Open. Select
Quilt1 from the cutwork-ready files and click Open.
Select the design once it is open in the work area.
While the design is selected, check the box next to
Proportional and change the size of the design to
125 mm (5”).
Choose File > Save As and save as block1_app.
In Object Properties click on the Fill tab (bucket icon).
Choose Appliqué. Place a check in Cleaning and choose
Laser Cut.
Click on the Outline tab (pencil icon) and select
Running. Scroll down and select ZigZag08, which is
the first stitch after #180. Choose a dark color so that
it stands out on the appliqué for editing. De-select the
design and examine the stitching; you will notice that it
is “wonky” in some spots. Editing, deleting and adding
nodes will correct this.
Select the design and then select Edit Nodes from the
side tool bar. Note that square nodes are “cusp” and
indicate a corner or change of direction. Round nodes
are “smooth” and indicate a curve. In some places
they will be on top of each other. Left Click on a node
to select it and then Right Click to open a new dialog
box. You will then have options that include changing
the type of node, adding a node, and deleting a node.
You can also edit the angles of the curves by moving
the arrows attached to a selected node. By pressing and
holding the Shift key you can select and edit multiple
nodes. Be sure to Save periodically as you edit.
When you are finished, deselect the design and review
how the stitches look. When you are ready to cut
and stitch your design, it is a good idea to do a test
stitchout. A wise friend once told me that there are
those who test their designs…and those who wish they
did!
Repeat these steps for three more Hawaiian blocks,
for a total of four shapes. I used these designs in the
featured quilt: Quilt1 (4 blocks), Quilt2 (4 blocks),
Quilt4 (1 block), and Quilt5 (4 blocks).
Create the Cutwork Files
Open block1_app. Open Object Properties, click on the
Fill tab, and select None. Select Cutwork in the Object
Properties box. Select Running Before and enter 1.0.
Change Number of Passes to 3.
Select the Create Rectangle tool. Draw a square around
the appliqué, approximately 138 mm on each side. (Be
sure that it is within the stitching boundaries of your
hoop.) While the square is selected, choose Duplicate
and select a new color for the second square. In the
Sequence Manager, click and drag the squares to form
Position 2 to Position 1.
Select Object Properties, place a check mark in Stitch
Length, and change it to 5.0. You have now created a
placement line and tack-down line for a 6” square of
fabric.
Choose Edit > Select All. Select Manage Hoop Options.
Place a check next to Center Design to Hoop and then
click OK.
Choose File > Save As and save as block1_cut.
After saving the file, export it to your BERNINA machine
of choice.
Repeat these steps to complete the other blocks.
Cut the Appliqué Blocks
Spray four colored squares with Mary Ellen’s Best Press.
Spray one side, press, and flip the fabric. Repeat this
two more times for a nicely starched square.
16 • THROUGH THE NEEDLE ONLINE
Cut 6” squares from each of four different fabrics. Cut
four 5½” squares of OESD Fuse & Fix Stabilizer and fuse
one to the center back of each 6” square.
Insert the Cutwork Plate into your machine. Note: The
bernette Deco 340 does not require a separate throat
plate.
Hoop a layer of OESD HydroStick Stabilizer (do not
moisten it!) and stitch the placement line. Stack
and place the four 6” squares in the hoop over the
placement line and stitch the tack down line.
Tip: 505 Temporary Adhesive Spray is helpful for
holding the fabric pieces together. (Do not spray near
your machine!)
Stitch the Running Before line.
Tip: When cutting just one layer of fabric, I like to
give the blade more material to cut. After stitching
the Running Before line, I remove the hoop from the
machine and tape a piece of cardstock to the back of
the hoop. This is a good
time to recycle those
advertising postcards
you get in the mail!
Then I reattach the hoop
and continue cutting.
(This tip came from the
Yahoo CutWork Group.)
Stitch the Appliqué
Press and lightly starch one of the 10” background
squares. Cut a piece of Fusible PolyMesh Cut-Away
Stabilizer larger than your hoop. Fuse the background
square to the center of the PolyMesh. Mark the center
of the square, and then hoop the fabric and stabilizer.
Thread the machine with thread in a color to match the
appliqué. Stitch the placement line.
Remove the sewing needle from the machine. Insert the
CutWork blade and finish the design, working through
all four blade positions.
After the placement line is stitched, carefully remove
the paper backing from the corresponding appliqué
shape and place it in the hoop. It may help to peel one
section first and stick it down, then gradually peel and
smooth the rest of the fabric piece into place. Handle
the appliqué shapes carefully to prevent distortion.
ISSUE 9 • 17
Finish stitching the design; remove the hoop from the
machine and the fabric from the hoop. Press the block
and trim it to the desired square size. It is not necessary
to remove the stabilizer.
Cut and appliqué the rest of your blocks to add a touch
of Hawaii to your home!
Mary Beck
I am a Registered Nurse by training, but a wife and
mom of three by profession. I dabbled in sewing as
a teenager, but didn’t really embrace it until I was
married. Life with kids sometimes takes over, but
now that they are moving on to college I can spend
more time in my “Sewing Cave,” as my youngest
calls it. Fellow residents of the “cave” are a BERNINA
830LE, bernette Deco 340, and BERNINA 1300MDC
serger. I work part-time at the Sewing Room in
Tucson, AZ — although it is hard to call it “work”
when you get to do something you love!
18 • THROUGH THE NEEDLE ONLINE
by NINA McVEIGH
Supplies
•1¼ yards of silk dupioni for the top, back, and
binding
•¼ yard each of silk dupioni in 3-5 colors for the
circles
•½ yard needle-punched fleece
•2 yards of 1"-wide ribbon
•1 yard of ½"-wide ribbon
•1 yard of ⅜"-wide lace
•OESD Fuse & Fix
Peaches
& Cream
Table
Runner
The curves of the circles complement the straight
line of the pintucks on this luscious runner.
Both circles and pintucks are enhanced with
decorative stitches.
•OESD MediumWeight Tear-Away stabilizer
•Spray starch
•Drawing compass with pencil
•Drawing paper
•Microtex needles, size #80/12
•Metafil needles, size #80/12
•Double needles, size #80/2.0
•OESD Isacord in desired colors
•YLI Fine Metallic Thread
•YLI Painters Threads (for optional bobbin play)
•Superior Threads Razzle Dazzle (for optional
bobbin play)
•Buttonhole gimp
•Water-soluble fabric marker
•Corded Pintuck Attachment
•Reverse Pattern Foot #1/1C/1D
•Edgestitch Foot #10/10C/10D
•Open Embroidery Foot #20/20C/20D
•Patchwork Foot #37/37D
•Pintuck and Decorative Stitch Foot #46
•Walking Foot #50
•Leather Roller Foot #55
•Circular Embroidery Attachment #83
ISSUE 9 • 19
Cut the Fabric
Cut the following from the silk dupioni:
•One 16" x 20" rectangle for the center of the runner
•One 18" x 16" rectangle for the end bands
•Three 2½" x 45" (or the width of the fabric) strips
for the binding
•One 17" x 36" rectangle for the backing
Cut one 17" x 36" rectangle of batting.
Create the Circle Appliqués
Using the compass, draw
several circles of different
sizes on the paper. Cut
out the paper circles and
make a hole in the center
of each one by poking the
sharp end of the compass
through the paper.
Heavily starch the fabric for the runner center. Arrange
the circles on the fabric to determine placement. Mark
the center of each circle with a water-soluble marker.
Cut the circles
fabrics into pieces
large enough to
accommodate the
circle patterns.
Following the
instructions on the
package, fuse the
Fuse & Fix to the
back of the circle
fabrics. Use the paper circles as a guide for marking the
center of each fabric piece.
Attach Open Embroidery Foot #20D to the machine and
engage the BERNINA Dual Feed. Select a straight stitch.
Install Circular Embroidery Attachment #83. Note that
the pivot pin of the attachment slides back and forth to
create circles of various sizes.
Place a paper circle
on the pivot pin,
and then slide the
pin so that the
edge of the circle
is aligned with the
sewing machine
needle.
Place a piece of tear-away stabilizer under the paper
circle, making sure it is larger than the circle to be
stitched. Remove the paper backing from the appliqué
fabric and place the marked center over the pivot pin.
Stick the circle fabric in position on the runner. Place
the rubber cap on the pivot pin. Stitch; the fabric will
automatically turn in a circle.
When the circle is
complete, carefully
remove the circle from
the machine and use
appliqué scissors to
cut away the excess
appliqué fabric closed to
the stitched line.
Place the fabric back on the pivot pin, making sure the
pin goes back though the original center hole. Select
a decorative stitch to sew around the outer edge of
the circle. Move the pivot pin one step away from the
needle. Sew, making sure the left swing of the needle
just touches the outside edge of the circle.
Slide the pin back to the original position, select a stitch
to cover the raw edge, and sew.
Slide the pin toward the needle a few positions, select a
decorative stitch, and sew.
Continue to select
decorative stitches and
move the pin position to
create circles of stitches.
Repeat the positioning
process for the second
circle, which will overlap
the first circle. Sew the
first line of straight
stitch around the outer edge of the circle and trim away
the excess fabric.
Cut a piece of appliqué
fabric large enough to
cover the overlapped
area. Fuse a piece of
Fuse & Fix to the back
of this piece, and then
adhere it to the runner
where the circles
overlap. Stitch the outer
straight stitch circle of
each of the overlapping
circles.
20 • THROUGH THE NEEDLE ONLINE
Trim away the excess fabric from around the overlapped
section. Select the stitch used to cover the edge of the
first circle, and use it to stitch the arc of the overlap
corresponding to the first circle.
Stitch around the second
circle using a decorative
edging, a cover stitch to
enclose the raw edge,
and additional decorative
stitches to enhance the
interior of the circle.
Stitch the
remaining circle
appliqués in the
same manner,
trimming as
necessary and
using a variety of
decorative stitches
and threads. For
this runner only
two colors were used, but this runner is a perfect place
to play with decorative and metallic threads. It is also a
perfect place for bobbin play!
Set the appliquéd center of the runner aside.
Embellish the End Bands
Lightly spray starch the fabric for the end bands.
Mark a line down the center of the 16" length with a
water-soluble marker.
Set up the machine with a Double needle and thread
both eyes. Install the cording attachment and thread it
with buttonhole gimp. Attach Pintuck and Decorative
Stitch Foot #46 to the machine. Select a straight stitch.
Stitch along the
marked line,
making a corded
pintuck.
Successive
pintucks are made
by guiding one of
the outer grooves
in the sole of the
foot along a previously stitched pintuck. Sew a total of
five pintucks: The center pintuck already stitched, and
two on each side of the center pintuck.
Mark a line 1¼"
from the last
pintuck on each
side. Stitch a single
pintuck along each
marked line.
Mark a line 2" out
from the outer
pintucks; stitch a
single pintuck along
each marked line.
Guiding the grooves of the foot along previously
stitched pintucks, as before, sew a total of four
pintucks.
Sew decorative stitches between the stitched pintucks
by placing the tucks in the middle grooves of the foot
as shown in the photo.
Center the lace between the 1¼"-apart pintucks.
Attach Edgestitch Foot #10D to the machine and
engage the BERNINA Dual Feed. Place the guide along
the edge of the lace and move the needle position to
the left 1-2 steps. Select a narrow zigzag stitch (SL = 2;
SW = 1.5) and zigzag over the lace header.
Repeat for the other side of
the lace, starting at the same
end, and moving the needle to
the right 1-2 steps.
Center the ribbon between the
2"-apart pintucks, securing it
in place with a light misting
of temporary adhesive spray.
Edgestitch in place in the same
manner as the lace.
Attach Open Embroidery Foot #20D and engage the
BERNINA Dual Feed. Sew a decorative stitch along the
sides of the ribbon, and then sew a stitch off the edge
of the ribbon.
When the band fabric is complete, mist it lightly with
water. Place the damp piece face down on a towel and
press dry.
Cut the stitched fabric into two 6½"-wide pieces. Don’t
worry about trimming the width, as it will be trimmed
with the entire runner later.
ISSUE 9 • 21
Complete the Table Runner
Mark a line 1" from the end of the center piece of the
runner. Mark another line 1"
from the first line. Place one
side of the narrow ribbon to
the inside of the first line;
edgestitch in place.
Slip the wide ribbon
under the loose edges of
the narrow ribbon and
edgestitch both ribbons.
Attach Open Embroidery
Foot #20D to the machine
and engage the BERNINA
Dual Feed. Sew decorative
stitches on the two
ribbons.
Choose another area to echo quilt and continue until
the entire piece is quilted.
Continue quilting the runner, using Edgestitch Foot
#10D and a center needle position to stitch-in-the-ditch
of the seams and along the ribbon edges.
Trim the runner to 15" wide and about 32" long.
Seam the binding pieces together at a 45° angle; press
seam allowances open. Fold binding in half lengthwise
and press.
Repeat for the other end
of the center circle piece.
Seam the end bands to the center circle piece, matching
centers.
Layer the fleece between the backing and the runner
top. Bond the layers with a light misting of 505
Temporary Spray Adhesive.
Attach Leather Roller Foot #55 to the machine. (If using
an 8 Series machine, use Presser Foot Recognition to
ensure that the needle threader doesn’t hit the foot.)
Move the needle as far left as possible. Stitch a partial
arc around one of the circles, beginning at an outside
edge of the runner and stitching into a circle, and
keeping the back of the textured part of the wheel on
the decorative stitching around the circle. Pivot and
stitch back out to the edge.
Continue in this
manner, echoquilting lines until
the area is filled
with stitching.
Seam the binding to the right side of the runner, raw
edges together. Fold toward the back and press. Using
a narrow piece of fusible web, fuse the binding in place
with the folded edge just over the seam line.
From the front of
the runner, secure
the binding in place
with a decorative
stitch.
Try this brown and bright color combination for
another striking look!
22 • THROUGH THE NEEDLE ONLINE
The Last Word
A sneak peek at what’s coming in
Through the Needle ONLINE, Issue #10:
Quilting with Decorative Threads
Do you have a collection of beautiful,
decorative threads that are hiding in a drawer?
Many of us buy them but are not successful
using them. Most of the frustration can be
eliminated by using the right needle. Kerry
Finn shares creative ideas for utilizing those
threads and practicing your free-motion
quilting skills.
Allison’s Needle-Punched Garden
Allison Stillwell is your guide as you play
with a variety of fibers and textures
to create your own unique garden of
colorful flowers.
December 2011 Special
25% OFF
Clear Embroidery
Foot #39
Clearly see the road ahead!
Designed for satin stitching of all
types, this foot has the benefit of
being clear so the entire stitching
area is visible. Strategic markings
on the foot help you achieve
perfect alignment.
For December 2011 only, get
25% OFF the BERNINA Clear
Embroidery Foot #39
Offer good December 2011 at
participating BERNINA dealers in the
United States. Coupon may not be
combined with any other offer.
January 2012 Special
25% OFF
ALL Pintuck
Presser Feet
Perfectly Spaced Pintucks
Keep your rows of pintucks even,
create corded pintucks, apply mini
piping or elastic gathering, and
much more with our wide variety
of pintuck presser feet.
For January 2012 only, get 25%
OFF all Pintuck Presser Feet:
#30, 31, 32, 33, and 46
Offer good January 2012 at participating
BERNINA Dealers in the United States.
Coupon may not be combined with any
other offer.
Quick Links
These are the main links featured in this issue;
see the articles for links to specific products,
projects, and technique information. Please
visit our sponsors and contributors for more
inspiration, information, and stitching fun!
• www.throughtheneedle.com
• www.berninaUSA.com
• www.WeAllSew.com
• www.benartex.com
• www.embroideryonline.com
• www.bernina8series.com/EN/
• www.berninamylabel.com
• www.facebook.com/berninausa
• www.rickytims.com/seminars
• www.AllAboutBlanks.com
• www.sewingroomtucson.com
• www.SharonInStitches.com
Until February ...
As always, we hope this issue of Through
the Needle ONLINE has inspired you to learn
something new and make your own adaptations
of our projects. We love seeing your creations;
send e-mail and photos to [email protected].