1
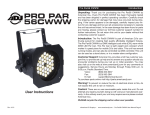
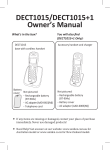
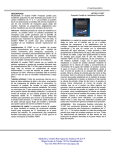
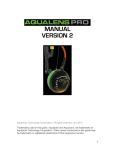
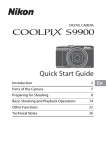
HYDROVIEW PRO SERIES
MANUAL
VERSION 2
Aquabotix Technology Corporation. All rights reserved. March 2014
Trademarks used in this guide, Aquabotix and HydroView, are trademarks of
Aquabotix Technology Corporation. Other names mentioned in this guide may
be trademarks or registered trademarks of their respective owners.
1
TABLE OF CONTENTS
3
LEGAL DISCLAIMER
5
6
11
13
14
16
CHAPTER 1 – Vehicle
Tech Specs
Topside Box
Before Using Your HydroView
Bobbers
Mainternance
17
18
21
CHAPTER 2 – Software Applications
App for iPad
App for PC/MAC
22
23
25
CHAPTER 3 – Troubleshooting
FAQs
Warranty
2
LEGAL DISCLAIMER
The purpose of this manual is to provide HydroView users with a clear
understanding of operating procedures. If further information is needed, contact
Aquabotix at [email protected] or 508.676.1000.
website: www.aquabotix.com
Important Safety Instructions
Assemble and use HydroView only as instructed by this manual. Keep this
manual in a safe place for future reference.
Read and follow these important safety instructions and the detailed assembly
in this manual prior to using the HydroView.
Follow all safety and operational warnings. Heed all additional restrictions on
use.
Refer all non-routine service issues to Aquabotix customer service at (508) 6761000 or [email protected].
Safety and Operational Warnings
Assemble HydroView in a safe, dry place. Do not assemble while submerged in
water or allow HydroView to get wet before it is fully assembled. Do not
assemble with wet hands.
Do not attempt to open the vehicle at any time.
HydroView is powered by a rechargeable Lithium battery pack. Do not attempt
to replace these at any time. Contact Aquabotix if the vehicle isn’t charging
properly. Only Aquabotix and our Authorized Service Centers are authorized to
replace the battery pack.
When using topside power to charge your HydroView, use caution to prevent
shock or damage.
The HydroView dome must be completely secured with O-ring correctly seated
to keep it watertight. The topside box is not waterproof. Do not submerge the
topside box in water.
HydroView Pro is meant for depths no greater than 330 feet from the waters
surface and distances of 500 feet from the topside box. Do not operate beyond
this depth/distance as operational safety is not tested and rated for such depths
or distances.
3
3
Legal Disclaimer
LEGAL DISCLAIMER
Secure all cables on board to prevent tripping hazards. Ensure watertight
connector cable is properly secured to the topside box before use.
Be careful of propellers when in use. Do not stick fingers, etc. in or near the
propellers.
Additional Restrictions On Use
Do not run the propellers while out of the water, it will damage them.
HydroView is meant for operation by adults over 18 years of age only.
Additional Restrictions On Use
Keep HydroView out of the reach of children and supervise children and pets
HydroView
is meant for operation only by adults over 18 years of age only.
when HydroView is in operation.
Keep HydroView out of the reach of children and supervise children and pets
Do not use HydroView in rain, rough sea conditions and/or storms.
when HydroView is in operation.
Do not use HydroView while underwater machinery is in operation.
Do not use HydroView in rain, rough sea conditions and/or storms. Do not use
HydroView
while underwater machinery is in operation nearby.
Do not touch HydroView to underwater marine growth. Keep HydroView clear of
all underwater objects.
Do not allow HydroView to contact underwater marine life or vegetation. Keep
HydroView
clear of all underwater objects.
Do not expose HydroView to high temperatures above 35° Celsius/ 95° Fahrenheit;
avoid direct sunlight. Do not leave case in direct sunlight.
Do not expose HydroView to high temperatures above 35° Celsius/ 95°
Fahrenheit;
avoid prolonged exposure to direct sunlight. Do not leave the
Use HydroView in the recommended operating water temperature range of 0°
carrying
case
in direct sunlight.
Celsius/32° Fahrenheit
to 35°Celsius/95° Fahrenheit.
Use
HydroView only in the recommended operating water temperature range of
Dropping HydroView or subjecting it to strong force may damage the vehicle and
0°itsCelsius/32°
Fahrenheit
to 35°Celsius/95°
Fahrenheit.
watertight dome
and propellers.
Handle with
care.
Dropping HydroView or subjecting it to force may damage the vehicle or its
watertight
dome and propellers. Handle with care.
the propellers.
Be careful of propellers when in use. Do not stick fingers, etc. in or near the
propellers.
Failure to follow these important safety instructions and the
detailed assembly and use instructions of this manual will void your
limited warranty from Aquabotix and may result in serious injury
or death. Aquabotix disclaims all liability arising from or caused
by the failure to assemble and use HydroView in accordance with
this manual, including all important safety instructions.
4
CHAPTER 1 - Vehicle
The HydroView is an underwater remotely operated vehicle (ROV) that can
record live video and capture photos in HD. Using our innovative iPad or laptop
applications, you fly the HydroView through the water viewing the live video feed
as if you were under the water yourself.
5
VEHICLE
TECHNICAL SPECIFICATIONS
HydroView Pro Technical Specifications
Vehicle Power
Battery (Standard) 2 Packs - Lithium, 15V 10.5 Ah
User replaceable
3 Hours Run Time
12 Hours Recharge Time
12V/24V Direct Power Requires 12V @ 30A, or 24V @ 20A DC
(Optional)
Indefinite Run Time
110-240 Direct Power Requires 10A Input AC
(Optional)
Indefinite Run Time
Mechanical/Physical Characteristics
Motors
Up to 8 Swiss Made High Torque Motors
Precious Metal Magnets with 80% Efficiency
Model 5M: 2 Thrusters, 3 Hovering/Pitch
Model 7M: 4 Thrusters, 3 Hovering/Pitch
Model 8M: 2 Thrusters, 1 Lateral, 3 Hovering/Pitch
Model 5M with Brushes: 2 Thrusters, 3
Hovering/Pitch, 2 Brushes
Weight
Dry: 13 – 15 lbs. (5.9 – 6.8 kg) (Based on
Configuration)
Wet: -0.1 lbs. (0.04 kg) (Salt water configuration)
Payload
2 lbs payload capability (Sensors / optional
instrumentation)
Dimensions
14.6 in x 19 in x 12 in (37 cm x 48 cm x 30 cm) –
WxLxH
Fits through 18 in (45 cm) circular hatch
Color (Standard)
Lime Green and Black (Custom colors available)
6
VEHICLE
Cable (Standard)
250 ft. (75m)
Black Thermoplastic Elastomer
Pressured 0.5 in. (12 mm)
RoHS compliant, hazardous industrial environment
Cable Extensions
(Optional)
125 ft (38 m) and 250 ft (76 m)
Enables extended operational range
Performance
Speed | Lithium Battery
Up to 4 Knots (7.4 Km/h) forward
Up to 2 Knot (3.7 Km/h) reverse
Speed | Direct Power
(Optional)
Up to 3 Knots (5.6 Km/h) forward
Up to 1 Knots (1.8 Km/h) reverse
Depth
330 ft. (100 m) cable dependent – Standard
Custom depths available
Range
250 ft. (75 m) Cable - Standard
350 ft. (106 m) Cable – Optional
500 ft. (152 m) Cable - Optional
Video and Picture
Pictures may be stored on iPad, PC (Windows, Linux
or Mac) and Vehicle
Videos may be stored on Vehicle, iPad, PC
(Windows, Linux or Mac)
Vehicle Memory Storage
(Video and Pictures)
Camera
32 GB High Speed – Standard
128/256 GB Solid State Drive - Optional
720p HD (1280x720), True HD quality
24bit color depth
16:9 Aspect Ratio Widescreen Format
66 degrees diagonal field of view
Auto Focus with Manual Focus Override (via app)
Automatic exposure control
7
VEHICLE
External Camera
(Optional)
720p HD (1280x720), True HD quality
Manual pan/tilt of camera
24bit color depth
16:9 Aspect Ratio Widescreen Format
66 degrees diagonal field of view
Auto Focus with Manual Focus Override (via app)
Automatic exposure control
VHD Camera
(Optional)
Very High Definition Camera
Up to 2592×1944
24bit color depth
Superior low-light conditions
Multiple Aspect Ratio Formats
Auto Focus with Manual Focus Override (via app)
Automatic exposure control
WAHD Camera
(Optional)
Wide Angle Full 1080p HD (1920x1080)
24bit color depth
Automatic low-light correction
Multiple Aspect Ratio Formats
H.264 video compression
Manual Focus Override (via app)
Automatic exposure control
Lights
10 LED Cool White
260000 mcd (80 Lumens)
6800K Dominant Wavelength
On/Off/Intensity controlled through App
High Intensity Lights 800 Lumens External Lighting
(Optional)
6800K Dominant Wavelength
On/Off/Intensity controlled through App
Vehicle Processing
Processor Board
Super-scalar ARM Cortex-A8 Processor at 1 GHz
Cortex C64X+ DSP Core
512MB DDR Ram
8
VEHICLE
Operating System Embedded Linux
MOOS Open Source Application Environment
Developed by Massachusetts Institute of Technology
and Oxford University
User Applications
Downloads available through Apple iPad Store and
www.aquabotix.com/support.php
iPad App (Free)
HydroView Pro (View and control vehicle, Manage
and download videos)
Windows (Free)
HydroView Install (View and control vehicle)
Web Media Manager (Manage and download videos)
Mac/Linux (Free)
HydroView jar file (View and control vehicle)
Web Media Manager (Manage and download videos)
Auto Pilot
Vehicle Heading, Thrust, Depth, Pitch (Standard)
Way points, Patterns (Optional)
Sensors
Orientation Sensor 3 axis attitude sensor (roll/pitch/yaw)
Compass heading with respect to true north
Depth Sensor
Provides depth of vehicle in water with 0.25+- %
accuracy
Temperature Sensor +- 0.2 degrees C, Tolerance +-0.32%, 1 sec
response
Propeller Covers
Guards vehicle propellers from debris
Buoyancy Management
Weights for adjusting vehicle to local
buoyancy environment
Hardened Cable / Power Cable for commercial applications with
topside power configurations
9
Additional Sensors Oxygen
(Optional)
Fluoride
pH
Turbidity
Carrying Case
Specifications
Waterproof molded ultra high-strength polypropylene
copolymer resin with gasket for water and dust
tightness. Submersible design spec MIL-C-4150J.
Corrosion and impact resistant. Extension Handle.
Size
23 in x 31 in x 17.5 in (58.4 cm x 78.7 cm x 44.5 cm)
User Control Workstation All-inclusive viewing, control and recording station
(Optional)
Display
10 in diagonal
Memory
8 GB RAM, 128 GB Storage
Operating System Windows/Linux
User Interfaces
Keyboard, Touchpad and Joystick
Recordings
User controlled recording of images and movies on
vehicle storage, workstation storage, USB thumb
drive, or external USB drive
Interfaces
USB, HDMI Video Out, Ethernet Cat5
Battery Charging
For battery configurations, battery charger is
embedded
Power Requirements
Carrying Case
100-240V AC 10 Amp Supply needed for
standard workstation
Waterproof molded ultra high-strength polypropylene
copolymer resin with gasket for water and dust
tightness. Submersible design spec MIL-C-4150J.
Corrosion and impact resistant.
10
VEHICLE
Topside Box
The topside box produces the Wi-Fi signal that connects to a user supplied iPad
or PC/Mac. It is also used to turn the vehicle on/off and recharge the batteries
inside the vehicle. The topside box is water resistant but special care should be
taken to keep it safely out of the water.
Setting Up the Topside Box
1. Locate the cable connected to the vehicle’s body and plug the watertight
connector at the opposite end into the topside box.
2. Turn on the power switch located on the topside box. An LED light will
indicate that it’s on.
3. Although the vehicle has been charged before shipment, it is suggested
that you charge it to make sure you have a fully charged battery before
taking your vehicle on the water. (See below)
4. Secure the cable to the topside box with the strain relief device attached
to the watertight connector cable.
How to Charge Your Vehicle
1. Turn off your vehicle by pressing the off switch located on the topside
box.
2. The cable to your vehicle must remain connected to the topside box
because the battery pack is located in the vehicle itself.
3. Plug the battery charger into an outlet. Plug the other end into the
topside box.
4. A light located on your charger will be solid red when charging and will be
solid green when fully charged.
11
VEHICLE
Continuous Power Topside Box - Optional
Topside Box with continuous power supply (12V)
The topside box produces the
Wi-Fi signal that connects to your laptop. It is also used to turn the vehicle on/off.
Power is provided by topside via 12V input. 12V power allows the HydroView to
be run continuously without the need to recharge the vehicle.
Setting up the 12V Topside Box
1. Locate the cable connected to the vehicle’s body and plug the watertight
connector at the opposite end into the topside box.
2. Secure the cable to the topside box with the strain relief device attached to
the watertight connector cable.
3. Plug the charger adapter from the topside box into the power supply source - A
red LED light will indicate that there is power.
12
VEHICLE
BEFORE USING YOUR HYDROVIEW
Important: Before operating your HydroView, always inspect the dome for any
cracks/damages that may have occurred during transport, storage or use. If
you find any sign of damage, contact Aquabotix customer service immediately
and do not submerge your vehicle in water. Call 508.676.1000 or email
[email protected]
13
VEHICLE
Cable Bobbers
The cable bobbers are used to assist with the cable management. They are
designed to keep the cable close to the surface of water to minimize drag on the
vehicle. The bobbers are also used to aid in navigation of the vehicle by giving
the driver a sense of the vehicle’s location.
Attaching Cable Bobbers
On the watertight connector cable there are yellow cable bobber attachment
indicators. Pinch the end of the cable bobber to open, loop over the indicator
and line up with the slit. Pinch again to secure.
Please use caution when attaching for sharp ends.
14
VEHICLE
Placement of Cable Bobbers
To minimize vehicle drag, the cable bobbers should always be placed a few feet
above your desired depth. For example, if you are planning to reach a depth of
10 ft., you would begin placing your bobbers at the first yellow indicator on the
watertight connector cable past 10 ft. from the vehicle (see figure above). Then,
place bobbers at the indicated locations following the first one. Likewise if you
are planning a depth of 50 ft., your first bobber will be located around 55 ft. from
the vehicle.
15
VEHICLE
11
Vehicle
Maintenance
Maintenance
Propellers
Propellers
1. Before and after water use: Check the left, right and back propellers for
debris.
1. Before
and after water use: Check the left, right and back propellers for any
debris caught.
2. If debris is present, turn off vehicle before cleaning.
3. Carefully clean out, making sure not to damage propellers.
3.
Carefully clean out, making sure not to damage propellers.
After Water Care
1. Make sure the HydroView is turned OFF.
After Water Care
1.
2.
3.
2. Completely submerge the vehicle in fresh water.
Make sure the HydroView is turned OFF.
3. Remove from fresh water and stand on side to drain.
Completely submerge the vehicle in fresh water.
4. Wipe vehicle down, using a microfiber lens cleaning cloth.
Remove from fresh water and stand on side to drain.
5. Unscrew watertight connector from the topside box.
Safely store
HydroView
back
inthe
provided
5. 6.Unscrew
watertight
connector
from
topsidecase.
box.
6.
Safely store HydroView back in provided case.
NOTE: Make sure to rinse your vehicle thoroughly to prevent
any harmful organisms from cross contaminating the waters
and possibly infecting them during vehicle use.
Condensation
Charging Vehicle
If condensation is present inside vehicle and it was within the temperature
operating range of 0° Celsius/32° Fahrenheit to 35°Celsius/95° Fahrenheit,
please
contact
your service
508.676.1000 for assistance.
2. Plug
the charger
regulatorrepresentative
into outlet.
3.
Light will indicate if vehicle is charging (blinking red) or if vehicle is fully
charged (solid green).
4.
If battery is completely uncharged, it will take 16 hours to fully recharge.
16
CHAPTER 2 – SOFTWARE APPLICATIONS
The HydroView Applications are used to control the movements and functions of
your vehicle. Please take the time to carefully read through the manual before
driving your vehicle.
17
HYDROVIEW APP FOR iPAD
How to Download & Connect
Download only required for initial setup. To download our free application, make
sure you have access to the internet. Then, follow these steps:
1. Go to our website at: http://www.aquabotix.com/support.php and click
downloads for a link to our app or visit the iTunes Store and search for
HydroView Pro.
2. Click install application.
3. Sign in using your existing apple ID or create a new apple ID.
4. The application will start installing.
5. When you are ready to drive the vehicle, turn on the topside box. The
vehicle’s lights will turn on then shut off. Then, they will continuously blink
until you open the application.
6. Click your settings icon.
7. From here, click Wi-Fi and make sure you are connected to the
HydroView’s network, which will end with the last 3 digits of your
vehicle’s serial number.
18
HYDROVIEW APP FOR iPAD
!
!
8. Return to the home screen and press the HydroView application icon. A
splash screen will appear while the iPad is connecting to the vehicle.
Please
PleaseRead
ReadBefore
BeforeUsing
UsingYour
YourHydroView
HydroView
9. Once connected, you are ready to explore the underwater world!
Important: Before operating your HydroView, please check the dome for any
Important: Beforethat
operating
your HydroView,
please check
for any
cracks/damages
have occurred
during shipment.
If youthe
finddome
any sign
of
cracks/damages
that
have
occurred
during
shipment.
If
you
find
any
sign
of
damage, contact Aquabotix customer service immediately and do not
damage, contact
Aquabotix
customer
service immediately
and do not
submerge
your vehicle
in water.
Call 508.676.1000
or email
submerge your vehicle in water. Call 508.676.1000 or email
Important for users using the iPad Application: You must ensure that your
Important
fordetails
usersare
using
thecorrectly
iPad Application:
You must
ensurethe
that your
Wi-Fi
network
setup
for connectivity.
To check
Wi-Fi network details are setup correctly for connectivity. To check the
settings:
Important for users using the iPad Application: You must ensure that your
settings:
1. Go to the settings menu – Wi-Fi
Wi-Fi
network
are menu
setup correctly
for connectivity. To check the settings:
Go
to the
thedetails
settings
– Wi-Fi
2.1. Select
HydroView
wireless
signal
and tap on the blue arrow to
2. open
Select
the
HydroView
wireless
signal
and tap on the blue arrow to
thesettings
network
details
1. Goopen
to the
menu
–
Wi-Fi
the network details
2. Select the HydroView wireless signal and tap on the blue arrow to open the
network details.
Turn
Auto
to and
On and
Login
to Off
3.3.Turn
Auto
JoinJoin
to On
AutoAuto
Login
to Off 3. Turn Auto Join to On and Auto Login to Off
Please
Pleasecontact
contactcustomer
customerservice
servicewith
withany
any
questions
or
concerns:
questions or concerns:
508.676.1000
[email protected]
[email protected]
19
HYDROVIEW APP FOR iPAD
APP CONTROLS
Please visit our website for the latest updates on software applications as they
are updated regularly.
http://www.aquabotix.com/support_manuals.php
Saving Photos and Videos to Your iPad
Make sure that the HydroView is powered on. Click on the photo or video tab at
the bottom of the application screen. You can toggle between your photos and
videos using the buttons appropriately labeled at the bottom of the app. Click
the green arrow to download and image or the red x to delete an image.
How do I get my photos and videos off the iPad?
Photos and videos saved to the iPad can then be saved to a computer by using
iPhoto (for a Mac) or by plugging in the iPad and selecting ‘Import Pictures and
Videos’ from the pop up (for Windows).
20
HYDROVIEW APP FOR PC/MAC
How to Download & Connect
Download only required for initial setup. To download our free application, make
sure you have access to the internet. Then, follow these steps:
1. Visit www.aquabotix.com/support.php and click on “downloads”.
2. Click on “Install HydroView Application for PC”.
3. After the application has finished downloading, select a save location if
you don’t previously have a default download folder.
4. Unzip the folder into your desired location.
5. When ready to drive the vehicle, turn on the topside box. The vehicle’s
lights will turn on then shut off. Then, they will continuously blink until you
open the application. On PC open your wireless networks and choose
HydroView’s network, which will end with the last 3 digits of the vehicle’s
serial number.
6. Open the application by double clicking the HydroView icon in the folder
you saved it to. A splash screen will appear while the computer is
connecting to the vehicle.
7. Once connected, you are ready to explore the underwater world!
APP CONTROLS
Please visit our website for the latest updates on software applications as they
are updated regularly.
http://www.aquabotix.com/support_manuals.php
21
CHAPTER 3 – Troubleshooting
CEO Guarantee
At Aquabotix, our customers come first. If you are not completely satisfied with
your Aquabotix product or service, please contact me at [email protected] or
by calling 508.676.1000.
Thank you, President and CEO Durval Tavares
Registration
To register your HydroView, please visit:
www.aquabotix.com/support_registration.php
For technical assistance or to report a problem, please contact Aquabotix
directly at 508.676.1000 or [email protected]
22
FAQs
What do I do if the vehicle’s battery dies while in the water?
If this occurs, pull your vehicle to the surface using its cable.
What do I do if the Wi-Fi isn’t showing up on the iPad settings?
Turn off the topside box and turn back on. Try to locate the Wi-Fi on your iPad.
If still not showing up after a few times of trying, contact Aquabotix.
How do I know my vehicle is ready to connect to the Wi-Fi?
The HydroView’s LED lights will turn on then shut off. Then, they will
continuously blink until you open the application. If the lights start off as dim and
then proceed to continuously get brighter, please contact Aquabotix by calling
(508) 676-1000 or email us at [email protected].
What do I do if my cord gets tangled?
Cable bobbers should assist with letting you see when your cord does get
tangled. In the chance that it does, retrace your vehicles path to untangle. If that
doesn’t work, gently pull it out of the water by the cord and untangle.
How do I get my HydroView out of the water?
Grab the watertight connector cable and pull the vehicle up. This cable is strong
and won’t detach from the vehicle.
Where do my photos and videos get stored after I record them?
All photos and videos are stored onboard the HydroViews’ memory card.
iPad: Photos and Videos get stored on the vehicle, which you can then
download from the iPad application to your video album on your iPad.
PC: Photos and Videos get stored on the vehicle, which you can then download
from the PC application. From there, you can download the videos to watch or
images to view.
How long does my vehicle run for?
Your vehicle will run for about 2-3 hours before requiring recharging, depending
upon your speed and use of lights during use.
23
FAQs
How long does it require to recharge the battery completely?
It requires 12 hours.
What are the system requirements for my iPad or PC?
Windows 7 or later, Mac Version 10.9 Mavericks, iOS 4.2.1 or later
How do I download the application?
iPad: Go to the iTunes store and search for HydroView Pro or visit our website
at www.aquabotix.com/support.php.
PC: Go to www.aquabotix.com/support.php and click on downloads. The
instructions will be located there.
What do I do if I get a scratch on the dome of the vehicle?
The products lenses are made of acrylic. If there are some scratches present,
acrylic polish can remove them. If your lens is cracked, we have replacement
lenses for purchase. When storing your lens, remember to use a cloth or some
form of cover to avoid scratching.
CUSTOMER SERVICE
To contact customer support, please call (508) 676-1000 or email
[email protected]
24
Warranty
HydroView PRO One Year Limited Warranty Certificate
Aquabotix warrants that, under normal use and service, the HydroView will be free from
defects in material and workmanship for one year from the date of purchase by the
original purchaser.
If Aquabotix receives, during the applicable warranty period, notice of defect in any
product which is covered by Aquabotix’s warranty, Aquabotix shall either replace or
repair the product at Aquabotix’s discretion.
If Aquabotix is unable to repair or replace, as applicable, a defective product which is
covered by Aquabotix’s warranty, Aquabotix shall, within a reasonable time after being
notified about the defect, refund the full purchase price of the product.
Aquabotix shall have no obligation to repair, replace or refund the purchase or product
until the customer submits an RMA form and returns the defective product to
Aquabotix.
Warranty does not cover the following: accidental damage, damage caused by abuse
or misuse, damage caused by vehicle depths greater than vehicle rating, damage
caused to other vehicles, ships, people etc. due to accidental or purposeful driving,
damage caused to topside box and battery charger from submerging in water, damage
to iPad, iPhone, Android device or computer, cable damage from normal use or cutting,
improper maintenance, incorrect assembly, or damage due to incorrect power
connection as described in the user manual.
Consumable items including LED lights and batteries are specifically excluded from the
warranty. Items subject to normal wear and tear include, but are not limited to, the lens
and the outer shell which are only covered for defects in workmanship or materials.
Opening the vehicle’s dome automatically voids this warranty.
Claims for damage, shortage or errors in shipping must be reported within three (3)
days following delivery to the customer. Aquabotix is not responsible for returned items
lost or damaged during shipping.
A copy of the dated receipt or bill of sale from the original end user purchase is required
to determine coverage.
This limited warranty gives you specific legal rights, and you may also have other rights
which vary from state to state.
25