1
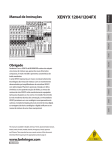
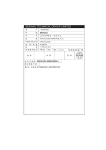
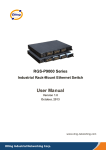
MIX.FX SERIES
USER' S MANUAL
MIX.FX SERIES MIXER
MIX .FX
SERIES
MIX.FX
SERIES
SAFETY RELATED SYMBOLS
NOTE
Protective Ground
Before turning the unit ON, make sure that it is connected
to Ground. This is to prevent the risk of electric shock.
Never cut internal or external Ground wires. Likewise, never
remove Ground wiring from the Protective Ground Terminal.
This symbol, wherever used, alerts you to the
presence of un-insulated and dangerous voltages
within the product enclosure. These are voltages
that may be sufficient to constitute the risk of
electric shock or death.
This symbol, wherever used, alerts you to important
operating and maintenance instructions.
Operating Conditions
Always install in accordance with the manufacturer's
instructions.
To avoid the risk of electric shock and damage, do not
subject this product to any liquid/rain or moisture.
Please read.
Do not use this product when in close proximity to water.
Protective Ground Terminal
Do not install this product near any direct heat source.
Do not block areas of ventilation. Failure to do so could
result in fire.
Keep product away from naked flames.
AC mains (Alternating Current)
AC mains (Alternating Current)
Denotes the product is turned on.
Denotes the product is turned off.
WARNING
Describes precautions that should be observed to
prevent the possibility of death or injury to the user.
CAUTION
Describes precautions that should be observed to
prevent damage to the product.
Disposing of this product should not be placed in
municipal waste but rather in a separate collection.
WARNING
Power Supply
Ensure that the mains source voltage (AC outlet)
matches the voltage rating of the product. Failure to
do so could result in damage to the product and
possibly the user. Unplug the product before electrical
storms occur and when unused for long periods of time
to reduce the risk of electric shock or fire.
External Connection
Always use proper ready-made insulated mains
cabling (power cord). Failure to do so could result in
shock/death or fire. If in doubt, seek advice from a
registered electrician.
Do Not Remove Any Covers
Within the product are areas where high voltages may
present. To reduce the risk of electric shock do not
remove any covers unless the AC mains power cord is
removed. Covers should be removed by qualified service
personnel only.
No user serviceable parts inside.
Fuse
To prevent fire and damage to the product, use only
the recommended fuse type as indicated in this
manual. Do not short-circuit the fuse holder. Before
replacing the fuse, make sure that the product is OFF
and disconnected from the AC outlet.
IMPORTANT SAFETY INSTRUCTIONS
Read these instructions
Follow all instructions
Keep these instructions. Do not discard.
Heed all warnings.
Only use attachments / accessories specified by the
manufacturer.
Power Cord and Plug
Do not tamper with the power cord or plug. These are
designed for your safety.
Do not remove Ground connections!
If the plug does not fit your AC outlet seek advice
from a qualified electrician.
Protect the power cord and plug from any physical
stress to avoid risk of electric shock.
Do not place heavy objects on the power cord. This
could cause electric shock or fire.
Cleaning
When required, either blow off dust from the product
or use a dry cloth.
Do not use any solvents such as Benzol or Alcohol.
For safety, keep product clean and free from dust.
Servicing
Refer all servicing to qualified service personnel only.
Do not perform any servicing other than those instruct
-ions contained within the User's Manual.
Carts and stands - The
component should be used
only with a cart or stand
that is recommended by
the manufacturer.
A component and cart
combination should be
moved with care. Quick
stops, excessive force,
and uneven surfaces may
cause the component and
cart combination to overturn.
MIX .FX
SERIES
MIX.FX
SERIES
TABLE OF CONTENTS
GUARANTEE
1. INTRODUCTION..................................................................................1
T.MIX guarantees the normal operation of the product against any defect of manufacture
and/or vice of material, by the term of (12) months, counted as of the date of purchase on the part
of the user, committing itself to repair or to change, to its election, without position some, any
piece or component that will fail in normal conditions of use within the mentioned period.
This guarantee is valid if the original buyer will have to present /display this certificate properly
sealed and signed by the selling house, accompanied by the corresponding invoice of purchase
where it consisted the model and serial number of the acquired equipment.
2. FEATURES..........................................................................................1
3. USEFUL DATA......................................................................................1
4. CONTROL ELEMENTS.........................................................................3
9
The guarantee does not cover:
5. INSTALLATION TIPS ..........................................................................11
-Damages caused by the illegal use of the product, repair and/or nonauthorized modification
conducted by people by T.MIX.
6. WIRE CONNECTIONS...... .................................................................12
-Damages caused by the connection of the equipment to other equipment different from the
specified ones in the manual of use, or by bad connection to these last ones.
7. BLOCK DIAGRAM ..............................................................................13
-Damages caused by electrical storms, blows and / or incorrect transport.
8. TECHNICAL SPECIFICATION.............................................................15
-Damages caused by excesses or falls of tension in the network or by connection to networks
with a tension different from the required one by the unit.
9. GUARANTEE ....................................................................................17
10. NOTE .............................................................................................18
-Damages caused by the presence of sand, acid of batteries, water, or any strange element
inside the equipment.
-Deteriorations produced by the course of the time, use and/or normal wear of the unit.
-Alteraion or absence of the serial number of factory of the equipment.
The repairs could only be carried out the authorized technical service by T.MIX , that will
inform about the term and other details into the repairs to take place according to this guarantee.
T.MIX, will repair this unit in counted a term nongreater to 30 days as of the date of entrance
of the unit to the Technical Service. In those cases in that due to the particularity of the spare
part, outside necessary their import, the repair time and the viability of the same one will be
subject to the effective norms for the import of parts, in which case one will inquire to the user
about the term and possibility into repair.
With the object of its correct operation, and of the validity of this one guarantee, this product
will have to be installed and to be used according to the instructions that are detailed in the
manual associate or the package of the product.
This unit will be able to appear for its repair, next to the invoice of purchase (or any other
comprobante where the date of purchase consists), to its authorized distributer T.MIX or an
authorized technical center on watch by T.MIX.
Exclusion of damages:
THE RESPONSIBILITY OF TOPP PRO BY ANY DEFECTIVE PRODUCT IS LIMITED THE REPAIR
OR THE REPLACEMENT OF HE HIMSELF, TO TOPP OPTION PRO. IF WE CHOSE TO REPLACE
THE PRODUCT, THE REPLACEMENT CAN BE A RECONDITIONATED UNIT. TOPP PRO WILL
NOT BE RESPONSIBLE BY THE DAMAGES BASED ON THE LOST, INCONVENIENCE, LOSS
OF USE, BENEFITS, LOST SAVINGS, BY THE DAMAGE TO OTHER EQUIPMENT OR OTHER
ARTICLES IN THE USE SITE, OR BY ANY OTHER DAMAGE IF HE IS FORTUITOUS,
CONSEQUENT OR OF ANOTHER TYPE, ALTHOUGH TOPP PRO HAS BEEN NOTICED OF THE
POSSIBILITY OF SUCH DAMAGES.
Some states do not allow to exclusion or the limitation to the fortuitous or consequent damages,
so the aforesaid limitation can not be applied to you.
This guarantee gives specific legal rights him, you can also have other right that varies of state
to state.
MIX .FX
SERIES
MIX.FX
SERIES
TECHNICAL SPECIFICATION
AC Power Requirements
Physical
Power Consumption
INTRODUCTION
40 Watts
U.S.
120 VAC, 60 Hz
Europe
240 VAC, 50 Hz
Japan
100 VAC, 50/60 Hz
Korea
220 VAC, 60 Hz
AC Connector
3-pin IEC 250 VAC
Thank you for purchasing the MIX.FX series mixing console. The MIX.FX mixing console
is packed with some features that can not be found in other consoles of its size: 4 mono
(these are provided with ultra low noise microphone preamplifiers and phantom power at
+48V) and 2 stereo input channels (4 channels for MIX 1622FX), and each of them is
provided with warm, natural EQ; 2-Track inputs assignable to Main mix, Phones/Control
Room outputs etc. Besides, the 24-bit effect processor with 256 effects.
Please read this manual carefully so you can take advantages of all the features of the
MIX.FX series. Thank you again for making the right choice in purchasing the T.MIX
MUSIC GEAR.
Dimensions (H x W x D)
MIX 1204FX
96 x 292 x 360 mm (3.8" x 11.5" x 14.2")
MIX 1622FX
96 x 348 x 384 mm (3.8" x 13.7" x 15.1")
Weight
MIX 1204FX
4.0 Kg (8.8 lb)
MIX 1622FX
4.4 Kg (9.8 lb)
FEATURES
4 mono inputs with gold plated XLR and Balanced TRS jack
2 (4 for MIX 1622FX) stereo inputs with Balanced TRS jack
GAIN control and +48V phantom power for mono inputs
3-band EQ (plus 75Hz low cut filter) on all mono channels (For MIX 1204FX)
3-band EQ with sweepable MID (plus 75Hz low cut filter) on all mono channels and 4-band
EQ on stereo channels (For MIX 1622FX)
2 AUX sends: AUX1 with PRE/POST-fader switch for monitoring, AUX2 POST-fader for
effect sends can be changed in PRE-fader for monitoring
Each input channel features MUTE/ALT3-4, SOLO switches and OL LED (MIX 1204FX)
MUTE, SUB1-2 and L-R assign switches, SOLO switches and OL LED (MIX 1622FX)
2-Track IN/OUT with discrete switches for routing to Control Room and to Main Mix
Two different ways of SOLO PFL/AFL for a better control over signal path
Balanced XLR & TRS jack output
24-bits internal DSP with 256 effects (16 presets by 16 variations), DSP MUTE and Peak
LED
USEFUL DATA
Please write your serial number here for future reference.
Serial Number:
Data of Purchase:
Purchased at:
MIX.FX
SERIES
HOOKUP DIAGRAM
TECHNICAL SPECIFICATION
Model Number
MIX 1622FX
Frequency Response
Distortion
Noise
MIX.FX Series Mixer
Mic Input to any Output (Trim at 0 dB)
+0, -1 dB
10 Hz to 150 kHz
-3 dB
10 Hz to 200 kHz
THD and SMPTE IMD
20 Hz to 20 kHz
Mic Input to Main Output
<0.005% @+4 dBu output
20 Hz to 20 kHz BW (150 Ohm source impedance)
Equivalent Input Noise (EIN)
-129 dBu
Residual Output Noise
Main, Ctrl Room, Phones
-105 dBu
CMRR
Mic In
60 dB@1 kHz, Gain@ aximum
Crosstalk
Adjacent Inputs or Input to Output
-90 dB@1 kHz
Input Gain Conrol Range
0 dB to +50 dB
Phantom Power
+48 VDC
MIX 1204FX High
+/-15 dB@12 kHz
Equalization
Mid
+/-12 [email protected] kHz
Low
+/-15 dB@80 Hz
MIX 1622FX (Mono Channels)
High
+/-15 dB@12 kHz
Mid
+/-15 dB, sweepable from 100 Hz to 8 KHz
Low
+/-15 dB@80 Hz
MIX 1622FX (Stereo Channels)
MIX 1622FX
Mixer Rated Output
Maximum Input Levels
Input Impedance
Output Impedance
VU Meters
High
+/-15 dB@12 kHz
Mid
+/-15 dB@3 KHz
Mid
+/-15 dB@500 Hz
Low
+/-15 dB@80 Hz
Main, Aux, Control Room
+4 dBu
Maximum Rated Output
+22 dBu
Mic Input
+12 dBu, Gain @+10 dB
Line Input
+30 dBu, Gain @+10 dB
Tape Input and Aux Return
+22 dBu
Mic Input
2.6 k
, balanced
Line Input
20 k
, balanced
Stereo Aux Returns
20 k
, balanced
CD/Tape In
24 k
, unbalanced
Main
240
, balanced; 120
Ctrl Room, Aux Sends
120
Tape Output
1k
Phones Output
25
, unbalanced
Main Left and Right (MIX 1204FX)
Clip (+18), +10, +5, +2, 0, -2, -5, -20
Main Left and Right (MIX 1622FX)
Clip (+18), +10, +7, +4, +2, 0, -2, -4, -7, -10, -20, -30
MIX .FX
SERIES
MIX.FX
SERIES
BLOCK DIAGRAM
CONTROL ELEMENTS
Mono MIC Input
MIX1622FX
1
The MIX. FX series is equipped with 4 low-noise mic
preamplifiers with optional phantom power providing
up to 50 dB of amplification. You can connect almost
any type of microphone. Dynamic microphones don't
need phantom power. Use phantom power only with
condenser microphones but make sure that the
phantom power switch is disengaged before connecting
the microphone. Phantom power will not damage your
dynamic microphones but it may damage tube or ribbon
microphones so make sure to read the microphone
instructions manual before engaging phantom power
switch. There are also equipped with 1/4" TRS balanced
and TS unbalanced LINE IN plug, you can connect
with line-level instruments, such as synthesizers,
keyboards, drum machines or effect devices.
NOTE: Never try to connect a line-level signal to the
XLR MIC input when the phantom power is engaged,
doing this you may seriously damage your equipment.
STEREO LINE INPUTS
1
3
4
GAIN
75Hz
2
They are organized in stereo pair and provided with
1/4" TRS jacks. It is used to connect the stereo
device, plug both the left input and the right input.
Using the left input if connect a mono input signal
to the STEREO INPUT, the signal will appear on
both sides.
GAIN CONTROL
2
5
+4
-10
3
This GAIN control is used to control the input sensitivity of the MIC and LINE inputs. The
adjustable range goes from 0 dB to 50 dB.
75 Hz Low-Cut Switch
4
By pressing this button you will activate a 75 Hz low frequency filter that cuts the bass
frequency below 75 Hz. You can use this switch to reduce the hum noise caused by the
mains power supply, or the stage rumble while using a microphone.
+4/-10 Switch
5
These switches are used to select the input sensitivity of the line inputs on the stereo
channels. +4 dBu is suitable for professional audio devices and -10 dBv is suitable
for general devices. If not sure to use which setting, try +4 dBu first, then change it
to -10 dBv if the volume is too small to be satisfied.
EQUALIZATION
The MIX 1204FX is equipped with 3-band EQ on all the channels while the MIX 1622FX
has 3-band EQ with sweepable MID on all mono channels and 4-band EQ on stereo
channels. All bands provide up to 15 dB boost or cut.
MIX .FX
SERIES
MIX.FX
SERIES
BLOCK DIAGRAM
CONTROL ELEMENTS
HIGH
6
This is the treble control. You can use it to get rid of high frequency of the human voice. The
gain range goes from -15 dB to +15 dB with a centre frequency of 12 kHz.
MIX 1204FX
6
6
600
MID
FREQ
7
100
MID
3kHz
8k
8
8
8
9
MID
500Hz
9
MID FREQ (Only for Mono Channels of MIX 1622FX)
7
It can change the center frequency for the MID EQ filter. From this knob you can more accurately
select the band of frequency that you want to boost or cut. The ranges goes from 100 Hz to
8 kHz.
MID EQ
8
This control provides 15 dB boost or cut at 2.5 kHz on the MIX 1204FX. The MIX 1622FX has one
sweepable MID EQ controls on the mono channels and two discrete MID EQ on the stereo
channels with center frequencies at 3 kHz and 500 Hz, it can affect most fundamental frequencies
of all musical instruments and human voice.
9
LOW EQ
This is the bass control. It is used to boost male voice, kick-drum or bass guitar. Your system
will sound much bigger than what it is. The gain range goes from -15 dB to +15 dB with a
center frequency of 80 Hz.
AUX Send Controls
10
These two controls are used to adjust the level of signal sent to AUX bus 1&2, and this
adjustment doesn't effect the main mix output signal at all.
AUX SEND1 (MON) can be configured as PRE/POST fader via the PRE switch. Up for POST
fader, the signal is sent out after the channel fader and will be affected by the channel fader.
Down for PRE fader, the signal is sent out before the channel fader and will not be affected
by the channel fader. AUX 2 (FX) is configured as POST fader.
11
PAN/BAL
Abbreviation of PANORAMA control for mono channels, for the stereo channels, always
says, BALANCE control. You can adjust the stereo image of the signal via this control.
For mono MIC/LINE channels, keep PAN control in centre position and your signal will be
positioned in the middle of stage that is to say the mono signal appears equally in both
sides. Turn this control fully counterclockwise and the signal will be present only on the
left speaker and vice-versa. For stereo channels, by rotating the BAL control, you can
attenuate the signal of left or right. It means if turn the control to left, the right channel will
be attenuated; if turned to right, the left channel will be attenuated.
MIX .FX
SERIES
MIX.FX
SERIES
WIRE CONNECTIONS
CONTROL ELEMENTS
Either the 1/4" TRS phone jack or XLR connector can be wired in balanced and unbalanced
modes, which will be determined by the actual application status, please wire your system as
the following wiring examples:
12
MUTE/ALT3-4 SWITCH (For MIX 1204FX)
MUTE SWITCH (For MIX 1622FX)
Each channel is equipped with the MUTE/ALT3-4 (in MIX 1204FX) or MUTE switch (in MIX
1622FX). Pressing this switch is equal to turning the fader down, which can mute the
corresponding channel output except for SOLO (in PFL mode), the MUTE LED will illuminate.
In MIX1204FX, the MUTE/ALT3-4 switch can also be used for signal routing.
For 1/4" Phone jack
+
-
+
Tip
+
Tip
Ring
Ring
Sleeve
Sleeve
TS Type Unbalanced
Tip
Sleeve
TRS Type Balanced
TRS Type Unbalanced
PRE
10
PRE
10
For XLR Connector
11
11
MUTE
MUTE
12
ALT
3/4
Pin2 (+)
Pin2 (+)
Pin3 (-)
Pin3 (-)
(Linked to Pin1 manually,
)
0
Pin1 ( )
XLR Type Unbalanced
XLR Type Balanced
SLEEVE RING TIP
3
3
1
1
2
2
Tip
Ring
Sleeve
Tip
Ring
Sleeve
1
3
2
1
2
1
2
3
3
Tip
Ring
1
2
3
Sleeve
Unbalanced
1
3
2
Tip
Ring
Sleeve
TIP RING SLEEVE
Tip
1
3
2
Sleeve
1
2
3
1
2
3
1
TIP SLEEVE
2
3
1
2
3
Tip
SLEEVE TIP
Sleeve
Tip
Ring
SLEEVE RING TIP
Cent r e
Screen
Tip
Sleeve
Tip
Ring
Sleeve
Sleeve
Tip
Cent r e
Sleeve
Screen
Tip
Ring
Centre
Sleeve
Screen
TIP SLEEVE
TIP RING SLEEVE
3
3
1
1
2
2
0
14
15
-10
-20
-20
-30
-30
-40
-50
-60
-40
-50
-60
1
2
3
1
2
3
SOLO SWITCH & OL LED
1-2
13
-5
-10
15
L-R
SOLO
CH1
MIX 1204FX
TIP RING SLEEVE
TIP RING SLEEVE
SOLO
CH1
Balanced
OL
10
13
5
-5
In-line Connection
For these applications the unit provides 1/4" TRS and XLR connectors to easily interface with
most professional audio devices. Follow the configuration examples below for your particular
connection.
TIP SLEEVE
OL
10
5
Pin1 ( )
TIP RING SLEEVE
12
MIX 1622FX
13
When pressing this switch, the OL LED will illuminate and the SOLO signal will replace
other signals and reach to the CONTROL ROOM/PHONES. Usually use the SOLO function
to preview each channel before they are get into the mix. You can solo more than one
channel at a time. And the soloed channels are sent to the CONTROL ROOM, PHONES,
and LED display. Engaging the SOLO switch, all CONTROL ROOM SOURCE selections
MAIN MIX, CD/TAPE, ALT3-4 (MIX 1204FX) and SUB1-2 (MIX 1622FX) will be muted.
1-2 & L-R Switches (only for MIX 1622FX)
14
Each channel provides two assignment switches: 1-2, and L-R.
Pressing the 1-2 will assign the channel signal to SUB1-2, you can depend on the PAN/BAL
control to adjust the amount of channel signal sent to the SUB1 versus SUB2, when turns
the PAN/BAL to completely left, then the signal can be only controlled by SUB1 and viceversa. In the same way, pressing the L-R will assign the channel signal to MAIN MIX L-R.
This switch must be engaged in to get the channel's signal through to main outs.
Fader
15
This control will adjust the overall level of this channel and set the amount of signal sent
to the main output.
MIX .FX
SERIES
MIX.FX
SERIES
CONTROL ELEMENTS
CONTROL ELEMENTS
16
SUB ASSIGN TO MAIN MIX Switches (only for MIX 1622FX )
Through these switches, you can operate the SUB1-2 faders as a master control for
assigning the SUB 1-2 to MAIN MIX.
Engage the LEFT switch to send the corresponding sub signal to MAIN MIX L, and the
RIGHT switch for MAIN MIX R. When engaging the both switches, the signal will be sent
to L/R of MAIN MIX.
XLR MAIN OUTS
47
These two outputs are supplied with the XLR connectors. Connect these to the inputs
of your main power amplifier, powered speaker, or serial effects processor.
ALT3-4 OUTS (Only for MIX 1204FX)
SUB OUTS (Only for MIX 1622FX)
48
These 1/4" jacks are unbalanced outputs. The signal level to the ALT3-4 OUTPUT/SUB
OUT is adjusted by ALT3-4/SUB1-2 knob on the front panel.
16
SUB ASSIGN
TO MAIN MIX
L
R
L
CONTROL RM OUT
R
MIX 1622FX
16-INPUT 2/2BUS MIXER WITH DIGITAL EFFECTS
10
10
10
10
5
5
5
5
0
0
0
0
-5
-5
-5
-5
-10
-10
-10
-10
-20
-20
-20
-20
-30
-30
-30
-30
-40
-50
-60
-40
-50
-60
-40
-50
-60
-40
-50
-60
SUB 1
SUB 2
17
10
10
10
10
5
5
5
5
0
0
0
0
-5
-5
-5
-5
-10
-10
-10
-10
-20
-20
-20
-20
-30
-30
-30
-30
-40
-50
-60
-40
-50
-60
-40
-50
-60
-40
-50
-60
ALT 3
ALT 4
MAIN MIX
MAIN MIX
18
ALT3-4 Master Faders (MIX 1204FX)
SUB1-2 Master Faders (MIX 1622FX)
17
18
49
These 1/4" TRS jacks are used to send the control room signal to the studio monitor
speakers or a second set of PA. They can also be used to provide another main mix
output, or to monitor the CD/TAPE Inputs (when CD/TAPE switch pushed in), or to
monitor the ALT3-4(MIX 1204FX only) or SUB1-2 output (MIX 1622FX only).
50
CHANNEL INSERTS1-4 (Only for MIX 1622FX)
Insert sockets are provided for all mono MIC channels. It can allow you patch
external processing devices into signal path via a TRS connector, the signal will
be taken out after the input gain control, and sent to an external processor such
as a compressor-limiter, then returned into the same channel immediately before
the EQ section.
17
These faders are used to control the levels of signal that send to the ALT3-4OUT /SUB
1-2 OUT. The range goes from - to +10 dB. By pushing in the MUTE/ ALT3-4 switch
(for MIX 1204FX) & SUB 1-2 ASSIGN switch (for MIX 1622FX), the signals will appear at
the ALT3-4/SUB1-2 OUTS.
MAIN MIX Faders
INSTALLATION TIPS
18
These two faders set the level of main mix signals sent to the Main Outputs, Tape Outputs,
CONTROL ROOM, PHONES, and LED display.
Note: When connecting a speaker to the speaker output jacks on rear panel, please pay more
attention to the level setting for avoiding damaging the speaker. Generally, the faders will be
positioned between 0 dB (U) and the +5 dB.
19
MASTER AUX SEND Controls
Both knobs are used to determine the master AUX SEND levels. The adjustable range is
from - to +15 dB. When the external effect unit connected to mixer has no input gain
control, you can get a further +15 dB gain available from these AUX SEND outputs.
MASTER AUX SEND SOLO Switches
20
From these two switches you can monitor the aux send signals in the CONTROL ROOM and
PHONES outputs.
AUX/FX RETURN Level Controls
MIX.FX
SERIES
21
These two controls adjust the amount of the AUX /FX Return signal that added to the L/R main
mix buses just before the MAIN MIX fader.
1- Speakers should be placed in a position that allows for unobstructe sound projection. In
many instances is beneficial for speakers to be elevated on tripod stands to achieve
maximum dispersion and reach.
2- Use professional advice or service when hanging and installing speakers. Please take
precautions to secure them to prevent them from falling and hurting someone. Care should
be taken as to not damage the cabinet or its components. Please comply with all pertinent
Regulations.
3- Use quality cables. Using quality cables will ensure the best possible sound.
4- For best results match the speakers to a good amplifier that matches the wattage and
impedance of your speakers. Proper amplification power results in good quality audio
and longer component life. Check out the power requirement for your cabinet.
5- Avoid pointing a microphone directly at an amplified speaker doing so, could cause
feedback possibly damaging speaker components and your hearing.
Enjoy the sound!
MIX .FX
SERIES
MIX.FX
SERIES
CONTROL ELEMENTS
CONTROL ELEMENTS
PHONES Jack
40
This socket will send out the mix signal to a pair of headphones, and the signal is the same as
the CTRL RM OUTS outputs. The level controlled by the CTRL ROOM/PHONES knob. You can
listen to the Main Mix, the CD/TAPE, or the ALT3-4 (MIX 1204FX) or SUB1-2 (MIX 1622FX)
depending on these CONTROL ROOM SOURCE select switches.
FOOT Switch
41
This 1/4" TS jack can be used to connect an external footswitch for engaging the internal FX
BYPASS function. If the LED which next to the FX BYPASS switch lights up, it means the bypass
function is engaged.
POWER LED
If you not plug any signal into FX RETURN inputs, the FX Return signal comes from the
internal effects module; If you plug an external effects processor into FX RETURN inputs,
the internal effects is disconnected and only the external effects signal is routed through the
FX RETURN level control.
MAIN/ALT3-4 Switch (MIX 1204FX)
MAIN/SUB1-2 Switch (MIX 1622FX)
22
AUX RETURN is equipped with the MAIN/ALT3-4 (MIX 1204FX) or MAIN/SUB1-2 (M
IX 1622FX) switch. Release the switch to send the stereo signal from AUX RETURN
to MAIN MIX buses; and engage this switch the stereo signal will be sent to ALT 3-4
or SUB1-2 buses.
42
This LED lights up when the power switch is turned on.
24
43
PHANTOM 48V Switch and LED
This +48VDC Phantom Power switch only apply to the XLR microphone inputs. Never
connect microphones when the phantom power is on already. The LED near to this switch
will light up when the phantom power is switched on.
NOTE: Turn down all output levels before operating this switch to avoid the possibility of
"pop" in your speakers. Do not use phantom power with tube or ribbon microphones, as this
may cause damage.
25
26
27
TAPE TO
MAIN
SOLO
MODE
CONTROL ROOM
PFL
AFL
MAIN
MIX
22
CD/
TAPE
SUB
1-2
SOURCE SELECT
CTRL ROOM/
PHONES
RUDE SOLO
CLIP
AUX
RETURN
MASTER
AUX SEND
+10
+7
SOLO
FX
RETURN
19
MAIN
SUB 1-2
+2
0
-2
RTRN
TO
AUX 1
28
-4
-7
SOLO
Rear Panel
LEVEL
SET
+4
-10
20
-20
-30
0dB = 0dBu
MIX 1204FX
ON
MIX 1622FX
ON
RIGHT
LEFT
BAL/UNBAL
4
ON
BAL/UNBAL
3
RIGHT
RIGHT
LEFT
BAL/UNBAL
4
POWER
44
BAL/UNBAL
3
RIGHT
LEFT
TIP SEND/RING RETURN
4
3
2
23
1
PHANTOM
MAIN OUT
46
21
ON
LEFT
45
47
ALT 3/4 OUTS
48
CONTROL RM OUT
POWER
49
46
44
PHANTOM
45
MAIN OUTS
SUB OUTS
CONTROL RM OUT
47
48
49
CHANNEL INSERTS
50
RTRN TO AUX1 Level Control
23
This control will route the signal that is present at the FX RETURN jacks to AUX1
output so that the effects can be heard in the monitor mix.
POWER ON/OFF Switch
44
This switch is used to turn the main power ON or OFF. When powered on the power LED
on the front panel lights up.
PHANTOM ON Switch
45
This switch will apply +48VDC Phantom Power only to the four XLR microphone inputs.
Never connect microphones when the phantom power is on already.
NOTE: Turn down all output levels before operating this switch to avoid the possibility of
"pop" in your speakers. Do not use phantom power with tube or ribbon microphones, as this
may cause damage.
AC Inlet with Fuse Holder
46
Use it to connect your mixer to the main AC with the supplied AC cord. Please check the
available voltage in your country and voltage required for your M. FX model before
attempting to connect your MIX.FX Series mixer to the main AC.
CONTROL ROOM SOURCE Switches
24
You can choose to monitor any combination of MAIN MIX, CD/TAPE, and ALT3-4 (MIX 12
04FX)/SUB1-2 (MIX 1622FX) via these switches. The corresponding stereo signals will be
delivered to the CONTROL ROOM/PHONES and LED display.
25
CTRL ROOM/PHONES Knob
This control is used to adjust the output level of CTRL ROOM/PHONES.
TAPE TO MAIN Switch
26
You can connect a CD or Tape Deck to the CD/TAPE inputs and press this switch to send
the CD/TAPE signal to the main mix. Also, you can use the MAIN MIX controls to adjust
the volume level.
MIX .FX
SERIES
MIX.FX
SERIES
CONTROL ELEMENTS
CONTROL ELEMENTS
27
SOLO MODE (PFL/AFL) & RUDE SOLO LED
By pushing down this button will made the selected signal of CONTROL ROOM SOURCE
replace by the SOLO signal, going into the CONTROL ROOM OUTPUTS, PHONES and
the RIGHT LED DISPLAY (LEFT and RIGHT LED DISPLAY when in AFL SOLO MODE).
The audible SOLO levels are controlled by the CTRL ROOM/PHONES knob.
The button provides two modes: up for PFL (Pre-Fader-Listen) mode, down for AFL (AfterFader-Listen) mode. In either mode, SOLO will not be affected by a channel's MUTE/ ALT
switch position.
NOTE: Be caution when switching from AFL to PFL mode. If you have the channel fader
turned down too much below the unity gain while in AFL mode, switch to PFL mode will
cause a sudden and startling increase in volume level.
When the solo mode is engaged, the SOLO LED will light up. (In PFL Solo mode ,the RUDE
SOLO LED is green, while in AFL Solo mode, the LED is red.)
FX BYPASS & LED
33
Engaging this switch in to bypass the internal effects processor and its output will not come
into main mix or stage monitors. When use this function, the LED next to the BYPASS
switch will illuminate.
AUX SEND OUT
34
These 1/4" TRS are used to send out the signal from the AUX bus to external device
such as effects equipment, they also can be used as monitoring outputs by connecting
a power amplifier and monitor speaker. Each channel has an AUX SEND 1 MON and
AUX SEND 2 FX control that adjusts how much of that channel's signal appear at each
of these outputs.
35
36
37
38
39 40
41
28
OUTPUT LEVEL LED DISPLAY
These stereo LED meter will indicate the level of the overall output signal.
1
MON
L
L
L
POWER
MONO
34
INTERNAL EFFECTS SECTION
2
R
R
R
PHONES
FOOTSW
FX
Internal Effects Selector
29
AUX SEND
Adjust this knob to select the right effect you wish to perform. There are totally 16 options for
you: SPRING, STAGE, TREMOLO and two-effect combinations. When you are satisfied with
the right preset, please push this knob to store it. When changing effects, the effects output
mutes for a second.
29
30
INTERNAL EFFECTS
ECHO
SPRING
15
ECHO + REV
STAGE
TREMOLD
STEREO DELAY
ROOM
FLANGER + REV
1
3
4
STUDIO
12
5
THEATER
CHORUS + REV
HALL
FX OL
11
9
8
FX RETURN
35
STEREO AUX RETURN Inputs
Use these stereo 1/4" jacks to return the signal of an effect unit to main mix.
(Note: In MIX 1622FX, if you engage the MAIN/SUB1-2 switch, the signal is routed to Sub 1-2
bus), the level controlled by Master AUX RETURN knob. Only use the left input if connect a
mono input signal to the AUX RETURN inputs, the signal will appear on both sides.
7
VARIATIONS
33
FX
BYPASS
36
Connect these inputs with the output of an external effects device. If you plugging a 1/4"
jack into these inputs, it will disconnect the internal effects processor. However, if you plug
into just the left input ,the right internal effects is still connected, and vice versa. The signal
is routed to main mix, the level controlled by FX RETURN knob.
1/4" MAIN OUT Jacks (Only for MIX 1622FX)
31
43
MAIN OUT
STEREO FX RETURN Inputs
6
10
AUX RETURN
PHANTOM
48V
2
13
CHORUS
FX
INPUT
LEVEL
16
14
CATHEDRAL
FLANGER
ROTARY
32
37
These 1/4" TRS jacks are used to connect with the inputs of an external amplifiers or active
speakers. It has the same signal that appears at the XLR MAIN OUTS on the rear panel.
30
VARIATIONS
Since you have selected the preferable effect, the next step, please go with the fine
consideration, there are also total 16 variations for each preset, and each variation may be
managed by several different factors.
FX INPUT LEVEL Control
31
This control is used to adjust the signal level coming into the internal effects processor. Adjust
the FX INPUT LEVEL knob until you can hardly see the FX OL LED blink.
FX OL LED
42
32
This LED lights up when the signal is too strong for the digital effects processor. Turn down the
FX INPUT LEVEL knob when you see the FX OL LED blink frequently.
38
CD/TAPE INPUTS
Use the Tape Input if you wish to listen to your mixer from a Taper Recorder or DAT. When
the TAPE TO MAIN switch is pushed in, you can assign the signal coming from Taper
Recorder to main mix; when the CD/TAPE switch which on the front panel is engaged in
the signal can also be assigned to the CONTROL ROOM/PHONES outputs. If you
connecting a mono device, you will need a "Y-splitter" RCA adapter.
TAPE OUTPUTS
39
These RCA sockets will route the main out signal into a tape recorder or DAT. The TAPE
OUT level is affected by MAIN MIX faders.