1
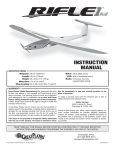
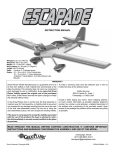
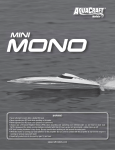
NOTES ABOUT USING LIPO BATTERIES IN YOUR BOAT:
INTRODUCTION & DESCRIPTION CHANGES
Thank you for purchasing the AquaCraft Motley Crew. We at
AquaCraft want the time you spend with your boat to be safe, fun
and successful. If for any reason you feel this R/C model is not for
you return it to your place of purchase immediately. Your hobby
dealer cannot accept returns on any model after final assembly or
after your boat has been operated.
AquaCraft products are to be used by ages 14 and over.
All pictures, descriptions, and specifications found in this instruction
manual are subject to change without notice. AquaCraft maintains
no responsibility for inadvertent errors in this manual.
ITEMS INCLUDED
The Motley Crew uses the AquaCraft 60amp ESC. This ESC has a
built in stutter bump system that cycles the power to the motor
when the battery voltage reaches 12V. This is designed to warn
you of impending low battery voltage and subsequent shut down.
It also has a 10.8V battery cut off safety system that shuts the
power down to the motor so not to damage the batteries.
Having said this: As a rule of thumb we have found it best in very
high current draw applications like an RC boat not to use more
than 70% of the rated capacity of the battery pack, per run. We
have also found that when in doubt and using the recommended
propellers you can expect to use about 1000mAh (give or take)
per minute of operation. Using this you can better judge your runs
knowing you’re taking the very best care of your battery pack
investment.
GrimRacer Says: It is best to test this by
making a timed 2-minute run, then charging
the batteries back up and noting the amount
of mAh the pack allowed back in. Do this each and every time
you make a prop change or any other significant change to your
setup! Then adjust your driving time so you don’t go over the
70% usage mark.
™
➧ Motley Crew Brushless Catamaran
➧ Tactic™ 2.4GHz Transmitter
➧ Boat Stand
Also keep in mind that car packs (hard case) could be used. But if
you get them wet they can store water causing the internal metal
parts of the pack to corrode; in turn causing short pack life. We
highly recommend the use a dedicated marine LiPo packs.
OPTIONAL PARTS
PARTS NEEDED TO COMPLETE YOUR MODEL
❏ 4 – AA Batteries (Transmitter)
❏ Battery packs (2)
❏ Charger
For your convenience we have listed below a few different battery
and charger options. It is also important to note that chargers come
in both DC and AC/DC versions. DC charger requires a 12V power
supply like a 12V car battery or bench top power supply to power
up the charger. AC/DC chargers allow you to plug the charger into a
120V house outlet or DC power supply, therefore making them more
convenient for most charging situations.
OPTION 1: (This is about the minimum cost and performance
needed to operate your Motley Crew.)
❏ 2-AQUC2135 GrimRacer Speed Packs 2S 7.4V 4200mAh 30C
Soft Pack
❏ DTXP4230 Onyx™ 230 Advanced AC/DC Battery Charger
OPTION 2: (This option is more advanced, providing more run
time and better future growth.)
❏ 2-AQUC2225 GrimRacer Speed Packs 2S 7.4V 5000mAh
40C Soft Pack
❏ GPMM3155 Great Planes® ElectriFly® Triton™ EQ AC/DC
Battery Charger
2
❏ GPMQ4480 Hook and Loop (If you purchase extra battery packs,
you are going to need to purchase extra hook and loop as well.)
❏ AQUB9725 42X55 2-Bladed Prop (This prop has great acceleration
as well as top speed.)
❏ AQUB9514 Grimracer Pro Radio Box Tape
❏ AQUB9500 Grimracer Speed Grease (You are going to need to
re-grease the drive cable after each day of running.)
❏ AQUB6322 Grimracer Decal Set (Let them know that you’re ready
to race!)
WARRANTY SERVICE
AquaCraft will warrant your model for 90 days after the purchase
from defects in materials or workmanship of original manufacture.
AquaCraft, at their option, will repair or replace at no charge, the
incorrectly made part. This warranty does not cover damage caused
by crash, abuse, misuse, alteration or accident. To return your boat
for service you need to provide proof of purchase. Your store receipt
or product invoice will suffice.
IN NO EVENT SHALL THE PURCHASER BE ENTITLED TO ANY
INCIDENTAL, SPECIAL, INDIRECT OR CONSEQUENTIAL DAMAGES,
WHETHER RESULTING FROM THE USE, MISUSE OR INABILITY TO
USE THE PRODUCT OR FROM DEFECTS IN THE PRODUCT.
This warranty gives you specific legal rights and you may also have
other rights, which vary from state to state.
Outside USA and Canada, contact local importer for warranty
information.
Hobby Services
3002 N. Apollo Drive, Suite 1
Champaign, Illinois 61822
Attn: Service Department
Phone: (217) 398-0007 9:00 am - 5:00 pm Central Time M-F
E-mail: [email protected]
SAFETY PRECAUTIONS
➧ Never, ever, attempt to swim after a stalled RC boat. DO NOT get
in the water for any reason to retrieve your boat. Your Motley
Crew has flotation added to the interior of the hull and the cowl.
It will not sink. To aid you in retrieving a stalled RC boat you can
use a fishing reel with a tennis ball tied to the end of the line. Or
better yet, get yourself a small Jon boat so you can row out and
pick up your boat. Remember to use a PFD any time you enter
your retrieval craft.
➧ Do not touch the propeller anytime the motor is running. Pay equally
close attention to items such as loose clothing, shirtsleeves, ties,
scarves, long hair or anything that may become entangled in the
spinning prop. If your fingers, hands, etc. come in contact with the
spinning propeller, you may be severely injured.
➧ The speed and mass of this boat can inflict property damage and
severe personal injury if a collision occurs. Never run this boat
in the presence of swimmers or where the possibility of collision
with people or property exists.
➧ This boat is controlled by radio signals, which are susceptible to
possible interference from RF sources. It is a good idea to precheck the system to make sure it’s operating properly before you
launch your boat.
➧ If your boat should happen to stall, water currents will slowly
carry it to shore. The bad news is the boat could be carried to the
opposite shore. When surveying areas to run your model, keep
variables in mind such as wind direction, size of the lake, etc. It is
not advisable to run R/C boats on any free-flowing bodies of water
such as creeks or rivers.
FEATURES & SPECIFICATIONS
MOTLEY CREW FEATURES:
Hand laid fiberglass hull and canopy
Drop tub design
Roomy interior
Tactic 2.4GHz radio system
AquaCraft 1800 KV 6 pole motor
AquaCraft 60amp Motor Controller (ESC)
Aluminum water jacket
Black anodized aluminum hardware
Transom mounted water cooling pickup
Hook and loop battery mounting
Registered Motley Crew graphics
Other standard features include:
High gloss painted finish
Brass stuffing tube
Low friction cable guide
.150" flex drive cable
Industry standard 3/16" (.187") prop shaft
42mm Fiber Reinforced Plastic (FRP) Propeller
BASIC HULL SPECIFICATIONS:
Hull Length: 29-3/4" (756mm)
Overall Length: 32" (813mm)
Width: 10-1/2" (242mm)
Height (Less Hardware): 6" (153mm)
Empty Weight: 4.18lb or 67oz (1.89kg)
Weight RTR: 5.53 lb or 88.5oz (2.50kg) (weight taken with
Marine Power 5000mAh LiPo packs)
MOTOR SPECIFICATIONS:
Diameter: 36mm
Length: 56mm
Shaft Length: 15mm
Overall Length: 71mm
Shaft Size: 5mm
Connectors: 4mm Bullet
Weight: 212g
Input Voltage: 7-18.5v
Max. Constant Current: 50A
Max. Surge Current: 80A/five
seconds
No Load Current: 5.0A
kV Rating: 1800 rpm/V
Watts: 925Max
ESC SPECIFICATIONS:
Length: 100mm
Width: 38mm
Height: 17mm
Weight: 3.8oz (109grams)
Wire Gauge: 14g
Battery Connectors: Male Deans® Ultra® Plugs (2)
Motor Connectors: 4mm gold plated bullet connectors (3)
Input Voltage: 12-14 NiMH
4 cells LiPo
8-20V input w/o BEC)
Output Current: 60A continuous maximum
72A surge maximum
Max Output Power: 720 watts
On-Resistance: 0.003 ohms
Operating Frequency: 8kHz
BEC: 5.2V/2A
Stutter Bump Voltage: 12V
Low Voltage Cutoff: 11.6V
Thermal Cutoff: 110C
Timing Angle: 10°
3
START UP AND OPERATION
Install four AA batteries into the transmitter using the
installation pattern molded into the bottom of the battery tray.
Turn on the transmitter, making sure it’s working by viewing
the LED on the front. The LED should glow bright red.
Remove the canopy and install the provided
hook and loop to your battery packs.
Install the batteries, making sure they are well seated.
4
Stand clear of the propeller and plug each of the battery packs into
the motor controller.
At this time you will hear one beep. To arm the system squeeze the
throttle trigger and hold until you hear one more beep. Release the
throttle trigger and you will here three more beeps. Your boat is
now ready to operate. Note: You will have to go though this simple
arming procedure each time to run your boat.
If your boat does not beep after plugging in the batteries turn the
throttle trim knob either left or right until you hear the boat beep.
Then continue the arming process.
2
%
6
)
%
7
Plug in the packs
One (1) beep
Squeeze the throttle trigger and hold
One (1) beep
Release the trigger
Three (3) beeps
Your boat is now ready to operate!
Now is a good time to check the rotation of the prop. Quickly squeeze
the throttle trigger and check the direction of the motor. It should
spin the propeller counterclockwise when viewing the boat from the
back. If the motor spins the wrong way, simply switch any two of
the three wires between the motor and the controller. Warning: Do
not hold the throttle down for more than one or two seconds to
check the motor direction or you might risk damaging the motor.
Also check the steering direction. When you turn the wheel to the
right, the back of the rudder blade should also move to the right.
Install the cowl and tape in place. You are now ready to run the boat.
After you have completed your run, bring the boat in, untape and
unplug the batteries.
TROUBLESHOOTING
NO SIGNAL BETWEEN THE TRANSMITTER AND THE BOAT:
Check to make sure the transmitter is bound to the receiver. To bind,
turn on the transmitter and plug the batteries into the boat. Press
and hold the bind button on the top of the receiver (use a tooth pick
or other small pointed object) for approximately 4 seconds or until
the system binds. You will know it is bound when the small LED
hidden behind the face of the receiver stops flashing and stays lit.
BOAT RUNS BACKWARDS:
Switch any two of the three motor wires.
ESC WILL NOT ARM:
Move the throttle trim knob slowly clockwise, then counterclockwise,
to adjust the center point of the throttle system. Also check the
throttle reverse switch to make sure it is in the down position.
BOAT IS SLOW TO TAKE OFF:
Make sure the cable coupler is tight. If it’s OK, try being more
aggressive with the throttle during the launch; or, toss the boat
forward with more force, applying power as the boat touches the
water.
BOAT SLOWS DOWN OR SHUTS OFF IN THE MIDDLE OF A RUN:
Check for weeds on the prop or any obstruction blocking the water
cooling pick up.
AFTER A RUN THE MOTOR, BATTERIES AND/OR ESC IS HOT:
Check to make sure the water pickup is not plugged. Check to see
that the prop is not broken or that you have changed to a propeller
that is too large for the power system.
➧ Be careful as electronic parts can become very hot during
operation.
➧ Allow the electronics to cool before running the boat again.
TIPS AND NOTES:
The handling and performance of your Motley Crew can be disrupted
by the smallest obstructions in the water. If you happen to pick up
a small duck feather or leaf, the power system could draw more
current than the ESC is capable of handling; the performance of the
boat will be compromised and you could damage the motor, ESC or
batteries. Please make sure the water you are running in is clear or
obstructions.
It’s also important to note that if you operate the boat for extended
periods of time at less than full throttle, you could overheat the ESC.
Be mindful of this as you operate the boat.
5
MAINTENANCE
Here are some basic maintenance routines.
After each day of operation we feel it’s best to remove the motor
and flush it out with a moisture displacer and re-oil the bearings.
You are going to need the following tools and supplies.
12mm open end wrench
10mm open end wrench
2.5mm hex wrench
Water displacer (WD-40,
CRC-56 or Corrosion X)
Bearing oil
AquaCraft Grimracer Speed
Grease (AQUB9500)
Paper Towels
Start by removing the water lines to the motor jacket.
Also unplug the three connector leads to the motor.
Use the 12mm and 10mm wrenches to loosen the cable
coupler from the cable. To do so hold the 12mm wrench
still and rotate the 10mm wrench counterclockwise.
Fully loosen the coupler. Using a rag cover the prop and
firmly pull the prop and shaft away from the coupler. Use
a 2.5mm hex wrench to loosen the two motor screws.
Remove the motor from the boat.
6
Place the motor in a rag or paper towel and spray a water
displacer into the fittings on the water jacket as well as in
the motor itself. After the motor is
“pickled,” re-oil the motor bearings,
wipe the motor down and reinstall
it in the boat using the above
instructions in reverse order.
After each 5 or so runs and/or after a day of running it’s a
good idea to re-lubricate the drive cable. Loosen the cable
coupler using the 10 and 12mm wrenches. Firmly pull the
prop and drive shaft out of the back of the boat. Wipe away
any old grease and water. Apply new speed grease to the shaft
and slide it back into the strut, moving it in and out as you do
so to help spread the grease along the length of the cable.
Before tightening the cable coupler, make sure to leave
a 4 or 5mm distance between the back of the strut
and the front of the drive dog. This will keep the drive
system from binding or breaking as the cable operates.
Tighten the cable coupler, reversing the direction of
the open end wrenches. DO NOT OVERTIGHTEN.
NOTE: The drive cable is supported by the brass stuffing
tube which has a low friction liner. The prop shaft (or “stub
shaft”) is hard-soldered to the flexible drive cable and
spins in a brass bushing located in the back of the stuffing
tube. The bushing and liner should be replaced when
they start to show wear. (AQUB7884 Prop Shaft Bushing;
AQUB7869 .150" Cable Liner 10", cut to length as needed.)
At the end of the day make sure to leave the cowl off
and the drain plug out overnight. This will allow any
moisture that collected in the boat to safely evaporate.
7
TUNING TIPS AND PROP INFO
NATIONAL ORGANIZATIONS & ONLINE HELP
“The Business End of the Boat”
STRUT: Tilting the strut down or lowering it tightens the ride of
the boat. A “tighter ride” will help stabilize the boat but at the risk
of more power consumption as well as a loss of speed. It’s also
important to note that this “tight ride” could cause the ESC and/or
motor to overheat. Tilting the strut up or raising it loosens the boat
ride. This looser ride allows the boat to go faster but at the risk of a
blow off (the boat lifting off the water). It’s best to make small strut
adjustments and only make one small change at a time.
RUDDER: The rudder can be tuned in a variety of ways. The most
important aspect is how sharp it is or you make it. Using a flat file,
sharpen the leading edge of the rudder finishing with 400 grit, then
600 grit wet/dry sandpaper. You can also gain some performance
if you remove the lift the rudder makes off the bottom of the blade.
You can either round or sharpen the bottom of the blade as either
method works. Another important aspect is the angle front to back
of the rudder blade. Tilting the rudder back and forth also changes
the way the boat operates. Tilting the rudder under the boat tightens
the ride while tilting it back loosens it.
CG: Adjusting the CG or center of gravity of the boat has a lot to do
with how tight the boat rides as well as the how the boat “flies” as
it enters and exits the water. Moving the battery packs forward or
rearward is the best way to adjust the CG.
SCUFFING: Scuffing is a tuning trick boat racers use to increase
the speed of their boat. Scuffing involves dulling the area/s of the
boat that touch the water as the boat is running. We like to use a
red scratch pad like the ones you find in the paint section of your
local home supply store. Scuff the bottom of the boat to the point
the shine is removed from the paint. While this tuning trick is mostly
geared towards the hard core boat racer, sport runners can benefit
from this as well. (IMPORTANT! Scuffing will remove the attractive
shine from the bottom of your hull. If having a pretty finish is
important to you, don’t scuff!)
PROPS: About the best we can do is help guide you to a better
performing prop. Ultimately how you drive and tune your boat will
determine the best prop for your racing program. Having said that
we have found the GrimRacer 42x55 (AQUB9725) is about the
best overall prop for your Motley Crew. It is also advisable that
you balance your propeller when it is new and check it for balance
periodically. If you want to learn more about tuning props check out
the “How to Balance your Propeller” link at aquacraftmodels.com.
RACING: Your Motley Crew was designed to fit into boat IMPBA
and NAMBA P class racing. What you will find is power systems
designed for the boat and others like it are making their own class
called P-Spec. This boat fits into the P-Spec Off-Shore racing class.
Check the websites listed at top right for information and places to
race your Motley Crew.
www.impba.net
www.namba.com
www.ampba.asn.au
www.aquacraftmodels.com
www.inltlwaters.com
www.rcgroups.com
www.rcuniverse.com
REPLACEMENT PARTS
Part #
Description
AQUB6233 . . . .Motley Crew Cowl
AQUB6904 . . . .Blue Water Tubing
AQUB6950 . . . .Strut Assembly
AQUB7111 . . . .Boat Stand
AQUB7758 . . . .FRP 3-Blade Prop 42mm
AQUB7806 . . . .Rudder Push Rod with Clevis
AQUB7869 . . . .Cable Liner (.150" x 10")
AQUB7884 . . . .Strut Bushing
AQUB7885 . . . .Drive Dog
AQUB7886 . . . .Motor Coupler 5mm to .150"
AQUB7906 . . . .Motor Mount Motley Crew
AQUB8000 . . . .Flex Drive .150" Cable 3/16" Prop Shaft
AQUB8729 . . . .Rudder Tiller Arm
AQUB8730 . . . .Rudder Transmom Mounting Bracket
AQUB8731 . . . .Rudder Blade with Water Fitting
AQUB8781 . . . .Steering Servo Mount
AQUB9503 . . . .Push Rod Seals
AQUB9506 . . . .Drain Plug
AQUB9518 . . . .One-Piece 36mm Alum. Water Cooling Jacket
AQUG7002 . . . .36-56-1800 6-Pole Marine Motor
AQUM7011 . . .60-Amp WC/WP LiPo ESC
FUTM0031 . . . .Futaba® S3003 Servo
TACJ0241. . . . .Tactic TTX240 2.4 Transmitter
TACJ0245. . . . .Tactic TTX240 2.4 Transmitter/Receiver
TACL0324 . . . .TR-324 Tactic 2.4 Receiver
OPTIONAL PARTS
AQUB9500 . . . .Cable Grease
AQUB9514 . . . .GrimRacer Pro Radio Box Tape
AQUB9575 . . . .GrimRacer Prop Balancer
AQUB9715 . . . .40 x 53 GrimRacer Metal Prop
AQUB9720 . . . .40 x 52 3-Blade GrimRacer Metal Prop
AQUB9725 . . . .42 x 55 GrimRacer Metal Prop
AQUC2135 . . . . GrimRacer Speed Packs 2S 7.4V
4200mAh 30C Soft Pack
AQUC2225 . . . . GrimRacer Speed Packs 2S 7.4V
5000mAh 40C Soft Pack
DTXP4230 . . . .Onyx 230 AC/DC Advanced Charger
FUTM0043 . . . .Hi-Torque Ball Bearing Servo
GPMM3156 . . .Triton EQ2 AC/DC Charger
AQUB2100 Mnl
© 2011 Hobbico®, Inc.