1
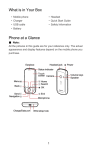
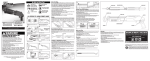
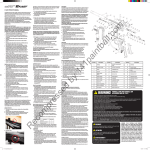
USER MANUAL
TABLE OF CONTENT
Table of Content.........................................................................................................2
Warning.....................................................................................................................3
Pending No................................................................................................................3
Statement of Liability.................................................................................................3
Disclaimer.................................................................................................................4
Limited Warranty........................................................................................................4
Features.....................................................................................................................5
Inside the Package......................................................................................................5
Power Source.............................................................................................................5
Air Source.................................................................................................................6
N 2 and Compressed Air...............................................................................................6
Disconnecting Air System..........................................................................................6
Pressure Adjustment..................................................................................................7
OPR Adjustment........................................................................................................7
LPR Adjustment.........................................................................................................7
Trigger Adjustment....................................................................................................8
LED Interface Operation.............................................................................................8
Activation..................................................................................................................8
Deactivation...............................................................................................................9
Board Adjustment.......................................................................................................9
External Maintenance..................................................................................................9
Sensor System Maintenance.......................................................................................10
Bolt Maintenance......................................................................................................10
Striker Maintenance..................................................................................................10
Firing Valve Maintenance..........................................................................................11
Storage and Transportation........................................................................................11
Troubleshooting.......................................................................................................12
Version 1.0 5/2006
2
WARNING
Eye protection must be worn at all times by the user and any person located in the range of an
actively used paintball marker. The eye protection gear must be approved and designed for paintball
use.
The Fusion marker is not a toy!
Misuse or careless use can cause serious injury or death.
Please read the operation manual and warranty card before using.
Always use a barrel blocking device.
Always ensure the marker is not pointed at anyone when it is being handled outside the
confines of an actual paintball game and where proper eye protection and equipment are not
being used.
This product is recommended for use for adults 18 years or older. Person under 18 must have
adult supervision or use only on paintball fields meeting ASTM standard F1777-97.
PENDING NO
Operation Pressure Regulator Patent No.:7045726B1
Rapid Feedneck Pending No.: 11/028640
Invisible Screw Pending No.: 11/256392
Reflecting Trigger Sensor Pending No.: 11/354808
Quick Release Bearing Lock Pending No.:11/255822
STATEMENT OF LIABILITY
The manufacturer assumes no responsibility for this product's resale or safe operation upon
distribution. PROPERTY DAMAGE, BODILIY INJURY OR DEATH could occur due to misuse,
abuse or failure to follow the manufacturer's instructions stated in this manual. The manufacturer
will assume no responsibility for physical injury or property damage resulting from the use of this
marker.
The information in this document is subject to change without prior notice. The manufacturer
assumes no responsibility for any errors that appear in this document.
3
DISCLAIMER
Notice is hereby given that this owner's manual is part of the article owned in whole by the
manufacturer, known as indicated by this disclaimer and all illustrations within the manual. All
rights for manufacturing and reproducing of such articles or any part thereof are reserved by the
manufacturer. Neither said article nor any part thereof may be manufactured or reproduced in any
way except by the written authorization from the manufacturer. All proprietary rights and
information are the sole property of the manufacturer.
LIMITED WARRANTY
DANGEROUS POWERTM warrants this Fusion paintball marker, to the initial retail purchaser, to be
free from defect in original materials and/or workmanship for twelve (12) months from the original
date of purchase with the following exceptions: (a) Disposable parts (batteries, o-rings, seals, micro
switch, air pressure hose, rubber and/or plastic material parts, etc.) are not included in this limited
warranty. (b) Electronic parts on this marker are fully warranted for 30 days from the original date of
purchase. (c) Bolt and striker systems of this marker are fully warranted for 6 months from the original
date of purchase. (d) Surface damages (scratches and nicks) or operation failure due to accident, neglect,
modification, normal wear, operator error, maintenance by anyone other than an authorized dealer or
agent, misuse, improper disassembly and reassembly, and attempts made to drill holes or remove metal
from the external surfaces which could reduce the safety and/or performance of this marker are not
covered under this limited warranty. Purchaser is responsible for all rendered services not covered under
this limited warranty, including any applicable shipping costs, labor, and/or installation. DANGEROUS
POWERTM reserves the right to determine the legitimacy of claimed defective original parts and their
eligibility for coverage under the terms of this warranty.
DANGEROUS POWERTM , its authorized dealers, affiliates, and/or agents, will not be held liable
under this warranty, state, federal, or common law for any product failure, personal injury, or
property damage resulting from improper use and/or alteration of this product. Any attempt to alter
the trigger assembly will instantly void your warranty and may result in serious injury. Any attempt
to alter basic marker parts without prior written consent from the manufacturer will result in
automatic default of all expressed warranties. Paintball markers are non-refundable and are not
subject to exchange from manufacturer.
This limited warranty is non-transferable and is valid only upon presentation of a completed warranty
registration card and original proof of purchase. There are no other warranties or guarantees, expressed
or implied, made by the manufacturer on this paintball marker.
4
FEATURES
250 to 300 psi operating pressure
Uses N2 or compressed air for air source
Air-ram electronic design
Cocker compatible barrel thread
ACS (anti-chop system) Delrin self-lubricating field-strip bolt
Quick-strip bolt / striker system
Sensor trigger with 2-step adjusting
LED user interface (Semi / ramping)
BPS (cap at 20) Sensor
Bounce-beam sensor system
Blade style trigger for lighter pull
Low-rise feedneck
3-D machined body milling
Dual regulator system
ASA (air system adapter) system and operating pressure gauge
INSIDE THE PACKAGE
One Fusion marker
14-inch Cocker thread 0.685 barrel
ASA style bottom front handle regulator
One low pressure regulator (LPR)
One barrel blocking condom
User manual
Warranty card
Tool pack
POWER SOURCE
One single 9V battery as power source.
Remove the battery from Fusion after each use.
Use of a long life alkaline 9V battery is recommended. To replace battery:
1.Remove the 2 screws located on the right side of grip using the supplied HEX tool and lift
the grip up.
2.Find the battery terminal and install the battery inside the grip frame.
3.Replace the 2 screws to reinstall the grip.
Make sure there that no wires are pinched when putting the grip back.
Do not force the wire into crevices; wires should fit easily into allowed space.
5
AIR SOURCE
Fusion will work with N 2 and compressed air.
Before attaching the air system onto Fusion, ensure the bottom line device is in place.
Always use the front handle regulator for ensuring the operating pressure is at 250 to 300 psi.
Before attaching the air system, put lubrication on the o-ring of the air tank.
If there is an on/off switch presented on the air system, shut the air system off before
connecting it onto Fusion.
It is recommended to maintain the factory stock dual regulator system for optimum
performance of Fusion.
2
N and compressed air can be extremely dangerous if not handle properly or misused. Only use
properly certified cylinders.
Keep air systems away from open flames or any other potential fire hazards.
Always remove the tank from Fusion when not in use.
N 2 AND COMPRESSED AIR
2
N and compressed air are recommended for best results with Fusion.
The OPR system could be used to utilize the pressure.
Pin valve type air system is recommended with the OPR.
DISCONNECTING AIR SYSTEM
Because there might be air left inside of Fusion after using, follow the instructions below to release
the pressure within.
1. Disconnect the loader and ensure there are no paintballs inside of Fusion.
2. If there is an on/off switch present on the air system, shut the air system off.
3. Turn off the sensor system.
4. OPR: Turning the adjustment screw clockwise, or in, will lower the OPR's output pressure.
Turning the adjustment screw counterclockwise, or out, will raise the OPR's output pressure.
LP R: Turning the adjustment screw clockwise, or in, will lower the LPR's output pressure.
Turning the adjustment screw counterclockwise, or out, will raise the LPR's output pressure.
5. Dry fire Fusion until there is no air left inside of it.
6. Disconnect the air system.
6
PRESSURE ADJUSTMENT
Before attaching the air system, ensure the air system adapter is in place.
OPR: Turning the adjustment screw clockwise, or in, will lower the OPR's output pressure.
Turning the adjustment screw counterclockwise, or out, will raise the OPR's output pressure.
LPR: Turning the adjustment screw clockwise, or in, will lower the LPR's output pressure.
Turning the adjustment screw counterclockwise, or out, will raise the LPR's output pressure.
The initial adjustment should be made with no paintballs loaded.
When adjusting or operating with low pressure, always check the velocity using chronograph
devices.
LPR controls the pressure supplied to the solenoid valve when Fusion is fired.
Use caution when adjusting, as internal damage may occur to the components or the regulator
systems and may void the warranty.
OPR ADJUSTMENT
Operating pressure can be adjusted by using the ASA style bottom-line regulator.
DO NOT ADJUST YOUR OPERATING PRESSURE OVER 350 PSI - INTERNAL
DAMAGE MAY OCCUR TO THE REGULATOR SYSTEM, SOLENOID VALVE AND
MARKER ITSELF.
The suggested operating pressure is between 250 to 300 psi.
Turning the adjustment screw clockwise, or in, will lower the OPR's output pressure.
Turning the adjustment screw counterclockwise, or out, will raise the OPR's output
pressure.
Immediately shut off OPR if any leakage is detected.
LPR ADJUSTMENT
LPR can be found on the front of Fusion.
LPR does not use a pressure gauge to monitor its pressure adjustment.
Turning the adjustment screw clockwise, or in, will lower the LPR's output pressure.
Turning the adjustment screw counterclockwise, or out, will raise the LPR's output
pressure.
Once the sound of firing seems right, place a couple of paintballs in Fusion to test the
velocity using a chronograph device.
Immediately shut off LPR if any leakage is detected.
7
TRIGGER ADJUSTMENT
The two adjustment screws are located on the left side of the frame above the trigger
guard.
The screw on the top controls the over-travel. By turning this screw you can adjust how far
the trigger will travel after it reaches the firing point.
The screw below controls the forward travel. Screwing it in will shorten the trigger's
length of pull.
LED INTERFACE OPERATION
Before operating the PC board of Fusion, ensure the barrel blocking device is in place.
There are 2 operating buttons located on the back.
Follow activation instructions for how to read the LED interface:
ACTIVATION
1. To activate Fusion, hold down button A for 1.5 seconds. When the red light turns into a
blinking blue light, the sensor has been activated.
2. Fusion is ready to be fired once the marker has been loaded and the blue light remains on.
3. Press the button B to switch sensor systems.
4. BPS and Ramping System:
Adjust the BPS and Ramping Systems as follows:
5. Fusion will turn off automatically after 20 minutes of non-use.
6. Press A to manually shut off Fusion.
Quick Reference Guide:
Red light flashing every 3 seconds Battery power low
8
Red light flashing every 5 seconds Standby mode (automatic after 30 seconds of non-use)
Blue light blinking rapidly Sensor system OFF
Blue light blinking slowly Sensor system ON and marker NOT loaded
Blue light steady Sensor system ON and marker loaded
DEACTIVATION
Press and hold the power button A for 4 seconds.
LED turn off after releasing the hand.
BOARD ADJUSTMENT
Using a HEX tool, remove the 2 screws located on the top and button of grip with the Fusion is
pointing to the left.
The 2 adjusting finger switches are located on the top of the PC board.
EXTERNAL MAINTENANCE
Most contaminates found on external surfaces can easily be removed with water and a dry
clean dump cloth or a few drops of cleaning oil.
Other useful supplies for maintaining Fusion are clean rags, Q-tips, and water / rubbing
alcohol mix.
9
SENSOR SYSTEM MAINTENANCE
The sensor system must be kept clean for optimal performance. Please follow the instructions below
for cleaning and maintenance:
1. Remove the two screws located on the top and bottom of grip using a HEX tool.
2. Clean the area thoroughly with cotton swab.
3. Replace the sensor system and the cover.
4. Replace the screws back onto the sensor system cover.
BOLT MAINTENANCE
Fusion is equipped with a Delrin fieldstrip bolt for durability and reducing friction.
The bolt must be kept clean for optimal performance.
If the surface of the bolt becomes sticky, please use the following cleaning instructions:
1.Make sure the air system is not attached to Fusion and there is no paintball inside.
2.Lift up the locking pin on the bolt and remove the bolt from the rear.
3.Clean the bolt with a clean damp cloth. Soap and warm water may be used to remove any residue.
4.Lubricate the bolt and the o-ring on it very lightly.
5.The pin locking system should be gently oiled to ensure proper functioning.
Oil very lightly and minimize oil residue on the bolt itself.
6.Clean the bore of Fusion with a squeegee and ensure there are no remaining contaminants.
Replace the bolt back to Fusion and check for movement - it should now move freely in the bore.
STRIKER MAINTENANCE
Follow the instructions below to carefully remove the striker assembly for cleaning and
maintenance:
1.Disconnect the air system and loader and ensure there is no paintball inside of Fusion.
2.Lift up the locking pin and turn the cylinder 90 degrees counterclockwise, then pull the striker
and main spring.
3.Place each component carefully and pay attention to their settings.
4.Pull the striker out from the ram cap and locate the two o-rings on the rear end of sticker.
Lubricate o-rings with gel-type lubricant if necessary.
Replace the o-rings after excessive wear.
5.Clean the bore of Fusion with a squeegee and ensure there are no remaining contaminants.
6.Reassemble the components and slip them back in their respective chambers.
Screw the hose connector back to ram cap and reinstall the striker locking pin in the rear of bolt
10
FIRING VALVE MAINTENANCE
Follow the below instruction to remove the firing valve assembly carefully for cleaning and
maintenance:
1. Remove the ASA (air system adapter) hoses.
2. Remove the two screws located on the top and bottom of grip using a HEX tool.
3. Disassemble the solenoid line and sensor eye system.
4. Remove the two invisible screws using a HEX tool.
5. Separate the body and grip frame.
6. Turn the firing valve screw (found under the body) counterclockwise.
7. Take out the firing valve by using plastic stick (under 17.5mm).
STORAGE AND TRANSPORTATION
Clean and deactivate Fusion. Detach air systems when not in use.
Make sure the barrel blocking device is in place when not in use.
Keep Fusion away from any unauthorized users.
During transportation, Fusion must be detached from air sources.
Do not carry Fusion uncased when not on a playing field. Non-playing public and law
enforcement personnel may mistake the marker for a firearm.
Always carry Fusion in its factory case or a suitable marker case.
2
2
Never transport Charged N / compressed air or CO air systems.
11
TROUBLESHOOTING
PROBLEM
Pressure gauge will not move
Fusion will not turn on
Fusion will not fire
POSSIBLE CASUE
The pressure used was too hi
SOLUTION
Replace the gauge
Not activated
Hold down operating button
for more than 4 seconds
Low battery power
Change battery
Battery is connected
incorrectly to the PC board
Check to see if the battery
cable were connected correctly
to the terminal
Low battery power
Change battery
Low pressure air
Refill the air system
Solenoid may be out of place
Open grip and press solenoid
forward
Adjust LPR pressure without
paintball present
Turn on the loader
LPR pressure is too low
No paintball present
Fusion will not fire with sensor
system on
Air leak from Barrel area
Fusion will not cycle
completely
Breaking paintball when
shooting out of the barrel
Chopping paintball internally
Sensor system is unclean
See Sensor System
Maintenance
Ball detent is damaged
Call the authorized dealers for
replacement
Paintball broke inside
See Bolt and Sensor System
Maintenance
Valve pin is at incorrect
position
Remove the LPR. Grease the
spring and valve pin
Valve pin is worn
Replace them
Air pressure is too low
Adjust the operating pressure
to 250 to 300 psi
Low battery power
Change battery
O-ring of striker is worn
Replace the o-ring
Striker is worn
Call the authorized dealers for
replacement
Barrel size does not match
paintball's
The stock barrel size is 0693,
change it if necessary
Ball detent is worn
Call the authorized dealers for
replacement
Sensor system is not on
Low battery power
Switch it to ON
Change battery
12
13
14