1
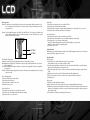
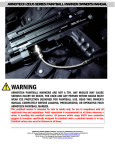
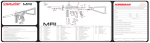
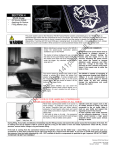
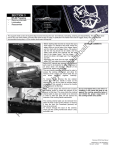
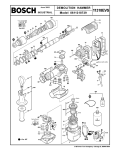
[WARNING]
This is not a toy. Misuse of this product
may cause serious injury or death. All
persons using this product, or within range
while this product is being used, must
wear eye protection specifically designed
for paintball. Recommend at least 18
years of age to purchase this product.
Please read operation/instruction manual
before using.
WARRANTY INFORMATION
Warranties to the original customer that this product is free from defects in material and workmanship under normal use and
service for a period of one year from the original date of purchase by the initial owner/purchaser. For warranty to be effective,customer must return the enclosed warranty registration card, along with a copy of the purchase receipt, within fifteen
days of purchase. The manufacturer agrees to repair or replace (at its discretion) any product within a reasonable period of
time. This warranty does not cover: o-rings, scratches, nicks, normal wear and tear of parts, any modifications or normal fading of anodizing or damage caused by dropping or hitting of the product. This warranty shall not apply if it is shown by the
manufacture that the consumer caused the defect or malfunction because of misuse. This warranty only covers original factory parts. Any modifications or tampering of original factory parts will not be covered by this warranty. Warranty work can only
be conducted by the manufacture technicians and or authorized technicians. If product needs to be repair, package it carefully and send it together with your name, address, phone number and a brief description of the malfunction to:
Silver Bullet Repair
570 Mantua Blvd. Sewell, NJ 08080
USER MANUAL
CAUTION:
• This paintball marker is NOT a toy. It can cause injury or death.
• Install a barrel plug in the barrel when not using the marker.
• All persons using this product, within range while this product is being used, must wear
eye and face protection specifically designed fro paintball.
• Fire only 0.68 caliber paintballs from this product.
• Read this manual before using this product.
IMPORTANT:
• Firing velocity may vary according to altitude and climate conditions.
• BEFORE using your marker in play, you must first preform a SAFE VELOCITY TEST.
(This can only be accomplished by using a testing device called a “Velocity Chronograph”
and can be preformed by the dealership where you purchased this product or at a local
paintball playing field).
• Recommended velocity is 280 (FPS) or less.
• This Product is NOT intended to be used at any distance less than 25 feet.
NOTE:
This product is intended to be used at a velocity no higher than 300 feet per second (FPS).
OPERATION GUIDE
1. Main Body
14. Volumizer
28. Drop-Forward
2. Venturi Bolt
15. Low Pressure Chamber
29. Adapter UFA
3. Hammer
16. Direct Feed
30. Disconnect Hose
4. Striker Spring
17. Barrel
31. Touch Switch
5. Striker Buffer
18. Sight Rail
32. Ball Detent
20. Expansion Chamber
33. Bolt Screw
7. Hammer Plug
21. Gauge
34. No.10-14x1/2” Screw
8. Thumb Adjuster
22. Double Trigger
35. C.S. Washer
9. Bolt Pin
23. O-ring A-015
36. Gel Grip
10. Cup Seal & Valve Pin
24. Barrel O-ring
37. M5X12 Screw
11. Valve Body
25. Quick Disconnect Pin
38. M5X5 Screw
12. Cup Seal Guide
26. Disconnect Lock Pin
13. Valve Spring
27. LCD/LED Elec.Board
6.
Striker Spring Guide
Basic Operation:
Button 1) Power button: Press and hold until screen turns on to power marker. When the marker is not in
use it is suggested to turn the marker off. To turn the marker off press and hold button 1 until the
screen powers off.
Button 2) Cycles through firing modes: Semi, Multi, Turbo and Full Auto. To select fire mode: with the safety
off press this button until the mode you wish to use appears on screen. This button is also used to
turn the electronic safety on and off.
BUTTON 1
BUTTON 2
This Grip has 4 firing options:
Semi Auto: One shot per trigger pull, adjustable from four to twenty balls per second.
Multi: Multiple shots per trigger pull. The number of shots per trigger pull is adjustable from one to twenty
balls per trigger pull.
Turbo: Same as Multi but the number of balls per second is increased, adjustable from four to twenty balls
per trigger pull.
Full Auto: Continuous firing per trigger pull, the number of balls per second is adjustable from four to twenty
balls per second.
Rate of Fire Adjustment:
1) Select the firing mode you wish to adjust.
2) Press and release button one.
3) Press button two to change the rate of fire
4) Press button one to save.
Shot Counter Reset:
1) Press button one two times, the screen will read "Counter"
2) Press button two, the number of balls fired will now be flashing.
3) Press button two, to reset the counter.
Game Timer:
1) Press button
2) Press button
3) Press button
4) Press button
one three times, the screen will read "Timer"
two, the timer will now be flashing.
two to adjust the countdown timer. Adjustable from 0 to 99 minutes. Select 0 to cancel.
one to start timer and return to the firing menu.
Auto shutoff options:
1) Press button one four times, the screen will now read "Power"
2) Press button two, the bottom half of the screen will be flashing the current setting.
3) Press button two, to cycle the power setting options.
"Autooff" The marker will shutoff after a period of inactivity, helping to conserve power.
"Normal" The marker will NOT automatically shutoff.
4) Press button one to save.
Safety Operation:
With safety on press and hold button two until the word "Safety" disappears from the screen. To turn safety
on repeat until "safety" appears on the screen.
Operation Guide:
Before you play.
1) Power button: Press and hold until screen turns on to power marker.
Caution: With the power on the marker is capable of firing.
2) Cock the marker by pulling the venturi bolt to the rear of the marker until it latches. Caution: Releasing
the bolt before it latches may cause the marker to fire.
3) Tighten the air tank until it is snug. If a leak occurs between the tank and C/A adapter, replace the tank
o-ring.
4) Install the loader into the feed tube. Fill the loader with .68 caliber paintballs only.
5) Turn electronic safety off and select fire mode. Refer to basic operation for instructions.
6) Pull trigger to fire.
After you play
1) Remove your loader and paint from marker.
2) Aim the marker in a safe direction and fire a few shots to empty paintballs from the breach.
3) Simultaneously unscrew your tank and fire the marker in a safe direction. Firing will release line pressure
and prevent o-ring breakage. Caution: do not unscrew the tank valve from the tank; doing so may cause
serious injury or death.
4) Turn the marker off and insert a barrel plug into the marker.
Maintenance:
1) To properly maintain your marker, you will need to disassemble your marker. (note how parts are
removed from the marker to ease reassembly). Remove the disconnect pin using caution as internal
parts are spring loaded. Pull the venturi cocking bolt out the back of the marker. The striker will also be
removed.
2) Clean any paint or dirt from the bolt and inside of the marker using a clean rag or squeegee.
3) Lubricate the bolt and striker using a few drops of paintball oil, spread evenly with your finger.
4) Reassemble the marker. Note: when putting the venturi bolt and striker back into the marker, you will
need to apply pressure to the venturi bolt while pushing the sear out of the way. To do this remove the
grip cover and push the movable part of the solenoid forward. Note in some cases it may be necessary
to push directly on the sear. This will allow the bolt and striker to be properly installed in the marker.
GENERAL INFORMATION
Trouble Shooting
I. One or more of the following may cause recocking related problems.
A. The pressure in the tank is too low or too high.
B. Need lubrication. (See the Operation Guide)
C. Striker o-ring is damaged. Replace with a new o-ring.
D. Need to clean barrel and upper chamber of the receiver.
E. Paintballs may be defective. (i.e. expired, change shape)
F. Bolt o-ring is damaged or the o-ring has expanded or swelled. Replace with a
new o-ring.
G. After ball breaks, remove all parts from the upper chamber of the receiver, wipe parts clean,
and reassemble parts into the receiver. Also make sure to clean the barrel with a squeegee.
Helpful Hints:
II. Always remove air tank before any disassembly of your marker.
DO NOT remove the valve body unless specific valve body repairs are needed.
If needed, remove the valve body with a long, soft tipped object such as an eraser end of a pencil. DO
NOT remove the valve body with a screw driver as it will
damage the valve body and cause air leaks.
It is recommended that you install a new battery to ensure the maximum
capacity. If you leave the battery unused for over a week install a new battery.
•Air leaks are usually caused by a damaged valve body or damaged cup seal. Replace with a new valve
body and/or cup seal if necessary.
General Maintenance
•To assure gun is assembled properly, follow the schematic drawing or place parts in order during disassembly. Parts assembled backwards or placed in the wrong order will cause major to malfunction.
(1) Use the compressed air to clean the coil set to keep it’s best performance after every use.
Cleaning should only be performed on the exterior of the marker. Never submerge the frame in any
type of liquid for any reason. The electronics may become damaged or destroyed. Keep water or
cleaning solutions from entering the inside of the frame. Solvents should not be used to clean any
part of the frame.
(2) Always use the appropriate tool to remove screws and other components of the frame.
(3) Do not dry fire.
(4) Only use paintball lubes or grease.
Electronic Grip Troubleshooting:
III. Electronic Grip
A. Check to make sure there is enough air pressure to fire the marker
B. Battery may need to be replaced
C. Specific troubleshooting questions may be answered by e-mailing
([email protected])
D. Velocity may be too high, lower to below 280 fps
"
WARRANTY REGISTRATION
Please complete and return this form, along with a copy of your purchase receipt,
within fifteen days of purchase so that we may validate your one year limited warranty.
Mail to:
Silver Bullet
570 Mantua Blvd.
Sewell, NJ 08080
Serial Number____________________________________________
Name __________________________________________________
Telephone ______________________________________________
Address ________________________________________________
City __________________State
______Zip ______Country ______
Your Age ____E-mail Address ______________________________
Occupation ______________________________________________
Product name and Model __________________________________
What other brand(s) of markers do you own? __________________
Why did you purchase this marker? __________________________
Avg# or times you play paintball per month ____________________
What other hobbies (other than paintball)? ____________________
______________________________________________________
What are some magazines you like to read?____________________
______________________________________________________
Have you purchased products from the internet? ________________
What website? __________________________________________