1
Mellanox FlexBoot
User Manual
Rev 2.1
www.mellanox.com
NOTE:
THIS HARDWARE, SOFTWARE OR TEST SUITE PRODUCT (“PRODUCT(S)”) AND ITS RELATED
DOCUMENTATION ARE PROVIDED BY MELLANOX TECHNOLOGIES “AS-IS” WITH ALL FAULTS OF ANY
KIND AND SOLELY FOR THE PURPOSE OF AIDING THE CUSTOMER IN TESTING APPLICATIONS THAT USE
THE PRODUCTS IN DESIGNATED SOLUTIONS. THE CUSTOMER'S MANUFACTURING TEST ENVIRONMENT
HAS NOT MET THE STANDARDS SET BY MELLANOX TECHNOLOGIES TO FULLY QUALIFY THE
PRODUCTO(S) AND/OR THE SYSTEM USING IT. THEREFORE, MELLANOX TECHNOLOGIES CANNOT AND
DOES NOT GUARANTEE OR WARRANT THAT THE PRODUCTS WILL OPERATE WITH THE HIGHEST
QUALITY. ANY EXPRESS OR IMPLIED WARRANTIES, INCLUDING, BUT NOT LIMITED TO, THE IMPLIED
WARRANTIES OF MERCHANTABILITY, FITNESS FOR A PARTICULAR PURPOSE AND NONINFRINGEMENT
ARE DISCLAIMED. IN NO EVENT SHALL MELLANOX BE LIABLE TO CUSTOMER OR ANY THIRD PARTIES
FOR ANY DIRECT, INDIRECT, SPECIAL, EXEMPLARY, OR CONSEQUENTIAL DAMAGES OF ANY KIND
(INCLUDING, BUT NOT LIMITED TO, PAYMENT FOR PROCUREMENT OF SUBSTITUTE GOODS OR SERVICES;
LOSS OF USE, DATA, OR PROFITS; OR BUSINESS INTERRUPTION) HOWEVER CAUSED AND ON ANY
THEORY OF LIABILITY, WHETHER IN CONTRACT, STRICT LIABILITY, OR TORT (INCLUDING NEGLIGENCE
OR OTHERWISE) ARISING IN ANY WAY FROM THE USE OF THE PRODUCT(S) AND RELATED
DOCUMENTATION EVEN IF ADVISED OF THE POSSIBILITY OF SUCH DAMAGE.
Mellanox Technologies
350 Oakmead Parkway Suite 100
Sunnyvale, CA 94085
U.S.A.
www.mellanox.com
Tel: (408) 970-3400
Fax: (408) 970-3403
Mellanox Technologies, Ltd.
Beit Mellanox
PO Box 586 Yokneam 20692
Israel
www.mellanox.com
Tel: +972 (0)74 723 7200
Fax: +972 (0)4 959 3245
© Copyright 2015. Mellanox Technologies. All Rights Reserved.
Mellanox®, Mellanox logo, BridgeX®, ConnectX®, Connect-IB®, CoolBox®, CORE-Direct®, InfiniBridge®, InfiniHost®,
InfiniScale®, MetroX®, MLNX-OS®, TestX®, PhyX®, ScalableHPC®, SwitchX®, UFM®, Virtual Protocol Interconnect®
and Voltaire® are registered trademarks of Mellanox Technologies, Ltd.
ExtendX™, FabricIT™, HPC-X™, Mellanox Open Ethernet™, Mellanox PeerDirect ™, Mellanox Virtual Modular
Switch™, MetroDX™, Unbreakable-Link™ are trademarks of Mellanox Technologies, Ltd.
All other trademarks are property of their respective owners.
2
Document Number: 3218
Table of Contents
Rev 2.1
Table of Contents
Document Revision History.................................................................................................................. 8
1
2
Mellanox FlexBoot (PXE) ................................................................................................................ 9
1.1
Overview ................................................................................................................................. 9
1.2
Supported Mellanox Adapter Devices and Firmware ............................................................. 9
1.3
FlexBoot Package ................................................................................................................... 9
Burning the Expansion ROM Image............................................................................................. 10
2.1
2.2
3
Burning the Image on ConnectX® Family Devices .............................................................. 10
2.1.1
Prerequisites ........................................................................................................... 10
2.1.2
Image Burning Procedure ....................................................................................... 10
Removing the Expansion ROM Image .................................................................................. 10
Preparing the DHCP Server in Linux ........................................................................................... 11
3.1
3.2
Case I: InfiniBand Ports ........................................................................................................ 11
3.1.1
Installing DHCP ...................................................................................................... 11
3.1.2
Configuring the DHCP Server................................................................................. 11
3.1.3
Running the DHCP Server...................................................................................... 13
3.1.4
Adding Device Driver Support in Linux Kernels/Initrd ............................................ 13
Case II: Ethernet Ports ......................................................................................................... 13
3.2.1
Extracting the MAC Address – Method I ................................................................ 13
3.2.2
Extracting the MAC Address – Method II ............................................................... 14
3.2.3
Extracting the MAC Address – Method III .............................................................. 14
3.2.4
Placing MAC Addresses in /etc/dhcpd.conf ............................................................ 14
4
Subnet Manager – OpenSM ......................................................................................................... 15
5
BIOS Configuration ....................................................................................................................... 16
6
Flexboot User Interface ................................................................................................................ 17
6.1
Skipping FlexBoot, FlexBoot User Interface and FlexBoot Port ........................................... 17
6.2
Invoking the User Interface ................................................................................................... 17
6.3
6.4
7
6.2.1
Browsing the User Interface Menu ......................................................................... 17
6.2.2
Accessing FlexBoot Sub Menus ............................................................................. 18
Configuring System Settings ................................................................................................ 18
6.3.1
Editing the Parameters using Free Text ................................................................. 18
6.3.2
Editing the Parameters using Set Values ............................................................... 19
6.3.3
Deleting Configurable Settings ............................................................................... 19
6.3.4
Restoring Default Configurations ............................................................................ 19
Exiting FlexBoot User Interface ............................................................................................ 20
System Settings Configuration Options ..................................................................................... 21
7.1
System Setup ....................................................................................................................... 21
3
Rev 2.1
Table of Contents
7.2
7.3
7.4
7.5
7.6
8
7.1.1
Bus:Device:Function ............................................................................................... 21
7.1.2
Chip Type................................................................................................................ 22
7.1.3
Device Name .......................................................................................................... 22
7.1.4
PCI Device ID ......................................................................................................... 22
7.1.5
Virtualization Mode ................................................................................................. 22
7.1.6
Number of Virtual Functions ................................................................................... 22
7.1.7
Max Number of VFs Supported .............................................................................. 22
Firmware Image Properties .................................................................................................. 23
7.2.1
Flexboot Version ..................................................................................................... 23
7.2.2
Family Firmware Version ........................................................................................ 23
Main Configuration ............................................................................................................... 24
7.3.1
Blink LEDs .............................................................................................................. 24
7.3.2
MAC Address .......................................................................................................... 24
7.3.3
Virtual MAC Address .............................................................................................. 25
NIC Configuration ................................................................................................................. 25
7.4.1
Legacy Boot Protocol .............................................................................................. 25
7.4.2
Boot Retry Count .................................................................................................... 26
7.4.3
Wake on LAN .......................................................................................................... 26
7.4.4
Option ROM ............................................................................................................ 26
7.4.5
Virtual LAN ID ......................................................................................................... 26
7.4.6
Virtual LAN Mode .................................................................................................... 27
iSCSI Initiator Parameters .................................................................................................... 27
7.5.1
CHAP ID ................................................................................................................. 28
7.5.2
CHAP Secret .......................................................................................................... 28
7.5.3
IPv4 Address .......................................................................................................... 28
7.5.4
IPv4 Primary DNS ................................................................................................... 28
7.5.5
IPv4 Default Gateway ............................................................................................. 29
7.5.6
iSCSI Name ............................................................................................................ 29
7.5.7
Subnet Mask ........................................................................................................... 29
iSCSI First Target Parameters ............................................................................................. 30
7.6.1
Boot LUN ................................................................................................................ 30
7.6.2
Connect................................................................................................................... 31
7.6.3
iSCSI Name ............................................................................................................ 31
7.6.4
CHAP ID ................................................................................................................. 31
7.6.5
CHAP Secret .......................................................................................................... 31
7.6.6
IP Address .............................................................................................................. 32
7.6.7
TCP Port ................................................................................................................. 32
How to Boot ................................................................................................................................... 33
4
Table of Contents
8.1
8.2
PXE Boot .............................................................................................................................. 33
8.1.1
Prerequisites ........................................................................................................... 33
8.1.2
Starting Boot ........................................................................................................... 33
8.1.3
How to Boot to ESXi ............................................................................................... 34
8.1.4
How to Boot Using HTTP Script ............................................................................. 34
iSCSI ..................................................................................................................................... 34
8.2.1
Appendix A:
A.1
Configuring an iSCSI Target in Linux Environment ................................................ 34
Diskless Machines ................................................................................................ 36
Case I: InfiniBand Ports ........................................................................................................ 36
A.1.1
A.2
Rev 2.1
Example: Adding an IB Driver to initrd (Linux) ........................................................ 37
Case II: Ethernet Ports ......................................................................................................... 39
A.2.1
Example: Adding an Ethernet Driver to initrd (Linux) .............................................. 39
5
Rev 2.1
Table of Contents
List of Figures
Figure 1: NIC Label ............................................................................................................................... 13
Figure 2: Main Menu Window ................................................................................................................ 18
Figure 3: Free Text Editing Example ..................................................................................................... 19
Figure 4: Exit Menu ............................................................................................................................... 20
Figure 5: System Setup Menu ............................................................................................................... 21
Figure 6: Firmware Image Properties Menu .......................................................................................... 23
Figure 7: Main Configuration ................................................................................................................. 24
Figure 8: NIC Configuration ................................................................................................................... 25
Figure 10: iSCSI Initiator Parameters .................................................................................................... 27
6
Table of Contents
Rev 2.1
List of Tables
Table 1: Document Revision History ....................................................................................................... 8
Table 2: Supported Mellanox Adapter Devices and Firmware ................................................................ 9
Table 3: PXE Browsing Keys ................................................................................................................. 17
7
Rev 2.1
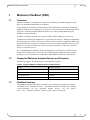
Mellanox FlexBoot (PXE)
Document Revision History
Table 1: Document Revision History
Revision
Date
Description
2.1
February 09, 2015
Updated the note in section Running the DHCP Server
Removed sections:
2.0
8
January 15, 2015
iSCSI General Parameters
DHCP Parameters
DHCP IP
DHCP Parameters
IP Version
Initial release of the restructured new User Manual.
Mellanox FlexBoot User Manual
Rev 2.1
1
Mellanox FlexBoot (PXE)
1.1
Overview
Mellanox FlexBoot is a multiprotocol remote boot technology. FlexBoot supports remote
Boot over InfiniBand (BoIB) and over Ethernet.
Using Mellanox Virtual Protocol Interconnect (VPI) technologies available in ConnectX®
adapters, FlexBoot gives IT Managers’ the choice to boot from a remote storage target (iSCSI
target) or a LAN target (Ethernet Remote Boot Server) using a single ROM image on
Mellanox ConnectX products.
FlexBoot is based on the open source project iPXE available at http://www.ipxe.org.
FlexBoot first initializes the adapter device, senses the port protocol – Ethernet or InfiniBand,
and brings up the port. Then it connects to a DHCP server to obtain its assigned IP address and
network parameters, and also to obtain the source location of the kernel/OS to boot from. The
DHCP server instructs FlexBoot to access the kernel/OS through a TFTP server, an iSCSI
target, or some other service.
For an InfiniBand port, Mellanox FlexBoot implements a network driver with IP over IB
acting as the transport layer. IP over IB is part of the Mellanox OFED for Linux software
package (see www.mellanox.com Products InfiniBand/VPI Drivers FlexBoot).
1.2
Supported Mellanox Adapter Devices and Firmware
The package supports the following HCA and firmware versions:
Table 2: Supported Mellanox Adapter Devices and Firmware
1.3
HCAs
Firmware Version
ConnectX®-2
2.9.1000
ConnectX®-3
2.33.5000
ConnectX®-3 Pro
2.33.5000
Connect-IB®
10.10.5000
FlexBoot Package
The FlexBoot package is provided as a tarball (.tgz extension). Uncompress it using the
command “tar zxf <package file name>”. The tarball contains PXE binary files (with the
*.mrom extension) for the supported adapter devices. See the release
notes file FlexBoot-<flexboot_version>_release_notes.txt for details.
9
Rev 2.1
Burning the Expansion ROM Image
2
Burning the Expansion ROM Image
2.1
Burning the Image on ConnectX® Family Devices
2.1.1
Prerequisites
Expansion ROM Image
The expansion ROM images are provided as part of the Mellanox FlexBoot package and
are listed in the release notes file FlexBoot-<flexboot_version>_release_notes.txt.
Firmware Burning Tools
You need to install the Mellanox Firmware Tools (MFT) package (version 3.7.0 or later) in
order to burn the PXE ROM image. To download MFT, see Firmware Tools under
www.mellanox.com > Products > InfiniBand/VPI Drivers > Firmware Tools.
2.1.2
Image Burning Procedure
To burn the composite image, perform the following steps:
1. Obtain the MST device name. Run:
# mst start
The device name will be of the form: mt<dev_id>_pci{_cr0|conf0}.1
2. Create and burn the composite image. Run:
flint -dev <mst device name> brom <expansion ROM image>
Example on Linux:
flint -d /dev/mst/mt4103_pci_cr0 brom FlexBoot-3.4.442_4103.mrom
Example on Windows:
flint -dev mt26428_pci_cr0 brom FlexBoot-3.4.442_4103.mrom
2.2
Removing the Expansion ROM Image
Remove the expansion ROM image. Run:
flint -dev <mst device name> drom
NOTE: When removing the expansion ROM image, you also remove Flexboot from the
boot device list.
1
Depending on the OS, the device name may be superseded with a prefix.
10
Mellanox FlexBoot User Manual
3
Rev 2.1
Preparing the DHCP Server in Linux
When the boot session starts, the PXE firmware attempts to bring up an adapter network link
(port). If it succeeds to bring up a connected link, the PXE firmware communicates with the
DHCP server. The DHCP server assigns an IP address to the PXE client and provides it with
the location of the boot program.
3.1
Case I: InfiniBand Ports
3.1.1
Installing DHCP
FlexBoot requires that the DHCP server runs on a machine which supports IP over IB.
1. Prior to installing DHCP, make sure that Mellanox OFED for Linux is already installed on
your DHCP server – see www.mellanox.com.
2. ISC DHCP of versions above 3.1.3 have native support for IPoIB clients. If using DHCP
v3.1.3, the provided patch must be deployed. Newer versions do not require patching.
3. To download and install other supported DHCP server versions, please download
Mellanox OFED from www.mellanox.com Products InfiniBand/VPI Drivers
Linux SW/Drivers and refer to docs/dhcp/README.
Standard DHCP fields holding MAC addresses are not large enough to contain an IPoIB
hardware address. To overcome this problem, DHCP over InfiniBand messages convey a
client identifier field (in DHCP option 61) used to identify the DHCP session. This client
identifier field can be used to associate an IP address with a client identifier value, such that
the DHCP server will grant the same IP address to any client that conveys this client identifier.
NOTE: In the DHCP discover packets, flexboot sends "hlen" 6 rather than 0.
"chaddr" will be the ethernet mac address rather than zeros.
In the DHCP server, the GUID in the client identifier can still be used to identify clients.
3.1.2
Configuring the DHCP Server
3.1.2.1
For ConnectX Family Devices
When a FlexBoot client boots, it sends the DHCP server various information including its
DHCP client identifier. This identifier is used to distinguish between the various DHCP
sessions. The value of the client identifier is composed of a prefix —
ff:00:00:00:00:00:02:00:00:02:c9:00 — and an 8-byte port GUID (all separated by colons and
represented in hexadecimal digits).
11
Rev 2.1
3.1.2.2
Preparing the DHCP Server in Linux
Extracting the Port GUID – Method I
To obtain the port GUID:
1. Start mst.
host1# mst start
host1# mst status
The following MFT commands assume that the Mellanox Firmware Tools (MFT) package
has been installed on the client machine.
2. Obtain the Port GUID using the device name. The device name will be of the form:
/dev/mst/ mt<dev_id>_pci{_cr0|conf0}.
flint -d <MST_DEVICE_NAME> q
Assuming that FlexBoot is connected via Port 1, then the Port GUID is
00:02:c9:03:00:00:10:39
3.1.2.3
Extracting the Port GUID – Method II
An alternative method for obtaining the port GUID involves booting the client machine via
Flex- Boot. This requires having a Subnet Manager running on one of the machines in the
InfiniBand subnet. The 8 bytes can be captured from the boot session as shown in the figure
below.
3.1.2.4
Placing Client Identifiers in /etc/dhcpd.conf
The following is an excerpt of a /etc/dhcpd.conf example file showing the format of
representing a client machine for the DHCP server
host host1 {
next-server 11.4.3.7; filename "pxelinux.0"; fixed-address 11.4.3.130;
option dhcp-client-identifier =
ff:00:00:00:00:00:02:00:00:02:c9:00:00:02:c9:03:00:0c:78:11;
}
12
Mellanox FlexBoot User Manual
3.1.3
Rev 2.1
Running the DHCP Server
NOTE: This section is applicable only when the Initiator's IP address is empty.
In order for the DHCP server to provide configuration records for clients, an appropriate
configuration file needs to be created. By default, the DHCP server looks for a configuration
file called dhcpd.conf under /etc. You can either edit this file or create a new one and provide
its full path to the DHCP server using the -cf flag. See a file example at docs/dhcpd.conf of
this package.
The DHCP server must run on a machine which has loaded the IPoIB module.
To run the DHCP server from the command line, enter:
dhcpd <IB network interface name> -d
Example:
host1# dhcpd ib0 –d
3.1.4
Adding Device Driver Support in Linux Kernels/Initrd
NOTE: A DHCP client can be used if you need to prepare a diskless machine with an IB
driver. See Step 11 under Example: Adding an IB Driver to initrd (Linux).
3.2
Case II: Ethernet Ports
When a FlexBoot client boots, it sends the DHCP server various information, including its
DHCP hardware Ethernet address (MAC). The MAC address is 6 bytes long, and it is used to
distinguish between the various DHCP sessions.
3.2.1
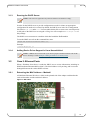
Extracting the MAC Address – Method I
All Mellanox Ethernet NICs have a label on the printed side of the adapter card that has the
card serial number and the card MAC address.
Figure 1: NIC Label
13
Rev 2.1
3.2.2
Preparing the DHCP Server in Linux
Extracting the MAC Address – Method II
The six bytes of MAC address can be captured from the display upon the boot of the ConnectX
device session as shown in the figure below.
3.2.3
Extracting the MAC Address – Method III
In case the previous methods fail to work, perform the following as a last resort:
1. Start mst.
host1# mst start
host1# mst status
The following MFT commands assume that the Mellanox Firmware Tools (MFT) package
has been installed on the client machine.
2. Obtain the MAC using the device name. The device name will be of the form: /dev/mst/
mt<dev_id>_pci{_cr0|conf0}.
flint -d <MST_DEVICE_NAME> q
Assuming that FlexBoot is connected via Port 1, then the MAC address is
00:02:c9:0c:7c:11.
3.2.4
Placing MAC Addresses in /etc/dhcpd.conf
The following is an excerpt of a /etc/dhcpd.conf example file showing the format of
representing a client machine for the DHCP server running on a Linux machine.
host host1 {
next-server 11.4.3.7; filename "pxelinux.0"; fixed-address 11.4.3.130;
hardware ethernet 00:02:c9:0c:78:12;
}
14
Mellanox FlexBoot User Manual
4
Rev 2.1
Subnet Manager – OpenSM
NOTE: This section applies to ports configured as InfiniBand only.
FlexBoot requires a Subnet Manager to be running on one of the machines in the IB network.
OpenSM is part of the Mellanox OFED for Linux software package and can be used to
accomplish this. Note that OpenSM may be run on the same host running the DHCP server but
it is not mandatory.
For large InfiniBand clusters (> 100 nodes), it is recommended to use OpenSM caching. For
further information, please refer to the Mellanox OFED User Manual.
15
Rev 2.1
5
BIOS Configuration
BIOS Configuration
The expansion ROM image presents itself to the BIOS as a boot device. As a result, the BIOS
will add to the list of boot devices “MLNX FlexBoot <ver>” for a ConnectX family device.
The priority of this list can be modified through BIOS setup.
16
Mellanox FlexBoot User Manual
Rev 2.1
6
Flexboot User Interface
6.1
Skipping FlexBoot, FlexBoot User Interface and FlexBoot Port
You can skip FlexBoot in any of the given options below:
Following system POST, when a FlexBoot advertisement banner and configuration prompt
is displayed, Press any key other than CTRL-B.
When FlexBoot execution starts (as depicted in the "Initializing Devices" screen output), a
UI prompt for escaping shortly follows.
After the BIOS called BEV_ENTRY: Press ESC when prompted (2-3 seconds)
Skip a specific port when booting starts: Press CTRL-C
6.2
Invoking the User Interface
Shortly after completion of the POST (Power-On-Self-Test sequence of the computer), the
user will be prompted to press CTRL-B to invoke Mellanox FlexBoot User Interface. The user
has few seconds to press CTRL-B before the message disappears.
Alternatively, you may skip invoking User Interface right after POST and invoke it instead
right after FlexBoot starts booting.
6.2.1
Browsing the User Interface Menu
To browse the menu, use the following keys:
Table 3: PXE Browsing Keys
Key
Operation
Arrows ↑↓
Browse options ( Highlighted option is current)
Enter
On forms – to enter menu
On configurable settings – edit configuration
Esc
Exit current menu
17
Rev 2.1
6.2.2
Flexboot User Interface
Accessing FlexBoot Sub Menus
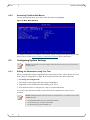
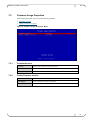
To enter the required menu, press Enter while the option is highlighted.
Figure 2: Main Menu Window
For further information on FlexBoot varies menus, and the configuration options they provide,
please refer to section System Settings Configuration Options and its subsections.
6.3
Configuring System Settings
NOTE: It is possible to save the changes made and exit the menu at any given time by
pressing Ctrl+S.
6.3.1
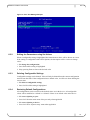
Editing the Parameters using Free Text
When a configurable setting is highlighted, the instructions to edit it will be shown on screen.
If the setting is configurable via input, the description will show the input restrictions.
To change the configuration:
3. Press Enter or start typing while the setting is highlighted.
4. [Optional] To discard the input while editing, press Ctrl+C.
5. Press Enter and wait to verify the new value is accepted and shown.
In case the value entered is invalid, an alert will be shown and the new value won’t be
accepted.
NOTE: Although numeric values are shown in decimal base, it is possible to insert values
in different bases:
For hexadecimal base type “0x” before the number
For octal base type “0” before the number
For decimal base type the number as is
18
Mellanox FlexBoot User Manual
Rev 2.1
Figure 3: Free Text Editing Example
6.3.2
Editing the Parameters using Set Values
When a configurable setting is highlighted, the instructions to edit it will be shown on screen.
If the setting is configurable with built-in options, the description will be “Select to change
value”.
To change the configuration:
1. Press Enter while setting is highlighted.
2. Keep pressing Enter to choose the desired value
6.3.3
Deleting Configurable Settings
Configurable settings can be deleted. Value will only be deleted from the current configuration
and not from the flash. If the configuration has a default value, it will be set when deleting the
current value.
To delete a configurable setting:
1. Press Ctrl+D while setting is highlighted.
6.3.4
Restoring Default Configurations
All configurations can be restored to the default values set in the device. All configurable
values will be modified to “default” or “deleted” if there is no default value in the device.
To restore defaults per port:
Press Ctrl+R on the main menu of the port only when applicable
To restore defaults per device:
Press Ctrl+R on “System setup” menu when applicable
19
Rev 2.1
6.4
Flexboot User Interface
Exiting FlexBoot User Interface
To exit FlexBoot User Interface press ESC from the System Setup menu.
Figure 4: Exit Menu
20
Mellanox FlexBoot User Manual
7
Rev 2.1
System Settings Configuration Options
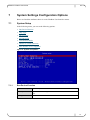
Below are listed the attributes shown in varies FlexBoot User Interface menus.
7.1
System Setup
In the following menu, you can set the following options:
Bus:Device:Function
Chip Type
Device Name
PCI Device ID
Virtualization Mode
Number of Virtual Functions
Max Number of VFs Supported
Figure 5: System Setup Menu
7.1.1
Bus:Device:Function
Location:
System setup
Description:
Specifies the BIOS assigned PCI Bus:Device:Function identifier of the
card
Configurable:
No
21
Rev 2.1
7.1.2
7.1.3
7.1.4
7.1.5
7.1.6
7.1.7
22
System Settings Configuration Options
Chip Type
Location:
System setup
Description:
Specifies the chip type
Configurable:
No
Device Name
Location:
System setup
Description:
The device’s product name
Configurable:
No
PCI Device ID
Location:
System setup
Description:
The PCI Device ID of the controller
Configurable:
No
Virtualization Mode
Location:
System setup
Description:
Specifies the type of virtualization used by the controller on all ports. Only
valid for adapters that support SR-IOV virtualization mode.
Configurable:
Yes – built-in options
Persistency:
Persistent through AC cycle
Reboot required:
Yes – reboot is needed in order for this change to apply
Available options:
1. None
2. SR-IOV
Number of Virtual Functions
Location:
System setup
Description:
The number of virtual functions advertised and usable by the driver
Configurable:
Yes – via input – If virtualization mode is SR-IOV
Persistency:
Persistent through AC cycle
Reboot required:
Yes – reboot is needed in order for this change to apply
Value restrictions:
Minimum integer value is 0. Maximum integer value is the value displayed
in attribute “Max number of VFs supported”.
Max Number of VFs Supported
Location:
System setup
Description:
The maximum number of virtual functions supported on the port.
Configurable:
No
Mellanox FlexBoot User Manual
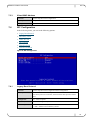
7.2
Rev 2.1
Firmware Image Properties
In the following menu, you can set the following options:
Flexboot Version
Family Firmware Version
Figure 6: Firmware Image Properties Menu
7.2.1
7.2.2
Flexboot Version
Location:
System setup /Firmware Image Properties
Description:
Flexboot driver version information
Configurable:
No
Family Firmware Version
Location:
System setup /Firmware Image Properties
Description:
Device’s firmware version information.
Configurable:
No
23
Rev 2.1
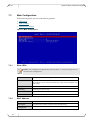
7.3
System Settings Configuration Options
Main Configuration
In the following menu, you can set the following options:
Blink LEDs
MAC Address
Virtual MAC Address
Figure 7: Main Configuration
7.3.1
Blink LEDs
NOTE: This configuration is applied when presssing Enter, so it may take longer time to
save than other configurations.
7.3.2
24
Location:
System setup/Port main configurations
Description:
Specifies the number of seconds the LEDs on physical network port
should blink to assist with port identification. Only valid for adapters with
blink LEDs.
Configurable:
Yes – via input
Persistency:
Valid only for current cycle
Effects:
Blink LEDs duration value of the port will be as set in the current cycle
Value restrictions:
The minimum integer value is 0 and the maximum is 15.
MAC Address
Location:
System setup/Port main configurations
Description:
Permanent MAC address assigned during manufacturing
Configurable:
No
Mellanox FlexBoot User Manual
7.3.3
7.4
Rev 2.1
Virtual MAC Address
Location:
System setup/Port main configurations
Description:
The port’s virtual MAC address
Configurable:
No
NIC Configuration
In the following menu, you can set the following options:
Legacy Boot Protocol
Boot Retry Count
Wake on LAN
Option ROM
Virtual LAN ID
Virtual LAN Mode
Figure 8: NIC Configuration
7.4.1
Legacy Boot Protocol
Location:
System setup/Port main configurations/NIC Configuration
Description:
Use a non-UEFI network boot protocol.
The chosen protocol is tried first; if boot fails the other protocol will be
used.
Configurable:
Yes – built-in options
Persistency:
Persistent through AC cycle
Available options:
1. None – no PXE boot, no iSCSI boot
2. PXE – PXE first and if failed try iSCSI
25
Rev 2.1
System Settings Configuration Options
3. iSCSI – iSCSI first and if failed try PXE
7.4.2
Boot Retry Count
Location:
System setup/Port main configurations/NIC Configuration
Description:
The number of retries to attempt in case of a boot failure.
Configurable:
Yes – built-in options
Persistency:
Persistent through AC cycle
Available options:
0. No retries
1. Retry
2. Retries
3. Retries
4. Retries
5. Retries
6. Retries
7. Indefinite Retries
7.4.3
Wake on LAN
Location:
System setup/Port main configurations/NIC Configuration
Description:
Status of Wake on LAN feature. When set, it enables the server to be
powered using an in-band magic packet.
Only valid for adapters that support Wake on LAN.
Configurable:
Yes – built-in options
Persistency:
Persistent through AC cycle
Available options:
1. Enabled
2. Disabled
7.4.4
Option ROM
Location:
System setup/Port main configurations/NIC Configuration
Description:
Controls the enablement of legacy Boot Protocols in the Option ROM. If
disabled, no legacy boot protocol is chosen. When set, the boot protocol
will be chosen by “Boot legacy protocol” attribute.
Configurable:
Yes – built-in options
Persistency:
Persistent through AC cycle
Reboot required:
Yes – reboot is needed in order for this change to apply
Available options:
1. Enabled
2. Disabled
7.4.5
26
Virtual LAN ID
Location:
System setup/Port main configurations/NIC Configuration
Description:
Uses the VLAN tag with the selected boot protocol.
Mellanox FlexBoot User Manual
7.4.6
Rev 2.1
Configurable:
Yes – via input – If virtual LAN mode is enabled
Value restrictions:
The minimum integer value is 1 and Maximum integer value is 4094.
Virtual LAN Mode
Location:
System setup/Port main configurations/NIC Configuration
Description:
Enable/Disable VLAN tagging on the selected boot protocol.
Configurable:
Yes – built-in options
Persistency:
Persistent through AC cycle
Available options:
1. Enabled
2. Disabled
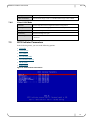
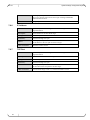
7.5
iSCSI Initiator Parameters
In the following menu, you can set the following options:
CHAP ID
CHAP Secret
IPv4 Address
IPv4 Primary DNS
IPv4 Default Gateway
iSCSI Name
Subnet Mask
Figure 9: iSCSI Initiator Parameters
27
Rev 2.1
7.5.1
7.5.2
7.5.3
7.5.4
28
System Settings Configuration Options
CHAP ID
Location:
System setup/Port main configurations/iSCSI Configuration/iSCSI
Initiator Parameters
Description:
The iSCSI initiator Challenge-Handshake Authentication Protocol
(CHAP) ID
Configurable:
Yes – via input
Persistency:
Persistent through AC cycle
Effects:
If the legacy boot protocol is iSCSI – This will be the username used for
the iSCSI initiator Challenge-Handshake Authentication Protocol.
Value restrictions:
Maximum string length is 128.
CHAP Secret
Location:
System setup/Port main configurations/iSCSI Configuration/iSCSI
Initiator Parameters
Description:
The iSCSI initiator Challenge-Handshake Authentication Protocol
(CHAP) secret (password).
Configurable:
Yes – via input
Persistency:
Persistent through AC cycle
Effects:
If the legacy boot protocol is iSCSI – This will be the password used for
the iSCSI initiator Challenge-Handshake Authentication Protocol.
Value restrictions:
String length should be 0 or 12 to 16
IPv4 Address
Location:
System setup/Port main configurations/iSCSI Configuration/iSCSI
Initiator Parameters
Description:
iSCSI initiator’s IPv4 address
Configurable:
Yes – via input
Persistency:
Persistent through AC cycle
Effects:
If the legacy boot protocol is iSCSI – This will be set as the IP address of
the initiator.
Value restrictions:
Should be in IPv4 format
IPv4 Primary DNS
Location:
System setup/Port main configurations/iSCSI Configuration/iSCSI
Initiator Parameters
Description:
The iSCSI initiator Primary DNS IP Address.
Configurable:
Yes – via input
Persistency:
Persistent through AC cycle
Effects:
If the legacy boot protocol is iSCSI – This will be set as the DNS for the IP
address of the initiator.
Mellanox FlexBoot User Manual
Value restrictions:
7.5.5
7.5.6
7.5.7
Rev 2.1
Should be in IPv4 format
IPv4 Default Gateway
Location:
System setup/Port main configurations/iSCSI Configuration/iSCSI
Initiator Parameters
Description:
The iSCSI initiator default Gateway IP address.
Configurable:
Yes – via input
Persistency:
Persistent through AC cycle
Effects:
If the legacy boot protocol is iSCSI – This will be set as the default
gateway IP address of the initiator.
Value restrictions:
Should be in IPv4 format
iSCSI Name
Location:
System setup/Port main configurations/iSCSI Configuration/iSCSI
Initiator Parameters
Description:
The initiator's iSCSI Qualified Name (IQN).
Configurable:
Yes – via input
Persistency:
Persistent through AC cycle
Effects:
If the legacy boot protocol is iSCSI – This will be set as the iSCSI
Qualified Name of the initiator.
Value restrictions:
Maximum string length is 223
Subnet Mask
Location:
System setup/Port main configurations/iSCSI Configuration/iSCSI
Initiator Parameters
Description:
The iSCSI initiator Subnet Mask for an IPv4 initiator configuration.
Configurable:
Yes – via input
Persistency:
Persistent through AC cycle
Effects:
If the legacy boot protocol is iSCSI – This will be set as the subnet mask
for the IP address of the initiator.
Value restrictions:
Should be in IPv4 format
29
Rev 2.1
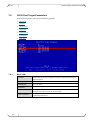
7.6
System Settings Configuration Options
iSCSI First Target Parameters
In the following menu, you can set the following options:
Boot LUN
Connect
iSCSI Name
CHAP ID
CHAP Secret
IP Address
TCP Port
7.6.1
30
Boot LUN
Location:
System setup/Port main configurations/iSCSI Configuration/iSCSI First
target Parameters
Description:
The boot Logical Unit Number (LUN) on the first iSCSI storage target.
Configurable:
Yes – via input
Persistency:
Persistent through AC cycle
Effects:
If the legacy boot protocol is iSCSI and Connect is enabled – This will be
the boot LUN in the root path for the first target.
Value restrictions:
The minimum integer value is 0 and the maximum is
18446744073709551615.
Mellanox FlexBoot User Manual
7.6.2
Rev 2.1
Connect
Location:
System setup/Port main configurations/iSCSI Configuration/iSCSI First
target Parameters
Description:
Enable/Disable connecting to the first iSCSI target. This will be ignored if
both DHCP IP and DHCP Parameters are enabled in iSCSI general
parameters.
Configurable:
Yes – built-in options
Persistency:
Persistent through AC cycle
Available options:
1. Enabled
2. Disabled
7.6.3
7.6.4
7.6.5
iSCSI Name
Location:
System setup/Port main configurations/iSCSI Configuration/iSCSI First
target Parameters
Description:
The iSCSI Qualified Name (IQN) of the first target
Configurable:
Yes – via input
Persistency:
Persistent through AC cycle
Effects:
If the legacy boot protocol is iSCSI and Connect is enabled – This will be
the iSCSI Qualified name in the root path for the first target.
Value restrictions:
Maximum string length is 223
CHAP ID
Location:
System setup/Port main configurations/iSCSI Configuration/iSCSI First
target Parameters
Description:
The first iSCSI storage target Challenge-Handshake Authentication
Protocol (CHAP) ID.
Configurable:
Yes – via input
Persistency:
Persistent through AC cycle
Effects:
If the legacy boot protocol is iSCSI and Connect is enabled – This will be
the reverse username used for the first target Challenge-Handshake
Authentication Protocol.
Value restrictions:
Maximum string length is 128.
CHAP Secret
Location:
System setup/Port main configurations/iSCSI Configuration/iSCSI First
target Parameters
Description:
The Challenge-Handshake Authentication Protocol secret (CHAP
password) of the first iSCSI storage target.
Configurable:
Yes – via input
Persistency:
Persistent through AC cycle
31
Rev 2.1
7.6.6
7.6.7
32
System Settings Configuration Options
Effects:
If the legacy boot protocol is iSCSI and Connect is enabled – This will be
the reverse password used for the first target Challenge-Handshake
Authentication Protocol.
Value restrictions:
String length should be 0 or 12 to 16
IP Address
Location:
System setup/Port main configurations/iSCSI Configuration/iSCSI First
target Parameters
Description:
The IP address of the first iSCSI target
Configurable:
Yes – via input
Persistency:
Persistent through AC cycle
Effects:
If the legacy boot protocol is iSCSI and Connect is enabled – This will be
the IP address in the root path for the first target.
Value restrictions:
Should be in IPv4 format
TCP Port
Location:
System setup/Port main configurations/iSCSI Configuration/iSCSI First
target Parameters
Description:
TCP Port number of first iSCSI target
Configurable:
Yes – via input
Persistency:
Persistent through AC cycle
Effects:
If the legacy boot protocol is iSCSI and Connect is enabled – This will be
the TCP Port in the root path for the first target.
Value restrictions:
The minimum integer value is 1, and the maximum is 65535.
Mellanox FlexBoot User Manual
8
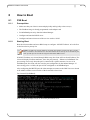
How to Boot
8.1
PXE Boot
8.1.1
Prerequisites
Rev 2.1
Make sure that your client is connected physically and logically to the server(s)
The FlexBoot image is already programmed on the adapter card
For InfiniBand ports only: Start the Subnet Manager
Configure and start the DHCP server
Configure and start at least one of the services such as: iSCSI
8.1.2
Starting Boot
Boot the client machine and enter BIOS setup to configure “MLNX FlexBoot” to be the first
on the boot device priority list.
NOTE: On dual-port network adapters, the client first attempts to boot from Port 1. If this
fails, it switches to boot from Port 2. Note also that the driver waits up to 10 seconds for port
come up and up to 90 seconds to assign an IP from the DHCP server.
If MLNX FlexBoot was selected through BIOS setup, the client will boot from FlexBoot. The
client will display FlexBoot attributes, sense the port protocol – Ethernet or InfiniBand. The
port sensing occurs only when the port is connected to a QSFP connector. In case of an
InfiniBand port, the client will also wait for port configuration by the Subnet Manager. If
auto-sensing proto- col fails, the port will be configured as an InfiniBand port.
After configuring the IB/ETH port, the client attempts to connect to the DHCP server to obtain
an IP address and the source location of the kernel/OS to boot from.
For ConnectX (InfiniBand):
Next, FlexBoot attempts to boot as directed by the DHCP server.
33
Rev 2.1
8.1.3
How to Boot
How to Boot to ESXi
For instructions on booting to ESXi, refer to the ESXi Installation Guide on VMWare site:
http://pubs.vmware.com/vsphere-55/index.jsp#com.vmware.vsphere.upgrade.doc/GUID-B9
DB94CA-4857-458B-B6F1-6A688726AED0.html
8.1.4
How to Boot Using HTTP Script
After performing basic HTTP configuration, add the following lines to the dhcp server
configuration file:
host uefi24-1 {
hardware ethernet F4:52:14:7A:56:F1 ;
fixed-address 14.7.6.24;
filename "pxe_script_linux";
option vendor-class-identifier "PXEClient";
}
“pxe_script_linux” file:
#!ipxe
dhcp net0
kernel -n vmlinuz http://14.7.6.30/RHEL6.4-x86_64-DVD1/images/pxeboot/vmlinuz
initrd http://14.7.6.30/RHEL6.4-x86_64-DVD1/images/pxeboot/initrd.img
boot
8.2
iSCSI
Mellanox FlexBoot enables an iSCSI-boot of an OS located on a remote iSCSI target. It has a
built-in iSCSI initiator which can connect to the remote iSCSI target and load from it the
kernel and initrd. There are two instances of connection to the remote iSCSI target: the first is
for get- ting the kernel and initrd via FlexBoot, and the second is for loading other parts of the
OS via initrd.
If you choose to continue loading the OS (after boot) through the HCA device driver, please
verify that the initrd image includes the HCA driver as described in Section 1.2.
NOTE: To boot via iSCSI, Flexboot must be selected from the BIOS boot menu (it will
be shown as a BEV entry). Do not look for the entry in the BVC table.
8.2.1
Configuring an iSCSI Target in Linux Environment
8.2.1.1
Prerequisites
Make sure that an iSCSI Target is installed on your server side.
You can download and install an iSCSI Target from the following location:
http://sourceforge.net/projects/iscsitarget/files/iscsitarget/
Dedicate a partition on your iSCSI Target on which you will later install the operating
system
Configure your iSCSI Target to work with the partition you dedicated. If, for example, you
choose partition /dev/sda5, then edit the iSCSI Target configuration file /etc/ietd.conf to
include the following line under the iSCSI Target iqn line:
Lun 0 Path=/dev/sda5,Type=fileio
34
Mellanox FlexBoot User Manual
Rev 2.1
Example of an iSCSI Target iqn line:
Target iqn.2007-08.7.3.4.10:iscsiboot
Start your iSCSI Target.
Example:
host1# /etc/init.d/iscsitarget start
8.2.1.2
Configuring the DHCP Server to Boot From an iSCSI Target
Configure DHCP as described in Chapter 3, “Preparing the DHCP Server in Linux”.
Edit your DHCP configuration file (/etc/dhcpd.conf) and add the following lines for the
machine(s) you wish to boot from the iSCSI target:
Filename "";
option root-path "iscsi:iscsi_target_ip::::iscsi_target_iqn";
The following is an example for configuring an IB/ETH device to boot from an iSCSI target:
host host1{ filename "";
option root-path "iscsi:iscsi_target_ip::::iscsi_target_iqn";
# For a ConnectX device with ports configured as InfiniBand, comment out# the
follow- ing line
# option dhcp-client-identifier =
ff:00:00:00:00:00:02:00:00:02:c9:00:00:02:c9:03:00:00:10:39;
# For a ConnectX device with ports configured as Ethernet, comment out# the
following line
# hardware ethernet 00:02:c9:00:00:bb;
}
35
Rev 2.1
How to Boot
Appendix A:
Diskless Machines
Mellanox FlexBoot supports booting diskless machines.
NOTE: The following configuration insturctions apply only to operation systems which do
not include an inbox driver, and should be skipped in case an OS with an inbox driver is used.
To enable using an IB/ETH driver, the initrd image must include a device driver module and
be configured to load that driver. This can be achieved by adding the device driver module into
the initrd image and loading it.
The ‘initrd’ image of some Linux distributions such as SuSE Linux Enterprise Server and Red
Hat Enterprise Linux, cannot be edited prior or during the installation process.
If you need to install Linux distributions over Flexboot, please replace your ‘initrd’
images with the images found at: www.mellanox.com Products InfiniBand/VPI
Drivers FlexBoot (Download Tab).
All OSes which doesn’t include inbox driver should do the following.
OSes which include the inbox driver should skip these configurations
A.1
Case I: InfiniBand Ports
The IB driver requires loading the following modules in the specified:
ib_addr.ko
ib_core.ko
ib_mad.ko
ib_sa.ko
ib_cm.ko
ib_uverbs.ko
ib_ucm.ko
ib_umad.ko
iw_cm.ko
rdma_cm.ko
rdma_ucm.ko
mlx4_core.ko
mlx4_ib.ko
ib_mthca.ko
ipoib_helper.ko – this module is not required for all OS kernels. Please check the release
notes.
36
Mellanox FlexBoot User Manual
Rev 2.1
ib_ipoib.ko
A.1.1
Example: Adding an IB Driver to initrd (Linux)
A.1.1.1
Prerequisites
The FlexBoot image is already programmed on the HCA card
The DHCP server is installed, configured and connected to the client machine
An initrd file.
To add an IB driver into initrd, you need to copy the IB modules to the diskless image.
Your machine needs to be pre-installed with a Mellanox OFED for Linux ISO image
(available for download from www.mellanox.com Products InfiniBand/VPI Drivers
Linux SW/ Drivers) that is appropriate for the kernel version the diskless image will run.
The remainder of this section assumes that Mellanox OFED has been installed on your
machine.
A.1.1.2
Adding the IB Driver to the initrd File
NOTE: The following procedure modifies critical files used in the boot procedure. It must be
executed by users with expertise in the boot process. Improper application of this pro- cedure
may prevent the diskless machine from booting.
1. Back up your current initrd file.
2. Make a new working directory and change to it.
host1$ mkdir /tmp/initrd_ib
host1$ cd /tmp/initrd_ib
3. Extract the initrd.
host1$ gzip -dc <initrd image> | cpio -id
The initrd files are now located at: /tmp/initrd_ib
4. Create a directory for the InfiniBand modules and copy them.
host1$ mkdir -p /tmp/initrd_ib/lib/modules/ib
host1$ cd /lib/modules/`uname -r`/updates/kernel/drivers
host1$ cp infiniband/core/ib_addr.ko /tmp/initrd_ib/lib/modules/ib
host1$ cp infiniband/core/ib_core.ko /tmp/initrd_ib/lib/modules/ib
host1$ cp infiniband/core/ib_mad.ko /tmp/initrd_ib/lib/modules/ib
host1$ cp infiniband/core/ib_sa.ko /tmp/initrd_ib/lib/modules/ib
host1$ cp infiniband/core/ib_cm.ko /tmp/initrd_ib/lib/modules/ib
host1$ cp infiniband/core/ib_uverbs.ko /tmp/initrd_ib/lib/modules/ib
host1$ cp infiniband/core/ib_ucm.ko /tmp/initrd_ib/lib/modules/ib
host1$ cp infiniband/core/ib_umad.ko /tmp/initrd_ib/lib/modules/ib
host1$ cp infiniband/core/iw_cm.ko /tmp/initrd_ib/lib/modules/ib
host1$ cp infiniband/core/rdma_cm.ko /tmp/initrd_ib/lib/modules/ib
host1$ cp infiniband/core/rdma_ucm.ko /tmp/initrd_ib/lib/modules/ib
host1$ cp net/mlx4/mlx4_core.ko /tmp/initrd_ib/lib/modules/ib
host1$ cp infiniband/hw/mlx4/mlx4_ib.ko /tmp/initrd_ib/lib/modules/ib
host1$ cp infiniband/hw/mthca/ib_mthca.ko /tmp/initrd_ib/lib/modules/ib
host1$ cp infiniband/ulp/ipoib/ipoib_helper.ko
/tmp/initrd_ib/lib/modules/ib
host1$ cp infiniband/ulp/ipoib/ib_ipoib.ko /tmp/initrd_ib/lib/modules/ib
37
Rev 2.1
How to Boot
5. Load the IPv6 module. If you do not have it in your initrd, add it using the following
command.
host1$ cp /lib/modules/`uname -r`/kernel/net/ipv6/ipv6.ko
/tmp/initrd_ib/lib/modules
6. Load the modules using the insmod executable. If you do not have it in your initrd, add it
using the following command.
host1$ cp /sbin/insmod /tmp/initrd_ib/sbin/
7. [Optional] Give your IB device a static IP address.
host1$ cp /sbin/ifconfig /tmp/initrd_ib/sbin
8. [Optional] Obtain an IP address for the IB device through DHCP. Copy the DHCP client
which was compiled specifically to support IB.
To continue with this step, DHCP client needs to be already installed on the machine you
are working with.
Copy the DHCP client file and all the relevant files as described below.
host1#
host1#
host1#
host1#
host1#
host1#
host1#
host1#
cp <path to DHCP client>/dhclient /tmp/initrd_ib/sbin
cp <path to DHCP client>/dhclient-script /tmp/initrd_ib/sbin
mkdir -p /tmp/initrd_ib/var/state/dhcp
touch /tmp/initrd_ib/var/state/dhcp/dhclient.leases
cp /bin/uname /tmp/initrd_ib/bin
cp /usr/bin/expr /tmp/initrd_ib/bin
cp /sbin/ifconfig /tmp/initrd_ib/bin
cp /bin/hostname /tmp/initrd_ib/bin
9. Create a configuration file for the DHCP client and place it under/tmp/initrd_ib/sbin.
Example of the dclient.conf
# The value indicates a hexadecimal number
# For a ConnectX® device interface "ib0" {send dhcp-client-identifier
ff:00:00:00:00:00:02:00:00:02:c9:00:00:02:c9:03:00:00:10:39;
}
10.Add the commands for loading the copied modules into the file init at the point you wish
the IB driver to be loaded.
Please pay attention to the following commands order (for loading modules) as it is critical.
Loading “ipoib_helper.ko” is not required for all OS kernels.
echo “loading ipv6”
/sbin/insmod /lib/modules/ipv6.ko echo “loading IB driver”
/sbin/insmod /lib/modules/ib/ib_addr.ko
/sbin/insmod /lib/modules/ib/ib_core.ko
/sbin/insmod /lib/modules/ib/ib_mad.ko
/sbin/insmod /lib/modules/ib/ib_sa.ko
/sbin/insmod /lib/modules/ib/ib_cm.ko
/sbin/insmod /lib/modules/ib/ib_uverbs.ko
/sbin/insmod /lib/modules/ib/ib_ucm.ko
/sbin/insmod /lib/modules/ib/ib_umad.ko
/sbin/insmod /lib/modules/ib/iw_cm.ko
/sbin/insmod /lib/modules/ib/rdma_cm.ko
/sbin/insmod /lib/modules/ib/rdma_ucm.ko
/sbin/insmod /lib/modules/ib/mlx4_core.ko
/sbin/insmod /lib/modules/ib/mlx4_ib.ko
/sbin/insmod /lib/modules/ib/ib_mthca.ko
In case of interoperability issues between iSCSI and Large Receive Offload (LRO), set the
“ib_ipoib.ko lro” to “0” to disable LRO.
38
Mellanox FlexBoot User Manual
Rev 2.1
/sbin/insmod /lib/modules/ib/ib_ipoib.ko lro=0
11.Assign an IP address to the IB device. Add either a call to ifconfig or to the DHCP client
in the init file after loading the modules. If you want to use the DHCP client, then you
need to add a call to the DHCP client in the init file after loading the IB modules.
For example:
/sbin/dhclient -cf /sbin/dhclient.conf ib1
12.Save the init file.
13.Close initrd.
host1$ cd /tmp/initrd_ib
host1$ find ./ | cpio -H newc -o > /tmp/new_initrd_ib.img
host1$ gzip /tmp/new_init_ib.img
14.Copy the modified initrd (including the IB driver) which is located
at/tmp/new_init_ib.img.gz and rename it properly.
A.2
Case II: Ethernet Ports
The Ethernet driver requires loading the following modules in the specified order – see the
exam- ple below:
mlx4_core.ko
mlx4_en.ko
A.2.1
Example: Adding an Ethernet Driver to initrd (Linux)
A.2.1.1
Prerequisites
The FlexBoot image is already programmed on the adapter card.
The DHCP server is installed, configured and connected to the client machine.
An initrd file.
To add an Ethernet driver into initrd, you need to copy the Ethernet modules to the
diskless image. Your machine needs to be pre-installed with a MLNX_EN Linux Driver
(available for download from www.mellanox.com Products Ethernet Drivers) that is
appropriate for the kernel version the diskless image will run.
A.2.1.2
Adding the Ethernet Driver to the initrd File
The following procedure modifies critical files used in the boot procedure. It must be executed
by users with expertise in the boot process. Improper application of this procedure may
prevent the diskless machine from booting.
1. Back up your current initrd file.
2. Make a new working directory and change to it.
host1$ mkdir /tmp/initrd_en
host1$ cd /tmp/initrd_en
3. Extract the initrd image.
host1$ gzip -dc <initrd image> | cpio -id
39
Rev 2.1
How to Boot
The initrd files can be located at: /tmp/initrd_en
4. Create a directory for the ConnectX EN modules and copy them.
host1$
host1$
host1$
host1$
mkdir -p /tmp/initrd_en/lib/modules/mlnx_en
cd /lib/modules/`uname -r`/updates/kernel/drivers
cp net/mlx4/mlx4_core.ko /tmp/initrd_en/lib/modules/mlnx_en
cp net/mlx4/mlx4_en.ko /tmp/initrd_en/lib/modules/mlnx_en
5. Load the modules using the insmod executable. If you do not have it in your initrd, add it
using the following command.
host1$ cp /sbin/insmod /tmp/initrd_en/sbin/
6. [Optional] Give your Ethernet device a static IP address.
host1$ cp /sbin/ifconfig /tmp/initrd_en/sbin
7. Add the commands for loading the copied modules into the file init at the point you wish
the Ethernet driver to be loaded.
Please pay attention to the following commands order (for loading modules) as it is critical.
echo “loading Mellanox ConnectX EN driver”
/sbin/insmod lib/modules/mlnx_en/mlx4_core.ko
/sbin/insmod lib/modules/mlnx_en/mlx4_en.ko
8. Assign an IP address to the ConnectX EB network interface.
9. Save the init file.
10.Close initrd.
host1$ cd /tmp/initrd_en
host1$ find ./ | cpio -H newc -o > /tmp/new_initrd_en.img
host1$ gzip /tmp/new_init_en.img
11.Copy the modified initrd (including the Ethernet driver) which is located
at/tmp/new_init_en.img.gz and rename it properly.
40