1
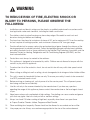
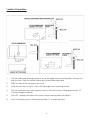
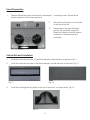
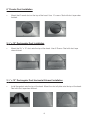
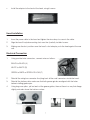
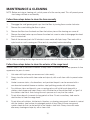
USER MANUAL
ALTO • S & ALTO • Si
ENGLISH
GETTING STARTED
Thank you for choosing Krüger home appliances!
Please follow the recommendations and guidelines contained in this manual. This way the
appliance will give you consistent high performance and efficiency for many years to come.
Table of Contents
Warnings & Caution
2
Characteristics
3
Installation & Usage
3
Maintenance & Cleaning
10
Product Specifications and Technical Parameters
Rated Voltage
120V
Rated Power Frequency
60Hz
Lighting Power Consumption
2 x 20W
Motor Power Consumption
2 x 130W
Auto-Clean Pump Power
1 x 8W (DC)
Total Power
300W
308W (w/ Auto Clean)
Motor(s)
2
Dimensions of Outer Adaptor
6” (Circular) / 3¼” x 10”
Dimensions
28 ¼” (Width) x 11 ¾” (Depth) x 7” (Height)
WARNING
TO REDUCE RISK OF FIRE, ELECTRIC SHOCK OR
INJURY TO PERSONS, PLEASE OBSERVE THE
FOLLOWING:
1.
Installation work and electric wiring must be done by a qualified professional in accordance with
local applicable codes and standards, including fire-rated construction.
2.
The stainless steel structural housing may have sharp edges. Be careful to avoid cuts and
abrasions during installation and cleaning.
3.
The hood must be placed at a minimum distance of 26” and a maximum of 30” from the cooktop
for best capture of cooking impurities, and a minimum distance of 28” from gas range.
4.
Provide sufficient air for proper combustion and exhausting of gases through the chimney of the
burning equipment to prevent backdraft. Follow the heating equipment manufacturer’s guideline
and safety standards such as those published by the National Fire Protection Association, and the
American Society for Heating, Refrigeration and Air Conditioning Engineer (ASHRAE), and the
local code authorities.
5.
Ducted fans must always be vented to the outdoors.
6.
This appliance is designed to be operated by adults. Children are not allowed to tamper with the
controls or play with this appliance.
7.
To reduce the risk of fire or electric shock, do not use this fan with any solid-state speed control
device.
8.
When cutting or drilling into wall or ceiling, do not damage electrical wiring and other hidden utilities.
9.
This unit is meant for household kitchen use only. To ensure your safety, it needs to be connected
to a GFCI protected branch circuit.
10.
Before servicing or cleaning unit, switch power off at the service panel. This will prevent power
from being switched on accidentally.
11.
Use this unit only in the manner intended by the manufacturer. If you have any questions
regarding the usage of this appliance, please contact the manufacturer or the local agent closest
to you.
12.
Never leave surface units unattended at high settings. Over boiling can cause smoke and grease
spills that may ignite. Heat oils slowly on low or medium settings.
13.
Always turn hood ON when cooking at high heat, especially when there is an open flame.
ie: Crepes Suzette, Cherries Jubilee, Peppercorn Beef Flambé.
14.
Clean ventilating fans frequently. Grease should not be allowed to accumulate on fan or filter.
15.
Use proper pan size. Always use cookware appropriate for the size of the surface element.
2
CHARACTERISTICS
Dimensions
5 1/4”
28 1/4”
11 3/4”
7”
22 1/4”
INSTALLATION & USAGE
NOTE: Carefully remove the blue coloured plastic protective film prior to final installation.
Description / Connection
This appliance should be mounted to the bottom of a standard wall cabinet. If the hood must be
mounted directly to the wall, secure the hood to wall studs.
›
Ductwork can be installed vertically or horizontally.
›
Duct runs should be as short as possible.
›
Avoid the use of elbows and reducers.
›
Use duct tape to connect joints and sections instead of screws.
›
Do not use ducts smaller than the exhaust output on the hood.
3
Location Preparation
1.
Use the dimensional drawings above to lay out the range hood’s mounting holes, wiring access
and ductwork. Mark the cabinet bottom and drywall where applicable.
2.
Make a cutout for the wiring and duct work.
3.
Install the ductwork so that it is flush with the range hood’s mounting surface.
4.
Run two conductor wires from a power source to the hood location. Bring approximately 12’’
of wiring through wiring hole.
5.
Drill 3/32” diameter pilot holes at th epoints where mounting holes are marked.
6.
Insert 4 mounting screws, leaving approximately ¼” of thread exposed.
4
Hood Preparation
1.
Remove the bottom panel of the hood by removing its 7 mounting screws. Set aside the
bottom panel once it has been removed.
2.
Remove the wiring knock-out located
at the top of the unit.
3.
Depending on the type of exhaust
options you would like to go with.
Please skip ahead to vertical exhaust
installation or horizontal exhaust
installation.
Vertical Exhaust Installation
1.
Install the small shut-off plate, or backdraft damper, inside the back of the hood. Fig 1.1
2.
Install the small shut-off plate, or backdraft damper, outside the back of the hood. Fig 1.2
Fig 1.1
3.
Fig 1.2
Install the rubber gasket (Included) on the top of the hood, as shown below. Fig 1.3
Fig 1.3
5
6” Circular Duct Installation
•
Mount the 6” round duct on the top of the hood. Uses 10 screws. Seal with duct tape when
finished.
3 ¼” x 10” Rectangular Duct Installation
•
Mount the 3¼” x 10” duct onto the top of the hood. Uses 5 Screws. Seal with duct tape
when finished.
3 ¼” x 10” Rectangular Duct Horizontal Exhaust Installation
•
Install the gasket onto the top of the hood. Mount the shut off plate onto the top of the hood.
Seal with duct tape when finished.
6
•
Install the adaptor to the back of the hood, using 6 screws.
Hood Installation
1.
Insert the power cable in the hood and tighten the wire clamp to screw in the cable.
2.
Align the hood’s keyhole mounting slots over the 4 partially installed screws.
3.
Making sure the duct positions over the hood’s duct adaptor, push the hood against the rear
wall.
Electrical Connection
1.
Using provided wire connectors, connect wires as follows:
BLACK to BLACK (A)
WHITE to WHITE (B)
GREEN to BARE or GREEN-YELLOW (C)
2.
Reinstall the wiring box converter. And plug back all the small connectors inside the hood.
3.
Reinstall the bottom plate, make sure that both grease guides are aligned with the holes
before installing grease pan.
4.
Using long nose pliers, pull out each of the grease guides, then set them in a way their flange
slightly protrudes above the bottom surface.
7
LIGHTING
The range hood requires two type JCD, 12V, 20W max, G-4 base, halogen bulbs.
WARNING: Always switch off the electrical supply before carrying out any operation or
maintenance on the appliance.
1.
Remove the halogen bulb cover with a flathead screw driver.
2.
Remove the bulb by pulling it out of its socket horizontally. DO NOT ROTATE THE BULB.
3.
Replace the bulb with an identical type JCD, 12V 20W G-4 base halogen bulb.
DO NOT touch replacement bulbs with bare hands.
CAUTION: The surface, the cover of the bulbs, and the bulbs themselves may be hot, please use
extra care when removing them.
OPERATION
This range hood is operated using a push button switch on the front panel. Both electronic controls
of the KS300 and KS300i are shown below.
KS300i
KS300
(from left to right)
(from left to right)
• Power
• Low
• Medium
• High
• Lights
• IntelliClean™
• Power
• Low
• Medium
• High
• Lights
8
INTELLICLEAN™ AUTOMATIC CLEANING SYSTEM
A detergent tank is integrated into the structure of the range hood and a pump will automatically
distribute cleansers onto both fans inside the unit when the INTELLICLEAN™ button is pushed.
Cleaning often can keep the inside of the rangehood clean and prolongs the life of the unit.
Operation Instructions
1.
Pour both cleanser and water to the marked level on the provided refill container.
2.
Pour the mixture into the refill hole on the top left hand side of the range hood. Be careful to
not overfill the reservoir. The volume of the reservoir is identical to the refill container.
3.
In the event of an overfill. The overflowing cleaner mixture will travel down into the transparent
oil capture tray below. This will be an indication to cease filling the reservoir.
4.
Press the IntelliClean™ button on the right-most side on the button controls to start the motor.
5.
The motor will discharge cleansers onto the fan at regular intervals to clean the inside of the
range hood. It will stop automatically once the cleaning cycle is finished.
6.
The oil capture tray will need to be removed and emptied when the marked line on the side
has been reached.
Precautions
1.
Only specific rangehood cleaning detergent and dishwashing detergent can be used. Using
inappropriate cleaning liquids can clog the lines and damage the pump. For more information
on which cleaning solutions to use, please contact the manufacturer or a local agent closest to
you.
2.
Follow the water and cleanser mixture ratio closely. The water to detergent ratio should be 5:1.
3.
Users are advised to clean the range hood once a day. If may be cleaned more or less
frequently depending on individual needs.
4.
When refilling the unit with cleansing mixture, use only the container provided and take care to
not overfill the reservoir.
5.
Always start the cleaning cycle with an empty oil capture tray. This will prevent the tray from
being overfilled by the refuse.
6.
Do not insert anything other than the cleansing mixture into the the refill hole.
7.
The refill container and reservoir are of identical volume. The IntelliClean™ system will
discharge any excess cleaner into the oil capture tray below.
9
MAINTENANCE & CLEANING
NOTE: Before servicing or cleaning unit, switch power off at the service panel. This will prevent power
from being switched on accidentally.
Follow these steps below to clean the fans manually
1.
Disengage the small grease guard cups from the filters by turning them counter-clockwise.
2.
Remove the screw holding the filters in place.
3.
Remove the filters from the hood and then the bottom piece of the housing can come off.
4.
Remove the wheel center cap and loosen the wheel set screw in order to disengage the wheel
from its motorshaft.
5.
Soak all the removed parts for 30 minutes in warm water with liquid soap. Then wash with a
nylon brush or a soft scouring pad. Rinse and dry completely before reinstalling.
NOTE: When reinstalling the fan, align the end of the set screw with the flat notch on the motor shaft.
Follow these steps below to clean the exterior of the range hood
Stainless steel is one of the easiest materials to keep clean. Occasional care will help preserve its fine
appearance for years to come.
1.
Hot water with liquid soap can remove most stains easily.
2.
Always rinse the surface with clean water and wipe dry with a soft clean cloth to prevent water
marks.
3.
Harder to remove stains, discolourations, and persistent deposits can be removed with a
non-abrasive household cleaner or stainless steel polishing powder with a little water.
4.
For stubborn stains and deposits, use a scouring pad or soft bristle brush along with a
stainless steel cleaner and water. Always rub in the direction of the polished lines, or “grain” of
the stainless steel finish. Avoid using too much pressure as it may mar the surface.
5.
Do not allow deposits to remain for long periods of time. Do not use ordinary steel wool or
steel brushes to clean the range hood.
6.
Do not allow salt solutions, disinfectants, bleaches, or cleaning compounds to remain in contact
with the stainless steel surface for prolonged periods of time. Many of these compounds
contain chemicals that can be harmful to the stainless steel finish. Always rinse with water
after every cleaning and wipe dry with a clean cloth.
10
ALTO™ and KRÜGER ZENISS™ are all subsidiary development branches of KRÜGER™ electrical appliances LTd. © 2011 All rights reserved.
For more information on how to care for your kitchen ventilation unit, please contact us at www.krugerliving.com