1
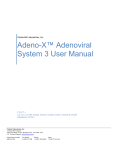
BRIC-Small Animal Imaging Facility
SOP. Page. 1
SOP/Guidelines for Optical Imaging Using IVIS-Kinetic
System at BRIC-Small Animal Imaging Facility
Effective date: September 1st, 2008
_______________________________________________________________
I. Purpose: The guidelines provide investigators with general information on
animal optical imaging studies using Xenogen IVIS-KInetic system in the
BRIC- Small Animal Imaging (SAI) Facility.
II. Responsibilities and Scope:
1. All investigators involved in performing animal imaging studies must
familiarize themselves with this SOP.
2. It is the responsibility of the Principle Investigators to provide the SAIF
with the following documents prior to the first imaging session:
9 SAIF Project Proposal Form
9 Approved Animal Protocol (including any amendments) for
animal imaging
9 UNC Account Number for billing purposes
3. It is the responsibility of the PIs/Users to follow the SOP for the Animal
Transportation Regulations established by UNC IACUC.
4. It is the responsibility of the PIs/Users to arrive at the imaging facility
preferably before or on the scheduled time. In the event that a user is late
or does not show up, he/she will still be charged for the scheduled time
unless cancellation is informed at least 24 hours prior to the scheduled
studies.
5. It is the responsibility of the PIs/Users to save or transfer the image data
after each study. SAIF staffs will do regular maintenance on the computer
and is not responsible to archive all the data on the computer.
6. Each user must get official training from SAIF staffs before using the
instrument. The training will be offered once a month according to the
schedule put on the BRIC website:
http://www.med.unc.edu/bric/sops-and-trainings
7. PIs/Users are responsible for cleaning the room thoroughly following the
standard operation procedure of cleaning after each experiment. If the
room found to be left unclean for several times from the same user, the
user will be banned to use the system.
II.
General Procedures
BRIC-Small Animal Imaging Facility
SOP. Page.
2
1. Anesthesia Procedure
1) Check the charcoal canisters on top of the anesthesia station by weighing the
canisters. If the weight is 50g over the beginning weight (marked on each
canister), change the canisters prior to the use of the anesthesia system. New
canisters are stored on top of the imaging chamber.
2) Make sure the snorkel hood is within six inches of the induction chamber when
isoflurane is being used; Turn exhaust on using switch by the refrigerator.
3) Check the isoflurane level in the vaporizer. If it is below the min. level, isoflurane needs
to be added into the vaporizer. The procedure for filling the vaporizer is the following:
a. Turn off O2 supply switch;
b. Check vaporizer to be on “Off” position;
c. Turn on the two toggle switches on front the panel, and turn them off once the
pressure drops to zero;
d. Remove the cap counter clockwise and fill isoflurane to be between Min. and
Max. level;
e. Close the cap.
4) Turn on the Evacuation Pump on the front panel
5) Turn on the O2 supply switch
6) Turn on the Gas On/Off switch on the imaging chamber
7) Set the vaporizer at 0% position; Turn on the IVIS Chamber toggle valve (IVIS Flow
On/Off) and set at 0.5 l/min; Turn on the Induction Chamber toggle valve (Chamber
On/Off) and set at 1.0 l/min; Confirm the flow rate, and then turn off the two toggles
8) Set the vaporizer to 2.0% for mice (or 3% for rats) for anesthesia induction
9) Put the mice (max. 5 mice and 2 rats) into induction chamber, and turn on the induction
chamber toggle valve (Chamber On/Off)
10) Turn on the IVIS chamber toggle valve (IVIS On/Off)
11) Once all the mice are anesthetized, transport animals to IVIS chamber, and turn off the
induction chamber toggle, and set the isoflurane level at 1.5%.
12) After imaging experiment, Turn off Anesthesia system:
a. Turn off the vaporizer
b. Turn on all the two toggles until the pressure drop to zero
c. Turn off all toggle valves
d. Turn off Oxygen valve
e. Turn off the evacuation pump
f. Turn off the Gas On/Off switch on the imaging chamber
13) Once anesthesia system is tuned off, switch off the snorkel exhaust using switch
by the refrigerator and disconnect the green oxygen hose.
BRIC-Small Animal Imaging Facility
SOP. Page.
3
2. Image Acquisition Procedure
1) Click the Living Image® software icon on the desktop.
2) In the control panel, click Initialize IVIS System, you will hear the motors moving.
3) Check the system temperature box to be Green in color. (If it is Red, which means that the
system is initialized, but the CCD camera temperature is out of range, call the SAI Facility
staffs immediately.)
4) Place samples or animals on the black (plastic or paper) sheet in the chamber. Check the
chamber temperature indicated on the bottom panel of the IVIS chamber to be what you need.
---------------------------------------------For luminescent imaging:
5). Choose the Luminescent option; Confirm that the Excitation Filter is set to Block and the
Emission Filter is set to Open.
For fluorescent imaging:
5). Choose the Fluorescent option; Choose the Filter Lock option and select the Excitation
filter from the drop-down list. The software automatically selects the appropriate emission
filter; confirm that the Fluorescent Lamp Level is set to High.
---------------------------------------------6) Set the FOV: To adjust the field of view (FOV), make a selection from the Field of View
drop-down list (A is using highest stage position with smallest FOV, and D is the largest FOV).
To view the subject(s) inside the chamber before image acquisition, take a photographic
image (clear the luminescent or fluorescent option, choose the Photographic and Auto
options, and click Acquire).
7) Set the Focus. Select use subject height from the Focus dropdown list and use the
arrows or the keyboard arrows to specify a subject height (cm). The default setting is 1.5cm
which is good for live animal study; If you are doing specimen imaging, give the best
estimation of subject height for best focal plane on the specimen.
8) Set the Binning and F/Stop: Confirm the default binning level and F/Stop or select a new
level for the luminescent or fluorescent image.
BRIC-Small Animal Imaging Facility
SOP. Page.
9) Set the Exposure Time: Confirm the default exposure time or enter a new setting for the
luminescent or fluorescent image.
10) Set the photographic image settings. Choose the Photographic option, choose the Auto
option, confirm the binning and f/stop defaults.
11) Click Overlay, to capture both photographic and Luminescent (or Fluorescent) images.
12) Click Acquire. Wait until the overlaid image is displayed on the screen.
13) Confirm that the signal of interest is above the noise level and below CCD saturation. (A
signal of interest greater than 600 counts and less than ~60,000 counts is recommended.) If
the signal level is unacceptable, adjust the exposure time or binning level.
14) In the Edit Image Labels box that appears, enter the image information and click OK. If
you do not want to enter label information, click Cancel.
15) Save the images to a defined folder or export images to certain format from File-Export.
Appendix
A. Spectral information for common fluorescent probes
Fluorophore
Excitation(nm)
Emission(nm)
GFP
445-490
515-575
DsRed
500-550
575-650
Cy5.5
615-665
695-770
ICG
710-760
810-875
B. Descriptions and setting of imaging parameters on the control panel
4
BRIC-Small Animal Imaging Facility
SOP. Page.
5
3. Clean-up Procedure
1) Shutdown the anesthesia system
a. Turn off the vaporizer
b. Turn off all toggle valves
c. Turn off the evacuation pump
d. Turn off Oxygen supply valve
2) Exit the imaging software by close the software window, copy all your image data to
your own portable drive or CD disks
3) Clean and disinfect the imaging platform inside the imaging chamber, the workspace,
the induction chamber, the nose cone, and any other areas that may have gotten
contact with the animal. All surfaces that come into contact with the animal must be
wiped down with the Roccal solution (the green solution provided in the imaging room).
Wipe the imaging platform/sheet with alcohol solution after Roccal wipe as Roccal
might produce artifact signal if left wet on the sheet.
4) There should be no blood, fur, tape, or fluids left on any part of the imaging system or
workspace.
5) Discard all needles in the sharps container, and all waste in the trash.
Living Image® Software User’s Manual
Table 3.1 General controls for all IVIS Systems
Item in the
Control Panel
Description
Luminescent
Choose this option to acquire a luminescent image.
Fluorescent
Choose this option to acquire a fluorescent image.
Exposure time
The length of time that the shutter is open during acquisition of a photographic or luminescent image.
The luminescent or fluorescent signal level is directly proportional to the exposure time. The goal is to
adjust the exposure time to produce a signal that is well above the noise (>600 counts recommended),
but less than the CCD camera saturation of ~60,000 counts.
Luminescent exposure time is measured in seconds or minutes. The minimum calibrated exposure
time is 0.5 seconds. The exposure time for fluorescent images is limited to 60 seconds to prevent
saturation of the CCD. There is no limit on the maximum exposure time for luminescent images;
however, there is little benefit to exposure times greater than five minutes.The signal is linear with
respect to exposure time over the range from 0.5 to 10 minutes. Integration times less than 0.5
seconds are not recommended due to the finite time required to open and close the lens shutter.
Binning
Controls the pixel size on the CCD camera. Increasing the binning increases the pixel size and the
sensitivity, but reduces spatial resolution. Binning a luminescent image can significantly improve the
signal-to-noise ratio. The loss of spatial resolution at high binning is often acceptable for in vivo images
where light emission is diffuse. For more details on binning, see Appendix B, page 160.
Recommended binning: 1-4 for imaging of cells or tissue sections, 4-8 for in vivo imaging of subjects,
and 8-16 for in vivo imaging of subjects with very dim sources.
f/stop
Sets the size of the camera lens aperture.The aperture size controls the amount of light detected and
the depth of field. A larger f/stop number corresponds to a smaller aperture size and results in lower
sensitivity because less light is collected for the image. However, a smaller aperture usually results in
better image sharpness and depth of field.
A photographic image is taken with a small aperture (f/8 or f/16) to produce the sharpest image and a
luminescent image is taken with a large aperture (f/1) to maximize sensitivity. For more details on f/
stop, see Appendix B, page 159.
Excitation Filter
A drop-down list of fluorescence excitation filters. For fluorescent imaging, choose the appropriate filter
for your application (GFP, DsRed, Cy5.5, or ICG). For bioluminescent imaging, Block is selected by
default. If you select Open, no filter is present. For systems equipped with spectral imaging capability,
choose the appropriate emission filter for your application (see Chapter 7, page 87).
Note: The excitation filter selection automatically sets the emission filter position.
Emission Filter
A drop-down list of fluorescence emission filters located in front of the CCD lens. The emission filter
wheel is equipped with filters for fluorescence or spectral imaging applications. The number of filter
positions (6 to 24) depends on the system. For bioluminescent imaging, the Open position (no filter) is
automatically selected by default.
Photographic
Choose this option to automatically acquire a photographic image. The illumination lights at the top of
the imaging chamber are on during a photographic image so that the system can acquire a black and
white photograph of the sample(s).
Note: You can adjust the appearance of the photographic image using the Bright and Gamma controls
(see Photo Adjustment, page 48).
Auto
If this option is chosen, the software automatically sets the exposure time to produce a good
photographic image.
Fluor Lamp
Level
Sets the illumination intensity level of the excitation lamp used in fluorescent imaging (Off, Low, High,
and Inspect). The Low setting is approximately 18% of the High setting. Inspect turns on the QTH
illumination lamp so that you can manually inspect the excitation lamp.
Note: Make sure that the filters of interest are selected in the filter drop-down lists before you select
Inspect. The Inspect operation automatically positions the selected filters in the system before turning
on the lamp. Subsequent changes to the filter popup menus will have no effect until another Inspect
operation is performed.
Overlay
If this option is chosen, the system automatically acquires a photographic image followed by a
luminescent image, then coregisters the two images.
Lights On
Turns on the lights located at the top of the imaging chamber.
13
3. Initializing the System & Acquiring Images
Table 3.1 General controls for all IVIS Systems
Item in the
Control Panel
Description
Field of View
(FOV)
Sets the size of the stage area to be imaged by adjusting the position of the stage and lens. The FOV
is the width of the square area (cm) to be imaged. A smaller FOV gives a higher sensitivity
measurement, so it is best to set the FOV no larger than necessary to accommodate the subject or
area of interest. The FOV also affects the depth of field (range in which the subject is in focus). A
smaller FOV results in a narrower depth of field. Select the FOV by choosing a setting from the dropdown list. For more details on the calibrated FOV positions A-E, see Table 3.5, page 16.
XFOV-24
Note: This check box is only available on an IVIS® System that includes the XFO-24 lens option. When
the XFO-24 lens is installed, choose the XFOV-24 option. For more details on how to install the XFO-24
lens, see the XFOV-24 Lens Instructions.
!
IMPORTANT
ALERT! If you remove the XFO-24 lens from the system, be sure to remove the check mark from the
XFOV-24 check box.
Service
Click to move the stage to a position for cleaning.
Load
Click to move the stage from the cleaning position back to the home position.
Subject height
(cm)
Sets the position of the focal plane of the lens/CCD system by adjusting the stage position. The subject
height is the distance above the stage that you are interested in imaging. For example, to image a
mouse leg joint, set the subject height to a few mm. To image the uppermost dorsal side of a mouse,
set the subject height to the 1.5 - 2.0 cm. The default subject height is 1.5 cm.
!
IMPORTANT
ALERT! The IVIS® System has a protection system to prevent instrument damage, however always
pay close attention to subject height, particularly on the IVIS Imaging System 200 Series. For example,
it is possible for a large subject (10 cm ventral-dorsal height) to contact the top of the imaging chamber
if you set the subject height = 0 and choose a small FOV.
Focus
Drop-down list of focusing methods available:
Use subject height - Choose this option to set the focal plane at the specified subject height.
Manual - Choose this option to open the Focus Image window so that you can manually adjust the
stage position. For more details on manual focusing, see Figure 3.16.
Temperature
The temperature box color indicates the temperature and status of the system:
System not initialized.
System initialized, but the CCD temperature is out of range.
System is initialized and the CCD temperature is at or within acceptable range of the demand
temperature and locked. The system is ready for imaging.
Click the temperature box to display the actual and demand temperature of the CCD and stage. For
more details, see page 10.
Acquire
Click to acquire an image using the settings and options selected in the control panel or to acquire an
image sequence specified in the Sequential Setup table.
Sequence Setup Click to display the Sequence Editor so that you can specify and manage sequence acquisition
parameters or open sequence acquisition parameters (xsq). For more details on acquiring an image
sequence, see page 23-24.
Image Setup
Click to close the Sequence Editor.
Initialize IVIS
system
Click to initialize the IVIS Imaging System. For more details on initializing the system, see page 9.
14