1
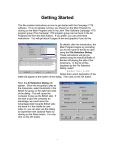
Gizmoball User Manual
Team IFTFC: Ruth Dhanaraj, Chris Varenhorst, Xiao Xiao
Contents
1 Building a Level
1.1 New Level: . . . . . . . . . . . . . . . . . . . . . . . . .
1.2 Adding Objects: . . . . . . . . . . . . . . . . . . . . . .
1.3 Moving Objects: . . . . . . . . . . . . . . . . . . . . . .
1.4 Deleting Objects: . . . . . . . . . . . . . . . . . . . . .
1.5 Setting Properties: . . . . . . . . . . . . . . . . . . . .
1.5.1 Loading a Game . . . . . . . . . . . . . . . . .
1.5.2 Examples . . . . . . . . . . . . . . . . . . . . .
1.6 Example 1: Adding a ball and several gizmos to a level
1.7 Example 2: Changing the orientation of an object . . .
1.8 Example 3: Adding velocity to a ball . . . . . . . . . .
1.9 Example 4: Adding triggers . . . . . . . . . . . . . . .
1.10 Example 5: Adding targets . . . . . . . . . . . . . . . .
1
.
.
.
.
.
.
.
.
.
.
.
.
.
.
.
.
.
.
.
.
.
.
.
.
.
.
.
.
.
.
.
.
.
.
.
.
.
.
.
.
.
.
.
.
.
.
.
.
.
.
.
.
.
.
.
.
.
.
.
.
.
.
.
.
.
.
.
.
.
.
.
.
.
.
.
.
.
.
.
.
.
.
.
.
1
1
2
2
3
3
4
4
4
5
5
6
7
There are two modes in our system - play mode and build mode. In play mode,
the user can load a game, watch the ball move around, and trigger objects with
keys if the triggers are set. In build mode, the user can create a customized game
level. To switch between modes, click on the Play/Pause button. In build mode,
the buttons on the side panel are active and a grid is displayed on the game board.
In play mode, all buttons on the side panel are inactive, and no grid is displayed.
1
1.1
Building a Level
New Level:
A user may build a customized level in our system. To do that, click on File >
New in the file menu, and an empty game board will load in build mode.
1.2
Adding Objects:
The buttons at the top of the side panel allows the user to add gizmos and balls.
To add an object, click on its corresponding add button and click on a spot on
the game board. Gizmos will snap to the grid such that the their top left front
corner is aligned with the top left front corner of the clicked on grid box. Balls
will snap to the grid such that they are placed in the exact center of the clicked
on grid box. Objects can only be added and moved on the z = 0 plane. If the
user does not click on another button in the side bar, other objects of the same
type as the added object will be added when the user clicks on other spots on the
game board. If a user tries to add an object in an already occupied grid, nothing
happens.
Flippers occupy more than one grid space. In fact, both left flippers and right
flippers occupy four grid spaces to take into account the theh arc of their motion.
To add a left flipper, click on the grid where you want the top of the left flipper to
be. To add a right flipper, click on the grid immediately to the left of where you
want the top of the right flipper to be.
1.3
Moving Objects:
To move an object, click on the Move button and select a game object in the grid.
The object will turn white, indicating that it is selected. Click on another spot
on the game board to move the object to that spot. If the new spot is already
occupied by another object, nothing happens. If the user does not click on another
button in the side bar, other objects may be moved without reclicking the ”Move”
button.
2
(a) The left flipper occupies all four grids shown
here.
This flipper was
added by clicking on the
top left corner grid.
1.4
(b) The right flipper occupies all four grids shown
here. This flipper was added
by clicking on the top left
corner grid
Deleting Objects:
To delete an object, click on the Delete button and click on a game object in the
grid. The object will immediately be removed. If The user clicks on an empty
grid, nothing happens. If the user does not click on another button in the side
bar, the user may delete other objects without reclicking the ”Delete” button.
1.5
Setting Properties:
To modify properties of an object, click the Select button and click on the object
to be modified. The selected object will turn white to indicate that it is selected.
A panel will appear on the bottom of the side bar, where the user may set object
properties. If the selected object is a ball, the only option on the bottom panel will
be velocity. The fields will display x, y, and z components of the current velocity of
the ball. To change the velocity, type in the desired components in the text fields
and press the Set Ball Velocity button. If an invalid velocity is entered, nothing
happens.
If the selected object is a gizmo, the details panel will have four sub-panes:
Orientation, Triggers, Targets, and Delay. To modify one of these properties,
click on the appropriate button on the side of the pane or click on the up arrow
and select one of the four options that show up. When Orientation is clicked,
the current orientation of the selected object is displayed in a combo box. Select
another value in the combo box to change orientation.
When Triggers is displayed, the trigger pane appears, which displays the current
triggers attached to the object as a list of buttons showing the name of the key
and an up or down button depending on the type of trigger. There are two types
3
of triggers: triggers on key press and trigger on key release. To add a key press
trigger, click the KeyDown button. To add a key release trigger, click the KeyUp
button. When clicked, the buttons will open a dialogue window. Press a key and
press select to add the trigger. To remove a trigger, click on the button associated
with it inthe list.
To add a delay to a trigger, click on the Delay button on the side. A slider will
appear, showing the current trigger delay in seconds. To modify the delay, move
the slider bar. Delay can be between 0 and 10 seconds.
To add targets to the selected gizmo, click on the Targets button on the side.
The target selection panel will pop up with a list of buttons displaying the name
of the target. Holding the mouse on the button displays the location of the target
object. To add a target, click the Add button and an object in the grid. Adding
another target requires reclicking the Add button. To remove a target, click the
button associated with the target in the list. To remove all targets, click the clear
button.
1.5.1
Loading a Game
After starting our program, the user can load a premade game level to play by
clicking on File > Load in the file menu. A file chooser will pop up, and the user
many select an XML file in the valid form. If the game is currently in build mode,
the user must switch to play mode from the Mode menu item. To change the look
of the game, go to F ile > Skins. There are three different looks available- the
default, natural, and cute. Skins only change the textures mapped to objects and
do not affect game play.
1.5.2
1.6
Examples
Example 1: Adding a ball and several gizmos to a level
This example gives instructions for building the level shown in figure 1.
1. Open a new game level by going to F ile > N ew in the file menu.
2. make sure that you are in build mode and that the grid is active. if not,
click on the ”Pause” button.
3. Add circle bumpers. Click on the Add Circle Bumper button and click on
the locations in the grid where you want to place them.
4. Add triangle bumpers. Click on the Add Triangle Bumper button and click
on the locations in the grid where you want to place the triangle buttons.
4
5. Add the absorber. Click on the Add Absorber button and click on the spot
on the grid to place the absorber.
6. Add the left flipper. Click on the Add Left Flipper button and click on the
grid location where you want the top half of the flipper to be.
7. Add the right flipper. Click on the Add Right Flipper button and click on
the grid location immediately to the left of where you want the top half of
the flipper to be.
8. Add the balls. Click on Add Ball and click on the grid where you want your
ball to go.
Figure 1: Follow the instructions in example 1 and look at this picture for where
to place the GameObjects.
1.7
Example 2: Changing the orientation of an object
this example starts where example one left off.
5
1. Select the triangle bumper on the left by clicking the ”Select” button and
clicking the triangle bumper. Now, a panel will appear beneath the buttons
in the side panel. This panel will have several buttons on the side.
2. Click on Orientation on the side of the bottom panel. The combo box
will display ”0 degrees” because that is the current orientation. Select ”270
degrees”. This will rotate the selected triangle bumper 270 degrees clockwise.
Figure 2: The orientation of the left triangle bumper has been changed to 270
degrees.
1.8
Example 3: Adding velocity to a ball
This example starts where example 1 left off.
1. Select a ball by clicking the Select button and clicking on a ball. Now, the
bottom panel will appear.
2. The only option for ball is Velocity. The fields will all display zero because
the default velocity for a ball is 0 for the x, y, and z components. Type the
desired ball velocity into the text boxes for each of the components.
6
3. Click Set Ball Velocity to change the ball’s velocity to what is in the text
boxes.
Figure 3: The detail panel showing the ball’s changed velocity
1.9
Example 4: Adding triggers
This example starts where example 1 left off. In this example, we add triggers to
a flipper such that it acts like a flipper in a normal pinball game:
1. Select a flipper by clicking the Select button and clicking on a flipper. Now,
the bottom panel will appear.
2. Click on the Triggers button on the side. The Triggers panel will show up.
3. Click on the KeyUp button. A dialogue will pop up.
4. Press the key that you want to use to trigger the flipper and hit the Select
button.
5. Click on the KeyDown button. The same dialogue will pop up.
6. Press the same key as you did for the KeyUp.
1.10
Example 5: Adding targets
This example starts where example 1 left off. In this example, we add connect a
flipper’s action to a circle bumper getting hit by the ball.
7
(a) Dialogue for trigger key selec- (b) The detail panel for
tion
Triggers
1. Select a circle bumper by clicking the Select button and clicking on a circle
bumper. Now the buttom panel will appear.
2. Click on the Targets button on the side. The Targets panel will show up.
3. Click on the Add button and click a flipper.
Figure 4: The dialog for trigger key selection. The numbers indicate the location
of the triangle bumper and appear when the mouse (not shown) is held over the
button.
8