1
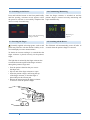
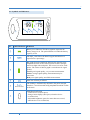
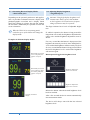
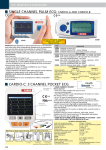
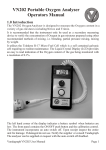
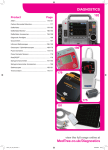
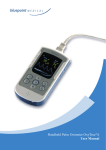
VM-2101 Finger Oximeter
User Manual
Table of Contents
1. Intended Use and Warnings
1.1 Intended Use
1.2 Warnings
3
3
3
2. Operation
2.1 Battery Installation
2.2 Switching on the Device
2.3 Inserting the Finger
2.4 Commencing Monitoring
2.5 Switching off the Device
2.6 Symbols and Indicators
2.7 Alternating Between Display Modes
– short button press
2.8 Adjusting Display Brightness
– long button press
3
3
4
4
4
4
5
6
6
3. Error Messages – Problems – Corrective Actions
3.1 General Information
3.2 Error Messages – Causes
3.3 Problems – Causes – Corrective Actions
3.4 EMI (Electromagnetic Interference)
7
7
7
7
7
4. Maintenance – Cleaning
8
5. Symbol Definitions
8
6. Technical Specifications
8
7. Packing List
8
8. Declaration of Conformity
9
9. Contact address
VM-2101 User Manual
Viamed Ltd. 2008
10
3
1. Intended Use and Warnings
1.1 Intended Use
The VM-2101 finger oximeter is indicated for spot
monitoring of functional arterial oxygen saturation
(SpO2) and pulse rate of adults and pediatrics in hospital, hospital type facilities, pre and postoperative
monitoring, transport, emergency care and mobile
environments, sports medicine as well as in the home
care environment.
1.2 Warnings
Warnings are identified by the WARNING symbol
shown above. Warnings alert the user to potential
serious outcomes, such as death, injury, or adverse
events to the patient or user.
Do not make any clinical judgments based solely
on the VM-2101. The monitor is intended only as an
adjunct in patient assessment. It must be used in conjunction with clinical signs and symptoms. The interpretation of the measurement values should be done
only by trained health care professionals.
Explosion hazard. Do not use VM-2101 in the presence of flammable anaesthetic mixture with air, oxygen, or nitrous oxide.
Routinely monitor the patient to ensure that the
VM-2101 is functioning and that the oximeter is
correctly placed.
Pulse oximetry measurements and pulse signals
can be affected by certain environmental conditions,
oximeter application errors, and certain patient conditions. See the appropriate sections of this manual for
specific safety information.
If you are uncertain about the accuracy of any
measurement, check the patient’s vital signs by alternate means; then ensure that the VM-2101 is functioning correctly.
The VM-2101 is not defibrillator-proof. However,
it may remain attached to the patient throughout defibrillation or whilst an electrosurgical unit is in use.
The measurements may be inaccurate throughout
the defibrillation, or use of an electrosurgical unit,
VM-2101 User Manual
Viamed Ltd. 2008
and shortly thereafter. To avoid shock, the caregiver
should not touch the VM-2101 while using a defibrillator on a patient.
Disconnect the VM-2101 from the patient throughout magnetic resonance imaging (MRI) scanning. Induced current could potentially cause burns.
Do not use a device that appears damaged. Do not
use the device when optical components are exposed.
2. Operation
2.1 Battery Installation
1. Slide back the cover of the battery-compartment
on the rear side of the device in the direction of
the arrow. Tilt the battery-compartment cover
on its hinge.
2. Insert two batteries (1.5 volt, AAA), ensuring
the correct orientation in accordance with the
polarity markings.
3. Tilt and slide the battery-compartment
cover closed.
4
2.2 Switching on the Device
Press and hold the button on the front panel briefly
until the opening “welcome screen” appears. After
the power-on self-test is successfully completed the
device is ready for monitoring.
Device ready for monitoring,
no finger inserted.
2.3 Inserting the Finger
Externally applied colouring agents, such as nail
polish may interfere with the monitor’s ability to detect and display accurate measurements!
To obtain an accurate reading it is essential that the
finger oximeter is placed correctly on the patient’s
finger.
The light that is emitted by the finger oximeter has
to transmit from the upside of the finger oximeter
through the patient’s finger nail.
• Turn the patient’s hand so that you can see
the finger nail.
• Nip one end of the finger oximeter to open
• Insert the patient’s finger, nail facing the top
of the finger oximeter, so that the finger is
placed fully on the silicone pad.
• Release the nipped end of the finger oximeter
to secure it on to the patient’s finger.
VM-2101 User Manual
Viamed Ltd. 2008
2.4 Commencing Monitoring
Once the finger oximeter is switched on and the
patient’s finger is inserted correctly, monitoring will
begin automatically.
Monitoring in
progress.
2.5 Switching off the Device
The VM-2101 will automatically power off after 15
seconds when the patient’s finger is removed.
5
2.6 Symbols and Indicators
1
4
2
3
6
5
No. Symbol/Indicator Definition
1
Battery level indicator. The three segments represent the
battery charge level. The symbol flashes red when the battery
capacity is low.
2
The SpO2 value shows the blood oxygen saturation level
expressed as a percentage.
3
Bar graph for pulse amplitude. Indicates the dynamic pulse
amplitude and rate. As the detected pulse becomes stronger,
more bars light with each pulse. The reverse is true for weak
pulses. The colour of the bar graph is an indicator for signal
quality:
Green: good signal quality, very accurate measurement.
Yellow: average signal quality, measurement may be
inaccurate.
Red: poor signal quality, unreliable measurement.
4
Pulse rate in beats per minute.
5
The reading is automatically adjusted to the pulse strength;
therefore, a waveform with strong amplitude should be visible
at all times.
Pleth waveform
6
VM-2101 User Manual
Multifunctional button
- switch device on (short press)
- change/rotate display (short press, when the device
is switched on)
- Adjustable brightness (press for more than one second,
when the device is switched on)
Viamed Ltd. 2008
6
2.7 Alternating Between Display Modes
– short button press
Depending on the personal preferences and application it is possible to alternate between a display with
plethysmographic waveform and a display which
shows the readings in a larger font size but without
the waveform. Additionally it is possible to rotate the
screen orientation.
When the VM-2101 is in operating mode,
each short press of the button will change the
display mode.
Examples of different display modes
Horizontally orientated
screen with plethysmographic waveform.
Horizontally orientated
screen with large digits
but without plethysmographic waveform.
2.8 Adjusting Display Brightness
– long button press
Attention! Using high display brightness will
consume more battery power than medium
or low brightness levels and a more frequent
change of batteries may be required!
The finger oximeter has 6 levels of adjustable brightness.
If, whilst in operation, the button is kept pressed for
longer than one second, the brightness adjustment becomes active and the brightness adjustment screen is
shown.
For every second that the button is kept pressed, the
brightness increases by one level. Once the highest level is reached the brightness will decrease by one level
for every second that the button is kept pressed. When
the lowest brightness level is reached the brightness
will increase again.
Button pressed toggles the brightness level
Brightness adjustment:
lowest level selected.
Brightness adjustment:
highest level selected.
Release the button when the desired brightness level
has been reached.
Vertically orientated
display.
After a few seconds the device returns automatically
into measurement mode.
The device will always start with the last selected
brightness level.
VM-2101 User Manual
Viamed Ltd. 2008
7
3. Error Messages – Problems
– Corrective Actions
Interference due to patient activity may be preventing
the monitor from tracking the pulse.
3.1 General Information
Keep the patient still, if possible. Change the application site.
Physiological conditions, medical procedures, or external agents that may interfere with the finger oximeter’s
ability to detect and display accurate measurements
include:
• Incorrect application of the finger oximeter
• Placement of the finger oximeter on an extremity
with a blood pressure cuff, arterial catheter,
or intravascular line
• Excessive patient activity
• Intravascular dyes
• Externally applied colouring agents, such as
nail polish
• Failure to shield the application site with opaque
material in high ambient light conditions
• Venous pulsation
• Dysfunctional haemoglobin
• Low perfusion
3.2 Error Messages – Causes
Display shows “-- --”
The finger has been removed from the finger oximeter.
Check that the finger is correctly inserted into the
finger oximeter.
“Low battery!”, battery symbol blinking red
The battery is almost completely discharged.
Replace batteries immediately.
3.3 Problems – Causes – Corrective Actions
Problem: There is no response to the power button. Cause/Corrective Action: Ensure that the power
button is fully depressed. The batteries may be missing, discharged, or oriented incorrectly. Install new
batteries.
Problem: No pulse signal found
Cause/Corrective Action: Check the patient. Check
that the finger oximeter is placed correctly. Test the
monitor on another subject.
Perfusion may be too low for the monitor to track the
pulse. Check the patient. Test the monitor on yourself.
Change the application site.
VM-2101 User Manual
Viamed Ltd. 2008
There may be interference due to ambient light, or the
finger oximeter may be on an extremity with a blood
pressure cuff, arterial catheter, or intravascular line.
Reposition the finger oximeter, as necessary.
Electromagnetic interference may be preventing the
monitor from tracking the pulse. Remove the source
of interference.
3.4 EMI (Electromagnetic Interference)
Caution: This device has been tested and found to
comply with the limits for medical devices according
to EN 60601-1-2, (second edition), and the Medical
Device Directive 93/42/EEC. These limits are designed to provide reasonable protection against harmful
interference in a typical medical installation.
Due to the proliferation of radio-frequency transmitting equipment and other sources of electrical noise
in healthcare environments, it is possible that high
levels of such interference due to close proximity, or
strength of a source, may result in disruption of performance of this device. Examples of noise sources in
healthcare environments that could cause electromagnetic interference include:
•
•
•
•
•
Electrosurgical units
Cellular phones
Mobile two-way radios
Electrical appliances
High-definition televisions (HDTVs)
The pulse can be obscured by electromagnetic interference. During such interference, measurements may
seem inappropriate or the finger oximeter may not
seem to operate correctly.
Disruption may be evidenced by erratic readings,
cessation of operation, or other incorrect functioning.
If this occurs, the operating environment should be
surveyed to determine the source of disruption, and
the following actions taken to eliminate the source:
8
• Turn equipment in the vicinity off and on to
isolate the offending equipment.
• Reposition or relocate the interfering equipment.
• Increase the distance between the interfering
equipment and the finger oximeter.
4. Maintenance – Cleaning
Maintenance
There are no user-serviceable parts inside the
VM-2101. The housing should not be opened.
The finger oximeter requires no calibration. If service
is necessary, contact qualified service personnel or
your local sales representative.
Caution
Do not spray, pour, or spill any liquid on the VM-2101
as this may damage the finger oximeter.
Surface-clean
Use a soft cloth dampened with either a commercial,
nonabrasive cleaner, or a solution of 70% alcohol in
water. Lightly wipe the surface of the finger oximeter.
Disinfection
Use a soft cloth saturated with a solution of 10% chlorine bleach in tap water. Lightly wipe the surface of
the finger oximeter.
5. Symbol Definitions
Attention! See instructions for use!
Manufacturer
Date of manufacture
6. Technical Specifications
Measurement Range:
SpO2: 0 to 100%
Pulse Rate: 20 to 300 beats per minute (bpm)
Accuracy:
SpO2: +/- 2% (70 to 100%)
Pulse Rate: +/- 1 digit ( ≤ 100 bpm);
+/- 1% ( > 100 bpm)
Display :
• OLED colour graphic display, 262,000 colours,
128 x 96 pixels
• Data displayed: oxygen saturation, pulse rate,
plethysmogram, bar graph
• Indicators: signal quality, pulse amplitude,
battery status
Environmental Conditions:
• Operating conditions: -20 to 50°C; 15 to 95% RH;
600 to 1300 hPa
• Storage conditions: -30 to 70°C; 10 to 95% RH;
600 to 1500 hPa
Other:
• Class IIa product
• Water-resistant construction IPX2
• Type BF
• Dimensions (L x W x H): 57 x 33 x 27 mm
• Weight (including batteries): approx. 50 g
• Power Supply: 2 batteries (1.5 volt, AAA)
• Battery Life: approx. 24h of continuous operation
Order Number:
0012101
Applied Standards:
EN 60601-1-2, BS EN ISO 9919:2005
Type BF
S/N
Serial number
P/N
Part number
Observe applicable waste disposal
regulations
European Union approval
VM-2101 User Manual
Viamed Ltd. 2008
7. Packing List
•
•
•
•
VM-2101, main unit
Lanyard
2 x AAA batteries, 1.5 volt
User manual on CD
9
8. Declaration of Conformity
VM-2101 User Manual
Viamed Ltd. 2008
Viamed Ltd.
15 Station Road
Cross Hills
Keighley
West Yorkshire BD20 7DT
United Kingdom
Tel: +44 (0)1535 634542
Fax: +44 (0)1535 635582
E-mail: [email protected]
VM-2101 – User Manual, Version: EN 1.1
08/2008
www.viamed-online.com