1
System Configuration Guide
Release 1.3.9
Copyright (c) 2014
MapuSoft Technologies
1301 Azalea Road
Mobile, AL 36693
www.mapusoft.com
System Configuration Guide
Table of Contents
Chapter 1.About this Guide ................................. 6
Objectives ..................................................................................................... 7
Audience ....................................................................................................... 7
Document Conventions ................................................................................ 7
MapuSoft Technologies and Related Documentation .................................. 8
Requesting Support..................................................................................... 10
Registering a New Account ........................................................................................... 10
Submitting a Ticket ....................................................................................................... 10
Live Support Offline ...................................................................................................... 11
Documentation Feedback ........................................................................... 11
Chapter 2.System Configuration ........................12
System Configuration ................................................................................. 13
Target OS Selection .................................................................................... 14
OS HOST Selection .................................................................................... 15
Target 64 bit CPU Selection ....................................................................... 15
User Configuration File Location ............................................................... 16
OS Changer Components Selection ........................................................... 17
POSIX OS Abstractor Selection ................................................................. 18
OS Abstractor Process Feature Selection ................................................... 19
OS Abstractor Task-Pooling Feature Selection .......................................... 20
OS Abstractor Profiler Feature Selection ................................................... 22
OS Abstractor Output Device Selection ..................................................... 23
OS Abstractor Debug and Error Checking ................................................. 23
OS Abstractor ANSI API Mapping ............................................................ 24
OS Abstractor External Memory Allocation .............................................. 25
OS Abstractor Resource Configuration ...................................................... 25
OS Abstractor Minimum Memory Pool Block Configuration ................... 28
OS Abstractor Application Shared Memory Configuration ....................... 28
OS Abstractor Clock Tick Configuration ................................................... 30
OS Abstractor Device I/O Configuration ................................................... 31
SMP Flags ..................................................................................................................... 31
OS Abstractor Target OS Specific Notes ................................................... 33
Nucleus PLUS Target .................................................................................................... 33
ThreadX Target.............................................................................................................. 33
Precise/MQX Target ...................................................................................................... 33
Linux Target ............................................................................................... 34
User Vs ROOT Login .................................................................................................... 34
System Resource Configuration .................................................................................... 34
Time Resolution ............................................................................................................ 34
Memory Heap ................................................................................................................ 35
Priority Mapping Scheme .............................................................................................. 35
2
System Configuration Guide
Memory and System Resource Cleanup ........................................................................ 35
Single-process Application Exit .................................................................................... 36
Multi-process Application Exit...................................................................................... 36
Manual Clean-up ........................................................................................................... 36
Multi-process Zombie Cleanup ..................................................................................... 36
Task’s Stack Size ........................................................................................................... 36
Windows Target ......................................................................................... 37
Android Target ........................................................................................... 37
Installing and Building the Android Platform ............................................................... 37
Adding Mapusoft Products to the Android Platform ..................................................... 37
Running the Demos from the Android Emulator ........................................................... 38
QNX Target ................................................................................................ 38
User Vs ROOT Login .................................................................................................... 38
Time Resolution ............................................................................................................ 39
Memory Heap ................................................................................................................ 39
Priority Mapping Scheme .............................................................................................. 39
Memory and System Resource Cleanup ........................................................................ 39
Task’s Stack Size ........................................................................................................... 39
Dead Synchronization Object Monitor .......................................................................... 39
VxWorks Target ......................................................................................... 40
Version Flags ................................................................................................................. 40
Unsupported OS Abstractor APIs .................................................................................. 40
Application Initialization ............................................................................ 42
Example: OS Abstractor for Windows Initialization ................................. 42
Example: POSIX Interface for Windows Target Initialization .................. 45
Runtime Memory Allocations .................................................................... 47
OS Abstractor Interface ................................................................................................. 47
POSIX Interface ............................................................................................................ 48
micro-ITRON Interface ................................................................................................. 48
VxWorks Interface ........................................................................................................ 49
pSOS Interface ............................................................................................................... 49
Nucleus Interface ........................................................................................................... 49
ThreadX Interface .......................................................................................................... 50
OS Abstractor Process Feature ................................................................... 51
Simple (single-process) Versus Complex (multiple-process) Applications52
Memory Usage ........................................................................................... 53
Memory Usage under Virtual memory model based OS ........................... 53
Multi-process Application ............................................................................................. 53
Single-process Application ............................................................................................ 54
Memory Usage under Single memory model based OS............................. 55
Multi-process Application ............................................................................................. 55
Single-process Application ............................................................................................ 56
Chapter 3: Ada System Configuration .................57
Interfacing to C and Machine ..................................................................... 57
Code............................................................................................................................... 57
Data Layout ................................................................................................................... 57
Interface to C ................................................................................................................. 57
Machine Code Inserts .................................................................................................... 58
Implementation-Defined Conventions ....................................................... 59
Interrupt Handling ...................................................................................... 60
Exceptions in Interrupt Handlers ................................................................................... 61
3
System Configuration Guide
Implementation-Defined Pragmas .............................................................. 72
Debugging Ada Programs .......................................................................... 73
Source File Display in a C debugger .......................................................... 73
Local Ada Variable Display in a C debugger ............................................. 73
Global Ada Variable Display in a C debugger ........................................... 73
Nested Subprograms and Up-level References .......................................... 73
Setting Break Points ................................................................................... 74
Stopping when an Exception is raised ........................................................ 74
Generics and Inlines ................................................................................... 74
Tasking-related Symbols and Breakpoints ................................................. 74
Tracing the Call Stack ................................................................................ 75
Revision History 76
4
System Configuration Guide
List of Tables
Table
Table
Table
Table
Table
Table
Table
Table
Table
Table
Table
Table
Table
Table
Table
Table
Table
Table
Table
Table
Table
Table
Table
Table
Table
Table
Table
Table
Table
Table
Table
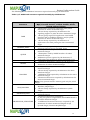
1_1: Notice Icons ..........................................................................................................................................7
1_2: Text and Syntax Conventions .........................................................................................................7
1_3: Document Description Table ..........................................................................................................8
2_1: Set the Pre-processor Definition For Selected Target OS .................................................... 14
2_2: Select the host operating system ................................................................................................. 15
2_3: Select the Target CPU type ............................................................................................................ 15
2_4: OS Changer components for your application ........................................................................ 15
2_5: Set the Pre-processor Definition For error checking ............................................................. 15
2_6: Cross_os_usr.h Configuration File .............................................................................................. 16
2_7: OS Changer Components Selection ............................................................................................ 17
2_8: POSIX component for application ............................................................................................... 18
2_9: OS Abstractor Process Feature Selection ................................................................................. 19
2_10: OS Abstractor Task-Pooling Feature Selection ..................................................................... 20
2_11: OS Abstractor Profiler Feature Selection ................................................................................ 22
2_12: OS Abstractor Output Device Selection .................................................................................. 23
2_13: OS Abstractor Debug and Error Checking............................................................................. 23
2_14: OS Abstractor ANSI API Mapping ............................................................................................. 24
2_15: OS Abstractor External Memory Allocation ........................................................................... 25
2_16: OS Abstractor system resource configuration parameters ............................................... 25
2_17: Additional resources required internally by OS Abstractor .............................................. 27
2_18: OS Abstractor Minimum Memory Pool Block Configuration ............................................ 28
2_19: OS Abstractor Application Shared Memory Configuration ............................................... 28
2_20: OS Abstractor Clock Tick Configuration ................................................................................ 30
2_21: OS Abstractor Device I/O Configuration ................................................................................ 31
2_23: Compilation Flag for SMP ............................................................................................................ 31
2_21: Compilation Flag For Nucleus PLUS Target .......................................................................... 33
2_22: Compilation Flag for Precise/MQX Target ............................................................................. 33
2_24: Version Flags for VxWorks Target ........................................................................................... 40
2_25: Unsupported OS Abstractor APIs for VxWorks Target ....................................................... 41
2_26: Simple (single-process) Versus Complex (multiple-process) Applications ................... 52
3_1: Symbols and Breakpoints Fields related about Ada task .................................................... 74
5
System Configuration Guide
Chapter 1.About this Guide
This chapter contains the following topics:
Objectives
Audience
Document Conventions
MapuSoft Technologies and Related Documentation
Requesting Support
Documentation Feedback
6
System Configuration Guide
Objectives
This manual contains instructions on how to get started with the Mapusoft products. The
intention of the document is to guide the user to install, configure, build and execute the
applications using Mapusoft products.
Audience
This manual is designed for anyone who wants to port applications to different operating
systems, create projects, and run applications. This manual is intended for the following
audiences:
Customers with technical knowledge and experience with the Embedded Systems
Application developers who want to migrate their application to different RTOSs
Managers who want to minimize the cost and leverage on their existing code
Document Conventions
Table 1_1 defines the notice icons used in this manual.
Table 1_1: Notice Icons
Ico
n
Meaning
Description
Informational note
Indicates important features
or icons.
Indicates a situation that
might result in loss of data
or software damage.
Caution
Table 1_2 defines the text and syntax conventions used in this manual.
Table 1_2: Text and Syntax Conventions
Convention
Courier New
Italic text like this
COURIER NEW, ALL CAPS
Courier New, Bold
Description
Identifies Program listings
and Program examples.
Introduces
important
new
terms.
Identifies book names
Identifies Internet draft
titles.
Identifies File names.
Identifies
Interactive
Command lines
7
System Configuration Guide
MapuSoft Technologies and Related Documentation
Reference manuals can be provided under NDA. Click http://mapusoft.com/contact/ to
request for a reference manual.
The document description table lists MapuSoft Technologies manuals.
Table 1_3: Document Description Table
User Guides
AppCOE Quick Start Guide
Application
Operating
Guide
Common
Environment
OS Abstractor
Reference Manual
Interface
POSIX Interface Reference
Manual
micron-ITRON
Reference Manual
Interface
pSOS Interface
Manual
Reference
pSOS
Classic
Reference Manual
Interface
Nucleus Interface Reference
Manual
Description
Provides detailed description on how to become
familiar with AppCOE product and use it with
ease. This guide:
Explains how to quickly set-up AppCOE on
Windows/Linux Host and run the demos that
came along AppCOE
Provides detailed description of how to do porting
and abstraction using AppCOE. This guide:
Explains how to port applications
Explains how to import legacy applications
Explains how to do code optimization
Explains how to generate library packages
Explains on Application profiling and platform
profiling
Provides detailed description of how to use OS
Abstraction. This guide:
Explains how to develop code independent of the
underlying OS
Explains how to make your software easily
support multiple OS platforms
Provides detailed description of how to get started
with POSIX interface support that MapuSoft
provides. This guide:
Explains how to use POSIX interface, port
applications
Provides detailed description of how to get started
with micron-ITRON interface support that MapuSoft
provides. This guide:
Explains how to use micron-ITRON interface, port
applications
Provides detailed description of how to get started
with pSOS interface support that MapuSoft
provides. This guide:
Explains how to use pSOS interface, port
applications
Provides detailed description of how to get started
with pSOS Classic interface support that MapuSoft
provides. This guide
Explains how to use pSOS Classic interface, port
applications
Provides detailed description of how to get started
with Nucleus interface support that MapuSoft
provides. This guide:
8
System Configuration Guide
ThreadX Interface Reference
Manual
VxWorks Interface Reference
Manual
Windows Interface Reference
Manual
Release Notes
Explains how to use Nucleus interface, port
applications
Provides detailed description of how to get started
with ThreadX interface support that MapuSoft
provides. This guide:
Explains how to use ThreadX interface, port
applications
Provides detailed description of how to get started
with VxWorks Interface support that MapuSoft
provides. This guide:
Explains how to use VxWorks Interface, port
applications
Provides detailed description of how to get started
with Windows interface support that MapuSoft
provides. This guide:
Explains how to use Windows interface, port
applications
Provides the updated release information about
MapuSoft Technologies new products and features
for the latest release.
This document:
Gives detailed information of the new products
Gives detailed information of the new features
added into this release and their limitations, if
required
9
System Configuration Guide
Requesting Support
Technical support is available through the MapuSoft Technologies Support Centre. If you are a
customer with an active MapuSoft support contract, or covered under warranty, and need post
sales technical support, you can access our tools and resources online or open a ticket at
http://www.mapusoft.com/support.
Registering a New Account
To register:
From http://www.mapusoft.com/main page, select Support.
Select Register and enter the required details.
After furnishing all your details, click Submit.
Submitting a Ticket
1. To submit a ticket:
1. From http://www.mapusoft.com/main page, select Support > Submit a
Ticket
2. Select a department according to your problem, and click Next.
3. Fill in your details and provide detailed information of your problem.
4. Click Submit.
MapuSoft Support personnel will get back to you within 48 hours with a valid response.
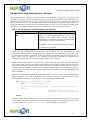
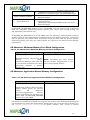
2. To submit a ticket from AppCOE
1. From AppCOE main menu, Select Help > Create a Support Ticket as shown in
below Figure
Figure: Create a Support Ticket from AppCOE
10
System Configuration Guide
2. Using the Existing Email and Password for login into Mapusoft Support Suite.
3. Select the department according to your problem, and click Next.
4. Fill in your details and provide detailed information of your problem.
5. Click Submit.
MapuSoft Support personnel will get back to you within 48 hours with a valid response.
Live Support Offline
MapuSoft Technologies also provides technical support through Live Support offline.
To contact live support offline:
1. From http://www.mapusoft.com/main page, select Support > Live Support
Offline.
2. Enter your personal details in the required fields. Enter a message about your
technical query. One of our support personnel will get back to you as soon as
possible.
3. Click Send.
You can reach us at our toll free number: 1-877-627-8763 for any urgent assistance.
Documentation Feedback
Send Feedback on Documentation: http://www.mapusoft.com/support/index.php/
11
System Configuration Guide
Chapter 2.System Configuration
This chapter contains the information about the System Configuration with the following
topics:
System Configuration
Target OS Selection
OS HOST Selection
Target 64 bit CPU Selection
User Configuration File Location
OS Changer Components Selection
POSIX Interface Selection
OS Abstractor Interface Process Feature Selection
OS Abstractor Interface Task-Pooling Feature Selection
OS Abstractor Interface Profiler Feature Selection
OS Abstractor Interface Output Device Selection
OS Abstractor Interface Debug and Error Checking
OS Abstractor Interface ANSI API Mapping
OS Abstractor Interface Resource Configuration
OS Abstractor Interface Minimum Memory Pool Block Configuration
OS Abstractor Interface Application Shared Memory Configuration
OS Abstractor Interface Clock Tick Configuration
OS Abstractor Interface Device I/O Configuration
OS Abstractor Interface Target OS Specific Notes
Runtime Memory Allocations
OS Abstractor Process Feature
Simple (single-process) Versus Complex (multiple-process) Applications
12
System Configuration Guide
System Configuration
The user configuration is done by setting up the appropriate value to the pre-processor
defines found in the cross_os_usr.h.
NOTE: Make sure the OS Abstractor Interface libraries are re-compiled and newly built
whenever configuration changes are made to the os_target_usr.h when you build your
application. In order to re-build the library, you would actually require the full-source code
product version (not the evaluation version) of OS Abstractor Interface.
Applications can use a different output device as standard output by modifying the
appropriate functions defines in os_target_usr.h along with modifying os_setup_serial_port.c
module if they choose to use the format Input/output calls provided by the OS
AbstractorInterface.
13
System Configuration Guide
Target OS Selection
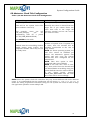
Based on the OS you want the application to be built, set the pre-processor definition in your
project setting or make files by using the Table 2_1.
Table 2_1: Set the Pre-processor Definition For Selected Target OS
Flag and Purpose
OS_TARGET
To select the target
operating system.
Available Options
The value of the OS_Target should be for the OS Abstractor
Interface product that you have purchased. For Example, if you
have purchased the license for :
OS_NUCLEUS – Nucleus PLUS from ATI
OS_THREADX – ThreadX from Express Logic
OS_VXWORKS – VxWorks from Wind River Systems
OS_ECOS – eCOS standards from Red Hat
OS_MQX - Precise/MQX from ARC International
OS_UITRON – micro-ITRON standard based OS
OS_LINUX - Open-source/commercial Linux distributions
OS_WINDOWS – Windows 2000, Windows XP, Windows CE,
Windows Vista from Microsoft. If you need to use the OS
Abstractor Interface both under Windows and Windows CE
platforms, then you will need to purchase additional target
license.
OS_TKERNEL – Japanese T-Kernel standards based OS
OS_LYNXOS - LynxOS from LynuxWorks
OS_QNX – QNX operating system from QNX
OS_LYNXOS – LynxOS from Lynuxworks
OS_SOLARIS – Solaris from SUN Microsystems
OS_ANDROID – Mobile Operating System running on Linux
Kernel
OS_NETBSD – UNIX like Operating System
OS_µCOS – µCOS from Micrium
For example, if you want to develop for ThreadX, you will define
this flag as follows:
OS_TARGET = OS_THREADX
PROPRIETARY OS: If you are doing your own porting of OS
Abstractor Interface to your proprietary OS, you could add your
own define for your OS and include the appropriate OS interface
files within os_target.h file. MapuSoft can also add custom
support and validate the OS Abstraction solution for your
proprietary OS platform
14
System Configuration Guide
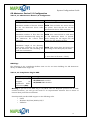
OS HOST Selection
The flag has to be false for standalone generation.
Table 2_2: Select the host operating system
Flag and Purpose
OS_HOST
To select the host
operating system
Available Options
This flag is used only in AppCOE
environment. It is not used in the target
environment. In Standalone products,
this flag should be set to OS _FALSE.
Target 64 bit CPU Selection
Based on the OS you want the application to be built, set the following pre-processor
definition in your project setting or make files:
Table 2_3: Select the Target CPU type
Flag and Purpose
OS_CPU_64BIT
To select the target CPU
type.
Available Options
The value of OS_CPU_64BIT can be any
ONE of the following:
OS_TRUE – Target CPU is 64 bit type
CPU
OS_FALSE – Target CPU is 32 bit
type CPU
NOTE: This value cannot be set in the
cross_os_usr.h, instead it needs to be
passed to compiler as –D macro either in
command line for the compiler or set this
pre-processor flag via the project
settings. If this macro is not used, then
the default value used will be OS_FALSE.
Select the OS Changer components for your application use as follows:
Table 2_4: OS Changer components for your application
Compilation Flag
Meaning
MAP_OS_ANSI_FMT_IO
Maps ANSI Formatted I/O functions
to the OS Abstractor equivalent
MAP_OS_ANSI_IO
Maps ANSI I/O functions to the OS
Abstractor equivalent
INCLUDE_OS_PSOS_CLA
SSIC
set to OS_TRUE to build for use with the
OS Changer for pSOS Classic product
Select the following definition if you want OS Changer to enable error checking for debugging
purposes:
Table 2_5: Set the Pre-processor Definition For error checking
Compilation Flag
OS_DEBUG_INFO
Meaning
Enable error checking for debugging
15
System Configuration Guide
User Configuration File Location
The default directory location of the cross_os_usr.h configuration file is given below:
Table 2_6: Cross_os_usr.h Configuration File
Target OS
OS_NUCLEUS
OS_THREADX
OS_VXWORKS
Configuration Files Directory Location
OS_MQX
OS_UITRON
OS_LINUX
\mapusoft\cross_os_mqx\include
\mapusoft\cross_os_uitron\include
\mapusoft\cross_os_linux\include
\mapusoft\cros_os_nucleus\include
\mapusoft\cross_os_threadx\include
\mapusoft\cross_os_vxworks\include
Please make sure you specify the appropriate
target OS versions that you use in the
osabstractor_usr.h
Please make sure you specify the appropriate
target OS versions that you use in the
cross_os_usr.h
NOTE: RT Linux, for using RT Linux you need
to select this option.
OS_SOLARIS
OS_WINDOWS
\mapusoft\cross_os_solaris\include
\mapusoft\cross_os_windows\include
Any windows platform including Windows CE
platform.
If
you
use
OS
Abstractor
Interfaceunder both Windows and Windows CE,
then you would require additional target
license.
NOTE: Windows 2000, Windows XP, Windows
CE, Windows Vista from Microsoft
OS_ECOS
OS_LYNXOS
OS_QNX
OS_TKERNEL
OS_ANDROID
OS_NETBSD
OS_µCOS
\mapusoft\cross_os_ecos\include
\mapusoft\cross_os_lynxos\include
\mapusoft\cross_os_qnx\include
\mapusoft\cross_os_tkernel\include
\mapusoft\cross_os_android\include
\mapusoft\cross_os_netbsd\include
\mapusoft\cross_os_µCOS\include
If you have installed the MapuSoft’s products in directory location other than
mapusoft then refer the corresponding directory instead of \mapusoft for correct
directory location.
16
System Configuration Guide
OS Changer Components Selection
OS Abstractor optional comes with various OS Changer API solutions in addition to its BASE
and POSIX API offerings. OS Changer APIs are used to port legacy code base from one OS to
another. Select one or more OS Changer components depending on the type of code that you
needed to port to one or more new operating system platforms. Set the pre-processor flag
below to select the components needed by your application:
Table 2_7: OS Changer Components Selection
Flag and Purpose
INCLUDE_OS_VXWORKS
To
include
VxWorks
Interface
product. Refer to the appropriate
Interface manual for more details.
INCLUDE_OS_POSIX/LINUX
To include POSIX/LINUX Interface
product. Refer to the appropriate
Interface manual for more details.
INCLUDE_OS_PSOS
To include pSOS Interface product.
Refer to the appropriate Interface
manual for more details.
INCLUDE_OS_PSOS_CLASSIC
To include a very old version of pSOS
Interface product. Refer to the
appropriate Interface manual for
more details.
INCLUDE_OS_UITRON
To include UITRON Interface product.
Refer to the appropriate Interface
manual for more details.
INCLUDE_OS_NUCLEUS
To include Nucleus PLUS Interface
product. Refer to the appropriate
Interface manual for more details.
INCLUDE_OS_NUCLEUS_NET
To include Nucleus NET Interface
product. Refer to the appropriate
Interface manual for more details.
INCLUDE_OS_THREADX
To
include
ThreadX
Interface
product. Refer to the appropriate
Interface manual for more details.
INCLUDE_OS_FILE
To include ANSI file system API
compliance for the vendor provided
File Systems. Refer to the appropriate
Interface manual for more details.
INCLUDE_OS_WINDOWS
To
include
Windows
Interface
product. Refer to the appropriate
Interface manual for more details.
Available Options
OS_TRUE – Include support
OS_FALSE – Do not include support
The default is OS_FALSE
OS_TRUE – Include support
OS_FALSE – Do not include support
The default is OS_FALSE
OS_TRUE – Include support
OS_FALSE – Do not include support
The default is OS_FALSE
OS_TRUE – Include support for pSOS 4.1
3/10/1986
OS_FALSE – do not include pSOS 4.1 support
The default is OS_FALSE
rev
OS_TRUE – Include support
OS_FALSE – Do not include support
The default is OS_FALSE
OS_TRUE – Include support
OS_FALSE – Do not include support
The default is OS_FALSE.
OS_TRUE – Include support
OS_FALSE – Do not include support
The default is OS_FALSE.
OS_TRUE – Include support
OS_FALSE – Do not include support
The default is OS_FALSE
OS_TRUE – Include support
OS_FALSE – Do not include support
The default is OS_FALSE.
This option is only available for Nucleus PLUS target
OS
OS_TRUE – Include support
OS_FALSE – Do not include support
The default is OS_FALSE
This option is not available on Windows operating
system host or target environment
17
System Configuration Guide
NOTE: For additional information regarding how to use any specific Interface product, refer
to the appropriate reference manual or contact www.mapusoft.com.
POSIX OS Abstractor Selection
OS Abstractor Interface optionally comes with POSIX support as well. Set the pre-processor
flag provided below to select the POSIX component for application use as follows:
Table 2_8: POSIX component for application
Flag and Purpose
INCLUDE_OS_POSIX
To include POSIX Interface
product component.
Available Options
OS_TRUE – Include support. You will need this
option turned ON either if the underlying OS
does not support POSIX (or) you need to POSIX
provided by OS Abstractor Interface instead of
the POSIX provided natively by the target OS
OS_FALSE – Do not include support
The default is OS_FALSE.
NOTE: The above component can be used across POSIX based and non-POSIX based target
OS for gaining full portability along with advanced real-time features. POSIX Interface
library will provide the POSIX functionality instead of application using POSIX
functionalities directly from the native POSIX from the OS and as a result this will ensure
that your application code will work across various POSIX/UNIX based target OS and also
its various versions while providing various real-time API and performance features. In
addition, OS Abstractor Interface will allow the POSIX application to take advantage of
safety critical features like task-pooling, fixing boundary for application’s heap memory use,
self recovery from fatal errors, etc. (these features are defined elsewhere in this document).
For added flexibility, POSIX applications can also take advantage of using OS Abstractor
Interface APIs non-intrusively for additional flexibility and features.
18
System Configuration Guide
OS Abstractor Process Feature Selection
Table 2_9: OS Abstractor Process Feature Selection
Flag and Purpose
INCLUDE_OS_PROCESS
Available Options
OS_TRUE – Include OS Abstractor process
support APIs and track resources under each
process and also allow multiple individually
executable applications to use OS Abstractor
OS_FALSE – Do not include process model
support. Use this option for optimized OS
Abstractor performance
The default is OS_FALSE
The INCLUDE_OS_PROCESS option is useful when there are multiple developers writing
components of the applications that are modular. The resource created by the process is
automatically tracked and when the process goes away they also go away. One process can
use another process resource, only if that process is created with ―system‖ scope. A process
cannot delete a resource that it did not create.
The INCLUDE_OS_PROCESS feature can also be used on target OS like VxWorks 5.x a nonprocess based operating system. In this case, the OS Abstractor provides software process
protection. Under process-based OS like Linux, the processes created by the OS Abstractor
will be an actual native system processes.
The INCLUDE_OS_PROCESS feature is also useful to simulate complex multiple embedded
controller application on x86 single processor host platform. In this case, each individual
process /application will represent individual controllers, which uses a shared memory
region for inter-communication. This application could then be ported to the real multiple
embedded controller environments with shared physical memory.
Process Feature use within OS Changer
It is possible for legacy applications to use the process feature along with OS Changer and
take advantage of process protection mechanism and also have the ability to break down
the complex application into multiple manageable modules to reduce complexity in code
development. However, when porting legacy code, we recommend that the application be
first ported to a single process successfully. Once this is completed, then the application
can be modified to move the global data to shared memory and can be made to easily reside
into individual process and or multiple executables.
To allow the legacy applications to be broken down into process modules and /or multiple
applications the flag INCLUDE_OS_PROCESS needs to be set to OS_TRUE. Also the
application needs to use OS_Create_Process envelopes to move the resources to appropriate
processes. Legacy application can also make in multiple applications which then compile
separately and can continue to use Interface APIs for inter-process communication.
Interface APIs provides transparency to the application and allows the application to use the
API among resources within a single process or multiple processes /applications.
19
System Configuration Guide
OS Abstractor Task-Pooling Feature Selection
Task-Pooling feature enhances the performances and reliability of application. Creating a task
(thread) at run-time require considerable system overhead and memory. The underlying OS
thread creation function call can take considerable amount of time to complete the operation
and could fail if there is not enough system memory. Enabling this feature, Applications can
create OS Abstractor tasks during initialization and be able to re-use the task envelope again
and again. To configure task-pooling, set the following pre-processor flag as follows:
Table 2_10: OS Abstractor Task-Pooling Feature Selection
Flag and Purpose
INCLUDE_OS_TASK_POOLI
NG
Available options
OS_TRUE – Include OS Abstractor task pooling
feature to allow applications to re-use task
envelops from task pool created during
initialization to eliminate run-time overhead with
actual resource creation and deletion
OS_FALSE – Do not include task pooling support
The default is OS_FALSE
Except for the performance improvement, this behavior will be transparent to the
application. Each process /application will contain its own individual task pool. Any
process, which requires a task pool, must successfully add tasks to the pool before it can be
used. Tasks can be added to (via OS_Add_To_Task_Pool function) or removed (via
OS_Remove_From_Task_Pool function) from a task pool at anytime.
When an application makes a request to use a pool task, OS Abstractor will first search for
a free task in the pool with an exact match based on stack size. If it does not find a match,
then a free task with the next larger stack size that is available will be used. If there are
multiple requests pending, a search will be made in FIFO order on the request list when a
task is freed to the pool. The first request that matches or fulfills the stack requirement will
then be fulfilled.
Refer to the MapuSoft supplied os_application_start.c file that came with the MapuSoft’s
demo application. The demo application pre-creates a bunch of fixed-stack-size (using
STACK_SIZE as defined in cross_os_def.h) task-pool-task as shown below:
#if (INCLUDE_OS_TASK_POOLING == OS_TRUE)
for(i = 0; i < Max_Threads; i++)
{
OS_Add_To_Task_Pool(STACK_SIZE); /*this is a portion of code in
init.c,
STACK_SIZE should be changed
according to the desired stack size
}
#endif
Typically, applications would need a variety of threads with different stack size. If you would
like to modify the demo application to use threads with larger or differing stack size, make
sure you modify the os_application_start.c file according to your needs.
20
System Configuration Guide
The OS_Create_Task function will be used to retrieve a task from the task pool. This will be
accomplished
by
passing
one
of
the
flags
OS_POOLED_TASK_WAIT
or
OS_POOLED_TASK_NOWAIT as a parameter to OS_Create_Task. When a task has completed
and either exits, falls through itself or gets deleted by another task using the
OS_Delete_Task function, the task will automatically be freed to be used again by the task
pool. For further details, please refer to the OS_Create_Task specification defined in the
following pages.
An Application can add or remove tasks with a specified stack size to the task pool at any
time. The task pool will grow or shrink depending on each addition or deletion of tasks in
the task pool. The Application cannot remove a valid task, which does not belong to the task
pool. OS_Get_System_Info function can be used to retrieve the system configuration and
run-time system status including information related to task pool.
If OS_TASK_POOLING is enabled, then all tasks POSIX threads created using the POSIX
Interface POSIX APIs provided by POSIX Interface with POSIX and/or any task creation
created using task create functions in any Interface products will automatically use the task
pool mechanism with the flag option set to OS_POOLED_TASK_NOWAIT.
Warning: Your application will fail during task creation if OS_TASK_POOLING is enabled
and you have not added any tasks to the task pool. Make sure you add tasks (via
OS_Add_To_Task_Pool function) with all required stack sizes prior to creating pooled tasks
(via OS_Create_Task function).
Special Notes: Task Pooling feature is not supported in ThreadX, µCOS, and Nucleus
targets.
21
System Configuration Guide
OS Abstractor Profiler Feature Selection
The following are the user configuration options that can be set in the cross_os_usr.h:
Table 2_11: OS Abstractor Profiler Feature Selection
Flag and Purpose
OS_PROFILER
Available Options
Can either be:
Profiler
feature
allows
applications running on the
target to collect valuable
performance data regarding
the application’s usage of
the OS Abstractor APIs.
Using the AppCOE tool, this
data can then be loaded and
analyzed
in
graphical
format. You can find out
how often a specific OS
Abstractor API is called
across the system or within
a specific thread. You can
also find out how much time
the functions took across
the whole system as well as
within a specific thread
OS_TRUE – Profiler feature will be included.
Profiling takes place with each OS Abstractor API
call. If profiler is turned on, also set the value for
the following defines:
PROFILER_TASK_PRIORITY
Profiler feature uses high
resolution clock counters to
collect profiling data and
this implementation may not
be available for all target
CPU and OS platforms.
Please contact MapuSoft for
any custom high resolution
timer
implementation
required for the profiler for
your
target/OS
environment.
Refer
to
OS_Get_Hr_Clock_Freq()
and
OS_Read_Hr_Clock()
for additional details on
what target/OS platforms
are currently supported by
the profiler.
If profiler feature is turned
ON, then it needs to use the
open/read/write calls to
write to profiler data file. If
you set OS_MAP_ANSI_IO to
OS_TRUE then make sure
you install the appropriate
file device and driver.
This will be the depth of the profiler queue. The
bigger the number, the more the memory is
needed. A maximum of 30,000 profiler records
can be created. Please make sure you increase
you
application’s
heap
size
by
NUM_OF_MSG_TO_HOLD_IN_MEMORY
times
PROFILER_MSG_SIZE in the OS_Application_Init
call.
The priority level (0 to 255) of the profiler thread.
The profiler thread starts picking up the
messages in the profiler queue, formats them
into XML record and write to file. If the priority is
set to the lowest (i.e, 255), then the profiler
thread may not have an opportunity to pick the
message from the queue in time and as such the
queue gets filled up and as such the profiler will
stop. The default profiler task priority value is set
to 200.
NUM_OF_MSG_TO_HOLD_IN_MEMORY
PROFILER_DATAFILE_PATH
This will be the directory location where the
profiler file will be created. For Linux,The default
location set is ―/root‖.
OS_FALSE – Profiler code will be excluded and
the feature will be turned off.
The default value is OS_FALSE.
22
System Configuration Guide
The profiler starts as soon as the application starts and will continue to collect performance
data until the memory buffers in the profiler queue gets filled up. After, this the profiling
stops and data is dumped into *.pal files at the user specified location. It is recommended
that the profiler feature be turned off for the production release of your application.
If the profiler feature is turned OFF, then the profiler hooks disappear within the OS
Abstractor and as such there are no impacts to the OS Abstractor API performance.
Special Notes: Profiler feature is not supported in ThreadX and Nucleus targets.
OS Abstractor Output Device Selection
The following are the user configuration options and their meanings:
Table 2_12: OS Abstractor Output Device Selection
Flag and Purpose
OS_STD_OUTPUT
Available options
Output device to print.
OS_SERIAL_OUT – Print to serial
OS_WIN_CONSOLE – Print to console
User can print to other devices by modifying the
appropriate
functions
within
os_setup_serial_port.c in the OS Abstractor
―source‖ directory and use OS Abstractor’s
format Input/Output calls.
The default value is OS_WIN_CONSOLE
OS Abstractor Debug and Error Checking
Table 2_13: OS Abstractor Debug and Error Checking
Flag and Purpose
OS_DEBUG_INFO
Available Options
OS_DEBUG_MINIMAL – print debug info, fatal
and compliance errors
OS_DEBUG_VERBOSE
–print
the
debug
information, Fatal Error & Compilation Error
elaborately.
OS_DEBUG_DISABLE -do not print debug info
OS_ERROR_CHECKING
The default value is OS_DEBUG_MINIMAL
OS_TRUE – Check for API usage errors
OS_FALSE – do not check for errors. Use this
option to increase performance and reduce code
size
The default value is OS_TRUE
23
System Configuration Guide
OS Abstractor ANSI API Mapping
OS Abstractor APIs can be mapped to exact ANSI names by turning on these features:
Table 2_14: OS Abstractor ANSI API Mapping
Flag and Purpose
MAP_OS_ANSI_MEMORY
MAP_OS_ANSI_FMT_IO
MAP_OS_ANSI_IO
Available options
OS_TRUE – map ANSI malloc() and free() to OS
Abstractor equivalent functions
OS_FALSE – do not map functions. Also, when
you call OS_Application_Free in this case, the
memory allocated via malloc() calls will NOT be
automatically freed.
The default value is OS_TRUE
NOTE: Refer to OS_USE_EXTERNAL_MALLOC
define, if you want to connect your own memory
management solution for use by OS Abstractor
OS_TRUE – map ANSI printf() and sprintf() to
OS Abstractor equivalent functions
OS_FALSE – do not map functions
The default value is OS_FALSE
OS_TRUE – map ANSI device I/O functions like
open(), close(), read(), write, ioctl(), etc. to OS
Abstractor equivalent functions
NOTE: If your target OS is NOT a singlememory model based (e.g. Windows, Linux,
QNX, etc.), then the OS Abstractor I/O
functions are to be used within one single
process/application.. If you need to use the I/O
across multiple process, then set this define to
OS_FALSE so that your application can use the
native I/O APIs from the OS
OS_FALSE – do not map functions
The default value is OS_FALSE
NOTE: When you set MAP_OS_ANSI_IO to OS_TRUE, OS Abstractor automatically replaces
open() calls to OS_open() during compile time when you include os_target.h in your source
code. If you set MAP_OS_ANSI_IO to OS_FALSE, then in your source code when you include
os_target.h, application can actually use both OS_open() and open() calls, where the
OS_open will come from OS Abstractor library and open() will come from the native OS
library. Given that OS Abstractor I/O APIs are similar to ANSI I/O, you probably can use
the third option so that you eliminate some performance overhead going through OS
Abstractor I/O wrappers if necessary. But, it is always recommended that application use
OS Abstractor or POSIX APIs instead of directly using native API calls from OS libraries for
maximum portability.
24
System Configuration Guide
OS Abstractor External Memory Allocation
OS Abstractor APIs can be mapped to exact ANSI names by turning on these features:
Table 2_15: OS Abstractor External Memory Allocation
Flag and Purpose
OS_USE_EXTERNAL_MALL
OC
Available options
OS_TRUE – OS Abstractor can be configured to
use an application defined external functions to
allocate and free memory needed dynamically by
the process. In this case, the OS Abstractor will
use these function for allocating and freeing
memory
within
OS_Allocate_Memory
and
OS_Deallocate_Memory
functions
These
external functions needs to be similar to
malloc() and free() and should be defined
within cross_os_usr.h in order for OS Abstractor
to successfully use them. This feature is useful if
the application has its own memory management
schemes far better than what the OS has to offer
for dynamic allocations.
OS_FALSE – OS Abstractor will directly use the
target OS system calls for allocating and freeing
the memory
The default value is OS_FALSE
OS Abstractor Resource Configuration
In addition to OS Abstractor resources used by application, there may be some additional
resources required internally by OS Abstractor. The configuration should take into the
account of these additional resources while configuring the system requirements. All or any of
the configuration parameters set in cross_os_usr.h configuration file can be altered by
OS_Application_Init function .
The following are the OS Abstractor system resource configuration parameters:
Table 2_16: OS Abstractor system resource configuration parameters
Flag and Purpose
OS_TOTAL_SYSTEM_PROCESSES
The total number of processes
required by the application
OS_TOTAL_SYSTEM_TASKS
The total number of tasks required
by the application
OS_TOTAL_SYSTEM_PIPES
The total number of pipes for
message passing required by the
application
OS_TOTAL_SYSTEM_QUEUES
Default Setting
100
One control block will be used by the
OS_Application_Init function when the
INCLUDE_OS_PROCESS option is true
100
One control block will be used by the
OS_Application_Init function when the
INCLUDE_OS_PROCESS option is true.
100
100
25
System Configuration Guide
The total number of queues for
message passing required by the
application
OS_TOTAL_SYSTEM_MUTEXES
The
total
number
of
mutex
semaphores
required
by
the
application
OS_TOTAL_SYSTEM_SEMAPHORES
The
total
number
of
regular
(binary/count) semaphores required
by the application
OS_TOTAL_SYSTEM_DM_POOLS
The total number of dynamic variable
memory pools required by the
application
OS_TOTAL_SYSTEM_PM_POOLS
The total number of partitioned
(fixed-size) memory pools required by
the application
OS_TOTAL_SYSTEM_TM_POOLS
The total number of Tiered memory
pools required by the application
OS_TOTAL_SYSTEM_TSM_POOLS
The total number of Tiered shared
memory pools required by the
application
OS_TOTAL_SYSTEM_EV_GROUPS
The total number of event groups
required by the application
OS_TOTAL_SYSTEM_TIMERS
The total number of application
timers required by the application
OS_TOTAL_SYSTEM_HANDLES
The total number of system Handles
required by the application
100
100
100
One control block will be used by the
OS_Application_Init function when the
INCLUDE_OS_PROCESS option is true.
100
100
100
100
100
100
NOTE: The first control block of Task, Queue, Dynamic Memory and Semaphore is reserved
for internal use in the OS Abstractor Interface.
26
System Configuration Guide
The following are the additional resources required internally by OS Abstractor:
Table 2_17: Additional resources required internally by OS Abstractor
Resources
TASK
DYNAMIC_POOL
QUEUE
PIPE
MUTEX
PROCESS
NON_PROCESS
PARTITION_POOL
PROTECTION_STRUCTURE
Linux /POSIX ,Vxworks, pSOS ,Windows, µCOS, QNX,
MQX, ThreadX, Nucleus, uITRON, NetBSD, Solaris,
LynxOS, Android Targets
2 Semaphore required if application uses µitron
Interface for above mentioned target
1 Event Group required by OS Abstractor for
signaling support in posix for above mentioned target
1 Event group required if application uses POSIX
Interface and/or VxWorks Interface and/or pSOS
Interface for above mentioned target
1 Event Group required by OS Abstractor if
application uses task pooling for above mentioned
target
1 Event Group required by OS Abstractor for above
mentioned target but not for MQX Target
2 Semaphores used by OS Abstractor for above
mentioned target
1 Semaphore used by POSIX Interface for above
mentioned target
Additional Queues required by OS Abstractor if
application uses profiler for above mentioned target
1 Additional Semaphore required by OS Abstractor
Additional Protection Structure required by OS
Abstractor for above mentioned target
1 DM_POOL used by OS Abstractor for above
mentioned target
1 Event Group required by OS Abstractor for above
mentioned target
1 Additional Task required by OS Abstractor for above
mentioned target
2 Protection Structures required by OS Abstractor for
above mentioned target
Note: Every process needs a memory pool only for µCOS
Target
1 Event Group required by OS Abstractor for Linux,
Windows, MQX Target
2 Event Group required by OS Abstractor µCOS
Target
1 Semaphore is used by OS Abstractor for above
mentioned target
1 Protection Structures required by
os_key_list_protect if application uses POSIX Interface
for above mentioned target
14 Additional Protection Structure required by OS
Abstractor for above mentioned Targets except
LynxOS Target, Vxworks & QNX Target
27
System Configuration Guide
Posix Condition Variable
Posix R/W Lock
13 Additional Protection Structure required by OS
Abstractor for LynxOS Target, Vxworks &QNX Target
1 Event Group required by POSIX Interface for above
mentioned target
1 Event Group required by POSIX Interface for above
mentioned target
1 Semaphore required by POSIX Interface for above
mentioned target
If INCLUDE_OS_PROCESS feature is set to OS_FALSE, then the memory will be allocated
from the individual application/process specific pool, which gets created during the
OS_Application_Init function call.
If INCLUDE_OS_PROCESS is set to OS_TRUE, then the memory is allocated from a shared
memory region to allow applications to communicate across multiple processes. Please note
that in this case, the control block allocations cannot be done from the process specific
dedicated memory pool since the control blocks are required to be shared across multiple
applications.
OS Abstractor Minimum Memory Pool Block Configuration
Table 2_18: OS Abstractor Minimum Memory Pool Block Configuration
Flag and Purpose
OS_MIN_MEM_FROM_POOL
Minimum memory allocated by the
malloc()
and/or
OS_Allocate_Memory() calls. This will
be the memory allocated even when
application
requests
a
smaller
memory size
Default Setting
4 (bytes)
NOTE: Increasing this value further
reduces memory fragmentation at the
cost of more wasted memory.
OS Abstractor Application Shared Memory Configuration
Table 2_19: OS Abstractor Application Shared Memory Configuration
Flag and Purpose
OS_USER_SHARED_REGION1_SIZE
Default Setting
1024 (bytes)
Application defined shared memory
region usable across all processbased
OS
Abstractor
processes/applications.
Processbased applications are required to be
built with OS_INCLUDE_PROCESS
feature set to OS_TRUE
OS Abstractor includes this shared user region in the memory area immediately following all
the OS Abstractor control block allocations. Applications can access the shared memory via
the System_Config->user_shared_region1 global variable. Also, access to shared
28
System Configuration Guide
memory region must be protected (i.e. use mutex locks prior to read/write by the
application).
NOTE: The actual virtual address of the shared memory may be different across
processes/application; however the OS Abstractor initialized the System_Config pointer
correctly during OS_Application_Init function call. Applications should not pass the shared
memory region address pointer from one process to another since the virtual address
pointing to the shared region may differ from process to process (instead use the above
global variable defined above for shared memory region access from each
process/applications).
29
System Configuration Guide
OS Abstractor Clock Tick Configuration
Table 2_20: OS Abstractor Clock Tick Configuration
Flag and Purpose
OS_TIME_RESOLUTION
Default Setting
10000 second (= 10milli sec)
This will be the system clock ticks
(not hardware clock tick).
Normally this value is derived from the
target OS. If you cannot derive the
value then refer to the target OS
reference manual and set the correct
per clock tick value
For
example,
when
you
call
OS_Task_Sleep(5),
you
are
suspending task for a period
(5* OS_TIME_RESOLUTION).
See NOTES in this table.
OS_DEFAULT_TSLICE
Default time slice scheduling window
width among same priority preemptable threads when they are all
in ready state.
10
Number of system ticks. If system tick
is 10ms, then the threads will be
schedule round-robin at the rate of
every 100ms.
NOTE: On Linux operating system, the
time slice cannot be modified per
thread. OS Abstractor ignores this
setting and only uses the system
default time slice configured for the
Linux kernel.
NOTE: Time slice option is NOT
supported under micro-ITRON.
NOTE: If the time slice value is nonzero, then under Linux the threads will
use Round-Robin scheduling using the
system default time slice value of Linux.
If
the
Linux
kernel
support
LINUX_ADV_REALTIME then the time
slice value will be set accordingly.
NOTE: Since the system clock tick resolution may vary across different OS under different
target. It is recommended that the application use the macro OS_TIME_TICK_PER_SEC to
derive the timing requirement instead of using the raw system tick value in order to keep
the application portable across multiple OS.
30
System Configuration Guide
OS Abstractor Device I/O Configuration
Table 2_21: OS Abstractor Device I/O Configuration
Flag and Purpose
NUM_DRIVERS
Default Setting
20
Maximum number of drivers allowed
in the OS Abstractor driver table
structure
NUM_FILES
NOTE: This excludes the native drivers
the system, since they do not use the
OS Abstractor driver table structure.
30
Maximum number of files that can
be opened simultaneously using the
OS Abstractor file control block
structure.
EMAXPATH
NOTE: One control block is used when
an OS Abstractor driver is opened.
These settings do not impact the OS
setting for max number of files.
255
Maximum length of the directory
path name including the file name
for OS Abstractor use excluding the
null char termination
MAX_FILENAME_LENGTH
NOTE: This setting does not impact the
OS setting for the max path/file name.
(EMAXPATH + 1)
/* max chars in filename + EOS*/
SMP Flags
The following is the compilation defines that can be set when building the OS Abstractor
library for SMP kernel target OS:
Table 2_23: Compilation Flag for SMP
Compilation Flag
OS_BUILD_FOR_SMP
Support
for
Symmetric
MultiProcessors (SMP)
Meaning
Specify the SMP or non-SMP kernel. The value can be:
OS_TRUE SMP enabled
OS_FALSE SMP disabled
Warning: If you fail to set SMP flag to OS_TRUE and use Mapusoft products on an SMP
enabled machine, you will get the result in an unpredictable behavior due to failure of
internal data protection mechanism.
Now MapuSoft provides SMP support to the following OS’s:
Linux
Windows XP/Vista/Mobile/CE/7
VxWorks
31
System Configuration Guide
Limitations:
In VxWorks there is a limitation to set affinity to a single core only. Hence in
OS_Application_Init.c and OS_Create_Process.c, the affinity mask in the respective init_info
structures should be passed accordingly.
SMP is not supported on the following OSs:
µCOS
Nucleus
ThreadX
MQX
uITRON
Android
T-Kernel
uITRON
QNX
Solaris
NetBSD
LynxOS
32
System Configuration Guide
OS Abstractor Target OS Specific Notes
Nucleus PLUS Target
The following is the compilations define that has to be set when building the Nucleus PLUS
library in order for the OS Abstractor to perform correctly:
Table 2_21: Compilation Flag For Nucleus PLUS Target
Compilation Flag
NU_DEBUG
Meaning
Regardless of the target you build, the OS Abstractor
library always requires this flag to be set in order to be
able to access OS internal data structures. Without this
flag, you will see a lot of compiler errors.
ThreadX Target
The ThreadX port for Win32 has a user defined memory ceiling which has a default value of
64K. If you run into issues with memory not being available, you will need to increase the
memory limit. This define is called TX_WIN32_MEMORY_SIZE and is located in tx_port.h.
Precise/MQX Target
The following are the compilation defines that has to be set if you are using Precise/MQX as
your target OS:
Table 2_22: Compilation Flag for Precise/MQX Target
Compilation Flag
MQX_TASK_DESTRUCTION
BSP_DEFAULT_MAX_MSGPO
OLS
Meaning
Set this macro to zero to allow OS Abstractor
to manage destruction of MQX kernel objects
such as semaphores.
Set this macro to match the maximum
number of message queues and pipes required
by your application at a given time.
For example, if your application would need a
max of 10 message queues and 10 pipes, then
this macro needs to be set to 20.
The MQX_TASK_DESTRUCTION macro is located in source\include\mqx_cnfg.h in your
MQX installation. Set it to zero as shown below (or pass it to compiler via pre-processor
setting in your project make files):
#ifndef MQX_TASK_DESTRUCTION
#define MQX_TASK_DESTRUCTION 0
#endif
The BSP_DEFAULT_MAX_MSGPOOLS macro is located in source\bsp\bspname\bspname.h
in your MQX installation, where bspname is the name of your BSP. Set the required value
as follows:
#define BSP_DEFAULT_MAX_MSGPOOLS (20L)
33
System Configuration Guide
Linux Target
User Vs ROOT Login
OS Abstractor internally checks the user ID to see if the user is ROOT or not. If the user is
ROOT, then it will automatically utilize the Linux real time policies and priorities. It is always
recommended that OS Abstractor application be run under ROOT user login. In this mode:
OS Abstractor task priorities, time slice, pre-emption modes and critical region
protection features will work properly.
OS Abstractor applications will have better performance and be more deterministic
behavior since the Linux scheduler is prevented to alter the tasks priorities behind
the scenes.
Also, when you load other Linux applications (that uses the default SCHED_OTHER
policies), they will not impact the performance of the OS Abstractor applications that
are running under real-time priorities and policies.
Under non-ROOT user mode, the task scheduling is fully under the mercy of the Linux
scheduler. In this mode, the OS Abstractor does not utilize any real-time priorities and/or
policies. It will use the SCHED_OTHER policy and will ignore the application request to set
and/or change scheduler parameters like priority and such. OS Abstractor applications will
run under the non-ROOT mode, with restrictions to the following OS Abstractor APIs:
OS_Create_Task: The function parameters priority, time-slice and OS_NO_PREEMPT flag
options are ignored
OS_Set_Task_Priority: This function will have no effect and will be ignored
OS_Set_Task_Preemption: Changing the task pre-emption to OS_NO_PREEMPT has no
effect and will be ignored
OS_Protect: Will offer NO critical region data protection and will be ignored. If you need
protection, then utilize OS Abstractor mutex features
OS_Create_Driver: The OS Abstractor driver task will NOT be run at a higher priority
level that the OS Abstractor application tasks.
Though OS Abstractor applications may run under non-ROOT user mode, it is highly
recommended that the real target applications be run under ROOT user mode.
System Resource Configuration
Linux has a limit on the sysv system resources. Typically, OS Abstractoris able to adjust these
limits as required. But, if the CAP_SYS_RESOURCE capability is disabled, OS Abstractorwill
not have the proper access privileges to do so. In this case, the values will need to be adjusted
manually using an account with the proper capabilities enabled, or the kernel will need to be
modified and rebuilt with the increased number of resources set as a default.
Time Resolution
The value of the system clock ticks is defined by OS_TIME_RESOLUTION, which is retrieved
from the Linux system. Under Red Hat®/GNU® Linux, this is actually 100 (this means every
tick equals to 10ms). However, the OS_TIME_TICK_PER_SEC could be different under other
real-time or proprietary Linux distributions.
Also, make sure you modify OS_DEFAULT_TSLICE value to match with your application needs
if necessary. By default, this value is set for the time slice to be 100ms. If the Linux Advanced
34
System Configuration Guide
Real Time Feature is present (i.e the Linux kernel macro LINUX_ADV_REALTIME == 1), then
OS Abstractor automatically takes advantage of this feature if present and uses the
sched_rr_set_interval() function and sets the application required round-robin thread
time-slice for the OS Abstractor thread. If this feature is not present, the time-slice value for
round-robin scheduling will be whatever the kernel is configured to.
Memory Heap
OS Abstractor uses the system heap directly to provide the dynamic variable memory
allocation. The Memory management for the variable memory is best left for the Linux kernel to
be handled, so OS Abstractor only does boundary checks to ensure that the application does
not allocate beyond the pool size. The maximum memory the application can get from these
pools will depend on the memory availability of the system heap.
Priority Mapping Scheme
The OS Abstractor uses priorities 0~255 plus one more for exclusivity which results in a total
of 257 priorities. If the Linux that you use provides less than 257 priority values, then OS
Abstractor maps its priority in a simple window-mapping scheme where a window of OS
Abstractor priorities gets mapped to each individual Linux priority. If the Linux that you use
provides more than 257 priority values, then the OS Abstractor maps it priority one-on-one
somewhere in the middle of the range of Linux priorities. Please modify the priority scheme as
necessary if required by your application. If you want to minimize the interruption of the
external native Linux applications then you would want the OS Abstractor priorities to map to
the higher end of the Linux priority window.
OS Abstractor priority value of 257 is reserved internally by OS Abstractor to provide the
necessary exclusivity among the OS Abstractor tasks when they request no preemption or task
protection. The exclusivity and protections are not guaranteed if the external native Linux
application runs at a higher priority.
It is recommended that the Linux kernel be configured to have a priority of 512, so that the OS
Abstractor priorities will use the window range in the middle and as such would not interfere
with some of core Linux components. If your Linux kernel is configured to have less than 257
priorities, the OS Abstractor will automatically configuring a windowing scheme, where
multiple number of OS Abstractor priorities will map to a single Linux priority. Because of this,
the reported priority value could be slightly different than what was used during the task
creating process. If your application uses the pre-processor called OS_DEBUG_INFO, then all
the priority values and calculations will be printed to the standard output device.
Memory and System Resource Cleanup
OS Abstractor uses shared memory to support multiple OS Abstractor and OS Changer
application processes that are built with OS_INCLUDE_PROCESS mode set to OS_TRUE.
35
System Configuration Guide
Single-process Application Exit
This will apply to application that does not use the OS_PROCESS feature. Each application
needs to call OS_Application_Free to unregister and free OS Abstractor resources used by the
application. Under circumstances where the application terminates abnormally, the
applications need to install appropriate signal handler and call OS_Application_Free within
them.
Multi-process Application Exit
This will be the case where the applications are built with OS_PROCESS feature set to
OS_TRUE. When the first multi-process application starts, shared memory is created to
accommodate all the shared system resources for all the multi-process application. When
subsequent multi-process application gets loaded, they will register and OS Abstractor will
create all the local resources (memory heap) necessary for the application. Application’s can
also spawn new applications using OS_Create_Process and will result the same as if a new
application get’s loaded. Each application needs to call OS_Application_Free to unregister
and free OS Abstractor resources used by the application. Under circumstances where the
application terminates abnormally, the applications need to install appropriate signal handler
and call OS_Application_Free within them. When the last application calls
OS_Application_Free, then OS Abstractor frees the resources used by the application and also
deletes the shared memory region.
Manual Clean-up
If application terminates abnormally and for any reason and it was not possible to call
OS_Application_Free, then it is recommended that you execute the provide cleanup.pl script
manually before starting to load applications. Users can query the interprocess shared
resources status by typing ipcs in the command line.
Multi-process Zombie Cleanup
There are circumstances where a multi-process application terminates abnormally and was
not able to call OS_Application_Free. In this case, the shared memory region would be left
with a zombie control block (i.e there is no native process associated with the OS Abstractor
process control block). Whenever, a new multi-process application get’s loaded, OS Abstractor
automatically checks the shared memory region for zombie control blocks. If it finds any, it
will take the following action:
Free and initialize all the control blocks that belong to the zombie process (this could even be
the zombie process of the same application currently being loaded but was previously
terminated abnormally).
Task’s Stack Size
The stack size has to be greater than PTHREAD_STACK_MIN defined by Linux, otherwise, any
OS Abstractor or OS Changer task creation will return success, but the actual task
(pthread) will never get launched by the target OS. It is also safe to use a value greater than or
equal to OS_MIN_STACK_SIZE defined in cross_os_def.h. OS Abstractor ensures
that OS_STACK_SIZE_MIN is always greater that the minimum stack size requirement set by
the underlying target OS.
36
System Configuration Guide
Windows Target
OS_Relinquish_Task API uses Window’s sleep() to relinquish task control. However, the
sleep() function does not relinquish control when stepping through code in the debugger, but
behaves correctly when executed. This is a problem inherent in the OS itself.
If you have windows interface turned ON (i.e OS_INCLUDE_WINDOWS = OS_TRUE) along with
other interface libraries in your project, make sure the project is build with process mode flag
is turned ON (i.e INCLUDE_OS_PROCESS = OS_TRUE). If you build one interface library with
process mode flag turned OFF and other interface libraries with process mode flag ON then
segmentation fault will occur due to mismatch all libraries not being built with the current
process feature.
Android Target
Installing and Building the Android Platform
Prerequisites:
To install and build Android requires the following packages:
JDK 5.0 update 12 or higher. Java 6 will not work. – Download from
http://java.sun.com
Android 1.5 SDK – Download from
http://developer.android.com/sdk/1.5_r3/index.html
Android 1.5 NDK – Download from
http://developer.android.com/sdk/ndk/1.5_r1/index.html
Refer to the Android website for instructions on how to properly install and configure the SDK
and the NDK.
It is very important that JDK 6 is not used. JDK 6 will cause compiler errors. If you have both
JDK’s installed confirm that JDK 5.0 is the one that will be used by using the command:
$ which java
Adding Mapusoft Products to the Android Platform
To add Mapusoft products to Android Platform:
1. Add the Mapusoft project into the ~/android-ndk-1.5_r1/sources directory. This directory
is referred to as <MAPUSOFT_ROOT>.
2. Run the setup.sh script located in <MAPUSOFT_ROOT>/cross_os_android. This creates
symbolic links for the demo applications.
The command used to build the applications is
$ make APP=<app_name>
For instance, to build the OS Abstractor demo the command would be
$ make APP=demo_cross_os
37
System Configuration Guide
Running the Demos from the Android Emulator
To run the demos from Android Emulator:
1. Follow the steps documented on the Android developer site on how to create an AVD for the
emulator.
2. Launch the emulator with the command:
$ emulator –avd <avd_name>
3. Open another terminal and enter the command:
$ adb logcat
This will capture the log output from the emulator.
4. After the emulator launches click on the menu button to unlock the phone.
5. Click on the popup arrow on the screen.
6. The demos should be listed in the list of applications. Click on one to launch it. The demo
output will be piped into the adb terminal window.
QNX Target
User Vs ROOT Login
OS Abstractor internally checks the user ID to see if the user is ROOT or not. If the user is
ROOT, then it will automatically utilize the Linux real time policies and priorities. It is always
recommended that OS Abstractor application be run under ROOT user login. In this mode:
OS Abstractor task priorities, time slice, pre-emption modes and critical region
protection features will work properly.
OS Abstractor applications will have better performance and be more deterministic
behavior since the Linux scheduler is prevented to alter the tasks priorities behind
the scenes.
Also, when you load other Linux applications (that uses the default SCHED_OTHER
policies), they will not impact the performance of the OS Abstractor applications that
are running under real-time priorities and policies.
Under non-ROOT user mode, the task scheduling is fully under the mercy of the Linux
scheduler. In this mode, the OS Abstractor does not utilize any real-time priorities and/or
policies. It will use the SCHED_OTHER policy and will ignore the application request to set
and/or change scheduler parameters like priority and such. OS Abstractor applications will
run under the non-ROOT mode, with restrictions to the following OS Abstractor APIs:
OS_Create_Task: The function parameters priority, time-slice and OS_NO_PREEMPT flag
options are ignored
OS_Set_Task_Priority: This function will have no effect and will be ignored
OS_Set_Task_Preemption: Changing the task pre-emption to OS_NO_PREEMPT has no
effect and will be ignored
OS_Protect: Will offer NO critical region data protection and will be ignored. If you need
protection, then utilize OS Abstractor mutex features
OS_Create_Driver: The OS Abstractor driver task will NOT be run at a higher priority
level that the OS Abstractor application tasks.
38
System Configuration Guide
Though OS Abstractor applications may run under non-ROOT user mode, it is highly
recommended that the real target applications be run under ROOT user mode.
Time Resolution
The value of the system clock ticks is defined by OS_TIME_RESOLUTION, which is retrieved from
the Linux system. Under Red Hat®/GNU® Linux, this is actually 100 (this means every tick
equals to 10ms). However, the OS_TIME_TICK_PER_SEC could be different under other real-time
or proprietary Linux distributions.
Also, make sure you modify OS_DEFAULT_TSLICE value to match with your application needs if
necessary. By default, this value is set for the time slice to be 100ms.
Memory Heap
OS Abstractor uses the system heap directly to provide the dynamic variable memory
allocation. The Memory management for the variable memory is best left for the Linux kernel to
be handled, so OS Abstractor only does boundary checks to ensure that the application does
not allocate beyond the pool size. The maximum memory the application can get from these
pools will depend on the memory availability of the system heap.
Priority Mapping Scheme
QNX native priority value of 255 will be reserved for OS Abstractor Exclusivity. The rest of the
255 QNX priorities will be mapped as follows:
0 to 253 OS Abstractor priorities -> 254 to 1 QNX priorities
254 and 255 OS Abstractor priorities -> 0 QNX priority
The OS Abstractor uses priorities 0~255 plus one more for exclusivity which results in a total
of 257.
Memory and System Resource Cleanup
Please refer to the same section under target specific notes for Linux operating system.
Task’s Stack Size
The stack size has to be greater than PTHREAD_STACK_MIN defined by Linux, otherwise, any
OS Abstractor or OS Changer task creation will return success, but the actual task
(pthread) will never get launched by the target OS. It is also safe to use a value greater than or
equal to OS_STACK_SIZE_MIN defined in def.h. OS Abstractor ensures
that OS_STACK_SIZE_MIN is always greater that the minimum stack size requirement set by
the underlying target OS.
Dead Synchronization Object Monitor
Use OS_Monitor_Register function to register a process as a dead synchronization object
monitor. A dead synchronization object situation can occur if a process is terminated while it
owns a synchronization object such as a mutex or a pthread_spinlock. When this happens any
other processes suspended on that object will never be able to acquire it. This situation can
only occur if the synchronization object is shared between processes. For further information
about OS_Monitor_Register function, refer to the OS Abstractor Interface Reference Manual.
39
System Configuration Guide
VxWorks Target
Version Flags
The following is the compilation defines that has to be set when building the OS Abstractor
library for VxWorks target OS:
Table 2_24: Version Flags for VxWorks Target
Compilation Flag
OS_VERSION
OS_USER_MODE
OS_KERNEL_MODE
OS_VXWORKS_TARGET
Meaning
Specify the VxWorks version. The value can be:
OS_VXWORKS_5X – VxWorks 5.x or older
OS_VXWORKS_6X – Versions 6.x or higher
Set this value to OS_TRUE if the OS Abstractor is
required to run as a application module.
Under
OS_VXWORKS_5X,
the
OS_KERNEL_MODE flag is ignored. The library is
built to run as application module.
Under OS_VXWORKS_6X, you have the option to
create the library for either as a kernel module or
a user application as below:
OS_USER_MODE = OS_TRUE for application
module
OS_USER_MODE =OS_FALSE for kernel module.
Set this value to OS_TRUE if the OS Abstractor is
required to run as a kernel module.
Under
OS_VXWORKS_5X,
the
OS_KERNEL_MODE flag is ignored. The library is
built to run as a kernel module.
Under OS_VXWORKS_6X, you have the option to
create the library for either as a kernel module or
a user application as below:
OS_KERNEL_MODE = OS_TRUE for kernel
module
OS_KERNEL_MODE = OS_FALSE for user
application.
Select your appropriate Target platform. The
value can be:
OS_VXWORKS_PPC
OS_VXWORKS_PPC_604
OS_VXWORKS_X86
OS_VXWORKS_ARM
OS_VXWORKS_M68K
OS_VXWORKS_MCORE
OS_VXWORKS_MIPS
OS_VXWORKS_SH
OS_VXWORKS_SIMLINUX
OS_VXWORKS_SIMNT
OS_VXWORKS_SIMSOLARIS
OS_VXWORKS_SPARC
Unsupported OS Abstractor APIs
The following OS Abstractor APIs are not supported as shown below:
40
System Configuration Guide
Table 2_25: Unsupported OS Abstractor APIs for VxWorks Target
Compilation Flag
OS_VERSION
OS_VXWORKS_5X
=
OS_VERSION
=
OS_VXWORKS_6X and
OS_KERNEL_MODE = OS_TRUE
OS_VERSION
=
OS_VXWORKS_6X
and
OS_KERNEL_MODE
=
OS_FALSE
Unsupported APIs
OS_Delete_Partion_Pool
OS_Delete_Memory_Pool
OS_Get_Semaphore_Count
OS_Set_Clock_Ticks
OS_Get_Semaphore_Count
41
System Configuration Guide
Application Initialization
Once you have configured the OS Abstractor (refer to chapter OS Abstractor Configuration),
now you are ready to create a sample demo application.
Application needs to initialize the OS Abstractor library by calling the OS_Application_Init()
function prior to using any of the OS Abstractor function calls. Please refer to subsequent
pages for more info on the usage and definition of OS_Application_Init function.
The next step would be is to create the first task and then within the new task context,
application needs to call other initializations functions if required. For example, to use the
POSIX Interface component, application need to call OS_Posix_Init() function within an OS
Abstractor task context prior to using the POSIX APIs. The OS_Posix_Init() function initializes
the POSIX library and makes a function call to px_main() function pointer that is passed along
within OS_Posix_Init() call. Please note that the px_main() function is similar to the main()
function that is typically found in posix code. Please refer to the example initialization code
shown at the end of this section.
If the application also uses OS Changer components, then the appropriate OS Changer library
initialization calls need to be made in addition to POSIX initialization. Please refer to the
appropriate Interface reference manual for more details.
Please refer to the init.c module provided with the sample demo application for the specific
OS, tools and target for OS Abstractor initialization and on starting the application.
If you need to re-configure your board differently or would like to use a custom board, or
would like to re-configure the OS directly, then refer to the appropriate documentations
provided by the OS vendor.
Example: OS Abstractor for Windows Initialization
int main(int
argc,
LPSTR argv[])
{
OS_Main();
return (OS_SUCCESS);
} /* main */
#if (OS_HOST == OS_TRUE)
/* The below defines are the system settings used by the OS_Application_Init()
function. Use these to modify the settings when running on the host. A value of -1
for any of these will use the default values located in cross_os_usr.h.
When you optimize for the target side code, the wizard will create a custom
cross_os_usr.h using the settings you specify at that time so these defines will no
longer be necessary. */
#define HOST_TASK_POOLING
OS_FALSE /* to use task pooling, set
this to OS_TRUE, and make sure
add tasks to pool using
OS_Add_To_Pool apis */
#define HOST_DEBUG_INFO
2
#define HOST_TASK_POOL_TIMESLICE
-1
#define HOST_TASK_POOL_TIMEOUT
-1
#define HOST_ROOT_PROCESS_PREEMPT
-1
#define HOST_ROOT_PROCESS_PRIORITY
-1
42
System Configuration Guide
#define
#define
#define
#define
#define
#define
#define
#define
#define
#define
#define
#define
#define
#define
#define
#define
#endif
HOST_ROOT_PROCESS_STACK_SIZE
HOST_ROOT_PROCESS_HEAP_SIZE
HOST_DEFAULT_TIMESLICE
HOST_MAX_TASKS
HOST_MAX_TIMERS
HOST_MAX_MUTEXES
HOST_MAX_PIPES
HOST_MAX_PROCESSES
HOST_MAX_QUEUES
HOST_MAX_PARTITION_MEM_POOLS
HOST_MAX_DYNAMIC_MEM_POOLS
HOST_MAX_EVENT_GROUPS
HOST_MAX_SEMAPHORES
HOST_MAX_PROTECTION_STRUCTS
HOST_USER_SHARED_REGION1_SIZE
HOST_ROOT_PROCESS_AFFINITY
-1
-1
0
8
5
5
5
8
4
9
8
4
7
5
2
0
/* set the OS_APP_INIT_INFO structure with the actual number of resources
we will use. If we set all the Variables to -1, the default values would be
used. On ThreadX and Nucleus, we must pass an OS_APP_INIT_INFO structure with
at least first_available set to the first unused memory. Other OS's can pass
NULL to OS_Application_Init and all defaults would be used. */
VOID OS_Main()
{
STATUS
sts
= OS_SUCCESS;
OS_APP_INIT_INFO info
= OS_APP_INIT_INFO_INITIALIZER;
UNSIGNED
process_id = 0;
#if (OS_HOST == OS_TRUE)
/* Initialize the info structure. During the optimization process the wizard will
create a custom cross_os_usr.h with these values set to the values you specify
at that time so this structure will not be necessary on the target system. */
info.debug_info
= HOST_DEBUG_INFO;
info.task_pool_timeslice
= HOST_TASK_POOL_TIMESLICE;
info.task_pool_timeout
= HOST_TASK_POOL_TIMEOUT;
info.root_process_preempt
= HOST_ROOT_PROCESS_PREEMPT;
info.root_process_priority
= HOST_ROOT_PROCESS_PRIORITY;
info.root_process_stack_size = HOST_ROOT_PROCESS_STACK_SIZE;
info.root_process_heap_size
= HOST_ROOT_PROCESS_HEAP_SIZE;
info.default_timeslice
= HOST_DEFAULT_TIMESLICE;
info.max_tasks
= HOST_MAX_TASKS;
info.max_timers
= HOST_MAX_TIMERS;
info.max_mutexes
= HOST_MAX_MUTEXES;
info.max_pipes
= HOST_MAX_PIPES;
info.max_processes
= HOST_MAX_PROCESSES;
info.max_queues
= HOST_MAX_QUEUES;
info.max_partition_mem_pools = HOST_MAX_PARTITION_MEM_POOLS;
info.max_dynamic_mem_pools
= HOST_MAX_DYNAMIC_MEM_POOLS;
info.max_event_groups
= HOST_MAX_EVENT_GROUPS;
info.max_semaphores
= HOST_MAX_SEMAPHORES;
info.max_protection_structs
= HOST_MAX_PROTECTION_STRUCTS;
info.user_shared_region1_size = HOST_USER_SHARED_REGION1_SIZE;
43
System Configuration Guide
info.task_pool_enabled
= HOST_TASK_POOLING;
info.affinity_mask
=
HOST_ROOT_PROCESS_AFFINITY;
#endif
#if ((OS_TARGET == OS_THREADX) || (OS_TARGET == OS_NUCLEUS))
info.pool = pool;
#endif
sts = OS_Application_Init(&process_id,
“Demo”,
"/",
HEAP_SIZE,
&info);
if ((sts != OS_SUCCESS)&&(sts != OS_SUCCESS_ATTACHED))
{
OS_Fatal_Error("OS_Main",
"os_init.c",
"OS_ERR_SYSTEM_NOT_INITIALIZED",
"There was an error while initializing Cross OS",
OS_ERR_SYSTEM_NOT_INITIALIZED,
sts);
return;
}
OS_Library_Init();
/* Wait for Application termination */
OS_Application_Wait_For_End();
}
VOID OS_Application_Start(UNSIGNED argv)
{
/*User application code*/
}
44
System Configuration Guide
Example: POSIX Interface for Windows Target Initialization
int main(int
argc,
LPSTR argv[])
{
OS_Main();
return (OS_SUCCESS);
} /* main */
#if (OS_HOST == OS_TRUE)
/* The below defines are the system settings used by the OS_Application_Init()
function.
Use these to modify the settings when running on the host. A value of -1 for any
of these
will use the default values located in cross_os_usr.h.
When you optimize for the target side code, the wizard will create a custom
cross_os_usr.h
using the settings you specify at that time so these defines will no longer be
necessary. */
#define HOST_TASK_POOLING
OS_FALSE /* to use task pooling, set
this to OS_TRUE, and make sure
add tasks to pool using
OS_Add_To_Pool apis */
#define HOST_DEBUG_INFO
-1
#define HOST_TASK_POOL_TIMESLICE
-1
#define HOST_TASK_POOL_TIMEOUT
-1
#define HOST_ROOT_PROCESS_PREEMPT
-1
#define HOST_ROOT_PROCESS_PRIORITY
-1
#define HOST_ROOT_PROCESS_STACK_SIZE
-1
#define HOST_ROOT_PROCESS_HEAP_SIZE
-1
#define HOST_DEFAULT_TIMESLICE
-1
#define HOST_MAX_TASKS
5
#define HOST_MAX_TIMERS
0
#define HOST_MAX_MUTEXES
0
#define HOST_MAX_PIPES
0
#define HOST_MAX_PROCESSES
1
#define HOST_MAX_QUEUES
2
#define HOST_MAX_PARTITION_MEM_POOLS
0
#define HOST_MAX_DYNAMIC_MEM_POOLS
0
#define HOST_MAX_EVENT_GROUPS
0
#define HOST_MAX_SEMAPHORES
1
#define HOST_MAX_PROTECTION_STRUCTS
1
#define HOST_USER_SHARED_REGION1_SIZE
-1
#define HOST_ROOT_PROCESS_AFFINITY
0
#endif
VOID OS_Main()
{
STATUS
sts
= OS_SUCCESS;
OS_APP_INIT_INFO info
= OS_APP_INIT_INFO_INITIALIZER;
UNSIGNED
process_id = 0;
/* set the OS_APP_INIT_INFO structure with the actual
* number of resources we will use. If we set all the
45
System Configuration Guide
* variables to -1, the default values would be used.
* On ThreadX and Nucleus, we must pass an OS_APP_INIT_INFO
* structure with at least first_available set to the first
* unused memory. Other OS's can pass NULL to OS_Application_Init
* and all defaults would be used */
#if (OS_HOST == OS_TRUE)
/* Initialize the info structure. During the optimization process the wizard will
create a custom cross_os_usr.h with these values set to the values you specify
at that time so this structure will not be necessary on the target system. */
info.debug_info
= HOST_DEBUG_INFO;
info.task_pool_timeslice
= HOST_TASK_POOL_TIMESLICE;
info.task_pool_timeout
= HOST_TASK_POOL_TIMEOUT;
info.root_process_preempt
= HOST_ROOT_PROCESS_PREEMPT;
info.root_process_priority
= HOST_ROOT_PROCESS_PRIORITY;
info.root_process_stack_size = HOST_ROOT_PROCESS_STACK_SIZE;
info.root_process_heap_size
= HOST_ROOT_PROCESS_HEAP_SIZE;
info.default_timeslice
= HOST_DEFAULT_TIMESLICE;
info.max_tasks
= HOST_MAX_TASKS;
info.max_timers
= HOST_MAX_TIMERS;
info.max_mutexes
= HOST_MAX_MUTEXES;
info.max_pipes
= HOST_MAX_PIPES;
info.max_processes
= HOST_MAX_PROCESSES;
info.max_queues
= HOST_MAX_QUEUES;
info.max_partition_mem_pools = HOST_MAX_PARTITION_MEM_POOLS;
info.max_dynamic_mem_pools
= HOST_MAX_DYNAMIC_MEM_POOLS;
info.max_event_groups
= HOST_MAX_EVENT_GROUPS;
info.max_semaphores
= HOST_MAX_SEMAPHORES;
info.max_protection_structs
= HOST_MAX_PROTECTION_STRUCTS;
info.user_shared_region1_size = HOST_USER_SHARED_REGION1_SIZE;
info.task_pool_enabled
= HOST_TASK_POOLING;
info.affinity_mask
=
HOST_ROOT_PROCESS_AFFINITY;
#endif
#if ((OS_TARGET == OS_THREADX) || (OS_TARGET == OS_NUCLEUS))
info.pool = pool;
#endif
sts = OS_Application_Init(&process_id,
“Demo”,
"/",
HEAP_SIZE,
&info);
if ((sts != OS_SUCCESS)&&(sts != OS_SUCCESS_ATTACHED))
{
OS_Fatal_Error("OS_Main",
"os_init.c",
"OS_ERR_SYSTEM_NOT_INITIALIZED",
"There was an error while initializing Cross OS",
OS_ERR_SYSTEM_NOT_INITIALIZED,
sts);
return;
}
OS_Library_Init();
46
System Configuration Guide
/* Wait for Application termination */
OS_Application_Wait_For_End();
}
VOID OS_Application_Start(UNSIGNED argv)
{
pthread_t task;
/* posix compatibility initialization. create the main process
* and pass in the osc posix main entry function px_main.*/
OS_Posix_Init();
pthread_create(&task, NULL, (void*)px_main, NULL);
pthread_join(task, NULL);
OS_Application_Free(OS_APP_FREE_EXIT);
} /* OS_Application_Start */
int px_main(int
argc,
char* argv[])
{
/*User application code*/
}
Runtime Memory Allocations
OS Abstractor Interface
Some of the allocations for this product will be dependent on the native OS. Some of these
may be generic among all products. The thread stacks should come from the process heap.
This is only being done on the OS Abstractor for QNX product at the moment.
Message in int_os_send_to_pipe
Device name in os_creat
Partitions in os_create_partition_pool
Device name in os_device_add
File structures in os_init_io
Driver structures in os_init_io
Device header for null device in os_init_io
Device name for the null device in os_init_io
Device name in os_open
Environment structure in os_put_environment
Environment variable in os_put_environment
Memory for profiler messages if profiler feature is turned ON
Thread stack (only under QNX)
47
System Configuration Guide
POSIX Interface
All of the following allocations use OS_Allocate_Memory using the System_Memory pool. Thus,
all these allocations come from the calling processes memory pool:
Pthread key lists and values
Stack item in pthread_cleanup_push
Sem_t structures created by sem_open.
Timer_t structures created by timer_create.
mqueue_t structures created by mq_open.
Message in mq_receive. This is deallocated before leaving the function call.
Message in mq_send. This is deallocated before leaving the function call.
Message in mq_timedreceive. This is deallocated before leaving the function call.
Message in mq_timedsend. This is deallocated before leaving the function call.
All of the following are specific to the TKernel OS and use the SMalloc api call. These will not
be accounted for in the process memory pool:
Parameter list for execve
INT_PX_FIFO_DATA structure in fopen
All of the following are specific to the TKernel OS and use os_malloc_external API call. These
will not be accounted for in the process memory pool.
Buffer for getline
Globlink structure in int_os_glob_in_dir
Globlink name in int_os_glob_in_dir
Directory in int_o_prepend_dir
micro-ITRON Interface
All of the following allocations use OS_Allocate_Memory using the System_Memory pool. Thus,
all these allocations come from the calling processes memory pool.
Message in snd_dtq. This is deallocated before leaving the function call.
Message in psnd_dtq. This is deallocated before leaving the function call.
Message in tsnd_dtq. This is deallocated before leaving the function call.
Message in fsnd_dtq. This is deallocated before leaving the function call.
Message in rcv_dtq. This is deallocated before leaving the function call.
Message in prcv_dtq. This is deallocated before leaving the function call.
Message in trcv_dtq. This is deallocated before leaving the function call.
Message in snd_mbf. This is deallocated before leaving the function call.
Message in psnd_mbf. This is deallocated before leaving the function call.
Message in tsnd_mbf. This is deallocated before leaving the function call.
Message in rcv_mbf. This is deallocated before leaving the function call.
Message in prcv_mbf. This is deallocated before leaving the function call.
48
System Configuration Guide
Message in trcv_mbf. This is deallocated before leaving the function call.
VxWorks Interface
All of the following allocations use OS_Allocate_Memory using the System_Memory pool. Thus,
all these allocations come from the calling processes memory pool.
Wdcreate allocates memory for an OS_TIMER control block .
Message in msgqsend. This is deallocated before leaving the function call.
Message in msgqreceive. This is deallocated before leaving the function call
pSOS Interface
All of the following allocations use OS_Allocate_Memory using the System_Memory pool.
Thus, all these allocations come from the calling processes memory pool.
Rn_getseg will allocate from the System_Memory if a pool is not specified.
Message in q_vsend. This is deallocated before leaving the function call.
Message in q_vrecieve. This is deallocated before leaving the function call.
Message in q_vurgent. This is deallocated before leaving the function call.
All of the following allocations use malloc. Depending on the setting of OS_MAP_ANSI_MEM
these may or may not be accounted for in the process memory pool.
IOPARMS structure in de_close
IOPARMS structure in de_cntrl
IOPARMS structure in de_init
IOPARMS structure in de_open
IOPARMS structure in de_read
Nucleus Interface
All of the following allocations use OS_Allocate_Memory using the System_Memory pool. Thus,
all these allocations come from the calling processes memory pool.
Message in nu_receive_from_pipe. This is deallocated before leaving the function
call
Message in nu_receive_from_queue. This is deallocated before leaving the
function call
Message in nu_send_to_front_of_pipe. This is deallocated before leaving the
function call
Message in nu_send_to_front_of_queue. This is deallocated before leaving the
function call
Message in nu_send_to_pipe. This is deallocated before leaving the function call
Message in nu_send_to_queue. This is deallocated before leaving the function
call
49
System Configuration Guide
ThreadX Interface
All of the following allocations use OS_Allocate_Memory using the System_Memory pool. Thus,
all these allocations come from the calling processes memory pool.
Message in tx_queue_receive. This is deallocated before leaving the function call
Message in tx_queue_send. This is deallocated before leaving the function call
Message in tx_queue_front_send. This is deallocated before leaving the function
call
50
System Configuration Guide
OS Abstractor Process Feature
An OS Abstractor process or an application (―process‖) is an individual module that contains
one or more tasks and other resources. A process can be looked as a container that provides
encapsulation from other process. The OS Abstractor processes only have a peer-to-peer
relationship (and not a parent/child relationship).
An OS Abstractor process comes into existence in two different ways. Application registers a
new OS Abstractor process when it calls OS_Application_Init function. Application also
launches a new process when it calls the OS_Create_Process function. In the later case, the
newly launched process does not automatically inherit the open handles and such; however
they can access the resources belonging to the other process if they are created with ―system‖
scope.
Under process-based operating system like Linux, this will be an actual process with virtual
memory addressing. As such the level of protection across individual application will be
dependent on the underlying target OS itself.
Under non-process-based operating system like Nucleus PLUS, a process will be a specialized
task (similar to a main() thread) owning other tasks and resources in a single memory model
based addressing. The resources are protected via OS Abstractor software. This protection
offered by OS Abstractor is software protection only and not to be confused with MMU
hardware protection in this case.
OS Abstractor automatically tracks all the resources (tasks, threads, semaphores, etc.) and
associates them with the process that created them. All the memory requirements come from
its own process dedicated memory pool called ―process system pool‖. Upon deletion of the
process, all these resources will automatically become freed.
Depending on whether the resource needs to be shared across other processes, they can be
created with a scope of either OS_SCOPE_SYSTEM or OS_SCOPE_PROCESS. The resources
with system scope can be accessible or usable by the other processes. However, the process
that creates them can only do deletion of these resources with system scope.
A new process will be created as a ―new entity‖ and not a copy of the original. As such, none
of the resources that are open becomes immediately available to the newly created process.
The new created process can use the resources which were created with system scope by first
retrieving their ID through their name. For this purpose, the application should create the
resources with unique names. OS Abstractor will all resource creation with duplicate names,
however the function that returns the resource ID from name will provide the ID of only the
first entry.
Direct access to any OS Abstractor resource control blocks are prohibited by the application.
In other words, the resource Ids does not directly point to the addresses of the control blocks.
51
System Configuration Guide
Simple (single-process) Versus Complex (multiple-process) Applications
An OS Abstractor application can be simple (i.e. single-process application) or complex (multiprocess application). Complex and large applications will greatly benefit in using the
OS_INCLUDE_PROCESS feature support offered by OS Abstractor.
Table 2_26: Simple (single-process) Versus Complex (multiple-process) Applications
OS_INCLUDE_PROCESS
=
OS_FALSE
(Simple
OR
Single-process
Application)
OS Abstractor applications are
independent from each other
and are complied and linked
into a separate executables.
There is no need for the OS
Abstractor and/or OS Changer
APIs to work across processes.
Many independent or even
clones of OS Abstractor singleprocess applications can be
hosted on the OS platform.
OS Abstractor applications do
NOT spawn new processes via
the OS_Create_Process function.
In fact, any APIs with the name
―process‖ in them are not
available for a single-process
application.
Each application uses its own
user configuration parameters
set in the cross_os_usr.h file.
OS Abstractor creates all the
resource control blocks within
the process memory individually
for each application.
OS_INCLUDE_PROCESS = OS_TRUE
(Complex OR multi-process Application)
OS Abstractor applications can share the OS
Abstractor resources (as long as they are created
with system scope) between them even though
they may be complied and linked separately.
The OS Abstractor and/or OS Changer APIs
works across processes.
In addition to independent single-process
applications, the current release of OS
Abstractor allows to host one multi-process
application.
OS Abstractor applications can spawn new
processes via the OS_Create_Process function.
Each application has to have the same set of
shared resources defined in the cross_os_usr.h
(e.g. max number of tasks/threads across all
multi-process applications). When the first
multi-process application gets loaded, the OS
Abstractor uses the values defined in
cross_os_usr.h or the over-ride values passed
along its call to OS_Application_Init function to
create all the shared system resources. When
subsequent multi-process application gets
loaded, OS Abstractor ignores the values defined
in the cross_os_usr.h or the values passed in
the OS_Application_Init call. Please note that the
shared resources are only gets created during
the load time of the first application and they
gets deleted when the last multi-process
application exits.
OS Abstractor creates all the resource control
blocks in shared memory during the first
OS_Application_Init function call. In other
words, when the first application gets loaded, it
will initialize the OS Abstractor library. After
this, every subsequent OS_Application_Init call
52
System Configuration Guide
will register and adds the application as a new
OS Abstractor process and also creates the
memory pool for the requested heap memory.
An application can delete or free or re-start itself
with a call to OS_Application_Free. An
application can delete or re-start another
application via OS_Delete_Process.
Also, it is up to the application to provide the
necessary
synchronization during loading
individual applications so that the complex
application will start to run only in the preferred
sequence.
Memory Usage
The memory usage depends on whether your application is built in single process mode (i.e
OS_INCLUDE_PROCESS set to false) or multi-processes mode (i.e OS_INCLUDE_PROCESS set
to true).
The memory usage also depends on whether the target OS supports single memory model or a
virtual memory model. Operating systems such as LynxOS, Linux, Windows XP, etc. are
based on virtual memory model where each application are protected from each other and run
under their own virtual memory address space. Operating systems like Nucleus PLUS,
ThreadX, MQX, etc. are based on single memory model where each application shares the
same address space and there is no protection from each other.
In general, OS Abstractor applications require memory to store the system configuration and
also to meet the application heap memory needs.
Memory Usage under Virtual memory model based OS
Multi-process Application
System_Config: The system config structure will be allocated from shared memory. The size
will be returned to the user for informational use via the OS_SYSTEM_OVERHEAD macro.
OS_Application_Init: the memory value passed into this API by memory_pool_size will be the
heap size for this particular process. In this type of system, it is possible to have multiple
applications, all of which will call this API. This API will create an OS Abstractor dynamic
memory pool the size of the heap. The global variable System_Memory will be set to the id of
this pool.
OS_Create_Process: The memory value passed into this API by process_heap_size will be the
heap size for this particular process. This API will create an OS Abstractor dynamic memory
pool the size of the heap. The global variable System_Memory will be set to the id of this pool.
System_Memory: This will be set to the pool id of the process memory pool.
53
System Configuration Guide
Single-process Application
System_Config: The system config structure will be allocated from the process heap. The size
will be returned to the user for informational use only by calling OS_System_Overhead();
OS_Application_Init: the memory value passed into this API by memory_pool_size will be the
amount of memory available to the system. This API will create an OS Abstractor dynamic
memory pool this size. The memory for System_Config does not come from this pool. So the
total memory requirements will be OS_SYSTEM_OVERHEAD + memory_pool_size.
System_Memory: This will be set to 0. Since there are no processes, the first pool will always
be the system memory pool.
54
System Configuration Guide
Native process heap size: We are not adjusting the native process heap size, so it could be
possible that there is an inconsistency between the amount of memory reserved by OS
Abstractor and the amount of memory reserved for the actual heap of the native process.
There is no upper bounds limit to the system wide memory use while in process mode. We
will create processes without regard to the actual size of the physical memory.
Memory Usage under Single memory model based OS
Multi-process Application
System_Config: The first available memory will be set in the OS_APP_INFO structure and will
be adjusted the size of the system_config structure.
OS_Application_Init: The memory value passed into this API by memory_pool_size will be the
heap size for this particular process. This API can only be called once since it is not possible
to have multiple applications natively. This API will create an OS Abstractor dynamic memory
pool the size of the heap.
OS_Create_Process: The memory value passed into this API by process_heap_size will be the
heap size for this particular process. This API will create an OS Abstractor dynamic memory
pool the size of the heap.
System_Memory: This will always be set to 0. When we get a pool id of 0 in any of the
allocation APIs we will know to allocate from the current process memory pool. This means
that the dynamic memory pool control block at index 0 is not to be used.
55
System Configuration Guide
Single-process Application
System_Config: The first available memory will be set in the OS_APP_INFO structure and will
be adjusted the size of the system_config structure.
OS_Application_Init: the memory value passed into this API by memory_pool_size will be the
amount of memory available to the system. This API will create an OS Abstractor dynamic
memory pool this size. The memory for System_Config does not come from this pool. So the
total memory requirements will be OS_SYSTEM_OVERHEAD + memory_pool_size.
System_Memory: This will always be set to 0. Since we are not in process mode, there should
not be any other OS Abstractor memory pools created.
There is no upper bounds limit to the system wide memory use while in process mode.
Also, it cannot be guaranteed that there will be enough memory to create all the processes
of the application since there is no total memory being reserved.
56
System Configuration Guide
Chapter 3: Ada System Configuration
Interfacing to C and Machine
Code
This section explains how to interface between Ada code and C and machine code. The Ada
compiler generates C code, which is compiled by the C compiler into machine language.
Therefore, most machine-level details require some understanding of the conventions used by
the C compiler.
Before reading this section, please read the sections of the C compiler manual that refer to
interfacing between C and assembly language. You will need to understand the calling
conventions, data layout conventions, and so forth documented there. In order to write
machine code inserts, you need to understand your target’s hardware architecture.
Data Layout
Ada types are converted into corresponding C types. In most cases, the correspondence is
simple:
An Ada array becomes a C array (starting at zero).An Ada record becomes a C struct with the
fields in the same order. Ada Integer becomes int, modular becomes unsigned, Character
becomes char, and enumerations become enum. See the C compiler documentation for
information about the layout of these types.
Packed Arrays
The effect of Pragma Pack on an array type is to cause packing of discrete type array elements
into 8-bit bytes. The component size used is the smallest divisor of 8 which is greater than or
equal to the component size with any leftover bits spread evenly into each component. For
example, if the component size is 3, each component, when packed in the array, is 4 bits. Note
that pragma Pack has no effect on the layout of the component type.
Packed Records
The effect of pragma Pack on a record type is to cause scalar components (other than floating
point) to be compressed so that they occupy the smallest number of bits appropriate to values
of those types. Sub-word sized items will be combined into a single word, packed starting at the
next available bit, but never to extend across a word boundary. If an item is word sized or
larger, it will start and end on a word boundary. Bit numbering starts with zero at the loworder end of words.
Interface to C
Since the compiler generates C, it is relatively straightforward to interface to C. Refer to RM-B.3
for information about the language-defined mechanisms. An example version of package
Interfaces.C may be found in the distribution, in the RTS or RTL subdirectory.
You can use the -ke switch to tell the Ada compiler to keep the C code after compiling it, and
you can look at the C code to determine what names and so forth were chosen.
57
System Configuration Guide
Machine Code Inserts
Ada provides two mechanisms for doing machine code inserts: Code statements and Intrinsics.
AdaMagic supports the more powerful of the two mechanisms— intrinsics. Code statements
and the corresponding package System, Machine_Code are not supported.
The C compiler supports machine code inserts using the ―asm‖ and ―asm_volatile‖ operations.
These operations have a special syntax that is a mixture of strings, colons, and parenthesized
C variable names.
This is supported in Ada as follows:
procedure <Ada subp name>(<formal_parameter_list>);
pragma Import(Inline_Asm[_Volatile], <Ada subp name>,
"<instruction1>;<instruction2>;...:<output constraint1>(Ada OUT
param):" &
"<input constraint1>(Ada IN param),...:<clobberreg1>,<clobberreg2,...")
This has the same format as the C inline asm operation except:
everything is enclosed in a single level of quotes
the names used are the Ada formal parameter names
OUT parameters may appear only in the output section. IN parameters may appear only in the
input section. IN OUT parameters must appear in both, with an appropriate digit in the input
section. After giving the pragma Import with the Inline_Asm convention, each call to that
procedure will be expanded by the compiler into an inline sequence of instructions; the
instructions are given in the string literal that is the second argument of the pragma.
In addition, there is a package System.Machine_Intrinsics, which contains two special
procedures:
procedure Asm(Instruction : String);
procedure Asm_Volatile(Instruction : String);
A call to Asm turns into the corresponding ―asm‖ statement in C; similarly for Asm_Volatile.
The string must of course be known at compile time—for example, a double-quoted string
literal, or (if that won’t fit on a line), several string literals concatenated together with "&".
The string literals may include assembler directives, macro calls, #include statements, and so
forth, in addition to actual machine code instructions.
Example:
with System.Machine_Instructions;
package body ... is
...
procedure Disable_Interrupts is
use System.Machine_Instructions;
begin
asm("#include <def21060.h>");
asm("bit clr MODE1 IRPTEN;");
end Disable_Interrupts;
58
System Configuration Guide
Implementation-Defined Conventions
As explained above, the following implementation-defined conventions may be used in pragmas
Convention, Import, and Export:
C
C_Pass_By_Copy
Inline_Asm
Inline_Asm_Volatile
Program_Memory: The entity mentioned in the pragma must be a library-level object
(it must not be nested in any subprogram). It must not be aliased. The generated C
code must represent the object as a static or extern variable; for example, the object
cannot be dynamic-sized, because that requires an extra indirection in the
generated C code. If you specify convention Program_Memory, then the Ada
compiler generates ―pm‖ in the C code. This causes the C back end to allocate the
object in program memory rather than the default data memory. See the C compiler
manual for more details.
59
System Configuration Guide
Interrupt Handling
This section explains how to write interrupt handlers. The basic Ada mechanisms for interrupt
handling are described in RM-C.3; please read that first. You will also need to read the
interrupt-related parts of your target’s hardware manual.
NOTE: If you want to write an interrupt handler that does not do any Ada tasking-related
operations (such as protected procedure calls), then you can use your target’s RTOS
mechanisms directly, instead of the mechanisms described here.
The basic idea is that a protected procedure can be attached as an interrupt handler. If the
procedure should be permanently attached throughout the execution of the program, use
pragma Attach_Handler to attach it. If the procedure needs to be attached and detached and
reattached from time to time during execution, then first use pragma Interrupt_Handler to
mark that procedure as a potential interrupt handler. Then use operations in package
Ada.Interrupts to attach and detach the procedure.
The example hardware (the Analog Devices SHARC) supports 32 interrupts. These are given
names in package Ada.Interrupts.Names, which is shown here:
package Ada.Interrupts.Names is
-- Hardware interrupts
-- If interested in further detail on this example, see page F-1 of the
-- ADSP-2106x SHARC User’s Manual, Second Edition,
Reserved_0 : constant Interrupt_ID := 0;
RSTI : constant Interrupt_ID := 1; -- (reserved) Reset (read-only, nonmaskable)
Reserved_2 : constant Interrupt_ID := 2;
SOVFI : constant Interrupt_ID := 3; -- Status stack or loop stack
overflow of PC stack full
. . .
SFT2I : constant Interrupt_ID := 30; -- User software interrupt 2
SFT3I : constant Interrupt_ID := 31; -- User software interrupt 3
-- Useful constants
First_Interrupt : constant Interrupt_ID := 0;
Last_Interrupt : constant Interrupt_ID := 31;
end Ada.Interrupts.Names;
These interrupt names can be used in a pragma Attach_Handler, or in the
operations defined in Ada.Interrupts. For example, to attach a handler
permanently:
protected PO is
procedure Handler;
pragma Attach_Handler(Handler, Ada.Interrupts.Names.IRQ0I);
end PO;
Or, in a more dynamic situation:
protected PO is
procedure Handler;
pragma Interrupt_Handler(Handler);
end PO;
And then, from time to time:
Ada.Interrupts.Attach_Handler
(New_Handler => PO.Handler’Access,
60
System Configuration Guide
Interrupt => Ada.Interrupts.Names.IRQ0I);
The interrupts marked above as ―(reserved)‖ are reserved for the Ada run-time system or the
real-time kernel. The Reserved_n interrupts are reserved by the hardware. You cannot attach
handlers to reserved interrupts. (If you try, Program_Error will be raised.)
Exceptions in Interrupt Handlers
If an exception is propagated out of an interrupt handler, it is ignored. So, if you have a bug
that causes an unhandled exception, the exception is lost, and you will be confused as to why
your program doesn’t work. To help in debugging, you can write your interrupt handlers like
this:
protected body Handler_PO is
procedure Handler is
-- Nothing here.
begin
declare
... -- If you want local variables, put them here,
-- so if their elaboration raises an exception,
-- it will be handled below.
begin
...
end;
exception
when X: others =>
Put_Line(Exceptions.Exception_Name(X)
& " raised in interrupt handler.");
end handler;
The exception handler can log the error and/or take some other appropriate action. Here, it
just prints something like ―Constraint_Error raised in interrupt handler.‖ to standard output.
NOTE: There is some time overhead associated with having the exception handler.
Priorities
Interrupt handlers run at interrupt priority, which means they are higher priority than normal
tasks.
More precisely, the ceiling priority of the protected object containing the interrupt handler is an
interrupt-level priority. Thus, not only does the interrupt handler run at interrupt level, but so
do all other operations of the same protected object. In the examples below, procedure Handler
and entry
Await_Interrupt will both execute at interrupt level (locking out other tasks).
Package System has:
subtype Priority is Integer range 1 .. 30;
subtype Interrupt_Priority is Integer range 31 .. 31;
subtype Any_Priority is Integer range
Priority’First .. Interrupt_Priority’Last;
Default_Priority : constant Priority := (Priority’First +
Priority’Last)/2;
61
System Configuration Guide
Interrupts are masked when an interrupt hander is executing, and when a task is executing at
a priority in Interrupt_Priority, because it called a protected operation of an interrupt-level
protected object.
Example 1
We show three examples of interrupt handling below. The first example shows how to attach a
simple interrupt handler. The second example shows how to communicate information from
the interrupt handler to Ada tasks using protected entries. The third example shows how to
use suspension objects (see RM-D.10) to notify a task from an interrupt handler that the event
has occurred.
The first example prints the following:
Hello from Simple_Interrupt_Test main procedure.
0 interrupts so far.
1 interrupts so far.
2 interrupts so far.
...
9 interrupts so far.
10 interrupts.
----------------------------------------------------------------- This is a simple example of interrupt handling using
-- protected procedures as interrupt handlers
-- We attach an interrupt handler that just counts up the number
-- of times it is called. We then simulate some interrupts,
-- and print out the count.
---------------------------------------------------------------with Ada.Interrupts.Names; use Ada.Interrupts.Names;
-- This is where the names of all the hardware interrupts
-- are declared.
with Ada_Magic.DBG; use Ada_Magic.DBG;
-- We could use Text_IO instead, but Ada_Magic.DBG is much smaller,
-- so it’s better if memory is tight.
package Simple_Interrupt_Test is
-- This is the root package of the example.
end Simple_Interrupt_Test;
---------------------------------------------------------------package Simple_Interrupt_Test.Handlers is
-- This package creates an interrupt handler for the SFT0I
-- interrupt. The interrupt handler is the protected
-- procedure Handler inside the protected object Handler_PO.
-- This interrupt handler simply counts the number of
-- interrupts; this number is returned by Number_Of_Interrupts.
pragma Elaborate_Body;
protected Handler_PO is
procedure Handler; -- The interrupt handler.
pragma Attach_Handler(Handler, SFT0I);
62
System Configuration Guide
function Number_Of_Interrupts return Natural;
-- Return number of interrupts that have
-- occurred so far.
private
Count: Natural := 0;
end Handler_PO;
end Simple_Interrupt_Test.Handlers;
---------------------------------------------------------------package body Simple_Interrupt_Test.Handlers is
protected body Handler_PO is
procedure Handler is
begin
Count := Count + 1;
end Handler;
function Number_Of_Interrupts return Natural is
begin
return Count;
end Number_Of_Interrupts;
end Handler_PO;
end Simple_Interrupt_Test.Handlers;
---------------------------------------------------------------with System.Machine_Intrinsics;
with Simple_Interrupt_Test.Handlers; use Simple_Interrupt_Test.Handlers;
procedure Simple_Interrupt_Test.Main is
-- This is the main procedure. It simulates an external interrupt 10
-- times by calling Generate_Interrupt, and prints out the number
-- each time.
procedure Generate_Interrupt(Interrupt : Ada.Interrupts.Interrupt_ID) is
-- This uses machine code intrinsics to simulate a hardware
-- interrupt, by generating an interrupt in software.
use System.Machine_Intrinsics;
-- This sets the N’th bit in IRPTL, where N is the interrupt number,
-- which causes the interrupt to happen; see page 3-26 of the
-- ADSP-2106x SHARC Users’ Manual, Second Edition.
-- We want to use the BIT SET instruction, so it’s atomic,
-- but that instruction requires an immediate value;
-- we can’t calculate 2**N and use that as the mask;
-- hence the rather repetitive code below.
procedure Gen_0 is
pragma Inline(Gen_0);
begin
63
System Configuration Guide
Asm("BIT SET IRPTL 0x00000001;");
end Gen_0;
procedure Gen_1 is
pragma Inline(Gen_1);
begin
Asm("BIT SET IRPTL 0x00000002;");
end Gen_1;
...
procedure Gen_31 is
pragma Inline(Gen_31);
begin
Asm("BIT SET IRPTL 0x80000000;");
end Gen_31;
subtype Handleable_Range is Ada.Interrupts.Interrupt_ID
range 0..31; -- These are the only interrupts that
-- actually exist in the hardware.
begin
case Handleable_Range’(Interrupt) is
when 0 => Gen_0;
when 1 => Gen_1;
when 2 => Gen_2;
...
when 31 => Gen_31;
end case;
end Generate_Interrupt;
begin
Put_Line("Hello from Simple_Interrupt_Test main procedure.");
for I in 1..10 loop
Put_Line(Integer’Image(Handler_PO.Number_Of_Interrupts)
& " interrupts so far.");
Generate_Interrupt(SFT0I);
end loop;
64
System Configuration Guide
Put_Line(Integer’Image(Handler_PO.Number_Of_Interrupts)
& " interrupts.");
end Simple_Interrupt_Test.Main;
Example 2
The second example prints the following:
Hello from Interrupt_Test_With_Entries main procedure.
Generating interrupt.
Waiting_Task: Got interrupt.
Generating interrupt.
Waiting_Task: Got interrupt.
...
Generating interrupt.
Goodbye from Interrupt_Test_With_Entries main procedure.
Waiting_Task: Got interrupt.
Goodbye from Waiting_Task.
—————————————————————-- This example illustrates how an interrupt handler (a protected procedure) may
communicate with a task using an entry. The interrupt handler is called when the
interrupt occurs, and it causes the entry’s barrier to become True. The task waits by
calling the entry; it is blocked until the barrier becomes True.
In this example, we simulate 10 interrupts, and we have a task
-- (Waiting_Task) that waits for 10 interrupts by calling the entry.
-- Each interrupt triggers one call to the entry to proceed. In this
-- example, the only information being transmitted back to the waiting
-- task is the fact that the interrupt has occurred.
-- In a real program, the protected object might have additional
-- operations to do something to some external device (e.g. initiate
-- some I/O). This might cause the device to generate an interrupt.
-- The interrupt would not be noticed until after this operation
-- returns, even if the device generates the interrupt right away;
-- that’s because of the priority rules. Also, the interrupt handler
-- might get some information from the device, save it locally in the
-- protected object, and then the entry body might pass this information
-- back to the task via an ’out’ parameter.
-- In other words, a protected object used in this way acts as a "device
65
System Configuration Guide
-- driver", containing operations to initiate I/O operations, to wait
-- for operations to complete, and to handle interrupts. Anything that
-- needs to be done while masking the interrupt of the device should be
-- part of the protected object.
-- Note that if multiple device drivers are needed for similar devices,
-- it is convenient to declare a protected type, and declare multiple
-- objects of that type. Discriminants can be used to pass in
-- information specific to individual devices.
---------------------------------------------------------------with Ada.Interrupts.Names; use Ada.Interrupts.Names;
with Ada_Magic.DBG; use Ada_Magic.DBG;
package Interrupt_Test_With_Entries is
-- Empty.
end Interrupt_Test_With_Entries;
---------------------------------------------------------------package Interrupt_Test_With_Entries.Handlers is
pragma Elaborate_Body;
protected Handler_PO is
procedure Handler; -- The interrupt handler.
pragma Attach_Handler(Handler, SFT0I);
entry Await_Interrupt;
-- Each time Handler is called,
-- this entry is triggered.
private
Interrupt_Occurred: Boolean := False;
end Handler_PO;
end Interrupt_Test_With_Entries.Handlers;
---------------------------------------------------------------package body Interrupt_Test_With_Entries.Handlers is
protected body Handler_PO is
procedure Handler is
begin
Interrupt_Occurred := True;
end Handler;
entry Await_Interrupt when Interrupt_Occurred is
begin
66
System Configuration Guide
Interrupt_Occurred := False;
end Await_Interrupt;
end Handler_PO;
end Interrupt_Test_With_Entries.Handlers;
---------------------------------------------------------------package Interrupt_Test_With_Entries.Waiting_Tasks is
pragma Elaborate_Body; -- So the body is allowed.
end Interrupt_Test_With_Entries.Waiting_Tasks;
---------------------------------------------------------------with
Interrupt_Test_With_Entries.Handlers;
Interrupt_Test_With_Entries.Handlers;
use
package body Interrupt_Test_With_Entries.Waiting_Tasks is
task Waiting_Task;
task body Waiting_Task is
begin
for I in 1..10 loop
Handler_PO.Await_Interrupt;
Put_Line("Waiting_Task: Got interrupt.");
end loop;
Put_Line("Goodbye from Waiting_Task.");
end Waiting_Task;
end Interrupt_Test_With_Entries.Waiting_Tasks;
---------------------------------------------------------------with System.Machine_Intrinsics;
with Interrupt_Test_With_Entries.Waiting_Tasks;
-- There are no references to this package; this with_clause is here
-- so that task Waiting_Task will be included in the program.
procedure Interrupt_Test_With_Entries.Main is
procedure
is
Generate_Interrupt(Interrupt
:
Ada.Interrupts.Interrupt_ID)
... -- as in previous example
end Generate_Interrupt;
begin
-- Generate 10 simulated interrupts, with delays in between.
Put_Line("Hello from Interrupt_Test_With_Entries main procedure.");
for I in 1..10 loop
67
System Configuration Guide
delay 0.01;
Put_Line("Generating interrupt.");
Generate_Interrupt(SFT0I);
end loop;
Put_Line("Goodbye from Interrupt_Test_With_Entries main procedure.");
end Interrupt_Test_With_Entries.Main;
Example 3
The third example prints the following:
Hello from Suspension_Objects_Test main procedure.
Generating interrupt.
Waiting_Task: Got interrupt.
Generating interrupt.
Waiting_Task: Got interrupt.
Generating interrupt.
Waiting_Task: Got interrupt.
Generating interrupt.
Waiting_Task: Got interrupt.
Goodbye from Waiting_Task.
Generating interrupt.
Generating interrupt.
Generating interrupt.
Generating interrupt.
Generating interrupt.
Generating interrupt.
Goodbye from Suspension_Objects_Test main procedure.
-- This example illustrates how an interrupt handler
-- (a protected procedure) may communicate with a task
-- using a suspension object. A suspension object allows a
-- task or interrupt handler to notify another task that some
-- event (in our case, an interrupt) has occurred.
-- Each time the interrupt occurs, the suspension object is set to True.
-- The task waits for this event by calling Suspend_Until_True.
-- In this example, we simulate some interrupts,
-- and we have a task (Waiting_Task) that waits for them
68
System Configuration Guide
-- using a suspension object called Interrupt_Occurred.
-- Note that if the task is already waiting (the usual case) when the
-- interrupt occurs, Interrupt_Occurred is only set to True momentarily;
-- Suspend_Until_True automatically resets it to False. If the task is
-- not waiting, then the True state will be remembered, and when the
-- task gets around to waiting, it will reset it to False and proceed
-- immediately.
-- Note that only one task can wait on a given suspension object; it’s
-- sort of like a protected object with an entry queue of length one,
-- which allows it to be implemented more efficiently. This means that
-- the programmer using suspension objects has to know which task will
-- do the waiting; it’s as if that task has a kind of ownership of that
-- particular suspension object.
---------------------------------------------------------------with Ada.Interrupts.Names; use Ada.Interrupts.Names;
with Ada_Magic.DBG; use Ada_Magic.DBG;
package Suspension_Objects_Test is
-- Empty.
end Suspension_Objects_Test;
---------------------------------------------------------------with Ada.Synchronous_Task_Control; use Ada.Synchronous_Task_Control;
package Suspension_Objects_Test.Handlers is
pragma Elaborate_Body;
protected Handler_PO is
procedure Handler; -- The interrupt handler.
pragma Attach_Handler(Handler, SFT0I);
end Handler_PO;
Interrupt_Occurred: Suspension_Object;
-- Default-initialized to False.
-- Set to True for each interrupt.
end Suspension_Objects_Test.Handlers;
---------------------------------------------------------------package body Suspension_Objects_Test.Handlers is
protected body Handler_PO is
procedure Handler is
69
System Configuration Guide
begin
Set_True(Interrupt_Occurred);
end Handler;
end Handler_PO;
end Suspension_Objects_Test.Handlers;
---------------------------------------------------------------package Suspension_Objects_Test.Waiting_Tasks is
pragma Elaborate_Body; -- So the body is allowed.
end Suspension_Objects_Test.Waiting_Tasks;
---------------------------------------------------------------with Suspension_Objects_Test.Handlers; use Suspension_Objects_Test.Handlers;
with Ada.Synchronous_Task_Control; use Ada.Synchronous_Task_Control;
package body Suspension_Objects_Test.Waiting_Tasks is
task Waiting_Task;
task body Waiting_Task is
begin
for I in 1..4 loop
Suspend_Until_True(Interrupt_Occurred);
Put_Line("Waiting_Task: Got interrupt.");
end loop;
Put_Line("Goodbye from Waiting_Task.");
end Waiting_Task;
end Suspension_Objects_Test.Waiting_Tasks;
---------------------------------------------------------------with System.Machine_Intrinsics;
with Suspension_Objects_Test.Waiting_Tasks;
-- There are no references to this package; this with_clause is here
-- so that task Waiting_Task will be included in the program.
procedure Suspension_Objects_Test.Main is
procedure Generate_Interrupt(Interrupt : Ada.Interrupts.Interrupt_ID) is
... -- as in previous example
end Generate_Interrupt;
begin
-- Generate some simulated interrupts, with delays in between.
Put_Line("Hello from Suspension_Objects_Test main procedure.");
70
System Configuration Guide
for I in 1..10 loop
delay 0.01;
Put_Line("Generating interrupt.");
Generate_Interrupt(SFT0I);
end loop;
Put_Line("Goodbye from Suspension_Objects_Test main procedure.");
end Suspension_Objects_Test.Main;
71
System Configuration Guide
Implementation-Defined Pragmas
The following implementation-defined pragmas are supported:
pragma Assert(boolean_expression[, static_string_expression]);
This pragma is allowed wherever a declaration or a statement is allowed. The
boolean_expression is evaluated, and Program_Error is raised if the value is not True. The
string expression is currently ignored. At some future date, we intend to add a separate
package to support the pragma Assert, and raise an Assert_Error exception instead. Note that
the check associated with a pragma Assert can be suppressed with a pragma Suppress
(Assertion_Check) or a pragma Suppress(All_Checks).
pragma C_Pass_By_Copy([Max_Size =>] static_integer_expression);
This is a configuration pragma. The expression may be of any integer type. This pragma affects
the parameter passing conventions of structs in subprograms whose convention is C. Any
struct whose size is less than or equal to that specified by this pragma will be passed by copy;
larger structs will be passed by reference. The Max_Size is measured in storage elements.
Without this pragma,all structs are passed by reference (for interface-C subprograms), unless
the convention is specified explicitly with a pragma Convention(C_Pass_By_Copy, …).
pragma Revision(static_string_expression);
This pragma is allowed wherever any pragma is allowed. The static_string_expression is
intended to contain a revision number for the current compilation unit. This pragma currently
has no effect. At some future date, it will include the revision as a string in the generated code.
pragma Suppress_Aggregate_Temps;
This pragma causes compiler-generated temporary variables to be suppressed in an
assignment statement where the right-hand side is an aggregate, such as ―X := (…);‖. The
generated code will build the aggregate directly in the target, which is more efficient than using
a temp.
Note: This pragma is dangerous. In particular, if the right-hand side overlaps the target, as in
this example: ―X := (This => X.That, That => X.This);‖ the compiler will generate incorrect code.
Without the pragma, the compiler can *sometimes* avoid the temp, but only in those cases
where the compiler is smart enough to prove the absence of overlapping.
This pragma is a configuration pragma, which means that you may place it at the top of a
source file, in which case it applies to the units in that file, or you may place it in a pragmasonly file, in which case it applies to the entire program library.
In addition, there is a compiler switch -suppress_aggregate_temps, which has the same effect
as the pragma.
pragma Unchecked_Union([Entity =>] first_subtype_local_name);
This is a representation pragma. It causes the discriminant to be omitted from an Ada variant
record type, in order to interface to a C union type. The discriminant can be (and in fact must
be) specified in aggregates, but it is not allocated any space at run time.
Pragma Interface:
This pragma is a synonym for pragma Import. It is provided for backward compatibility; new
code should use pragma Import instead.
Pragmas Memory_Size, Storage_Unit, System_Name:
These pragmas are ignored. They are provided for compatibility with Ada 8
72
System Configuration Guide
Debugging Ada Programs
This section contains advice for debugging using a C debugger.
Source File Display in a C debugger
The AdaMagic Compiler generates optimized ANSI C as its intermediate language, which is
then compiled by an ISO/ANSI C compiler to produce object modules. When given the ―-ga‖ flag
(―-g‖ for debugger, ―a‖ for Ada source display), the AdaMagic compiler will generate ―#line‖
directives in the generated C source which will allow a typical C debugger (e.g. gdb) to trace the
generated object code back to the original Ada source file and line that produced it.
Alternatively, when given the ―-gc‖ flag (―-g‖ for debugger, ―c‖ for C source display), the
generated intermediate C will be saved, with C comments identifying the original Ada source
line, and the target debugger will show the generated C source, rather than the original Ada
source, when stepping through an AdaMagic program.
Local Ada Variable Display in a C debugger
When either the -ga or -gc flag is given, information on all Ada local variables is carried forward
into the debugger symbol information included in the generated object modules. Because Ada
ignores upper/lower case, whereas a typical C debugger distinguishes between upper and
lower case, it is important to understand the ―canonical‖ upper/lower case conventions used in
the generated debugger symbol information. In particular, the original upper/lower case in the
Ada name is ignored – the name in the debugger symbol table always starts with an upper case
letter, and then the remaining letters are in lower case. For example, an Ada local variable
called ―My_Local_Variable‖would appear in the debugger as ―My_local_variable.‖
Global Ada Variable Display in a C debugger
For Ada variables (or subprograms) declared inside packages, a concatenated name appears in
the debugger symbol table. The concatenated name consists of the package name,
canonicalized so that the first letter is upper case, followed by an underscore (’_’), followed by
the name of the variable (or subprogram) inside the package, again with the first letter
capitalized. For example, an Ada variable whose full name is ―My_Package.My_Global‖ would
appear in the debugger as ―My_package_My_global‖. Effectively every ―.‖ in the full expanded
name has been converted to ―_‖ with the next letter in upper case.
If the Ada variable (or subprogram) is declared in the package body rather than in the package
spec, then two underscores separate the package name from the variable (or subprogram)
name. Hence, a variable from the body such as ―My_Package.My_Hidden_Global‖would appear
in the debugger as ―My_package__My_hidden_global‖.
Nested Subprograms and Up-level References
If a variable is declared in a subprogram that has nested subprograms, and at least one of
those nested subprograms makes an ―up-level‖ reference to the variable, then the variable is
moved into a ―frame record‖ and the whole frame record is passed to each of the nested
subprograms to support up-level access.
The frame record of the current subprogram (if any) is called ―this_frame‖ in the debugger, and
the frame record of the enclosing subprogram (if any) is pointed to by a parameter called
―parent_frame.‖ If you can’t ―find‖ a local variable you expected to see, and the current
subprogram has nested subprograms, then take a look in the local variable called ―this_frame.‖
If it exists, it might contain the local variable you were looking for.
Similarly, if you are looking for a variable from an enclosing subprogram, look through the
―parent_frame‖ parameter. If the variable is multiple levels up in the hierarchy of enclosing
subprograms, then look for another ―parent_frame‖ component in the frame record pointed to
73
System Configuration Guide
by the ―parent_frame‖ parameter, and keep following the chain. For example, a variable called
―My_Up_Level‖, which is two levels up in the hierarchy, would be accessible via ―this_frame>parent_frame->My_up_level‖.
Setting Break Points
When viewing a source file in the debugger, you can set a break point by double clicking on the
line of interest. This should work whether looking at Ada source, C source, or disassembly.
Disassembly is most reliable if you want to stop at a very specific instruction. With Ada or C
source, there is some imprecision in the setting of the break point.
Watch points generally work with the simulator, and don’t seem to slow it down significantly
(given that the simulator is already quite slow).
Stopping when an Exception is raised
By setting a break point at the symbol ―rts_raise‖ the debugger will stop when any exception is
raised. To set a breakpoint when a run-time check fails causing a language-defined exception
to
be
raised,
you
can
set
a
break
point
at
―rts_raise_constraint_error,‖
―rts_raise_program_error,‖ or ―rts_raise_storage_error.‖
Note that rts_raise_storage_error is only used for ―primary‖ stack overflow, and it bypasses
―rts_raise‖ itself because of the intricate processing required when the primary stack overflows.
Other storage overflows go through rts_raise directly, and bypass rts_raise_storage_error.
To stop when an exception is re-raised (e.g. via the ―raise;‖ statement in Ada), set a break point
at ―rts_raise_occurrence.‖ When rts_raise is called, the only parameter is the address of a string
containing the full name of the exception being raised. When rts_raise_occurrence is called, the
only parameter is the address of an ―exception_occurrence‖ record, which contains as its first
word a pointer to the string name of the exception being re-raised.
Generics and Inlines
It is not generally possible to set a breakpoint in an instance of a generic or an inline expansion
of a subprogram call. However, line number information is included which should allow the C
debugger to step through instances and inlines.
Tasking-related Symbols and Breakpoints
To determine the current task, the global variable per_thread_ptr points to the task control
block for the current task. The global variable main_thread is the task control block for the
environment (main) thread of the program.
More information on the Ada task is described in the following fields:
Table 3_1: Symbols and Breakpoints Fields related about Ada task
Position in Record
2
Field Name
highwater_mark
3
4
5
7
Ss_last_chunk
Ss_Priority
Name
Suspended_On
8
Defer_count
9
Pending_abort_level
Meaning
Secondary
stack
pointer
Secondary stack limit
Current task priority
(null terminated)
!= null means thread is
suspended
> 0 means is abortdeferred
Normally 2**31-1
74
System Configuration Guide
The field Suspended_On contains a non-null address when the corresponding Ada task is
suspended. The target of the pointer is the ―Suspension Object‖ on which the task is
suspended.
To set a breakpoint for when a task is about to suspend, set it at:
System_Rts_Tgt_Kernel_Threads_Suspend_until_true_or_timeout
(NOTE: This is case sensitive)
The parameters to this routine are the pointer to the Suspension Object, and the maximum
time in ticks the task will wait. To set a breakpoint for when a task ends, set it at:
System_Rts_Task_termination_pkg_Terminate_task
The only parameter to this routine is the completion
Completed_normally(=1) or Unhandled_exception(=4).
status,
which
is
either
To set a breakpoint for when a task is aborted, set it at:
System_Rts_Master_pkg_Abort_self
The only parameter to this routine is the abort ―level‖ where zero means abort completely, and
> 0 means abort to the asynchronous select statement at the corresponding level of dynamic
nesting. To set a breakpoint for when the main subprogram ends, either because it is complete,
or because of an unhandled exception, set it at:
ada_fini
This routine performs any necessary finalization and then returns, allowing the target program
to exit.
Tracing the Call Stack
The debugger’s stack trace back command is generally useful. However, sometimes it is
necessary to track the stack manually. To do that, you will need to know the target calling
conventions. In an interrupt handler, there may be different calling conventions used by the
target hardware or operating system.
75
System Configuration Guide
Revision History
Document Title: System Configuration Guide
Release Number: 1.3.9
Release
1.3.5
Revision
0.1
Orig. of
Change
VV
Description of Change
1.3.6
0.1
VV
1.3.7
1.3.8
1.3.9
0.1
0.1
0.1
VV
VV
VV
New document
Updated UITRON with microITRON
Added revision history
Renamed Getting started to
Programmers Guide
Changed the Programmers Guide
description on page 8
Modified the Release number
Added the SMP Flag information
Added Android Specific notes
Added Ada System Configuration
Modified the Release number
Modified the Release number
Added the Threadx Interface
Added the Threadx Target
Added SMP Flag Limitation
© Copyright 2014 MapuSoft Technologies, Inc. - All Rights Reserved
The information contained herein is subject to change without notice. The materials located on the Mapusoft.
(‖MapuSoft‖) web site are protected by copyright, trademark and other forms of proprietary rights and are owned or
controlled by MapuSoft or the party credited as the provider of the information.
MapuSoft retains all copyrights and other property rights in all text, graphic images, and software owned by
MapuSoft and hereby authorizes you to electronically copy documents published herein solely for the purpose of
reviewing the information.
You may not alter any files in this document for advertisement, or print the information contained herein, without
prior written permission from MapuSoft.
MapuSoft assumes no responsibility for errors or omissions in this publication or other documents which are
referenced by or linked to this publication. This publication could include technical or other inaccuracies, and not
all products or services referenced herein are available in all areas. MapuSoft assumes no responsibility to you or
any third party for the consequences of an error or omissions. The information on this web site is periodically
updated and may change without notice.
This product includes the software with the following trademarks:
MS-DOS is a trademark of Microsoft Corporation.
UNIX is a trademark of X/Open.
IBM PC is a trademark of International Business Machines, Inc.
Nucleus PLUS and Nucleus NET are registered trademarks of Mentor Graphics Corporation.
Linux is a registered trademark of Linus Torvald.
VxWorks and pSOS are registered trademarks of Wind River Systems.
76