1
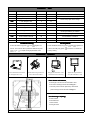
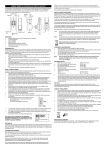
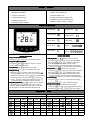
Product Features
� Easy Use Touch Keypad
� Power Supply:AC230V,50Hz
� Backlight LCD Display
� Output Load:<3600W/16A
� Auto Frost Protection
� Protection Rating:IP30
� Holiday Mode Function
� Housing Case:Fireproof ABS Plastic
� Intelligent Keypad Lock
� Installation Type: EU Flush Mounting
� Monoblock Type Installation
� Dimension:86(H)×86(W)×12(D)mm
Display & Operation
Heat Output
Keypad Lock
Frost Protect
Holiday Mode
Target Temp
Temp Hold
Room Temp
Week
Floor Temp
Event
Power-Off Status
Power-On Status
Power On/Off Status Switch:
1.
1.P
1.Holiday Mode:
Mode:(The “
Short press “ ” to do the Power On/Off Status switch.
1.Programme/Manual Switch:
Long press “
Short press “ ”,“ ” or “ ” to adjust the target value.
a.The Holiday Mode will start at 24:00 of the day.
b. Power-Off Status,access Holiday Mode Setting again.
Reduce “Day Setting” to 00 could exit the Holiday Mode.
2.Temp Hold:
Hold:(The “ ” displays when it’s actived)
Long press “ ”and “ ” together for 5 Secs. to do the
Programme/Manual Mode switch.
2.Temp Setting:
Setting:(The “
” displays when it start)
Short press “ ” or “
3.Temp Checking
Checking:
” to choose target temp value.
” displays when it’s actived)
” for 5 Secs. to access the Holiday Mode,
Long press “
a.Short press “ ” to check the “Floor Temp”,then the “ ”
displays when the floor sensor connect to the thermostat.
b.In the Manual mode,short press “ ” to check “Target Temp”.
c.In the Programme mode,short press “ ” to check the
“Event 1” programme setting information,short press “ ”
to check next Event programme setting information.
ypad Lock
/Unlock
5.Ke
5.Key
Lock/Unlock
/Unlock::(The “ ” displays when it’s actived)
Long press “ ” and “ ” together for 5 Secs. to do the
keypad lock/unlock switch.The keypad lock function have
two level,please check the Parameter Table Item-P08.
” for 5 Secs. to access the Temp Hold Mode,
Short press “ ”,“ ” or “ ” to adjust the target value.
a.The Min Setting is 0.5 Hour,the Max Setting is 72 Hour.
b. Power-Off Status,access the Temp Hold Setting again.
Reduce “Hour Setting” to 00 could exit Temp Hold Mode.
3.Clock Setting:
Long press “
” for 5 Secs. to access the Clock Setting,
Short press “
”,“
” or “
” to adjust the right time.
4.Programme Setting:
Setting:(4 or 6 Events are for option)
Long press “
” for 5 Secs. to access Programme Setting,
Short press “
” and “
”, “
” or “
” to do the setting.
Programme Table
6 Programme Events
Workday 1-5
Event
4 Programme Events
Weekend 6-7
Time
Temp
06:00
Event
Workday 1-5
Time
Temp
20℃
06:00
08:00
15℃
23:00
12:00
Event
Weekend 6-7
Time
Temp
20℃
06:00
15℃
Event
Time
Temp
20℃
06:00
20℃
08:00
15℃
23:00
15℃
20℃
16:00
20℃
13:00
15℃
23:00
15℃
18:00
20℃
23:00
15℃
Parameter Table
Serial No.
Definition & Function
Default Value
P01
Communication ID
01
P02
Temp Measure Offset
50
0.1℃
P03
Upper Setpoint Limit
35
1℃
P04
Lower Setpoint Limit
5
1℃
P05
Frost Protection Temp
05
1℃
P06
Beep On/Off
01
00=Disabled,01=Enabled
P07
Backlight On/Off
01
00=Disabled,01=Enabled
P08
Keypad Lock
01
01=All the Keypad are locked
02=Only Power key is enabled
P09
Floor Protection Temp
65
P10
Frost Protection On/Off
00
00=Disabled,01=Enabled
P11
Programme Events Number
00
00=4,01=6
P12
Time Format
00
00=24 Hour,01=12 Hour
Unit
Explanation
The Unit No. in the Central Control System
1℃
Parameter Setting
Power-Off Status,long press “
” and “
Calibrate The Room Temp
Room Temp Up & Down Range
Room Temp Lower Limit
Floor Temp Higher Limit
Factory Reset
” together for
Power-Off Status,Firstly long press “
5 Secs. to access the above parameter table,short press
5 Secs.,Secondly long press “
“
Factory Setting.
”,“
” or “
” to adjust the target parameter value.
” and “
” together for
” for 5 Secs. to restore the
Installation Guidance
1.
2.
Fix the installation-board on the
wall and tighten the screw
3.
4.
Do the unit wiring connection
Hang up the thermostat on the
Tighten the top and bottom
refer to the unit back label
installation-board as showing
screw,the installation is OK
Floor Probe Information
Information:
a.The length is 3m and can be extended if need.
b.The sensor head type is the NTC10KΏ@25℃.
c.The floor probe could be replaced by other brand
probe if the type is also the NTC10KΏ@25℃.
Unit Packing List(280g)
List(280g):
a.Thermostat×1
b.User Manual×1
c.Floor Probe×1
d.Fixing Screw×2
Note:The CD28-11 User Manual(V12) technique data maybe changed without prior nitification because the unit upgrade!