1
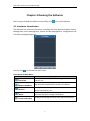
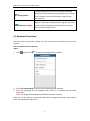
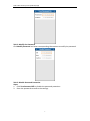
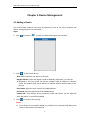
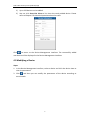
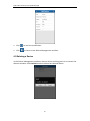
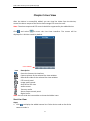
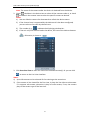
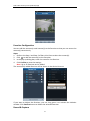
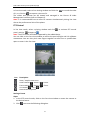
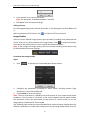
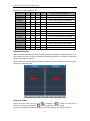
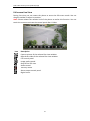
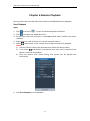
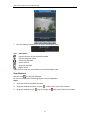
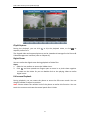
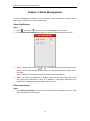
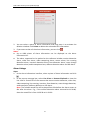
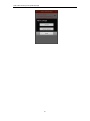
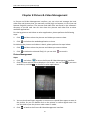
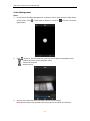
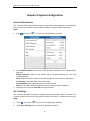
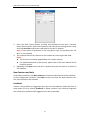
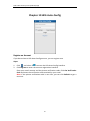
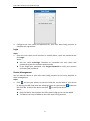
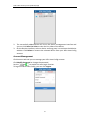
Hills Video Security CCTV Android App User Manual V1.1 Hills Video Security CCTV (Android) App Thank you for purchasing our product. This manual applies to Hills Video Security CCTV (Android) mobile client software. The contents in this manual are subject to change without notice. For further information, including datasheets, FAQ and technical support please visit: www.hills.com.au/videosecurity 1 Hills Video Security CCTV (Android) App Contents Chapter 1 Introduction...................................................................................................................... 3 1.1 Overview ............................................................................................................................. 3 1.2 System Requirements.......................................................................................................... 3 1.3 Conventions......................................................................................................................... 3 Chapter 2 Installing and Uninstalling the Software ........................................................................... 4 2.1 Installing the Software ........................................................................................................ 4 2.2 Uninstalling the Software .................................................................................................... 4 Chapter 3 Running the Software ....................................................................................................... 5 3.1 Interfaces Introduction........................................................................................................ 5 3.2 Password Protection............................................................................................................ 6 Chapter 4 Device Management ........................................................................................................ 8 4.1 Adding a Device ................................................................................................................... 8 4.2 Modifying a Device.............................................................................................................. 9 4.3 Deleting a Device............................................................................................................... 10 Chapter 5 Live View ........................................................................................................................ 11 Chapter 6 Remote Playback ............................................................................................................ 19 Chapter 7 Alarm Management ....................................................................................................... 23 Chapter 8 Picture & Video Management........................................................................................ 26 Chapter 9 System Configuration ..................................................................................................... 28 Chapter 10 Hills Auto-Config Serivce .............................................................................................. 30 Appendix ......................................................................................................................................... 33 Version History ........................................................................................................................ 33 2 Hills Video Security CCTV (Android) App Chapter 1 Introduction 1.1 Overview Hills Video Security (HVS) CCTV Android App, designed for mobile phone on Android OS (Version 2.3.3 or higher), can be used to remotely monitor the live video from HVS NVR and network camera via wireless network, play back record files, locally store and manage pictures and videos, manage alarm notification and information, and control alarm output as well. HVS CCTV Android App also provides the services for managing your Hills Auto-config account and the added devices. With this software installed in your phone, you are able to log onto the front-end device via Wi-Fi, 3G or 4G; besides, if there is no public IP available for the device, it’s accessible by using a dynamic domain name, or by mapping ports to the public IP of router. Notes: 1. Wi-Fi, 3G or 4G access service must be supported by the phone. 2. Network traffic charges may be produced during the use of this client software. Please refer to the local ISP. 1.2 System Requirements The mobile phone should be based on Android OS (version 2.3.3 or higher). Note: The mobile phone with resolution of 480*800, 480*854, 960*540, 1280*720, 800*1280 or 1920*1080 is supported. 1.3 Conventions In order to simplify the description, we define the “Hills Video Security CCTV Android App” as “software” and “NVR and network camera” as “device” in the following chapters. 3 Hills Video Security CCTV (Android) App Chapter 2 Installing and Uninstalling the Software 2.1 Installing the Software Steps: 1. Log onto the Google Play. 2. Enter “Hills Video Security CCTV” to search the mobile client software. 3. Select the HVS CCTV software, download and install it to your phone. 4. After having installed the software successfully, you can click to start the software. 2.2 Uninstalling the Software Steps: 1. Enter the Application Management interface of your mobile phone (e.g., Settings > Apps). Note: The path for entering the Application Management interface varies depending on the Android OS version of your phone. 2. Click the software icon. 3. In the App info interface of the software, click Uninstall button and then click OK button to uninstall the software. 4 Hills Video Security CCTV (Android) App Chapter 3 Running the Software After having installed the software successfully, click to run the software. 3.1 Interfaces Introduction The software has seven main functions, including Live View, Remote Playback, Device Management, Alarm Management, Picture & Video Management, Configuration and Hills Auto-Config Management. You can click to activate the main menu. Description of Main Menu Menu Live View Descriptions Live view, PTZ control, local recording, alarm outputs control, etc. Remote Playback Play back the recorded files stored in the device. Alarm Display device list, add/delete/modify device, view device information, etc. Enable alarm notification, manage alarm information and view the alarm linkage information. Picture and Video Display and manage the local video files and pictures. Devices 5 Hills Video Security CCTV (Android) App Configuration Hills Auto-Config Configure password protection and email feedback. Check the traffic statistics and configure Wi-Fi settings. View software’s version information, help file and main features. Register a Hills Auto-Config account, log into your Hills Auto-Config and manage the devices which support the Hills Auto-Config service. 3.2 Password Protection With the password protection enabled, only the user that has the password can access the software. Task 1: Enable Password Protection Steps: 1. Click and select to enter the Configuration interface. 2. Click Turn Password On to enter the password settings interface. 3. Enter the password for the software and confirm it to activate the password protection. Note: The length of the password should be between 1 and 10. Next time, if you want to run the software after closing the software, you need to enter the password to log in first. 6 Hills Video Security CCTV (Android) App Task 2: Modify the Password Click Modify Password and enter corresponding information to modify the password. Task 3: Disable Password Protection Steps: 1. Click Turn Password Off to disable the password protection. 2. Enter the password to confirm the settings. 7 Hills Video Security CCTV (Android) App Chapter 4 Device Management 4.1 Adding a Device You need to add a device firstly that all operations such as live view, playback and device management can be accessible. Steps: 1. Click and select to enter the Device Management interface. 2. Click to add a new device. Alias: Edit a name for the device as desired. Register Mode: Select the register mode to HiDDNS, IP/Domain, or IP Server. IP/Domain: You can access the device through fixed IP address or domain name. You need to edit the IP address or domain address and the port of the device. User Name: Input the user name of the added device. Password: Input the password of the added device. Camera No.: The number of the camera(s) under the device can be obtained after the device is successfully added. 3. Click to confirm the settings. Notes: 1) If the device is successfully added, the software can automatically obtain the camera information of the device. 8 Hills Video Security CCTV (Android) App 2) Up to 256 devices can be added. 3) You can click Start Live View to live view the newly added device. Please refer to Chapter 5 for detailed operation about live view. Click to return to the Device Management interface. The successfully added new device will be displayed in the Device Management interface. 4.2 Modifying a Device Steps: 1. In the Device Management interface, select a device and click the device item to view its parameters. 2. Click and then you can modify the parameters of the device according to actual needs. 9 Hills Video Security CCTV (Android) App 3. Click 4. Click to save the modification. to return to the Device Management interface. 4.3 Deleting a Device In the Device Management interface, select a device and long press it to activate the deletion window. Click Confirm button to delete the selected device. 10 Hills Video Security CCTV (Android) App Chapter 5 Live View After the device is successfully added, you can view live video from the devices, control the alarm output of the device and manage PTZ control as well. Note: The alarm output and PTZ control should be supported by the added device. Click and select to enter the Live View interface. The screen will be displayed in 1-division mode by default. Icon toolbar Icon Description Go to the Camera List interface. Capture picture of the selected live view window. Record the video of the selected live view window. PTZ control panel. Image quality panel. Stop all the live view. Audio control. Two-way audio. Alarm output control panel. Digital zoom. Note: You can slide the icon toolbar to show the hidden icons. Start Live View Steps: 1. Click to display the added camera list. Click a device node to list all the cameras under it. 11 Hills Video Security CCTV (Android) App Note: The name of the camera under the device is obtained from the device. 2. Check checkbox in the device item to select all the cameras under it, or check checkbox in the camera item to select the specific camera as desired. Notes: 1) You can slide the camera list downwards to refresh the device status. 2) If the channel-zero is supported by the device and it has been configured, you can select to live view by channel-zero. 3) The number (e.g., ) indicates the displaying window No.. 4) If there is only one channel under the device, the icon of the device shows as . Otherwise, it shows as . 3. Click Start Live View to start live view of the selected camera(s). Or you can click to return to the Live View interface. Notes: 1) Up to 16 cameras can be selected for live viewing at the same time. 2) If the camera is live viewed for the first time, it plays the live video at sub-stream if it supports sub-stream, otherwise it plays at main stream; if not, the camera plays at the stream type of the last time. 12 Hills Video Security CCTV (Android) App Favorites Configuration You can add the commonly used camera(s) to the favorites so that you can access the camera(s) conveniently. Steps: 1. Perform the Step 1 and Step 2 of Start Live View to select the camera(s). 2. Click to add the camera(s) to the Favorites. 3. In the pop-up dialog box, enter the name for the favorites. 4. Click Confirm to save the settings. Note: Up to 32 favorites can be added. The successfully added favorites will be shown in the device list area. If you want to delete the favorites, you can long press it to activate the deletion window. Click Confirm button to delete the selected favorites. Record & Capture 13 Hills Video Security CCTV (Android) App In live view mode, select a live viewing window and click the to record the video of it, or click the to capture a picture of it. The videos and pictures can be viewed and managed in the Picture & Video Management interface (refer to Chapter 8). Note: It is recommended not to record 4 cameras simultaneously during live view due to the performance limit of the phone. PTZ Control In live view mode, select a playing window and click to activate PTZ control panel, and the changes to . Note: The PTZ control should be supported by the added device. You can slide on the live view window to realize the pan left/right and tilt up/down movements. You can also pinch two fingers together to zoom out or spread them apart to zoom in the live view. Icon Description Start / stop the auto-scan. Zoom control: Zoom+ / ZoomFocus control: Focus+ / FocusIris control: Iris+ / IrisSet and call the preset. Setting a Preset Steps: 1. In the PTZ control mode, slide on the live view window to move the camera to the desired scene. 2. Click to access the following dialog box. 14 Hills Video Security CCTV (Android) App 3. In the number area, set the preset No.. Note: The preset No. should be between 1 and 256. 4. Click Set to finish the preset settings. Calling a Preset For the programmed preset, edit the preset No. in the dialog box and click Call to call it. After completion of PTZ control, click to hide the PTZ control panel. Image Quality There are three defined image quality types provided, including Clear, Balanced and Fluent. And you can also customize the image quality. Click to adjust the quality according to the performance of your network and phone hardware. Note: If you change the image quality, the live view and recording of the device may be affected due to the new settings. Customize the Image Quality Steps: 1. Click to activate the customized panel shown below. 2. Configure the parameters according to actual needs, including Stream Type, Resolution, Frame Rate and Bitrate. 3. Click Confirm to save the settings. Note: The live view effect is related to the performance of your network and phone hardware. If the live view is not fluent or the screen appears blurred, please reduce the resolution, frame rate and bitrate of the camera in Custom mode, or set the image quality as Balanced or Fluent mode. The following table shows the recommended frame rate and bitrate configuration for different resolution at H.264 video compression by Samsung I9100 Galaxy SII (CPU: 15 Hills Video Security CCTV (Android) App dual-core 1.2 GHz, Memory: 1G). Resolution 1-ch 2-ch 3-ch 4-ch Recommended Configuration HD1080P √ Frame rate: 4fps; Bitrate: 1024Kbps UXGA √ Frame rate: 4fps; Bitrate: 1024Kbps HD900P √ Frame rate: 6fps; Bitrate: 1024Kbps SXGA √ Frame rate: 10fps; Bitrate: 1024Kbps XVGA √ Frame rate: 15fps; Bitrate: 1024Kbps HD720P √ Frame rate: 15fps; Bitrate: 1024Kbps XGA √ Frame rate: 20fps; Bitrate: 1024Kbps WD1 √ Frame rate: 25fps; Bitrate: 1024Kbps SVGA √ Frame rate: 25fps; Bitrate: 1024Kbps 4CIF √ √ Frame rate: 25fps; Bitrate: 1024Kbps VGA √ √ Frame rate: 25fps; Bitrate: 512Kbps 2CIF √ √ √ √ Frame rate: 25fps; Bitrate: 512Kbps CIF √ √ √ √ Frame rate: 25fps; Bitrate: 256Kbps QVGA √ √ √ √ Frame rate: 25fps; Bitrate: 128Kbps QCIF √ √ √ √ Frame rate: 25fps; Bitrate: 128Kbps Window Division When multiple cameras are under live view, they are 4-division mode by default. You can double-click the live view window to display the camera in 1-division mode and double-click again to restore. When there are multiple pages of playing windows, you can slide the screen to go to the next or previous page. Stop Live View During the live view, you can click (it changes to ) to stop live view of all cameras. And you can also click to recover the previous live view. Or you can perform the following steps to stop live view of the specific camera. 16 Hills Video Security CCTV (Android) App Steps: 1. Click and hold the live view window. 2. Drag the window upwards, and the shows on the top of the window. 3. Drag the window to the until it changes to and then release the window. Alarm Output Control You can control the alarm outputs of the added device by the software. Note: The alarm output should be supported by the device. Steps: 1. Slide the icon toolbar to access the hidden icons. 2. Click to activate the alarm output control panel. 3. Select an alarm output and click it to set it as output. You can also click the enabled alarm output disable it. to enable this alarm to set it as to Digital Zoom You can realize the digital zoom during live view. Steps: 1. Click to select a playing window. 2. Slide the icon toolbar to access the hidden icons. 3. Click and the selected window will be display in 1-division mode. 4. Spread two fingers apart to zoom in or pinch them together to zoom out the live view. Or you can double-click on the live view image to realize digital zoom. 17 Hills Video Security CCTV (Android) App Full-screen Live View During live view, you can rotate the phone to enter the full-screen mode. You can drag the toolbar to adjust its position. Note: Please release the rotation lock of the phone to realize this function. You can touch the screen to activate the control panel after it hides. Icon Description Capture picture of the selected live view window. Record the video of the selected live view window. PTZ control panel. Image quality panel. Stop all the live view. Audio control. Two-way audio. Alarm output control panel. Digital zoom. 18 Hills Video Security CCTV (Android) App Chapter 6 Remote Playback You can search the recorded video files stored in the added device for playback. Start Playback Steps: 1. Click and select to enter the Remote Playback interface. 2. Click to display the added device list. 3. Set the start time and end time in the From and To field to define the search condition. 4. Select a device node and click to list all the cameras under it. 5. Select radio button in the camera item to select a camera for playback. Notes: 1) You can slide the camera list downwards to refresh the device status. 2) If you select radio button in the device item, then the first camera of the device is selected for playback. 3) Only the camera with record during that period can be played back successfully. 6. Click Start Playback to start playback. 19 Hills Video Security CCTV (Android) App 7. You can slide the timeline bar to adjust the playback time. Icon Description Capture picture of the playback window. Clip the playback video. Pause the playback. Audio control. Stop the playback. Digital zoom. Note: You can slide the icon toolbar to show the hidden icons. Stop Playback You can click to stop the playback. Or you can perform the following steps to stop the playback. Steps: 1. Click and hold the playback window. 2. Drag the window upwards, and the 3. Drag the window to the shows on the top of the window. until it changes to 20 and then release the window. Hills Video Security CCTV (Android) App Clip & Capture During the playback, you can click to clip the playback video, or click to capture pictures of it. The clipped video and captured pictures can be viewed and managed in the Picture & Video Management interface (refer to Chapter 8). Digital Zoom You can realize the digital zoom during playback of video files. Steps: 1. Slide the icon toolbar to access the hidden icons. 2. Click and then spread two fingers apart to zoom in or pinch them together to zoom out the video. Or you can double-click on the playing video to realize digital zoom. Full-screen Playback During playback, you can rotate the phone to enter the full-screen mode. You can drag the toolbar to adjust its position. Note: Please release the rotation lock of the phone to realize this function. You can touch the screen to activate the control panel after it hides. 21 Hills Video Security CCTV (Android) App Icon Description Pause the playback. Capture picture of the playback video. Clip the playback video. Audio control. Digital zoom. 22 Hills Video Security CCTV (Android) App Chapter 7 Alarm Management In Alarm Management interface, you can enable alarm notification, manage alarm information, and view the alarm linked video. Alarm Notification Steps: 1. Click and select to enter the Alarm Management interface. 2. Click Alarm Push Notification to enter the Alarm Push Notification interface. 3. Select a device and set the as to enable the alarm notification of the device. In this way, the alarm information can be pushed to your phone at the first time. Note: The device should be armed and support alarm notification. 4. When you receive a notification, it appears briefly at the top of the screen. You can ignore the notification or click it to address it right away. Otherwise, the notification displays in the alarm information directly. Alarm Information Steps: 1. Click Alarm Information to enter the alarm information interface, you can view the received alarm information. 23 Hills Video Security CCTV (Android) App 2. You can select a piece of alarm information and long press it to activate the deletion window. Click Delete to delete the selected alarm information. 3. If you want to clear all the alarm information, you can click . Notes: Up to 1000 pieces of alarm information can be displayed on the alarm information list. The alarm supported to be pushed to the software includes motion detection alarm, video loss alarm, video tampering alarm, sensor alarm, line crossing detection alarm, intrusion detection alarm, face detection alarm, scene change detection alarm, audio exception alarm, defocus detection alarm and PIR alarm. Alarm Linkage Steps: 1. In the alarm information interface, select a piece of alarm information and click . 2. In the pop-up message box, select Live View or Remote Playback to view the live view or record file of the camera that occurs motion detection, video loss, video tampering, line crossing, intrusion, face detection, scene change detection, audio exception, defocus detection or PIR alarm. Note: The related record file will be played from 30s before the alarm occurs to 90s after the alarm. E.g., if the motion detection alarm occurred at 11:30:00, then the record file is from 11:29:30 to 11:31:30. 24 Hills Video Security CCTV (Android) App 25 Hills Video Security CCTV (Android) App Chapter 8 Picture & Video Management In Picture and Video Management interface, you can view and manage the local video files and pictures that you manually record (clip) and capture in Live View and Remote Playback interface. The pictures and video files are stored in the software’s directory of the SD card. You can also share the pictures and video files to other available applications. For sharing pictures and videos to other applications, please perform the following steps. 1. Click and then select the pictures and videos you want to share. 2. Click and select the needed application to share. For deleting the pictures and videos in batch, please perform the steps below. 1. Click 2. Click and then select the pictures and videos you want to delete. to delete the selected file(s). Or you can click to cancel it. Picture Management Steps: 1. Click and select to enter the Picture & Video Management interface. 2. Click a picture and the picture displays in full screen. You can click if you want to delete it, and click to share it to other applications. 3. You can pinch two fingers together to zoom out or spread them apart to zoom in the picture. Or you can double-click on the picture to realize digital zoom. You can also slide to pan the picture under zoom-in mode. 4. Click to back to the Picture & Video Management interface. 26 Hills Video Security CCTV (Android) App Video Management Steps: 1. In the Picture & Video Management interface, click a video and the video shows in full screen. Click if you want to delete it, and click to share it to other applications. 2. Click to play it. You can slide the time line bar to adjust the playback time. Capture a picture of the playback video. Pause the playback. Audio control. 3. You can also rotate the phone to enter the full-screen mode. Note: Please release the rotation lock of the phone to realize this function. 27 Hills Video Security CCTV (Android) App Chapter 9 System Configuration Check Traffic Statistics The network traffic consumed during live view and remote playback can be checked. You can check the mobile network traffic and Wi-Fi network traffic separately. Steps: 1. Click and select to enter the Configuration interface. 2. Click Traffic Statistics to enter the Traffic Statistics interface. The recorded traffic data lists. Mobile Network: Refer to the cellular data consumed during live view and remote playback. Wi-Fi: Refer to the Wi-Fi data consumed during live view and remote playback. Current Day: The traffic data consumed today. Current Month: The traffic data consumed this month. History: The traffic data consumed since you started using the software. 3. (Optional) You can click Clear All to empty the data. Wi-Fi Settings The software provides the function of generating the QR code of Wi-Fi network. The network camera can scan the QR code to connect to the Wi-Fi network conveniently. Steps: 1. Click and select to enter the Configuration interface. 2. Click Wi-Fi Settings to enter the Wi-Fi Settings interface. 28 Hills Video Security CCTV (Android) App 3. Enter the Wi-Fi Name (known as SSID) and password of the Wi-Fi network, select the encryption type which should be the same as the settings of the router, and click Generate to generate a QR code for the Wi-Fi network. Note: If you select no password as the encryption type, the password for the Wi-Fi is not required. 4. The network camera can connect to this network by scanning the QR code. Notes: This function should be supported by the network camera. For detailed operation of the camera, please refer to the User Manual of the network camera. 5. (Optional) Click Save to save the Wi-Fi network and you can check it in the Wi-Fi List interface. New Features and Help In the About interface, click New Features to view the main features of the software. In the Configuration interface, click Help and you can enter the Help interface. You can view the help of the software. Feedback If there is any problem or suggestion when you use the software, please feel free to send emails to us by clicking Feedback in About interface. Our technical engineers will handle your problems and suggestions as soon as possible. 29 Hills Video Security CCTV (Android) App Chapter 10 Hills Auto-Config Register an Account If you do not have a Hills Auto-Config account, you can register one. Steps: 1. Click and select to enter the Hills Auto-Config interface. 2. Click Register to enter the account registration interface. Enter your email account and the picture verification code. Click Get Verification Code and enter the verification code received by your email. Note: If the picture verification code is not clear, you can click Refresh to get a new one. 30 Hills Video Security CCTV (Android) App 3. Configure the user name and password for your Hills Auto-Config account to complete the registration. Login Steps: 1. Enter the user name, email account or mobile phone, input the password and click Login. Notes: You can check Auto-login checkbox to remember the user name and password log into the software automatically. If you forget your password, click Forgot Password to verify your account and reset your password. Device Management You can add the device to your Hills Auto-Config account for live view, playback or other management. Steps: 1. Click and use your phone to scan the serial No. on the label of your device by aligning the QR Code with the scanning frame. Or you can click and enter the serial No. (9-bit) of the device and click to search the device. Notes: Only the device that supports the Hills Auto-Config service can be added. The device can only be added to one Hills Auto-Config account. 31 Hills Video Security CCTV (Android) App 2. The successfully added device will list on the device management interface and you can click Start Live View to view the live video of the device. 3. On the Devices interface, select a device and long press it to activate the deletion window. Click Delete to remove the selected device from your Hills Auto-Config account. Account Management Click Account tab and you can manage your Hills Auto-Config account. Click Modify Password to change the password. Set the as to enable the auto-login function. To log out of Hills Auto-Config, you can click Logout. 32 Hills Video Security CCTV (Android) App Appendix Version History 33